[转]WPF中Binding的技巧
在WPF应用的开发过程中Binding是一个非常重要的部分。
在实际开发过程中Binding的不同种写法达到的效果相同但事实是存在很大区别的。
这里将实际中碰到过的问题做下汇总记录和理解。
1. source = {binding} 和source = {binding RelativeSource={RelativeSource self},Path=DataContext}效果相同
理解:{binding} 不设定明确的绑定的source,这样binding就去从本控件类为开始根据可视树的层次结构自下而上查找不为空的Datacontext属性的值。
{binding RelativeSource={RelativeSource self},Path=DataContext}中RelativeSource self的含义为绑定的source为控件自身,这样binding 就绑定了自身控件的Datacontext。
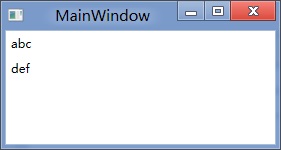
效果:
<StackPanel DataContext="abc">
<Label Content="{Binding}"></Label>
<Label Content="{Binding RelativeSource={RelativeSource Self},Path=DataContext}"></Label>
</StackPanel>

<StackPanel DataContext="abc">
<Label Content="{Binding}"></Label>
<Label DataContext="def" Content="{Binding RelativeSource={RelativeSource Self},Path=DataContext}"></Label>
</StackPanel>

2.在Template的Trigger中改变Template中某个样式控件的属性
<Style TargetType="{x:Type Button}">
<Setter Property="Template">
<Setter.Value>
<ControlTemplate TargetType="{x:Type Button}">
<Border>
<Label x:Name="PART_Label" Content="{TemplateBinding ContentA}" />
</Border>
<ControlTemplate.Triggers>
<Trigger Property="IsChecked" Value="True">
注: <Setter TargetName="PART_Label" Property="Content" Value="{Binding Path=ContentB, RelativeSource={RelativeSource TemplatedParent}}" />
</Trigger>
</ControlTemplate.Triggers>
</ControlTemplate>
</Setter.Value>
</Setter>
</Style>
当然把注:的这句改成<Setter TargetName="PART_Label" Property="Content" Value="{Binding Path=ContentB, RelativeSource={RelativeSource AncestorType={x:TypeButton}}}">效果一样。
先写到这,下篇继续关注Binding中ElementName,RelativeSource,Source的相同点和区别。
转载时,请注明本文来源:www.cnblogs.com/tmywu
接上篇,
我们来看一看Elementname,Source,RelativeSource 三种绑定的方式
1.ElementName顾名思义就是根据Ui元素的Name来进行绑定:
例子:
<Window x:Name="MainWindow">
<Grid>
<Button Background=”{Binding ElementName=MainWindow, Path=Background}”/>
</Grid>
</Window>
效果等同于
<Window>
<Grid>
<Button Background=”{Binding RelativeSource={RelativeSource Mode=FindAncestor, AncestorType={x:Type Window},Path=Background}”/>
</Grid>
</Window>
区别:
ElementName属性用于引用一个UI对象的名称,其的作用域在同一XAML文件内,不能引用另一XAML文件的某个Ui元素名。
2.Source属性用于指定对象绑定路径的引用。 其特点是:Source属性通常用于绑定设置的对象时,是已知的。
<Window x:Name="MainWindow">
<Grid>
<Button Background=”{Binding Source={StaticResource ButtonStyle}}”/>
</Grid>
</Window>
3.RelativeSource
在不确定绑定的Source时,但知道与绑定对象两者相对关系时就需要使用RelativeSource,这也是RelativeSource 与ElementName和Source的最大区别。
RelativeSource 的三种典型用法:
/1.UI元素的一个属性绑定在自身的另一个属性上
<Label Background = {Binding Path=Forgroud, RelativeSource={RelativeSource Self}} />
/2.UI元素的一个属性绑定在某个父元素的属性上
<Grid>
<Label Background = {Binding Path=Background, RelativeSource={RelativeSource AncestorType={x:Type Grid}}}/>
</Grid>
/3.Template中的元素的属性绑定在Template使用者元素的属性上
{Binding Path=PathToProperty, RelativeSource={RelativeSource TemplatedParent}}
例子:
<Style TargetType="{x:Type local:NumericUpDown}">
<Setter Property="HorizontalAlignment" Value="Center"/>
<Setter Property="VerticalAlignment" Value="Center"/>
<Setter Property="Template">
<Setter.Value>
<ControlTemplate TargetType="{x:Type local:NumericUpDown}">
<Grid Margin="3">
<Grid.RowDefinitions>
<RowDefinition/>
<RowDefinition/>
</Grid.RowDefinitions>
<Grid.ColumnDefinitions>
<ColumnDefinition/>
<ColumnDefinition/>
</Grid.ColumnDefinitions>
<Border BorderThickness="1" BorderBrush="Gray"
Margin="2" Grid.RowSpan="2"
VerticalAlignment="Center" HorizontalAlignment="Stretch"><TextBlock Text="{Binding RelativeSource={RelativeSource TemplatedParent}, Path=Value}"
Width="60" TextAlignment="Right" Padding="5"/>
</Border>
</Grid>
</ControlTemplate>
</Setter.Value>
</Setter>
</Style>
利用TemplateBinding 绑定模板与原对象之间的属性
{TemplateBinding Path=PathToProperty}
例子:
<ControlTemplate TargetType="{x:Type Button}" x:Key="buttonTemp">
<Border BorderThickness="3" Background="{TemplateBinding Foreground}">
<TextBlock Foreground="{TemplateBinding Background}"/>
</Border>
</ControlTemplate>
转载时,请注明本文来源:www.cnblogs.com/tmywu
最新文章
- iOS提交AppStore后申请加急审核
- 20145308刘昊阳 《Java程序设计》第7周学习总结
- Weex中文文档
- linux上的常见命令掌握
- C# 问题解决思路--《数组bytes未定义》,ASP.NET页面加载顺序
- baidu 快递查询API
- java静态代码块、初始化块和构造方法的执行顺序
- MVVM 代码记录
- LDR伪指令与ADR伪指令的区别
- android gallery的使用
- JavaHTTP下载视频
- 安装Microsoft .NET Framework 3.5 Service Pack 1回报1603错
- Arduino live weather broadcasting 实时天气站
- redis 编译安装(生产环境推荐)
- 『zkw线段树及其简单运用』
- APP测试要点—UI、功能测试
- 你在为谁工作——IT帮深圳分站2019年3月线下活动回顾
- Centos 7.x nginx隐藏版本号
- D Tree Requests dfs+二分 D Pig and Palindromes -dp
- 20145225《网络对抗》Exp8 Web基础