Spring系列13:bean的生命周期
本文内容
- bean的完整的生命周期
- 生命周期回调接口
Aware接口详解
Spring Bean的生命周期
面试热题:请描述下Spring的生命周期?
4大生命周期
从源码角度来说,简单分为4大阶段: 实例化 -> 属性赋值 -> 初始化 -> 销毁
- 实例化 Instantiation
- 属性赋值 Populate
- 初始化 Initialization
- 销毁 Destruction
实例化和属性赋值对应构造方法和 setter 方法的注入,初始化和销毁是用户能自定义扩展的两个阶段。在这四步之间穿插了各种Spring提供的容器扩展点。
看下源码实现 AbstractAutowireCapableBeanFactory#doCreateBean ,无关源码已经省略,会保留一定的源码的英文注释。
protected Object doCreateBean(String beanName, RootBeanDefinition mbd, @Nullable Object[] args)

			throws BeanCreationException {

		// Instantiate the bean.

		BeanWrapper instanceWrapper = null;

		if (instanceWrapper == null) {

            // 1 实例化阶段

			instanceWrapper = createBeanInstance(beanName, mbd, args);

		}

		// Initialize the bean instance.

		Object exposedObject = bean;

		try {

            // 2 属性赋值阶段

			populateBean(beanName, mbd, instanceWrapper);

            // 3 初始化阶段

			exposedObject = initializeBean(beanName, exposedObject, mbd);

		}

		return exposedObject;

	}
bean销毁阶段源码可以看下 ConfigurableApplicationContext#close(),最终每个bean会调到 DisposableBeanAdapter#destroy() 方法,比较简单。
class DisposableBeanAdapter implements DisposableBean, Runnable, Serializable {

@Override

	public void destroy() {

		if (this.invokeDisposableBean) {

			try {

                //  1 实现DisposableBean 销毁

				else {

					((DisposableBean) this.bean).destroy();

				}

			}

		}

		if (this.destroyMethod != null) {

            // 2 自定义销毁方法

			invokeCustomDestroyMethod(this.destroyMethod);

		}

		else if (this.destroyMethodName != null) {

			Method methodToInvoke = determineDestroyMethod(this.destroyMethodName);

			if (methodToInvoke != null) {

				invokeCustomDestroyMethod(ClassUtils.getInterfaceMethodIfPossible(methodToInvoke));

			}

		}

	}

}
生命周期扩展点
Spring 之所以强大的原因是易扩展,生命周期相关的常用扩展点非常多。扩展点分2类:
作用于多个bean的增强扩展
- InstantiationAwareBeanPostProcessor 作用于实例化阶段前后
- BeanPostProcessor 作用于初始化阶段前后
- InstantiationAwareBeanPostProcessor 作用于销毁阶段前
作用于单个bean的增强扩展
初始化阶段
3个 Aware 接口: BeanNameAware BeanClassLoaderAware BeanFactoryAware
InitializingBean 接口
自定义的初始化方法
销毁阶段
DisposableBean 接口
自定义的销毁方法
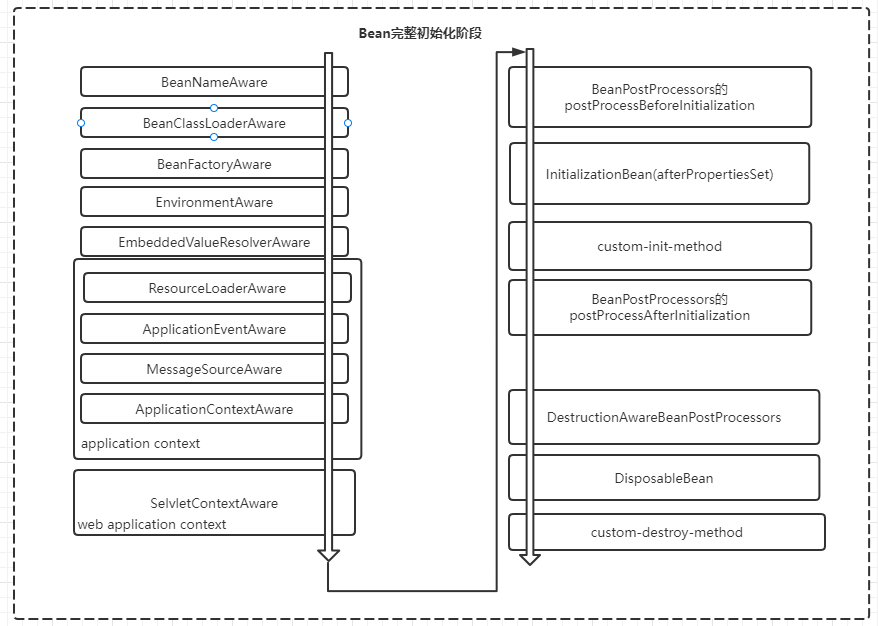
来一张汇总图,直观明了。

提示:
BeanNameAware BeanClassLoaderAware BeanFactoryAware是在初始化阶段调用对应的接口方法设置的;而其它Aware接口如 EnvironmentAware、EmbeddedValueResolverAware、ApplicationContextAware(ResourceLoaderAware\ApplicationEventPublisherAware\MessageSourceAware)是在初始化前通过 BeanPostProcessor#postProcessBeforeInitialization() 来调用对应接口设置的。
后面有机会写Spring源码的时候再深入。
bean生命周期回调
挖个坟纠个错,在Spring系列2:Spring容器基本概念和使用 中我们提到:
非常建议阅读
BeanFactory的源码上的注释说明,非常的详尽,常见的面试题:请描述下Spring的生命周期?注释上就有非常官方的完整说明
其实此处表述有误,准确来说如下的源码注释写的是完整的生命周期回调,局限于bean的初始化阶段和销毁阶段。完整bean的生命周期看上一小节的分析。
初始化化阶段完整的调用过程整理如下:
容器对 bean 生命周期的管理提供了生命周期接口,允许开发者对bean的初始化和销毁等生命周期中进行自定义的操作。
bean 初始化回调3种
Spring提供了3种方式进行bean的初始化回调:
InitializingBean 接口
org.springframework.beans.factory.InitializingBean 接口让 bean 在容器设置了 bean 的所有必要属性后执行初始化工作。这种方式有个弊端是类中耦合了Spirng容器。
xml中
<bean/>指定init-method方法<bean class="com.crab.spring.ioc.demo11.BeanOne" id="beanOne" init-method="myInit"/>
使用@PostConstruct注解
既然提供了3种,那么不禁会有疑问:
- 同时使用3种方式,指定3个不同的方法,执行顺序是如何的?
- 同时使用3种方式,指定的是同一个方法,执行次数是多少次,3次?
直接通过案例来验证。
案例1:3种方式3个不同方法
类的定义
public class BeanOne implements InitializingBean {

    // 1 实现接口的方式

    @Override

    public void afterPropertiesSet() throws Exception {

        System.out.println("BeanOne InitializingBean afterPropertiesSet");

    }

    // 通过xml init-method 配置的方式

    public void myInit() {

        System.out.println("BeanOne init-method myInit");

    }

    @PostConstruct

    public void postConstruct() {

        System.out.println("BeanOne PostConstruct postConstruct");

    }

}
通过xml配置文件的方式定义bean信息
<?xml version="1.0" encoding="UTF-8"?>

<beans xmlns="http://www.springframework.org/schema/beans"

       xmlns:xsi="http://www.w3.org/2001/XMLSchema-instance"

       xmlns:context="http://www.springframework.org/schema/context"

       xsi:schemaLocation="http://www.springframework.org/schema/beans http://www.springframework.org/schema/beans/spring-beans.xsd http://www.springframework.org/schema/context https://www.springframework.org/schema/context/spring-context.xsd">

    <!--扫描指定包下的bean并自动DI-->

    <context:annotation-config/>

    <bean class="com.crab.spring.ioc.demo11.BeanOne" id="beanOne" init-method="myInit"/>

</beans>
运行测试
    @org.junit.Test

    public void test1() {

        System.out.println("开始初始化容器");

        ClassPathXmlApplicationContext context = new ClassPathXmlApplicationContext("demo11/spring.xml");

        System.out.println("容器使用中----");

        BeanOne beanOne = context.getBean(BeanOne.class);

        System.out.println(beanOne);

        System.out.println("开始销毁容器");

        context.close();

        System.out.println("结束销毁容器");

    }
测试结果
开始初始化容器

BeanOne PostConstruct postConstruct

BeanOne InitializingBean afterPropertiesSet

BeanOne init-method myInit

容器使用中----

com.crab.spring.ioc.demo11.BeanOne@f0f2775

开始销毁容器

结束销毁容器
结论:@PostConstruct > InitializingBean > xml init-method
案例2:3种方式指定同一个方法
类定义如下
public class BeanTwo implements InitializingBean {

    // 1 实现接口的方式

    // 2 通过xml init-method 配置的方式

    // 3 注解方式

    @PostConstruct

    @Override

    public void afterPropertiesSet() throws Exception {

        System.out.println("BeanTwo InitializingBean afterPropertiesSet");

    }

}
xml配置文件和测试程序和上面的类似,不重复。
运行结果如下
开始初始化容器

BeanTwo InitializingBean afterPropertiesSet

容器使用中----

com.crab.spring.ioc.demo11.BeanTwo@3f200884

开始销毁容器

结束销毁容器
结论:3种方式指定同一方法,只会回调一次,不会重复调用
思考下: 一个类中配置2个@PostConstruct注解的初始化方法 init1()和 init2() ,回调初始化哪一个?
bean的销毁回调
类似初始化回调,Spring提供了3种方式进行bean的销毁回调:
- 实现 DisposableBean接口
- xml中配置destroy-method
- 使用@PreDestroy
类似执行顺序和次数结论:
- 3种方式指定3个不同方法,回调顺序:@PreDestroy > DisposableBean > xml中配置destroy-method
- 3种方式指定同一个方法,只回调1次
综合案例
定义类
public class BeanThree implements DisposableBean {

    // 方式1 实现DisposableBean

    @Override

    public void destroy() throws Exception {

        System.out.println("BeanThree DisposableBean destroy");

    }

    // 方式2 xml中配置destroy-method

    public void destroy2(){

        System.out.println("BeanThree destroy-method destroy3");

    }

    // 方式3 使用 @PreDestroy 注解

    @PreDestroy

    public void destroy3(){

        System.out.println("BeanThree @PreDestroy destroy3");

    }

}
xml中配置销毁回调
<!--扫描指定包下的bean并自动DI-->

<context:annotation-config/>

<bean class="com.crab.spring.ioc.demo11.BeanThree" destroy-method="destroy2"/>
测试程序和结果
    @org.junit.Test

    public void test3() {

        System.out.println("开始初始化容器");

        ClassPathXmlApplicationContext context = new ClassPathXmlApplicationContext("demo11/spring3.xml");

        System.out.println("容器使用中----");

        BeanThree beanOne = context.getBean(BeanThree.class);

        System.out.println(beanOne);

        System.out.println("开始销毁容器");

        context.close();

        System.out.println("结束销毁容器");

    }

// 结果对照结论看

开始初始化容器

容器使用中----

com.crab.spring.ioc.demo11.BeanThree@f0f2775

开始销毁容器

BeanThree @PreDestroy destroy3

BeanThree DisposableBean destroy

BeanThree destroy-method destroy3

结束销毁容器
思考下:xml配置中如何配置全局默认的初始化和销毁回调方法,而不用每个bean都配置?default-init-method default-destroy-method
Aware接口详解
原理解析
Aware 是一个标记超接口,Spring 提供了广泛的 Aware 回调接口实现,让 bean 向容器获取它们需要特定的基础设施依赖项。
public interface Aware {}
来看一下``ApplicationContextAware 接口
public interface ApplicationContextAware {

    void setApplicationContext(ApplicationContext applicationContext) throws BeansException;

}
当 ApplicationContext 创建一个实现 org.springframework.context.ApplicationContextAware 接口的对象实例时,会为该实例提供对该 ApplicationContext 的引用。直接上案例。
定义一个类实现 ApplicationContextAware
public class BeanFour implements ApplicationContextAware {

    // 用于获取初始该类对象的容器对象ApplicationContext

    private ApplicationContext context;

    @Override

    public void setApplicationContext(ApplicationContext applicationContext) throws BeansException {

        this.context = applicationContext;

    }

    public ApplicationContext getContext() {

        return context;

    }

}

@Configuration

@ComponentScan

public class AppConfig {

}
测试程序和结果
@org.junit.Test

public void test_aware() {

    AnnotationConfigApplicationContext context =

            new AnnotationConfigApplicationContext(AppConfig.class);

    BeanFour bean = context.getBean(BeanFour.class);

    System.out.println(bean.getContext() == context);

    context.close();

}

// 结果

true
从结果看,BeanFour实例已获取到创建它的容器对象。
使用 Aware 接口主要目的是获取容器中相关的基础对象,也就是依赖注入,但这样做的弊端是将应用程序类和Spring强耦合在一起了。换个角度,依赖注入通过 @Autowired 也可以实现,耦合更低。
@Component

public class BeanFour2  {

    // 用于获取初始该类对象的容器对象ApplicationContext

    @Autowired

    private ApplicationContext context;

    public ApplicationContext getContext() {

        return context;

    }

}
Aware 接口汇总
Spring 提供了广泛的 Aware 回调接口,让 bean 向容器指示它们需要特定的基础设施依赖项,如下表。作为一般规则,名称表示依赖类型。
| 接口名 |
|---|
ApplicationContextAware |
ApplicationEventPublisherAware |
BeanClassLoaderAware |
BeanFactoryAware |
BeanNameAware |
LoadTimeWeaverAware |
MessageSourceAware |
NotificationPublisherAware |
ResourceLoaderAware |
总结
本文介绍各种bean的完整的生命周期、生命周期回调接口和Aware接口。
知识分享,转载请注明出处。学无先后,达者为先!
最新文章
- socket.io,io=Manager(source, opts)
- 浅谈可扩展性框架:MEF
- paip.2013年技术趋势以及热点 v3.0 cao
- matlab 不要图像界面
- MySQL连接语法
- 容器的end()方法
- 使用WM_COPYDATA跨进程发送数据
- Android NDK编程,引入第三方.so库
- C# 处理图片 不规则图形裁剪
- servlet过滤器简化版
- java 导出blob图片到excel
- 如何在CentOS 7上部署Google BBR【搬运、机翻】
- Python-Django-Ajax进阶3
- Job for network.service failed because the control process exited with error code
- idea输入法不跟随解决办法
- angular 时间戳转换(星期过滤器)
- cf1107d 映射关系
- Qt编写自定义控件6-指南针仪表盘
- 软工网络15团队作业4——Alpha阶段敏捷冲刺4.0
- Spring Environment(三)生命周期
热门文章
- Chapter 8 Selection Bias
- 使用 JavaScript 中的 document 对象查找 HTML 元素,实现“登录”按钮的高亮特效 鼠标悬浮于“登录”按钮时,按钮高亮显示;
- Java基础周测题,输入一个整数,输出所有能整除该整数的结果:
- 【已开源】Flutter 穿山甲广告插件的集成-FlutterAds
- Drools集成SpringBoot
- linux 开启和关闭防火墙
- Selenium_使用switch_to.window方法处理窗口切换(12)
- List<FieldModelBase> 转 DataTable
- Word2010制作收款单
- Linux环境下的Docker的安装和部署、学习二