python实验报告(第11章)
实验11:使用Python操作数据库
一、实验目的和要求
1、学会数据库编程接口;
2、学会使用SQLite;
3、学会使用MySQL。
二、实验环境
软件版本:Python 3.10 64_bit
三、实验过程
1、实例1:创建SQLite数据库文件
创建一个mrsoft.db的数据库文件,然后执行SQL语句可创建一个 user(用户表),user表包含id和name两个字段,代码如下:

 1 import sqlite3

 2 # 连接到SQLite数据库

 3 # 数据库文件是mrsoft.db,如果文件不存在,会自动在当前目录创建

 4 conn = sqlite3.connect('mrsoft.db')

 5 # 创建一个Cursor

 6 cursor = conn.cursor()

 7 # 执行一条SQL语句,创建user表

 8 cursor.execute("create table user (id int(10) primary key, name varchar(29))")

 9 # 关闭游标

10 cursor.close()

11 # 关闭Connection

12 conn.close()
2、实例2:新增用户数据信息
由于在实例1中已经创建了user表,所以本实例可以直接操作user表,向user表中插入3条用户信息。此外,由于是新增数据,需要使用commit()方法提交事务。因为对于增加、修改和删除操作,使用commit()方法提交事务后,如果相应操作失败,可以使用rollback()方法回滚到操作之前的状态。新增用户数据信息的代码如下:
 1 import sqlite3

 2 # 连接到sQlite数据库

 3 # 数据库文件是mrsoft.db

 4 # 如果文件不存在,会自动在当前目录创建

 5 conn = sqlite3.connect('mrsoft.db')

 6 # 创建一个Cursor

 7 cursor = conn.cursor()

 8 #执行一条SQL语句,插入一条记录

 9 cursor.execute('insert into user (id, name) values ("1", "MRSOFT")')

10 cursor.execute('insert into user (id, name) values ("2","Andy")')

11 cursor.execute('insert into user (id, name) values ("3","明日科技小助手")')

12 # 关闭游标

13 cursor.close()

14 # 提交事务

15 conn.commit()

16 # 关闭Connection

17 conn.close()
3、实例3:使用3种方法查询用户数据信息
(1)分别使用fetchone、fetchmany和fetchall这3种方式查询用户信息,具体代码如下:
 1 import sqlite3

 2 # 连接到SQLite数据库,数据库文件是mrsoft.db

 3 conn =sqlite3.connect("mrsoft.db")

 4 # 创建一个Cursor

 5 cursor =conn.cursor()

 6 #执行查询语句

 7 cursor.execute("select * from user where id > ?",(0,))

 8 # 获取查询结果

 9 result1 = cursor.fetchall()

10 print(result1)

11 # 关闭游标

12 cursor.close()

13 # 关闭Connection

14 conn.close()
(2)运行结果如图所示:

4、实例4:修改用户数据信息
(1)将SQLite数据库中user表ID为1的数据name字段值“mrsoft”修改为“MR”,并使用fetchAll获取表中的所有数据。具体代码如下:
 1 import sqlite3

 2 # 连接到sQLite数据库,数据库文件是mrsoft.db

 3 conn = sqlite3.connect('mrsoft.db')

 4 # 创建一个Cursor:

 5 cursor =conn.cursor()

 6 cursor.execute("update user set name = ? where id = ?",("MR",1))

 7 cursor.execute("select * from user")

 8 result = cursor.fetchall()

 9 print(result)

10 # 关闭游标

11 cursor.close()

12 # 提交事务

13 conn.commit()

14 # 关闭Connection:

15 conn.close()
(2)运行结果如图所示:

5、实例5:删除用户数据信息
(1)将SQLite数据库中user表ID为1,2,3的数据删除,并使用fetchAll获取表中所有数据,查看删除后的结果。具体代码如下:
 1 import sqlite3

 2 # 连接到SQLite数据库,数据库文件是mrsoft.db

 3 conn = sqlite3.connect("mrsoft.db")

 4 # 创建一个Cursor:

 5 cursor = conn.cursor()

 6 cursor.execute("delete from user where id = ?",(1,))

 7 cursor.execute("delete from user where id = ?",(2,))

 8 cursor.execute("delete from user where id = ?",(3,))

 9 cursor.execute("select * from user")

10 result = cursor.fetchall()

11 print(result)

12 # 关闭游标

13 cursor.close()

14 # 提交事务

15 conn.commit()

16 # 关闭Connection:

17 conn.close()
(2)运行结果如图所示:

6、实例6:使用PyMySQL连接数据库
(1)前面我们已经创建了一个MySQL连接“studyPython”,并且在安装数据库时设置了数据库的用户名“root”和密码“root”。下面通过connect()方法接MySQL数据库mrsoft,具体代码如下:
 1 import pymysql

 2 # 打开数据库连接,host:主机名或IP;user:用户名;password:密码;database:数据库名称

 3 db = pymysql.connect(host="localhost",user= "root",password= "root",database= "mrsoft")

 4 #使用cursor()方法创建一个游标对象cursor

 5 cursor=db.cursor()

 6 # 使用execute()方法执行SQL查询

 7 cursor.execute("SELECT VERSION()")

 8 # 使用fetchone()方法获取单条数据

 9 data=cursor.fetchone()

10 print("Database version : %s " % data)

11 # 关闭数据库链接

12 db.close()
(2)运行结果如图所示:

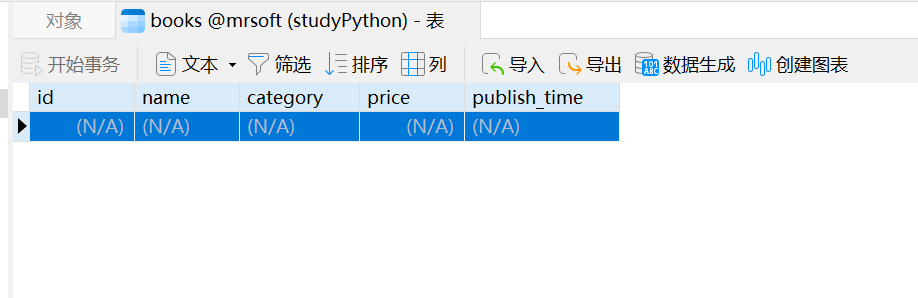
7、实例7:创建books图书表
(1)具体代码如下:
 1 import pymysql

 2 #打开数据库连接

 3 db=pymysql.connect(host="localhost",user= "root",password= "root",database= "mrsoft")

 4 # 使用cursor()方法创建一个游标对象cursor

 5 cursor = db.cursor()

 6 # 使用execute()方法执行SQL,如果表存在则删除

 7 cursor.execute("DROP TABLE IF EXISTS books")

 8 # 使用预处理语句创建表

 9 sql = """

10 CREATE TABLE books (

11   id int(8) NOT NULL AUTO_INCREMENT,

12   name varchar(50) NOT NULL,

13   category varchar(50) NOT NULL,

14   price decimal(10,2) DEFAULT NULL,

15   publish_time date DEFAULT NULL,

16   PRIMARY KEY (id)

17 ) ENGINE=MyISAM AUTO_INCREMENT=1 DEFAULT CHARSET=utf8;

18 """

19 # 执行SQL语句

20 cursor.execute(sql)

21 #关闭数据库连接

22 db.close()
(2)运行结果如图所示:
8、实例8:向books图书表添加图书数据
具体代码如下:
 1 import pymysql

 2 # 打开数据库连接

 3 db=pymysql.connect(host="localhost",user="root",password="root",database="mrsoft",charset="utf8")

 4 # 使用cursor()方法获取操作游标

 5 cursor =db.cursor()

 6 # 数据列表

 7 data=[("零基础学Python","Python","79.80","2018-5-20"),

 8       ("Python从入门到精通","Python","69.80","2018-6-18"),

 9       ("零基础学PHP","PHP","69.80","2017-5-21"),

10       ("PHP项目开发实战入门","PHP","79.80","2016-5-21"),

11       ("零基础学]ava","Java","69.80","2017-5-21"),

12       ]

13 try:

14     #执行sq1语句,插入多条数据

15     cursor.executemany("insert into books(name, category, price, publish_time) values (%s,%s,%s,%s)",data)

16 # 提交数据

17     db.commit()

18 except:

19     # 发生错误时回滚

20     db.rollback()

21     # 关闭数据库连接

22     db.close()
(2)运行结果如图所示:

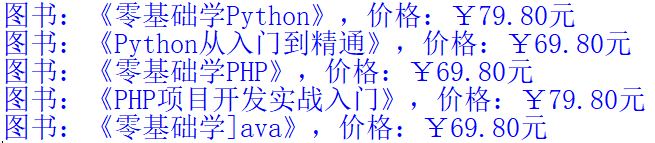
9、实战一:获取指定数据表中的信息
(1)打印MySQL中books表图书的名称和价格,代码如下:
1 import pymysql

2 db = pymysql.connect(host="localhost",user= "root",password= "root",database= "mrsoft")

3 cursor = db.cursor()

4 cursor.execute("select name,price from books")

5 result = cursor.fetchall()

6 for i in range(0,len(result)):

7     print("图书:《" + str(result[i][0]) + "》,价格:¥" + str(result[i][1]) + "元")

8 cursor.close()

9 db.close()
(2)运行结果如图所示:
10、实战二:查找指定年份之后的图书信息
(1)查询MySQL中books表图书价格小于70元并且为2017年以后出版的所有图书,代码如下:
1 import pymysql

2 db = pymysql.connect(host="localhost",user= "root",password= "root",database= "mrsoft")

3 cursor = db.cursor()

4 cursor.execute("select name,price,publish_time from books where price < 70 and publish_time >= '2017-01-01'")

5 result = cursor.fetchall()

6 for i in range(0,len(result)):

7     print("图书:《" + str(result[i][0]) + "》,价格:¥" + str(result[i][1]) + "元,出版日期:" + str(result[i][2]))

8 cursor.close()

9 db.close()
(2)运行结果如图所示:

11、实战三:批量删除指定的图书信息
(1)删除MySQL中books表所有分类为PHP的图书,删除完成后查看所有图书,代码如下:
 1 import pymysql

 2 db = pymysql.connect(host="localhost",user= "root",password= "root",database= "mrsoft")

 3 cursor = db.cursor()

 4 cursor.execute("delete from books where category = 'PHP'")

 5 cursor.execute("select name,price from books")

 6 result = cursor.fetchall()

 7 for i in range(0,len(result)):

 8     print("图书:《" + str(result[i][0]) + "》,价格:¥" + str(result[i][1]) + "元")

 9 cursor.close()

10 db.close()
(2)运行结果如图所示:

最新文章
- TortoiseSVN客户端重新设置用户名和密码
- Java学习笔记(二二)——Java HashMap
- Windows Server 2012/2016在桌面上添加计算机等图标
- JVM性能监控与故障处理命令行工具
- JAVA单向/双向链表的实现
- cell线条前后缩短
- nginx: [emerg] getpwnam(“www”) failed
- php 数组定义、取值和遍历
- php 判断 xml 里是否存在某个节点
- [转]NHibernate之旅(6):探索NHibernate中的事务
- POJ 2253 Frogger floyd算法
- Nancy.Host的Web应用
- bootstrap 表单控件 控件状态 控件大小 help-block
- 【译文】用Spring Cloud和Docker搭建微服务平台
- 反汇编Dis解析
- linux启动http服务
- c++ 启动exe(启动别的exe程序)
- Delphi XE5 for Android (八)
- nexus 手动更改 私服包
- vc 使窗口置顶 在最前面
热门文章
- spring boot项目使用mybatis-plus代码生成实例
- 【JavaScript排序】 sort()方法(解决null、undefined、0之间的排序(混乱)问题)
- 『现学现忘』Git基础 — 35、Git中删除文件
- Can not set int field xxx to java.lang.Long 错误
- 17.MongoDB系列之了解应用程序动态
- spring boot+vue前后端项目的分离(我的第一个前后端分离项目)
- CentOS6/7 配置守护进程
- 通过Jenkins,执行远程服务器的自动化脚本
- nginx日志切割并备份
- 【云原生 · Kubernetes】Kubernetes基础环境搭建