elasticsearch基础及在Python中的简单使用
一. 安装java环境与elasticsearch、kibana
首先要求jdk为1.8及以上,这里elasticsearch(kibana同理,尽量保证elasticsearch版本一致,安装和启动方式也是一样的)版本采用6.5.4。
elasticsearch简介:https://baike.baidu.com/item/elasticsearch/3411206?fr=aladdin
elasticsearch官网:https://www.elastic.co/cn/downloads/

点击下载,之后下拉选择历史版本past releases
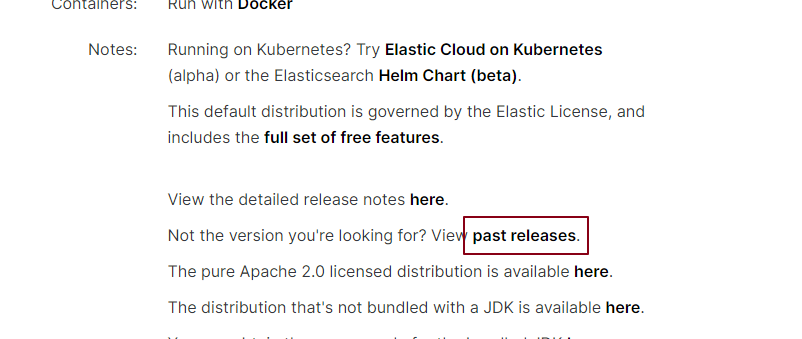
最后点击download即可

java环境配置看该博客:https://www.cnblogs.com/Neeo/articles/10368280.html
安装完毕后如果没有出现错误,解压elasticsearch,然后进入其bin目录,双击打开其中的elasticsearch.bat文件即可,随后访问127.0.0.1:9200,如果能看到返回的json数据,代表配置成功。(其中9200是节点监听的断开,而9300是集群默认监听的端口)。
未能正常启动原因

二. elasticsearch、kibana的部分文件说明
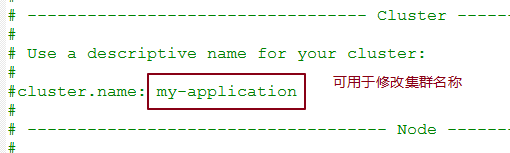
1. 解压后的config中的elasticsearch.yml就是ES的配置文件,这用Notepad打开。


同目录的jvm.options是虚拟机jrel的配置。

同目录的log4j2.properties是日志的配置,可以配置日志的输出、级别等信息,一般不会修改。(log4j是Apache的一个框架,用于控制日志)
- Kibana目录下的config中的kibana.yml存放其配置文件。


三. Kibana的Dev tools中ES的简单命令
数据准备
PUT s18/doc/2

{

  "name":"yangtao",

  "age": 18,

  "tags":"浪",

  "b":"19970521",

  "sex": "男"

}

PUT s18/doc/1

{

  "name":"egon",

  "age": 20,

  "tags":"认真学习",

  "b":"19970781",

  "sex": "男"

}

PUT s18/doc/3

{

  "name":"sybil",

  "age": 3,

  "tags":"认真学习",

  "b":"19971216",

  "sex": "女"

}
   以 '索引/类型/文档' 的格式

#增 PUT  如果PUT对的数据已存在,那么会进行更新的操作,但是PUT时传的参数是什么,更新之后的数据就是什么,所以需要填写所有的字段

    PUT s18/doc/1   #新增索引s18/doc/1  s18是_index,1是该数据的文档,doc是Type

    {

        "name":"sybil",

        "skill":"fly",

        "hobby":"sleep",

        "tags":"beautiful"

    }

#删  DELETE

	DELETE s18  #删除索引(数据库)

    DELETE s18/doc/1  #删除索引s18下type是doc,文档是1的数据

    DELETE s18/doc/_search?q=tags:beautiful  #这是错误的删除方式,要使用search的方式删除需要使用POST

#查  GET

	GET s18/doc/1  #查文档为1的数据

	GET s18/doc/_search  #查所有

    GET s18/doc/_search?q=name:sybil  #查名字叫sybil的

#更新指定字段POST,或配合search删除

	POST s18/doc/1/_update

    {

      "doc":{  # 需要指定type,相当于指定表名

        "tags":"美丽冻人"

      }

    }

    POST s18/doc/_delete_by_query?q=age:18  #删除年龄为18的数据,不过不推荐使用该方式

#查询的两种方式

	1.查询字符串 query string

    	GET s18/doc/_search?q=age:18

    2. DSL 结构化查询

    	GET s18/doc/_search

        {

            "query":{

                "match":{

                    "age":18

                }

            }

        }

        GET s18/doc/_search

        {

            "query":{

                "match_all":{}  #因为是查所有,不需要参数

            }

        }
- GET s18/_mapping
GET s18/_settings

GET s18
四. ES的复杂查询
1.排序sort、分页、布尔查询bool
#排序 sort  不是所有的字段都能排序,比如名字

	GET s18/doc/_search

        {

            "query":{

                "match_all":{}

            },

            "sort": [  #排序

                {

                    "age":{

                        "order": "asc" #升序,desc降序

                    }

                }

            ]

        }

#分页 内部会先排好序,保证翻页后不会出现已经返回过的数据

	GET s18/doc/_search

    {

        "query":{

               "match_all":{}

           },

        "from": 0,  #从0条开始

        "size": 2  #返回2条数据

    }

#布尔查询bool: should(or)  must(and)  must_not(not),must_not

	GET s18/doc/_search

    {

        "query": {

            "bool": {

                "should": [  #名字是sybil或者年龄18岁

                    {

                        "match": {

                            "name": "sybil"

                        }

                    },

                    {

                        "match": {

                            "age": "18"

                        }

                    }

                ]

            }

        }

    }

    '查询性别是男的,年龄18'

    GET s18/doc/_search

    {

        "query": {

            "bool":{

                "must": [

                    {

                        "match": {

                            "age": "18"

                        }

                    },

                    {

                         "match": {

                        "sex": "男"

                    	}

                    }

                ]

            }

        }

    }

#查询年龄大于19岁的男的  filter尽量用must配合,避免脏数据

    GET s18/doc/_search

    {

        "query": {

            "bool": {

                "must": [

                    {"match": {

                        "sex": "男"

                    }}

                ],

                "filter": {

                    "range": {

                        "age": {

                            "gte": 19,

                            "lte": 20

                        }

                    }

                }

            }

        }

    }
2.高亮查询highlight
#查询name是sybil的文档

#高亮查询,查询name是sybil的文档,查询的结果需要在前端才能体现高亮,因为是标签的效果

GET s18/doc/_search

{

  "query": {

    "match": {

      "name": "sybil"

    }

  },

  "highlight": {

    "fields": {

      "name": {}  #查询的结果用<em>标签包裹

    }

  }

}

GET s18/doc/_search

{

  "query": {

    "match": {

      "name": "sybil"  #会将我们这里定义的字段高亮显示

    }

  },

  "highlight": {  #可以使用pre_tags与post_tags自定义标签

    "pre_tags": "<b style='color:red;font-size:20px'>",

    "post_tags": "<\b>",

    "fields": {

      "name": {}  #这里指定字段后空着即可

    }

  }

}
3.结果过滤_source
#过滤出查询结果中想要的字段

GET s18/doc/_search

{

  "query": {

    "match": {

      "name": "sybil"

    }

  },

  "_source": "name"  #单个字段

}

GET s18/doc/_search

{

  "query": {

    "match": {

      "name": "sybil"

    }

  },

  "_source": ["name", "age"]  #多个字段

}
4.聚合查询
#sum,查询所有男生的年龄

GET s18/doc/_search

{

  "query": {

    "match": {

      "sex": "男"

    }

  },

  "aggs": {

    "my_sum": {  #这是查询结果的键,可以自定义

      "sum": {  #这是聚合的方法

        "field": "age"  #指定聚合的依据

      }

    }

  }

}

#查询最大年龄的男生

GET s18/doc/_search

{

  "query": {

    "match": {

      "sex": "男"

    }

  },

  "aggs": {

    "my_max": {

      "max": {

        "field": "age"

      }

    }

  }

}

#查询最小年龄的男生

GET s18/doc/_search

{

  "query": {

    "match": {

      "sex": "男"

    }

  },

  "aggs": {

    "my_min": {

      "min": {

        "field": "age"

      }

    }

  }

}

#查询男生的平均年龄

GET s18/doc/_search

{

  "query": {

    "match": {

      "sex": "男"

    }

  },

  "aggs": {

    "my_avg": {

      "avg": {

        "field": "age"

      }

    }

  }

}

#分组,根据年龄,0-10,,0-20

GET s18/doc/_search

{

  "query": {

    "match": {

      "sex": "男"

    }

  },

  "aggs": {

    "my_group": {  #分组名称

      "range": {

        "field": "age",

        "ranges": [

          {

            "from": 0,  #[0, 10)

            "to": 10

          },

          {

            "from": 10,

            "to": 20

          },

          {

            "from": 20,

            "to": 30

          }

        ]

      }

    }

  }

}

#分组,根据年龄,0-10,,0-20, 对每组年龄求和

GET s18/doc/_search

{

  "query": {

    "match": {

      "sex": "男"

    }

  },

  "aggs": {

    "my_group": {

      "range": {

        "field": "age",

        "ranges": [

          {

            "from": 0,

            "to": 10

          },

          {

            "from": 10,

            "to": 20

          },

          {

            "from": 20,

            "to": 30

          }

        ]

      },

      "aggs": {

        "my_sum": {

          "sum": {

            "field": "age"

          }

        }

      }

    }

  }

}
5. ES的mapping映射
#自定义索引的映射
PUT s2
{
"mappings": {
"doc":{ #类型
"properties":{ #文档的属性
"name":{
"type":"text"
},
"age":{
"type":"long"
},
"desc":{
"type":"text"
}
}
}
}
}
#如果给该索引加文档时,额外增加了字段,那么mappings会自动增加该字段,使其能够成为查询条件
GET s2/_mapping
PUT s2/doc/2
{
"name":"catmao",
"age":30,
"desc":"beautiful",
"skill":"sleep"
}
GET s2/_mapping #再次执行会发现字段多了skill
#这是由mappings的dynamic的三种状态,三种状态时,均可以缺省字段
dynamic为true时特征如上。
dynamic为false时,PUT添加的数据有额外字段时,Mapping不会自动添加,该字段也无法成为查询的条件。
dynamic为strict时,添加的数据不能有额外的字段,会直接报错
PUT s6
{
"mappings": {
"doc":{
"dynamic":"strict",
"properties":{
"name":{
"type":"text"
}
}
}
}
}
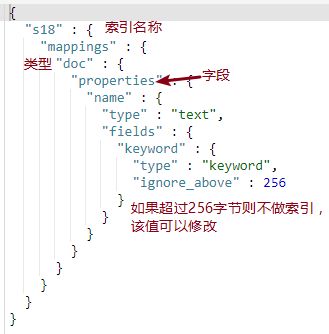
#mapping的ignore_above,不会为超过该设定字符长度的字符串设定索引与存储,即无法成为有效的查询条件,仅对type为keyword的字段有效。
https://www.cnblogs.com/Neeo/articles/10789701.html
PUT s7
{
"mappings": {
"doc":{
"properties":{
"title":{
"type":"keyword",
"ignore_above":10
}
}
}
}
}
PUT s7/doc/2
{
"title":"从手机、平板电脑、路由器"
}
PUT s7/doc/1
{
"title":"1234567"
}
GET s7/doc/_search
{
"query": {
"match": {
"title": "1234567"
}
}
}
#mappings参数之index,设置为false后,ES不会为该字段建立索引,其实是不会做分词
#mappings的index参数
PUT s8
{
"mappings": {
"doc":{
"properties":{
"t1":{
"type":"text",
"index":"true"
},
"t2":{
"type":"text",
"index":"false"
}
}
}
}
}
PUT s8/doc/1
{
"t1":"论母猪的厂前保养",
"t2":"论母猪的厂后保养"
}
GET s8/doc/_search
{
"query": {
"match": {
"t2": "母猪"
}
}
}
#mappings的copy_to,把一个字段的值复制给另一个,可以减少一次查询的次数
PUT s9
{
"mappings": {
"doc":{
"properties":{
"t1":{
"type":"text",
"copy_to":"full_name" #复制给多个字段 ["f1", "f2"]
},
"t2":{
"type":"text",
"copy_to":"full_name"
},
"full_name":{
"type":"text"
}
}
}
}
}
PUT s9/doc/1
{
"t1":"xxx",
"t2":"ooo"
}
GET s9/doc/_search
{
"query": {
"match": {
"full_name": "xxx"
}
}
}
6.嵌套属性
#嵌套类型

    PUT w1

    {

      "mappings": {

        "doc":{

          "properties":{

            "name":{

              "type":"text"

            },

            "age":{

              "type":"long"

            },

             "info":{  #info字段嵌套两个字段

                "properties":{

                  "addr":{

                    "type":"text"

                  },

                  "tel":{

                    "type":"long"

                  }

                }

        }

          }

        }

      }

    }

    PUT w1/doc/1  #插入一条数据

    {

      "name":"tom",

      "age":18,

      "info":{

        "addr":"北京",

        "tel":"10010"

      }

    }

    GET w1/doc/_search

    {

      "query": {

        "match": {

          "info.tel": "10010"  #以嵌套字段的属性为查询条件时,直接点语法即可

        }

      }

    }
7.settings设置主从分片
#主分片一旦设置无法更改,复制分片可以

PUT w2

{

  "mappings": {

    "doc":{

      "properties":{

        "title":{

          "type":"text"

        }

      }

    }

  },

  "settings": {  #通过settings设置

    "number_of_shards": 3,  #主分片数量,默认为5

    "number_of_replicas": 3  #复制分片数量,默认为1

  }

}

GET w2
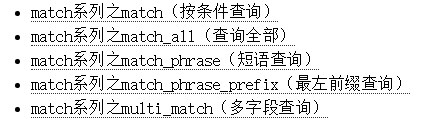
8.match系列
博客地址https://www.cnblogs.com/Neeo/articles/10578482.html
#数据准备

PUT t1/doc/1

{

  "title":"中国是世界上人口最多的国家"

}

PUT t1/doc/2

{

  "title":"美国是世界上军事实力强大多的国家"

}

PUT t1/doc/3

{

  "title":"北京是中国 的首都"

}
使用match查询“中国”
#会发现美国也包含在其中,这是因为match内部会散列分词,内部是采用标准的分析器,中国会分为中和国

GET t1/doc/_search

{

  "query": {

    "match": {

      "title": "中国"

    }

  }

}
我们想把中国当成一个短语,需要采用match_phrase
#这样就不好分词,把中国当成一个短语去查询

GET t1/doc/_search

{

  "query": {

    "match_phrase": {

      "title": "中国"

      "slop": 1  #该参数可以指定分词的间隔

    }

  }

}
最左前缀查询match_phrase_prefix
PUT t2/doc/1

{

  "title":"beautiful girl"

}

PUT t2/doc/2

{

  "title":"beautiful so"

}

GET t2/doc/_search

{

  "query": {

    "match_phrase_prefix": {

      "title": "bea"  #只要有单词以bea开头

    }

  }

}
multi_match多字段查询,可以完成match_phrase和match_phrase_prefix的工作,使用很灵活。
PUT t3/doc/1

{

  "t1":"beautiful girl",

  "t2":"beautiful so"

}

#查找字段t1和t2都包含beautiful的文档

GET t3/doc/_search

{

  "query": {

    "multi_match": {

      "query": "beautiful",

      "fields": ["t1", "t2"]

    }

  }

}
五. elasticsearch分析数据的过程漫谈
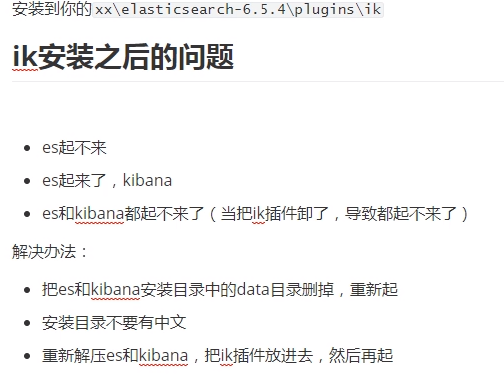
详见博客https://www.cnblogs.com/Neeo/p/10304892.html,附带安装ik分词
5.1 ik安装的问题
5.2 ik分词的测试
#ik分词的测试

GET _analyze

{

  "analyzer": "standard",

  "text":"上海自来水来自海上"

}

GET _analyze

{

  "analyzer": "ik_smart",

  "text":"上海自来水来自海上"

}

#粒度更细,一般存储时建议使用粒度粗的(意义更大),ik_max_word会将文档做最细粒度的拆分

GET _analyze

{

  "analyzer": "ik_max_word",

  "text":"上海自来水来自海上"

}
六. python操作Elasticsearch
6.1 python连接 ES
doc_type默认是doc,所以可以不写,不过建议都写上,以防万一
'1. 安装elasticsearch模块'

pip install elasticsearch

# 豆瓣源

pip install -i https://pypi.doubanio.com/simple/ 		     elasticsearch

'2. 连接的方式'

from elasticsearch import  Elasticsearch

# es = Elasticsearch()    # 默认连接本地elasticsearch

# es = Elasticsearch(['127.0.0.1:9200'])  # 连接本地9200端口

es = Elasticsearch(

    ["192.168.1.10", "192.168.1.11", "192.168.1.12"], # 连接集群,以列表的形式存放各节点的IP地址

    sniff_on_start=True,    # 连接前测试

    sniff_on_connection_fail=True,  # 节点无响应时刷新节点

    sniff_timeout=60    # 设置超时时间

)

'3. 配置忽略响应状态码'

es = Elasticsearch(['127.0.0.1:9200'],ignore=400)  # 忽略返回的400状态码

es = Elasticsearch(['127.0.0.1:9200'],ignore=[400, 405, 502])  # 以列表的形式忽略多个状态码

'4. 简单的示例'

from elasticsearch import  Elasticsearch

es = Elasticsearch()    # 默认连接本地elasticsearch

# print(es.ping())  #可以用该方法查看是否连接成功,如果群集已启动,则返回True,否则返回False

print(es.index(index='p1', doc_type='doc', id=1, body={'name': "sybil", "age": 18}))  #index方法,如果索引存在则更新,否则增加新记录

print(es.get(index='p1', doc_type='doc', id=1))
6.2 python操作ES
# search方法使用的较多,因为可以跟复杂查询

'对返回的信息的几种过滤方法(过滤出想要显示的信息)'

body = {

    "query": {

        "match": {

            "name": "lou22"

        }

    }

}

# 返回的是一个大字典

print(es.search(index='p1', body=body))

# 可以使用filter_path过滤出其中想要的信息

print(es.search(index='p1', body=body, filter_path=['hits.hits']))

# 查询出来的信息主要保存在_source中  {'hits': {'hits': [{'_source': {'name': 'lou22'}}]}}

print(es.search(index='p1', body=body, filter_path=['hits.hits._source']))

# 也可以指定多个要显示的信息 {'hits': {'total': 1, 'hits': [{'_source': {'name': 'lou22'}}]}}

print(es.search(index='p1', body=body, filter_path=['hits.hits._source', 'hits.total']))

# 可以用*指定返回hits下所有的内容  *是语法,表示所有

print(es.search(index='p1', body=body, filter_path=['hits.*']))

# 可以用*指定返回hits下的hits中所有的内容

print(es.search(index='p1', body=body, filter_path=['hits.hits._*']))

'过滤出结果中想要的字段,_source'

print(es.search(index='py3', doc_type='doc', body={"query": {"match":{"age": 20}}}))  # 一般查询

print(es.search(index='py3', doc_type='doc', body={"query": {"match":{"age": 19}}},_source=['name', 'age']))  # 结果字段过滤

print(es.search(index='py3', doc_type='doc', body={"query": {"match":{"age": 19}}},_source_exclude  =[ 'age']))  #除了age字段之外的所有字段都要

print(es.search(index='py3', doc_type='doc', body={"query": {"match":{"age": 19}}},_source_include =[ 'age']))  #只要age字段,同_source差不多
get_source直接返回数据字典
# 直接返回数据字典  {'name': 'lou22'}

print(es.get_source(index='p1', doc_type='doc', id=1))
count统计查询结果的个数
# 新建几条数据

for i in range(2, 11):

    print(es.index(index='p1', doc_type='doc', body={"name": "lou%s" % i}))

# 指定用于查询的方式

body = {

    "query": {

        "match": {

            "name": "lou2"

        }

    }

}

#查询回来的结果就是字典,可以采用字典的操作方式

print(es.count(index='p1', doc_type='doc', body=body))['count']  # 1

print(es.count(index='w2'))  # {'count': 6, '_shards': {'total': 5, 'successful': 5, 'skipped': 0, 'failed': 0}}

print(es.count(index='w2', doc_type='doc')) # {'count': 6, '_shards': {'total': 5, 'successful': 5, 'skipped': 0, 'failed': 0}}
es.create****创建索引(索引不存在的话)并新增一条数据,索引存在仅新增(只能新增,重复执行会报错
#其实内部调用了es.index,一般不使用create方法

print(es.create(index='py3', doc_type='doc', id='1', body={"name": '王五', "age": 20}))

print(es.get(index='py3', doc_type='doc', id='1'))
es.delete与es.delete_by_query
#es.delete,删除指定的文档。比如删除文章id为4的文档,但不能删除索引,如果想要删除索引,还需要es.indices.delete来处理

print(es.delete(index='py3', doc_type='doc', id='4'))

#es.delete_by_query,删除与查询匹配的所有文档

print(es.delete_by_query(index='py3', doc_type='doc', body={"query": {"match":{"age": 20}}}))
es.exists与es.info
# es.exists,查询elasticsearch中是否存在指定的文档,返回一个布尔值

print(es.exists(index='py3', doc_type='doc', id='1'))

#es.info,获取当前集群的基本信息,一般使用kibana查看,因为比较直观

print(es.info())
6.3 es.indices对索引的操作
es.indices.create****在Elasticsearch中创建索引,用的最多
body = {

    "mappings": {

        "doc": {

            "dynamic": "strict",  #设置严格模式

            "properties": {

                "title": {

                    "type": "text",

                    "analyzer": "ik_max_word"

                },

                "url": {

                    "type": "text"

                },

                "action_type": {

                    "type": "text"

                },

                "content": {

                    "type": "text"

                }

            }

        }

    }

}

es.indices.create('py4', body=body)
es.indices.analyze,返回分词结果
es.indices.analyze(body={'analyzer': "ik_max_word", "text": "皮特和茱丽当选“年度模范情侣”Brad Pitt and Angelina Jolie"})
es.indices.delete,在Elasticsearch中删除索引
print(es.indices.delete(index='py4'))

print(es.indices.delete(index='w3'))    # {'acknowledged': True}
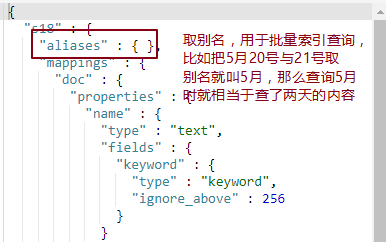
es.indices.put_alias,为一个或多个索引创建别名,查询多个索引的时候,可以使用这个别名
print(es.indices.put_alias(index='py4', name='py4_alias'))  # 为单个索引创建别名

print(es.indices.put_alias(index=['py3', 'py2'], name='py23_alias'))  # 为多个索引创建同一个别名,联查用
es.indices.delete_alias,删除一个或多个别名
print(es.indices.delete_alias(index='alias1'))

print(es.indices.delete_alias(index=['alias1, alias2']))
es.indices.get_mapping,检索索引或索引/类型的映射定义
print(es.indices.get_mapping(index='py4'))
es.indices.get_settings,检索一个或多个(或所有)索引的设置
print(es.indices.get_settings(index='py4'))
es.indices.get,允许检索有关一个或多个索引的信息
print(es.indices.get(index='py2'))    # 查询指定索引是否存在

print(es.indices.get(index=['py2', 'py3']))
es.indices.get_alias,检索一个或多个别名
print(es.indices.get_alias(index='py2'))

print(es.indices.get_alias(index=['py2', 'py3']))
es.indices.get_field_mapping,检索特定字段的映射信息
print(es.indices.get_field_mapping(fields='url', index='py4', doc_type='doc'))

print(es.indices.get_field_mapping(fields=['url', 'title'], index='py4', doc_type='doc'))
其他
# es.indices.delete_alias,删除特定别名。

# es.indices.exists,返回一个布尔值,指示给定的索引是否存在。

# es.indices.exists_type,检查索引/索引中是否存在类型/类型。

# es.indices.flus,明确的刷新一个或多个索引。

# es.indices.get_field_mapping,检索特定字段的映射。

# es.indices.get_template,按名称检索索引模板。

# es.indices.open,打开一个封闭的索引以使其可用于搜索。

# es.indices.close,关闭索引以从群集中删除它的开销。封闭索引被阻  止进行读/写操作。

# es.indices.clear_cache,清除与一个或多个索引关联的所有缓存或特定缓存。

# es.indices.put_alias,为特定索引/索引创建别名。

# es.indices.get_uprade,监控一个或多个索引的升级程度。

# es.indices.put_mapping,注册特定类型的特定映射定义。

# es.indices.put_settings,实时更改特定索引级别设置。

# es.indices.put_template,创建一个索引模板,该模板将自动应用于创建的新索引。

# es.indices.rollove,当现有索引被认为太大或太旧时,翻转索引API将别名转移到新索引。API接受单个别名和条件列表。别名必须仅指向单个索引。如果索引满足指定条件,则创建新索引并切换别名以指向新别名。

# es.indices.segments,提供构建Lucene索引(分片级别)的低级别段信息
6.4 Cluster 集群相关
es.cluster.get_settigns,获取集群设置
print(es.cluster.get_settings())
es.cluster.health,获取有关群集运行状况的非常简单的状态
print(es.cluster.health())
es.cluster.state,获取整个集群的综合状态信息
print(es.cluster.state())
es.cluster.stats,返回群集的当前节点的信息
print(es.cluster.stats())
6.5 Node 节点相关
es.nodes.info,返回集群中节点的信息
print(es.nodes.info())  # 返回所节点

print(es.nodes.info(node_id='node1'))   # 指定一个节点

print(es.nodes.info(node_id=['node1', 'node2']))   # 指定多个节点列表
es.nodes.stats,获取集群中节点统计信息
print(es.nodes.stats())

print(es.nodes.stats(node_id='node1'))

print(es.nodes.stats(node_id=['node1', 'node2']))
es.nodes.hot_threads,获取指定节点的线程信息
print(es.nodes.hot_threads(node_id='node1'))

print(es.nodes.hot_threads(node_id=['node1', 'node2']))
es.nodes.usage,获取集群中节点的功能使用信息
print(es.nodes.usage())

print(es.nodes.usage(node_id='node1'))

print(es.nodes.usage(node_id=['node1', 'node2']))
6.6 Cat 一种查询方式
es.cat.aliases,返回别名信息
#name要返回的以逗号分隔的别名列表。

#formatAccept标头的简短版本,例如json,yaml

print(es.cat.aliases(name='py23_alias'))

print(es.cat.aliases(name='py23_alias', format='json'))
es.cat.allocation,返回分片使用情况
print(es.cat.allocation())

print(es.cat.allocation(node_id=['node1']))

print(es.cat.allocation(node_id=['node1', 'node2'], format='json'))
es.cat.count,Count提供对整个群集或单个索引的文档计数的快速访问
print(es.cat.count())  # 集群内的文档总数

print(es.cat.count(index='py3'))  # 指定索引文档总数

print(es.cat.count(index=['py3', 'py2'], format='json'))  # 返回两个索引文档和
es.cat.fielddata,基于每个节点显示有关当前加载的fielddata的信息。有些数据为了查询效率,会放在内存中,fielddata用来控制哪些数据应该被放在内存中,而这个es.cat.fielddata则查询现在哪些数据在内存中,数据大小等信息
print(es.cat.fielddata())

print(es.cat.fielddata(format='json', bytes='b'))

#bytes显示字节值的单位,有效选项为:'b','k','kb','m','mb','g','gb','t','tb' ,'p','pb'

#formatAccept标头的简短版本,例如json,yaml
es.cat.health,从集群中health里面过滤出简洁的集群健康信息
print(es.cat.health())

print(es.cat.health(format='json'))
es.cat.help,返回es.cat的帮助信息
print(es.cat.help())
es.cat.indices,返回索引的信息
print(es.cat.indices())

print(es.cat.indices(index='py3'))

print(es.cat.indices(index='py3', format='json'))
es.cat.master,返回集群中主节点的IP,绑定IP和节点名称
print(es.cat.master())

print(es.cat.master(format='json'))
es.cat.nodeattrs,返回节点的自定义属性
print(es.cat.nodeattrs())

print(es.cat.nodeattrs(format='json'))
es.cat.nodes,返回节点的拓扑,这些信息在查看整个集群时通常很有用,特别是大型集群。我有多少符合条件的节点
print(es.cat.nodes())

print(es.cat.nodes(format='json'))
es.cat.plugins,返回节点的插件信息
print(es.cat.plugins())

print(es.cat.plugins(format='json'))
es.cat.segments,返回每个索引的Lucene有关的信息
print(es.cat.segments())

print(es.cat.segments(index='py3'))

print(es.cat.segments(index='py3', format='json'))
es.cat.shards,返回哪个节点包含哪些分片的信息
print(es.cat.shards())

print(es.cat.shards(index='py3'))

print(es.cat.shards(index='py3', format='json'))
es.cat.thread_pool,获取有关线程池的信息
print(es.cat.thread_pool())
6.7 Snapshot 快照相关
# es.snapshot.create,在存储库中创建快照。

    repository 存储库名称。

    snapshot快照名称。

    body快照定义。

# es.snapshot.delete,从存储库中删除快照。

# es.snapshot.create_repository。注册共享文件系统存储库。

# es.snapshot.delete_repository,删除共享文件系统存储库。

# es.snapshot.get,检索有关快照的信息。

# es.snapshot.get_repository,返回有关已注册存储库的信息。

# es.snapshot.restore,恢复快照。

# es.snapshot.status,返回有关所有当前运行快照的信息。通过指定存储库名称,可以将结果限制为特定存储库。

# es.snapshot.verify_repository,返回成功验证存储库的节点列表,如果验证过程失败,则返回错误消息
6.8 Task 任务相关
# es.tasks.get,检索特定任务的信息。

# es.tasks.cancel,取消任务。

# es.tasks.list,任务列表
七. python使用ES搜索小例子
7.1 settings.py中指定连接数据库
DATABASES = {

    'default': {

        'ENGINE': 'django.db.backends.mysql',

        'NAME': 'test_es',

        'HOST': '127.0.0.1',

        'PORT': 3306,

        'USER': 'root',

        'PASSWORD': 'root'

    }

}
7.2 models.py中建立模型表,并同步至数据库
from django.db import models

class Car(models.Model):

    title = models.CharField(max_length=255)

    summary = models.CharField(max_length=255)

    img_url = models.CharField(max_length=255, null=True)

    tags = models.CharField(max_length=255)

    a_url = models.CharField(max_length=255)
随后执行数据库迁移命令
python manage.py makemigrations

python manage.py migrate
7.3 新建一个spider.py文件,配置django环境,爬取数据
#!/usr/bin/env python

import os

if __name__ == "__main__":

    os.environ.setdefault("DJANGO_SETTINGS_MODULE", "review_django.settings")

    import django

    django.setup()

    import requests

    from bs4 import BeautifulSoup

    from concurrent.futures import ThreadPoolExecutor

    from app01 import models

    def work(k):

        response = requests.get(url='https://www.autohome.com.cn/all/{}/#liststart'.format(k))

        response.encoding = 'GBK'

        soup_obj = BeautifulSoup(response.text, 'html.parser')

        div_obj = soup_obj.find(name='div', attrs={"id": "auto-channel-lazyload-article"})

        li_list = div_obj.find_all(name='li')

        for i in li_list:

            no_obj = i.find(name='h3')

            if not no_obj: continue

            title = i.find(name='h3').text

            summary = i.find(name='p').text

            a = 'https:' + i.find(name='a').get('href')

            img = 'https:' + i.find(name='img').get('src')

            tags = a.split('/', 4)[3]

            print(response.url, title, tags)

            print(summary, img)

            models.Car.objects.create(

                title=title,

                summary=summary,

                tags=tags,

                img_url=img,

                a_url=a

            )

    def spider():

        t = ThreadPoolExecutor(10)

        for k in range(1, 60):

            t.submit(work, k)

        t.shutdown()

    spider()
7.4 urls.py中配置路由
from django.conf.urls import url

from app01 import views

urlpatterns = [

    # 用于简单显示一个页面,同时展示用户搜索的内容

    url(r'index', views.index),

    # 将数据库数据写入es

    url(r'es', views.es2)

]
7.5 views.py中视图函数
from django.shortcuts import render, HttpResponse

from django.http import JsonResponse

from elasticsearch import Elasticsearch

from elasticsearch import helpers

from app01 import models

# 实例化一个ES对象

es = Elasticsearch()

# Create your views here.

def filter(search_msg):

    body = {

        "size": 100,  # 返回一百条数据

        "query": {

            "match": {

                "title": search_msg  # 从标题中查找输入的关键字

            }

        },

        "highlight": {  # 内容高亮显示,使用pre_tags与post_tags定义标签,默认是em标签

            "pre_tags": "<b style='color:red;font-size:24px'>",

            "post_tags": "</b>",

            "fields": {

                "title": {}  # 将标题高亮显示

            }

        },

    }

    # 存储es搜索的结果

    res = es.search(index='s18', body=body)

    # print(res)

    return res

def index(request):

    if request.method == "POST":

        search_msg = request.POST.get('search_msg')

        res = filter(search_msg)

        # 将es搜索的结果返回

        return JsonResponse(res)

    return render(request, 'search.html', locals())

def es2(request):

    body = {

        "mappings": {

            "doc": {

                "properties": {

                    "title": {

                        "type": "text"

                    },

                    "summary": {

                        "type": "text"

                    },

                    "a_url": {

                        "type": "keyword"

                    },

                    "img_url": {

                        "type": "keyword"

                    },

                    "tags": {

                        "type": "text"

                    }

                }

            }

        }

    }

    # es.indices.create(index='s18', body=body)

    # print(es.indices.get_mapping())

    query_list = models.Car.objects.all()

    # 定义写入es的数据格式,使用生成器,减轻内存压力

    action = ({

        "_index": "s18",  # 索引,相当于指定数据库,不存在则创建

        "_type": "doc",  # 类型,相当于指定表,不存在则创建

        "_source": {  # 指定要写入的内容

            "title": i.title,

            "summary": i.summary,

            "a_url": i.a_url,

            "img_url": i.img_url,

            "tags": i.tags

        }

    }

        for i in query_list

    )

    # helpers会使用java虚拟机帮我们进行该任务

    helpers.bulk(es, action)

    return HttpResponse('ok es')
7.6 templates文件下写的search.html
<!DOCTYPE html>

<html lang="en">

<head>

    <meta charset="UTF-8">

    <title>Title</title>

    <script src="https://cdn.bootcss.com/jquery/3.4.1/jquery.min.js"></script>

    <script src="https://cdn.bootcss.com/twitter-bootstrap/3.4.1/js/bootstrap.min.js"></script>

    <link href="https://cdn.bootcss.com/twitter-bootstrap/3.4.1/css/bootstrap.min.css" rel="stylesheet">

</head>

<body>

<nav class="navbar navbar-default">

  <div class="container-fluid">

    <!-- Brand and toggle get grouped for better mobile display -->

    <div class="navbar-header">

      <button type="button" class="navbar-toggle collapsed" data-toggle="collapse" data-target="#bs-example-navbar-collapse-1" aria-expanded="false">

        <span class="sr-only">Toggle navigation</span>

        <span class="icon-bar"></span>

        <span class="icon-bar"></span>

        <span class="icon-bar"></span>

      </button>

      <a class="navbar-brand" href="#">Brand</a>

    </div>

    <!-- Collect the nav links, forms, and other content for toggling -->

    <div class="collapse navbar-collapse" id="bs-example-navbar-collapse-1">

      <ul class="nav navbar-nav">

        <li class="active"><a href="#">Link <span class="sr-only">(current)</span></a></li>

        <li><a href="#">Link</a></li>

        <li class="dropdown">

          <a href="#" class="dropdown-toggle" data-toggle="dropdown" role="button" aria-haspopup="true" aria-expanded="false">Dropdown <span class="caret"></span></a>

          <ul class="dropdown-menu">

            <li><a href="#">Action</a></li>

            <li><a href="#">Another action</a></li>

            <li><a href="#">Something else here</a></li>

            <li role="separator" class="divider"></li>

            <li><a href="#">Separated link</a></li>

            <li role="separator" class="divider"></li>

            <li><a href="#">One more separated link</a></li>

          </ul>

        </li>

      </ul>

{#        搜索框                #}

      <form class="navbar-form navbar-left">

        <div class="form-group">

          <input type="text" class="form-control" placeholder="Search" oninput="foo()" id="search">

        </div>

        <button type="submit" class="btn btn-default">Submit</button>

          <span id="totalNum"></span>

      </form>

      <ul class="nav navbar-nav navbar-right">

        <li><a href="#">Link</a></li>

        <li class="dropdown">

          <a href="#" class="dropdown-toggle" data-toggle="dropdown" role="button" aria-haspopup="true" aria-expanded="false">Dropdown <span class="caret"></span></a>

          <ul class="dropdown-menu">

            <li><a href="#">Action</a></li>

            <li><a href="#">Another action</a></li>

            <li><a href="#">Something else here</a></li>

            <li role="separator" class="divider"></li>

            <li><a href="#">Separated link</a></li>

          </ul>

        </li>

      </ul>

    </div><!-- /.navbar-collapse -->

  </div><!-- /.container-fluid -->

    <div class="container">

        <div class="row">

            <div class="col-md-8 col-lg-offset-2">

                <div id="showData"></div>

            </div>

        </div>

    </div>

</nav>

</body>

<script>

    //搜索

    function foo() {

        var searchMsg = $('#search').val();

        console.log(searchMsg);

        $.ajax({

            url:"/app01/index",

            type: "post",

            data: {'search_msg': searchMsg},

            success:function (data) {

                console.log(data);

                if (data){

                    //展示结果条数

                    $("#totalNum").html("结果约<b style='color:red'>" + data.hits.total + "<b>")

                    //结果展示

                    var html = '';

                    $.each(data.hits.hits, function (index, item) {

                        //console.log(item._source.title)

                        html += "<a href='+ item.a_url +'>\n" +

                            "                                <div class=\"article-pic\"></div>\n" +

                            "                                <h3>"+item.highlight.title+"</h3>\n" +

                            "                                <div class=\"article-bar\">\n" +

                            "                                    <span class=\"fn-left\"></span>\n" +

                            "                                    <span class=\"fn-right\">\n" +

                            "                                        <em><i class=\"icon12 icon12-eye\"></i></em>\n" +

                            "                                        <em data-class=\"icon12 icon12-infor\" data-articleid=\"945066\"><i class=\"icon12 icon12-infor\"></i>13</em>\n" +

                            "                                    </span>\n" +

                            "                                </div>\n" +

                            "                                <p>"+item._source.summary+"</p>\n" +

                            "                            </a>";

                        $("#showData").html(html)

                    })

                }

            }

        })

    }

</script>

</html>
7.7 启动项目先访问es路由,后面访问index即可
最新文章
- Android添加图片到ListView或者 RecyclerView显示
- cefsharp设置默认语言
- nano编辑器使用教程
- redis集群同步迁移方法(二):通过redis-migrate-tool实现
- android/ios js 启动apk
- 调试SQLSERVER (一)生成dump文件的方法
- [CareerCup] 6.2 Dominos on Chess Board 棋盘上的多米诺
- SSH 内网端口转发实战
- c# session总结
- C语言笔记之结构体
- 从数据库读取数据并动态生成easyui tree构结
- 获取百度地图POI数据二(准备搜索关键词)
- mapreduce中文乱码,已解决
- postgresql某进程占用cpu资源过高,降不下来
- windows平台下安装linux
- hive hadoop 大数据初探
- [转]关于ReentrantLock中线程读某个变量是否需要加锁
- 在SharePoint Server 2010中更改“我的网站”
- 成为Java GC专家
- 旁听<基因编辑与精准医疗>(北京大学)