十四、i2c子系统
由于之后的触摸屏驱动分析中使用到了GPIO子系统和i2c子系统,因此在分析触摸屏驱动之前我准备把这两个子系统进行简单分析。
在读者学习本章以及后续i2c相关章节之前,最好了解i2c通信方式,可以参考:i2c编程。
一、i2c框架分析
和总线设备驱动模型类似,i2c分为核心层、总线驱动层和设备驱动层。总线驱动层向核心层提供统一接口,设备驱动层实现底层设备操作。
核心层:drivers/i2c/i2c-core.c文件
总线驱动层:i2c总线驱动是i2c适配器的软件实现,让i2c适配器与从设备间完成数据通信
设备驱动层:用于实现设备的注册和设备驱动的注册
由于i2c也是使用总线,在此不再分析核心层框架,对于总线核心层读者可以查看:总线设备驱动模型第三节。i2c核心层主要实现的有:
1. 注册总线i2c_bus_type
2. 提供总线match()等函数。其中总线probe()会调用i2c_driver的probe(),这是因为之前说的:总线驱动层向核心层提供统一接口,设备驱动层实现底层设备操作
3. 向底层提供注册函数
i2c框架如下图:
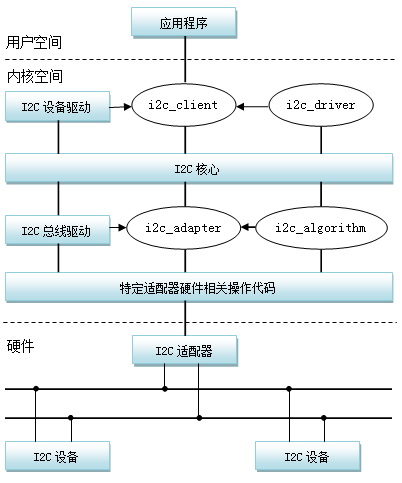
在上图中除去之前介绍的总线驱动和设备驱动,接下来我会分别介绍其余结构体。
1. i2c_client表示一个i2c设备
 struct i2c_client {

     unsigned short flags;        /* i2c设备标志位 */

     unsigned short addr;         /* i2c设备地址 */

     char name[I2C_NAME_SIZE];    /* 名字 */

     struct i2c_adapter *adapter; /* 指向与其对应的适配器 */

     struct i2c_driver *driver;   /* 指向与其对应的设备驱动 */

     struct device dev;           /* the device structure */

     int irq;                     /* irq issued by device */

     struct list_head detected;   /* 作为节点挂接到i2c_driver链表中 */

 };
2. i2c_driver表示i2c设备驱动
 struct i2c_driver {

     unsigned int class;

     /* attach_adapter()用于匹配适配器 */

     int (*attach_adapter)(struct i2c_adapter *) __deprecated;

     int (*detach_adapter)(struct i2c_adapter *) __deprecated;

     /* 设备驱动层的probe()和注销函数 */

     int (*probe)(struct i2c_client *, const struct i2c_device_id *);

     int (*remove)(struct i2c_client *);

     /* 电源管理相关,暂时用不到 */

     /* driver model interfaces that don't relate to enumeration  */

     void (*shutdown)(struct i2c_client *);

     int (*suspend)(struct i2c_client *, pm_message_t mesg);

     int (*resume)(struct i2c_client *);

     /* Alert callback, for example for the SMBus alert protocol.

      * The format and meaning of the data value depends on the protocol.

      * For the SMBus alert protocol, there is a single bit of data passed

      * as the alert response's low bit ("event flag").

      */

     void (*alert)(struct i2c_client *, unsigned int data);

     /* a ioctl like command that can be used to perform specific functions

      * with the device.

      */

     int (*command)(struct i2c_client *client, unsigned int cmd, void *arg);

     struct device_driver driver;          /* 设备驱动对应的device_driver */

     const struct i2c_device_id *id_table; /* 匹配设备驱动和设备的id_table */

     /* Device detection callback for automatic device creation */

     int (*detect)(struct i2c_client *, struct i2c_board_info *);

     const unsigned short *address_list;  /* 设备驱动支持的所有i2c设备的地址数组 */

     struct list_head clients;            /* 用于挂接匹配成功的i2c_client的链表头 */

 };
3. i2c_adapter表示i2c适配器,可以理解为是一个i2c主机
 struct i2c_adapter {

     struct module *owner;

     unsigned int class;          /* classes to allow probing for */

     const struct i2c_algorithm *algo; /* 适配器与设备的通信算法 */

     void *algo_data;

     /* data fields that are valid for all devices    */

     struct rt_mutex bus_lock;

     int timeout;        /* 超时时间,使用jiffies表示 */

     int retries;

     struct device dev;  /* 适配器对应的device */

     int nr;             /* 适配器的编号 */

     char name[];      /* 适配器名字 */

     struct completion dev_released;

     struct mutex userspace_clients_lock;

     struct list_head userspace_clients;    /* 用于挂接i2c_client的链表头 */

 };
4. i2c_algorithm是i2c数据通信的算法
 struct i2c_algorithm {

     /* 数据传输函数 */

     int (*master_xfer)(struct i2c_adapter *adap, struct i2c_msg *msgs,

                int num);

     /* smbus协议传输函数,在i2c中使用不上 */

     int (*smbus_xfer) (struct i2c_adapter *adap, u16 addr,

                unsigned short flags, char read_write,

                u8 command, int size, union i2c_smbus_data *data);

     /* To determine what the adapter supports */

     u32 (*functionality) (struct i2c_adapter *);

 };
代码中第3行:struct i2c_msg定义如下:
struct i2c_msg {

    __u16 addr;    /* i2c设备地址 */

    __u16 flags;     /* 读/写。一般1为读,也就是I2C_M_RD,0为写 */

#define I2C_M_TEN        0x0010    /* this is a ten bit chip address */

#define I2C_M_RD        0x0001    /* read data, from slave to master */

#define I2C_M_NOSTART        0x4000    /* if I2C_FUNC_NOSTART */

#define I2C_M_REV_DIR_ADDR    0x2000    /* if I2C_FUNC_PROTOCOL_MANGLING */

#define I2C_M_IGNORE_NAK    0x1000    /* if I2C_FUNC_PROTOCOL_MANGLING */

#define I2C_M_NO_RD_ACK        0x0800    /* if I2C_FUNC_PROTOCOL_MANGLING */

#define I2C_M_RECV_LEN        0x0400    /* length will be first received byte */

    __u16 len;        /* msg length                */

    __u8 *buf;        /* pointer to msg data            */

};
由于适配器的参数根据芯片不同有所不同。因此i2c_adapter的初始化一般会在会在平台驱动初始化或probe()函数中配置。
i2c_algorithm在i2c_adapter中有指针定义,因此我们需要在配置i2c_adapter之前配置i2c_algorithm。
i2c_client由我们实现,主要需要设置它的地址。
i2c_driver也由我们实现,格式与platform_driver类似。
二、核心层提供的注册函数
1. i2c_add_adapter()和i2c_add_numbered_adapter()用于注册i2c_adapter
i2c_add_adapter()由系统给设备分配编号,i2c_add_numbered_adapter()由我们指定设备编号,如果设备编号被使用,会返回错误。
两函数底层调用的都是i2_register_adapter():
 static int i2c_register_adapter(struct i2c_adapter *adap)

 {

     int res = ;

 ...

     rt_mutex_init(&adap->bus_lock);

     mutex_init(&adap->userspace_clients_lock);

     /* 初始化i2c_adapteruserspace_clients链表 */

     INIT_LIST_HEAD(&adap->userspace_clients);

     /* Set default timeout to 1 second if not already set */

     if (adap->timeout == )

         adap->timeout = HZ;

     dev_set_name(&adap->dev, "i2c-%d", adap->nr);    /* 设置adapter名字 */

     adap->dev.bus = &i2c_bus_type;                   /* 设置设备的总线类型 */

     adap->dev.type = &i2c_adapter_type;              /* 设置设备的设备类型 */

     res = device_register(&adap->dev);               /* 注册设备/sys/devices/i2c-%d */

 ...

     /* create pre-declared device nodes */

     if (adap->nr < __i2c_first_dynamic_bus_num)

         i2c_scan_static_board_info(adap);    /* 扫描并创建i2c设备 */

     /* Notify drivers */

     mutex_lock(&core_lock);

     bus_for_each_drv(&i2c_bus_type, NULL, adap, __process_new_adapter);

     mutex_unlock(&core_lock);

 ...

     return res;

 }
现在我们继续分析上面代码中的第22行:i2c_scan_static_board_info(adap),它调用了i2c_new_device()函数来添加一个i2c设备。
 static void i2c_scan_static_board_info(struct i2c_adapter *adapter)

 {

     struct i2c_devinfo    *devinfo;

     down_read(&__i2c_board_lock);

     list_for_each_entry(devinfo, &__i2c_board_list, list) {

         if (devinfo->busnum == adapter->nr

                 && !i2c_new_device(adapter,

                         &devinfo->board_info))

             dev_err(&adapter->dev,

                 "Can't create device at 0x%02x\n",

                 devinfo->board_info.addr);

     }

     up_read(&__i2c_board_lock);

 }
2. i2c_new_device()用于注册i2c_client
i2c_new_device()调用了device_register()来添加一个设备。关于device的注册过程可以查看Linux驱动函数解读第二节
 struct i2c_client *i2c_new_device(struct i2c_adapter *adap, struct i2c_board_info const *info)

 {

     struct i2c_client    *client;

     int            status;

     /* 设置i2c_client成员 */

     client = kzalloc(sizeof *client, GFP_KERNEL);

 ...

     client->adapter = adap;

     client->dev.platform_data = info->platform_data;

     if (info->archdata)

         client->dev.archdata = *info->archdata;

     client->flags = info->flags;

     client->addr = info->addr;

     client->irq = info->irq;

     strlcpy(client->name, info->type, sizeof(client->name));

     /* 判断地址的有效性 */

     status = i2c_check_client_addr_validity(client);

 ...

     /* Check for address business */

     status = i2c_check_addr_busy(adap, client->addr);

 ...

     client->dev.parent = &client->adapter->dev; /* 设置设备的适配器 */

     client->dev.bus = &i2c_bus_type;            /* 设置所属总线 */

     client->dev.type = &i2c_client_type;        /* 设置设备类型 */

     client->dev.of_node = info->of_node;

     /* For 10-bit clients, add an arbitrary offset to avoid collisions */

     dev_set_name(&client->dev, "%d-%04x", i2c_adapter_id(adap),

              client->addr | ((client->flags & I2C_CLIENT_TEN)

                      ? 0xa000 : ));

     /* 注册设备 */

     status = device_register(&client->dev);

 ...

     return client;

 ...

 }
i2c_new_device()函数的第二个传入参数struct i2c_board_info涉及了i2_client的设置。该参数应该是我们注册设备时传入的,我们可以在内核中搜索static struct i2c_board_info来看看它的格式是什么:
 static struct i2c_board_info i2c_board_info[] = {

     {

         /* "uda1380"为名字,0x18为设备地址 */

         I2C_BOARD_INFO("uda1380", 0x18),

         /* 自己定义的结构体,在此不需要关心 */

         .platform_data = &uda1380_info,

     },

 };
此处我们需要特别注意设备地址的定义。在uda1380的数据手册中可以确定其i2c设备地址如下图所示:

由于最后一位为读写位,因此地址为0x18而不是0x30。
3. i2c_add_driver()用于注册i2c_device driver
i2c_add_driver()调用了i2c_register_driver()来注册一个设备驱动。
 int i2c_register_driver(struct module *owner, struct i2c_driver *driver)

 {

     int res;

     /* Can't register until after driver model init */

     if (unlikely(WARN_ON(!i2c_bus_type.p)))

         return -EAGAIN;

     /* add the driver to the list of i2c drivers in the driver core */

     driver->driver.owner = owner;

     driver->driver.bus = &i2c_bus_type;

     /* 注册设备驱动 */

     res = driver_register(&driver->driver);

 ...

     /* 初始化 i2c_driver->clients 链表 */

     INIT_LIST_HEAD(&driver->clients);

     /* Walk the adapters that are already present */

     i2c_for_each_dev(driver, __process_new_driver);

     return ;

 }
代码中第14行:driver_register()函数调用过程和platform_driver_register()的driver_register()函数调用过程是一样的。
driver_register(&drv->driver);

  -> bus_add_driver(drv);            // 添加驱动到链表中

    -> driver_attach(drv);

      -> bus_for_each_dev(drv->bus, NULL, drv, __driver_attach);

        -> __driver_attach()

          -> driver_match_device(drv, dev);

              // 调用driver的match()

              -> return drv->bus->match ? drv->bus->match(dev, drv) : ;

        -> driver_probe_device(drv, dev);

          -> really_probe(dev, drv);

            -> drv->probe(dev);    // 调用i2c_driver的probe()函数
通过前3点分析,可知i2c子系统内部存在着两个匹配过程:
1. i2c_adapter与i2c_client之间,两者通过适配器编号进行匹配
2. i2c总线下的i2c_client与i2c_driver之间,两者通过设备驱动的id_table进行匹配
在第一节末尾,我提到了四个结构体的实现位置。在第三节,我会根据具体平台进行分析。
三、i2c-s3c2410.c文件分析
首先我们来查看probe()函数:
 static int s3c24xx_i2c_probe(struct platform_device *pdev)

 {

     struct s3c24xx_i2c *i2c;

     struct s3c2410_platform_i2c *pdata = NULL;

     struct resource *res;

     int ret;

 ...

     i2c = devm_kzalloc(&pdev->dev, sizeof(struct s3c24xx_i2c), GFP_KERNEL);

 ...

     i2c->pdata = devm_kzalloc(&pdev->dev, sizeof(*pdata), GFP_KERNEL);

 ...

     i2c->quirks = s3c24xx_get_device_quirks(pdev);

     if (pdata)

         memcpy(i2c->pdata, pdata, sizeof(*pdata));

     else

         s3c24xx_i2c_parse_dt(pdev->dev.of_node, i2c);

     /* 设置i2c_adapter */

     strlcpy(i2c->adap.name, "s3c2410-i2c", sizeof(i2c->adap.name));

     i2c->adap.owner   = THIS_MODULE;

     i2c->adap.algo    = &s3c24xx_i2c_algorithm;    /* 通信算法 */

     i2c->adap.retries = ;

     i2c->adap.class   = I2C_CLASS_HWMON | I2C_CLASS_SPD;

     i2c->tx_setup     = ;

     init_waitqueue_head(&i2c->wait);

     /* find the clock and enable it */

     i2c->dev = &pdev->dev;

     i2c->clk = clk_get(&pdev->dev, "i2c");    /* 获取并使能时钟 */

 ...

     clk_enable(i2c->clk);

     /* map the registers */

     res = platform_get_resource(pdev, IORESOURCE_MEM, );

 ...

     i2c->ioarea = request_mem_region(res->start, resource_size(res), pdev->name);

 ...

     i2c->regs = ioremap(res->start, resource_size(res));

 ...

     i2c->adap.algo_data = i2c;

     i2c->adap.dev.parent = &pdev->dev;

     /* inititalise the i2c gpio lines */

     if (i2c->pdata->cfg_gpio) {

         i2c->pdata->cfg_gpio(to_platform_device(i2c->dev));

     }

 ...

     ret = s3c24xx_i2c_init(i2c);    /* 硬件初始化 */

 ...

     i2c->irq = ret = platform_get_irq(pdev, );

 ...

     ret = request_irq(i2c->irq, s3c24xx_i2c_irq, ,

               dev_name(&pdev->dev), i2c);

 ...

     ret = s3c24xx_i2c_register_cpufreq(i2c);

 ...

     i2c->adap.nr = i2c->pdata->bus_num;

     i2c->adap.dev.of_node = pdev->dev.of_node;

     ret = i2c_add_numbered_adapter(&i2c->adap);        /* 注册i2c_adapter */

 ...

     of_i2c_register_devices(&i2c->adap);

     platform_set_drvdata(pdev, i2c);

 ...

     clk_disable(i2c->clk);

 ...

     return ret;

 }
和我们预想的一致,probe()函数初始化并注册了i2c_adapter和i2c_algorithm。
看完i2c_adapter之后,我们来看一下i2c_algorithm是如何定义的。
 /* 底层寄存器操作 */

 static void s3c24xx_i2c_message_start(struct s3c24xx_i2c *i2c, struct i2c_msg *msg)

 {

     unsigned int addr = (msg->addr & 0x7f) << ;

     unsigned long stat;

     unsigned long iiccon;

     stat = ;

     stat |=  S3C2410_IICSTAT_TXRXEN;

     if (msg->flags & I2C_M_RD) {

         stat |= S3C2410_IICSTAT_MASTER_RX;

         addr |= ;

     } else

         stat |= S3C2410_IICSTAT_MASTER_TX;

     if (msg->flags & I2C_M_REV_DIR_ADDR)

         addr ^= ;

     /* todo - check for whether ack wanted or not */

     s3c24xx_i2c_enable_ack(i2c);

     iiccon = readl(i2c->regs + S3C2410_IICCON);

     writel(stat, i2c->regs + S3C2410_IICSTAT);

     dev_dbg(i2c->dev, "START: %08lx to IICSTAT, %02x to DS\n", stat, addr);

     writeb(addr, i2c->regs + S3C2410_IICDS);

     /* delay here to ensure the data byte has gotten onto the bus

      * before the transaction is started */

     ndelay(i2c->tx_setup);

     dev_dbg(i2c->dev, "iiccon, %08lx\n", iiccon);

     writel(iiccon, i2c->regs + S3C2410_IICCON);

     stat |= S3C2410_IICSTAT_START;

     writel(stat, i2c->regs + S3C2410_IICSTAT);

 }

 static int s3c24xx_i2c_doxfer(struct s3c24xx_i2c *i2c,

                   struct i2c_msg *msgs, int num)

 {

     unsigned long timeout;

     int ret;

 ...

     ret = s3c24xx_i2c_set_master(i2c);

 ...

     i2c->msg     = msgs;

     i2c->msg_num = num;

     i2c->msg_ptr = ;

     i2c->msg_idx = ;

     i2c->state   = STATE_START;

     s3c24xx_i2c_enable_irq(i2c);

     s3c24xx_i2c_message_start(i2c, msgs);

     timeout = wait_event_timeout(i2c->wait, i2c->msg_num == , HZ * );

     ret = i2c->msg_idx;

 ...

     s3c24xx_i2c_wait_idle(i2c);

     return ret;

 }

 static int s3c24xx_i2c_xfer(struct i2c_adapter *adap,

             struct i2c_msg *msgs, int num)

 {

     struct s3c24xx_i2c *i2c = (struct s3c24xx_i2c *)adap->algo_data;

     int retry;

     int ret;

     pm_runtime_get_sync(&adap->dev);

     clk_enable(i2c->clk);

     for (retry = ; retry < adap->retries; retry++) {

         ret = s3c24xx_i2c_doxfer(i2c, msgs, num);

         if (ret != -EAGAIN) {

             clk_disable(i2c->clk);

             pm_runtime_put_sync(&adap->dev);

             return ret;

         }

         dev_dbg(i2c->dev, "Retrying transmission (%d)\n", retry);

         udelay();

     }

     clk_disable(i2c->clk);

     pm_runtime_put_sync(&adap->dev);

     return -EREMOTEIO;

 }

 static u32 s3c24xx_i2c_func(struct i2c_adapter *adap)

 {

     return I2C_FUNC_I2C | I2C_FUNC_SMBUS_EMUL | I2C_FUNC_NOSTART |

         I2C_FUNC_PROTOCOL_MANGLING;

 }

 static const struct i2c_algorithm s3c24xx_i2c_algorithm = {

     .master_xfer        = s3c24xx_i2c_xfer,

     .functionality        = s3c24xx_i2c_func,

 };
代码中底层操作是我们可能需要根据用户手册时序的属性更改的部分;i2c_algorithm成员函数functionality定义的是adapter所具有的功能,如是否支持smbus协议。
四、设备驱动层程序编写过程
我们在写i2c设备驱动层时,需要获取i2c_adapter,此时需要使用的函数是i2c_adapter *i2c_get_adapter(int nr)。
与i2c_get_adapter()对应的注销使用函数是void i2c_put_adapter(struct i2c_adapter *adap)。
消息接收顶层使用的是int i2c_master_send(const struct i2c_client *client, const char *buf, int count)和int i2c_master_recv(const struct i2c_client *client, char *buf, int count)。两函数底层调用都是i2c_transfer(),我们也可以直接调用i2c_transfer()。
i2c_get_adapter()函数参数nr为adapter的编号,如下图,nr有0、1、3等。

除上图之外,我们也可以查看设备地址等信息。
查询i2c设备地址:ls /sys/bus/i2c/devices/
设备和原理图对应关系:3-0038 I2C_3_SCL(addr为0x38)
查询i2c设备名称:cat /sys/bus/i2c/devices/3-0038/name

现在我们来想象一下设备驱动层程序编写过程:
对于i2c_client:
1. 设置struct i2c_board_info
2. 在初始化函数中,首先i2c_get_adapter(),之后i2c_new_device(),最后i2c_put_adapter()
3. 在退出函数中,i2c_unregister_device()
对于i2c_driver:
1. 定义i2c_driver,由于i2c也属于字符设备,所以我们要在probe()函数中注册cdev、file_operations、class和device。
2. 在write()函数中调用i2c_master_send()
3. 在read()函数中调用i2c_master_recv()
4. 在初始化函数中,i2c_add_driver()
5. 在退出函数中,i2c_del_driver()
下一章我们来实现触摸屏驱动程序。
下一章 十五、电容触摸屏驱动
最新文章
- (十三)Maven插件解析运行机制
- input表单手机号、身份证号验证
- linux下的触控板手势xSwipe and tag
- Hibernate的session一级缓存
- 【SAP BusinessObjects】WEBI中的动态求和,累加函数的使用
- ubuntu 16.04 samba 文件共享
- C# try catch finally 执行
- Intellij IDEA 导入Eclipse或MyEclipse的Web项目(旧版 转载)
- Android Studio无法关联Api23源码-提示Souces for android api 23 platform not found
- jQuery 之 $(this) 出了什么问题?
- webpack提取库
- 利用mvn进行多环境配置
- 机器学习 MLIA学习笔记(一)
- uiview animation 卡一下
- ie11 下 input 默认有 X 关闭按钮的问题
- 两个cookie的合并
- java队列queue的我觉得很好的使用方式
- model模块
- js处理url
- mysql数据库表的基本操作sql语句总结