Kubernetes 学习4 kubernetes应用快速入门
一、相关命令
1、kubectl
通过连接api server 进行各k8s对象资源的增删改查,如pod,service,controller(控制器),我们常用的pod控制器replicaset,deployment,statefulet,daemonset,job,cronjob等,甚至node都是对象。
[root@k8smaster ~]# kubectl --help

kubectl controls the Kubernetes cluster manager.

Find more information at: https://kubernetes.io/docs/reference/kubectl/overview/

Basic Commands (Beginner): #新手用的命令

  create  #增       Create a resource from a file or from stdin.

  expose         Take a replication controller, service, deployment or pod and expose it as a new Kubernetes Service

  run            Run a particular image on the cluster

  set            Set specific features on objects

Basic Commands (Intermediate):  #中级的基础命令

  explain        Documentation of resources

  get   #查         Display one or many resources

  edit #改          Edit a resource on the server

  delete  #删       Delete resources by filenames, stdin, resources and names, or by resources and label selector

Deploy Commands: #部署命令

  rollout  #滚动,回滚      Manage the rollout of a resource

  scale    #改变应用程序的规模      Set a new size for a Deployment, ReplicaSet, Replication Controller, or Job

  autoscale #自动改变,就是创建HPA的     Auto-scale a Deployment, ReplicaSet, or ReplicationController

Cluster Management Commands: #集群管理相关命令

  certificate #证书   Modify certificate resources.

  cluster-info #集群信息  Display cluster info

  top    #查看资源使用率        Display Resource (CPU/Memory/Storage) usage.

  cordon  #标记一个节点不可被调用       Mark node as unschedulable

  uncordon #标记一个节点可被调用      Mark node as schedulable

  drain  #排干模式        Drain node in preparation for maintenance

  taint  #增加污点,给节点增加污点以后,能容忍该污点的pod才能被调度到该节点,默认master会有很多污点,所以创建的pod默认是不会在master上创建,这样确保了master只运行各系统组件        Update the taints on one or more nodes

Troubleshooting and Debugging Commands: #修复和调试命令

  describe #描述一个资源的详细信息      Show details of a specific resource or group of resources

  logs  #查看日志         Print the logs for a container in a pod

  attach  #和docker 中的attach相似       Attach to a running container

  exec  #和docker exec 相似         Execute a command in a container

  port-forward #端口转发  Forward one or more local ports to a pod

  proxy #代理         Run a proxy to the Kubernetes API server

  cp   #跨容器复制文件          Copy files and directories to and from containers.

  auth  #测试认证         Inspect authorization

Advanced Commands: #高级命令

  apply  #创建,修改        Apply a configuration to a resource by filename or stdin

  patch  #打补丁        Update field(s) of a resource using strategic merge patch

  replace #替换       Replace a resource by filename or stdin

  wait  #等待         Experimental: Wait for one condition on one or many resources

  convert #转换       Convert config files between different API versions

Settings Commands:  #设置命令

  label   #打标签       Update the labels on a resource

  annotate  #给资源加一个注解     Update the annotations on a resource

  completion #用来做命令补全    Output shell completion code for the specified shell (bash or zsh)

Other Commands: #其它命令

  alpha          Commands for features in alpha

  api-resources  Print the supported API resources on the server

  api-versions   Print the supported API versions on the server, in the form of "group/version"

  config         Modify kubeconfig files

  plugin         Runs a command-line plugin

  version        Print the client and server version information

Usage:

  kubectl [flags] [options]

Use "kubectl <command> --help" for more information about a given command.

Use "kubectl options" for a list of global command-line options (applies to all commands).
2、查看kubectl 版本信息或集群信息
[root@k8smaster ~]# kubectl version

Client Version: version.Info{Major:"", Minor:"", GitVersion:"v1.11.1", GitCommit:"b1b29978270dc22fecc592ac55d903350454310a", GitTreeState:"clean", BuildDate:"2018-07-17T18:53:20Z", GoVer

sion:"go1.10.3", Compiler:"gc", Platform:"linux/amd64"}Server Version: version.Info{Major:"", Minor:"", GitVersion:"v1.11.1", GitCommit:"b1b29978270dc22fecc592ac55d903350454310a", GitTreeState:"clean", BuildDate:"2018-07-17T18:43:26Z", GoVer

sion:"go1.10.3", Compiler:"gc", Platform:"linux/amd64"}
[root@k8smaster ~]# kubectl cluster-info

Kubernetes master is running at https://192.168.10.10:6443

KubeDNS is running at https://192.168.10.10:6443/api/v1/namespaces/kube-system/services/kube-dns:dns/proxy

To further debug and diagnose cluster problems, use 'kubectl cluster-info dump'.
3、kubectl run 命令
[root@k8smaster ~]# kubectl run --help

Create and run a particular image, possibly replicated.

Creates a deployment or job to manage the created container(s).#基于这两种中的某一种创建容器(也就是pod)

Examples:

  # Start a single instance of nginx.

  kubectl run nginx --image=nginx  #基于nginx镜像启动pod

  # Start a single instance of hazelcast and let the container expose port  .

  kubectl run hazelcast --image=hazelcast --port=

  # Start a single instance of hazelcast and set environment variables "DNS_DOMAIN=cluster" and "POD_NAMESPACE=default"

in the container.

  kubectl run hazelcast --image=hazelcast --env="DNS_DOMAIN=cluster" --env="POD_NAMESPACE=default"

  # Start a single instance of hazelcast and set labels "app=hazelcast" and "env=prod" in the container.

  kubectl run hazelcast --image=nginx --labels="app=hazelcast,env=prod"

  # Start a replicated instance of nginx.

  kubectl run nginx --image=nginx --replicas=5 #启动5个pod

  # Dry run. Print the corresponding API objects without creating them.

  kubectl run nginx --image=nginx --dry-run #单跑模式

  # Start a single instance of nginx, but overload the spec of the deployment with a partial set of values parsed from

JSON.

  kubectl run nginx --image=nginx --overrides='{ "apiVersion": "v1", "spec": { ... } }'

  # Start a pod of busybox and keep it in the foreground, don't restart it if it exits.

  kubectl run -i -t busybox --image=busybox --restart=Never #默认容器结束了会自动补上去,加了此命令后就不会再自动补上去

  # Start the nginx container using the default command, but use custom arguments (arg1 .. argN) for that command.

  kubectl run nginx --image=nginx -- <arg1> <arg2> ... <argN>

  # Start the nginx container using a different command and custom arguments.

  kubectl run nginx --image=nginx --command -- <cmd> <arg1> ... <argN> #加上自定义的命令

  # Start the perl container to compute π to  places and print it out.

  kubectl run pi --image=perl --restart=OnFailure -- perl -Mbignum=bpi -wle 'print bpi(2000)'

  # Start the cron job to compute π to  places and print it out every  minutes.

  kubectl run pi --schedule="0/5 * * * ?" --image=perl --restart=OnFailure -- perl -Mbignum=bpi -wle 'print bpi(2000)' #创建一个定时job
使用kubectl run创建一个单跑模式的nginx容器
[root@k8smaster ~]# kubectl run nginx-deploy --image=nginx:1.14-alpine --port= --replicas= --dry-run=true

deployment.apps/nginx-deploy created (dry run) #deployment控制器下所控制的应用程序,叫做nginx-deploy
使用kubectl run创建一个nginx容器
[root@k8smaster ~]# kubectl run nginx-deploy --image=nginx:1.14-alpine --port= --replicas=

deployment.apps/nginx-deploy created

[root@k8smaster ~]# kubectl get deployment

NAME           DESIRED(期望)   CURRENT(当前)   UP-TO-DATE   AVAILABLE(可用)   AGE

nginx-deploy                                            23s
过一会儿查看显示已经可用
[root@k8smaster ~]# kubectl get deployment

NAME           DESIRED   CURRENT   UP-TO-DATE   AVAILABLE   AGE

nginx-deploy                                            2m
查看创建的pod
[root@k8smaster ~]# kubectl get pods

NAME                          READY     STATUS    RESTARTS   AGE

nginx-deploy-5b595999-vw5vt   /       Running             3m

[root@k8smaster ~]# kubectl get pods -o wide

NAME                          READY     STATUS    RESTARTS   AGE       IP           NODE

nginx-deploy-5b595999-vw5vt   /       Running             4m        10.244.2.2   k8snode2
到节点2中查看网桥可用发现启动的相应pod是连接在cni0 网桥上的
[root@k8snode2 ~]# ip addr

: lo: <LOOPBACK,UP,LOWER_UP> mtu  qdisc noqueue state UNKNOWN qlen

    link/loopback ::::: brd :::::

    inet 127.0.0.1/ scope host lo

       valid_lft forever preferred_lft forever

    inet6 ::/ scope host

       valid_lft forever preferred_lft forever

: ens33: <BROADCAST,MULTICAST,UP,LOWER_UP> mtu  qdisc pfifo_fast state UP qlen

    link/ether :0c::b3::ea brd ff:ff:ff:ff:ff:ff

    inet 192.168.10.12/ brd 192.168.10.255 scope global ens33

       valid_lft forever preferred_lft forever

    inet6 fe80::df7a:6e6c::ba25/ scope link

       valid_lft forever preferred_lft forever

: docker0: <NO-CARRIER,BROADCAST,MULTICAST,UP> mtu  qdisc noqueue state DOWN

    link/ether ::::4d: brd ff:ff:ff:ff:ff:ff

    inet 172.17.0.1/ brd 172.17.255.255 scope global docker0

       valid_lft forever preferred_lft forever

: flannel.: <BROADCAST,MULTICAST,UP,LOWER_UP> mtu  qdisc noqueue state UNKNOWN

    link/ether :d1:5f:6c::7b brd ff:ff:ff:ff:ff:ff

    inet 10.244.2.0/ scope global flannel.

       valid_lft forever preferred_lft forever

    inet6 fe80::90d1:5fff:fe6c:717b/ scope link

       valid_lft forever preferred_lft forever

: cni0: <BROADCAST,MULTICAST,UP,LOWER_UP> mtu  qdisc noqueue state UP qlen

    link/ether 0a::0a:f4:: brd ff:ff:ff:ff:ff:ff

    inet 10.244.2.1/ scope global cni0

       valid_lft forever preferred_lft forever

    inet6 fe80:::a3ff:fe46:ac7e/ scope link

       valid_lft forever preferred_lft forever

: vethadaa4f42@if3: <BROADCAST,MULTICAST,UP,LOWER_UP> mtu  qdisc noqueue master cni0 state UP

    link/ether 3e:4d:5f:db:: brd ff:ff:ff:ff:ff:ff link-netnsid

    inet6 fe80::3c4d:5fff:fedb:/ scope link

       valid_lft forever preferred_lft forever

[root@k8snode2 ~]# docker exec -it 706159bf29fc /bin/sh

/ # ifconfig

eth0      Link encap:Ethernet  HWaddr 0A::0A:F4::

          inet addr:10.244.2.2  Bcast:0.0.0.0  Mask:255.255.255.0

          UP BROADCAST RUNNING MULTICAST  MTU:  Metric:

          RX packets: errors: dropped: overruns: frame:

          TX packets: errors: dropped: overruns: carrier:

          collisions: txqueuelen:

          RX bytes: (1.1 KiB)  TX bytes: (0.0 B)

lo        Link encap:Local Loopback

          inet addr:127.0.0.1  Mask:255.0.0.0

          UP LOOPBACK RUNNING  MTU:  Metric:

          RX packets: errors: dropped: overruns: frame:

          TX packets: errors: dropped: overruns: carrier:

          collisions: txqueuelen:

          RX bytes: (0.0 B)  TX bytes: (0.0 B)

/ #
[root@k8snode2 ~]# curl 10.244.2.2

<!DOCTYPE html>

<html>

<head>

<title>Welcome to nginx!</title>

<style>

    body {

        width: 35em;

        margin:  auto;

        font-family: Tahoma, Verdana, Arial, sans-serif;

    }

</style>

</head>

<body>

<h1>Welcome to nginx!</h1>

<p>If you see this page, the nginx web server is successfully installed and

working. Further configuration is required.</p>

<p>For online documentation and support please refer to

<a href="http://nginx.org/">nginx.org</a>.<br/>

Commercial support is available at

<a href="http://nginx.com/">nginx.com</a>.</p>

<p><em>Thank you for using nginx.</em></p>

</body>

</html>

[root@k8snode2 ~]#
4、kubelet delete :使用此命令删除刚刚创建的nginx容器,会发现删除后控制器会再次启动一个pod
[root@k8smaster ~]# kubectl delete pods nginx-deploy-5b595999-vw5vt

pod "nginx-deploy-5b595999-vw5vt" deleted

[root@k8smaster ~]# kubectl get pods -o wide

NAME                          READY     STATUS              RESTARTS   AGE       IP        NODE

nginx-deploy-5b595999-kbj6j   /       ContainerCreating             17s       <none>    k8snode1

[root@k8smaster ~]# kubectl get pods -o wide

NAME                          READY     STATUS    RESTARTS   AGE       IP           NODE

nginx-deploy-5b595999-kbj6j   /       Running             2m        10.244.1.2   k8snode1
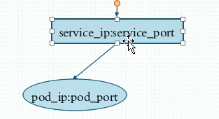
5、kubelet expose (暴露):此时会发现pod的ip已经变了,因此我们需要创建一个固定的service来提供固定的访问接口。我们使用kubelet expose命令来进行创建。(service 默认只服务于集群的内部pod客户端)
[root@k8smaster ~]# kubectl expose deployment(控制器) nginx-deploy(控制器名字) --name=nginx  --port=(service 端口) --target-port=(pod端口) --protocol=TCP

service/nginx exposed
查看和测试创建后的service
[root@k8smaster ~]# kubectl get service

NAME         TYPE        CLUSTER-IP      EXTERNAL-IP   PORT(S)   AGE

kubernetes   ClusterIP   10.96.0.1       <none>        /TCP   20h

nginx        ClusterIP   10.103.127.92   <none>        /TCP    17m

[root@k8smaster ~]# kubectl describe service nginx

Name:              nginx

Namespace:         default

Labels:            run=nginx-deploy

Annotations:       <none>

Selector:          run=nginx-deploy

Type:              ClusterIP

IP:                10.103.127.92

Port:              <unset>  /TCP

TargetPort:        /TCP

Endpoints:         10.244.1.2:

Session Affinity:  None

Events:            <none>

[root@k8smaster ~]# curl 10.103.127.92

<!DOCTYPE html>

<html>

<head>

<title>Welcome to nginx!</title>

<style>

    body {

        width: 35em;

        margin:  auto;

        font-family: Tahoma, Verdana, Arial, sans-serif;

    }

</style>

</head>

<body>

<h1>Welcome to nginx!</h1>

<p>If you see this page, the nginx web server is successfully installed and

working. Further configuration is required.</p>

<p>For online documentation and support please refer to

<a href="http://nginx.org/">nginx.org</a>.<br/>

Commercial support is available at

<a href="http://nginx.com/">nginx.com</a>.</p>

<p><em>Thank you for using nginx.</em></p>

</body>

</html>

[root@k8smaster ~]#
删除pod然后等自动重建后继续访问原来的service发现依然可以访问
[root@k8smaster ~]# kubectl get pods -o wide

NAME                          READY     STATUS    RESTARTS   AGE       IP           NODE

client                        /       Error               14m       10.244.2.3   k8snode2

nginx-deploy-5b595999-jdbtn   /       Running             31s       10.244.1.3   k8snode1

[root@k8smaster ~]# kubectl delete pods nginx-deploy-5b595999-jdbtn

pod "nginx-deploy-5b595999-jdbtn" deleted

[root@k8smaster ~]# kubectl get pods -o wide

NAME                          READY     STATUS    RESTARTS   AGE       IP           NODE

client                        /       Error               14m       10.244.2.3   k8snode2

nginx-deploy-5b595999-d9lv5   /       Running             27s       10.244.2.4   k8snode2

[root@k8smaster ~]# kubectl get service

NAME         TYPE        CLUSTER-IP      EXTERNAL-IP   PORT(S)   AGE

kubernetes   ClusterIP   10.96.0.1       <none>        /TCP   21h

nginx        ClusterIP   10.103.127.92   <none>        /TCP    42m

[root@k8smaster ~]# curl 10.103.127.92

<!DOCTYPE html>

<html>

<head>

<title>Welcome to nginx!</title>

<style>

    body {

        width: 35em;

        margin:  auto;

        font-family: Tahoma, Verdana, Arial, sans-serif;

    }

</style>

</head>

<body>

<h1>Welcome to nginx!</h1>

<p>If you see this page, the nginx web server is successfully installed and

working. Further configuration is required.</p>

<p>For online documentation and support please refer to

<a href="http://nginx.org/">nginx.org</a>.<br/>

Commercial support is available at

<a href="http://nginx.com/">nginx.com</a>.</p>

<p><em>Thank you for using nginx.</em></p>

</body>

</html>
6、关于集群dns,所有启动的pod的nameserver 地址都是指向集群中 系统名称空间 中的dns的service的
[root@k8smaster ~]# kubectl get svc --all-namespaces

NAMESPACE     NAME         TYPE        CLUSTER-IP      EXTERNAL-IP   PORT(S)         AGE

default       kubernetes   ClusterIP   10.96.0.1       <none>        /TCP         21h

default       nginx        ClusterIP   10.103.127.92   <none>        /TCP          29m

kube-system   kube-dns     ClusterIP   10.96.0.10      <none>        /UDP,/TCP   21h

[root@k8smaster ~]# kubectl describe svc kube-dns -n kube-system

Name:              kube-dns

Namespace:         kube-system

Labels:            k8s-app=kube-dns

                   kubernetes.io/cluster-service=true

                   kubernetes.io/name=KubeDNS

Annotations:       prometheus.io/port=

                   prometheus.io/scrape=true

Selector:          k8s-app=kube-dns

Type:              ClusterIP

IP:                10.96.0.10

Port:              dns  /UDP

TargetPort:        /UDP

Endpoints:         10.244.0.2:,10.244.0.3:

Port:              dns-tcp  /TCP

TargetPort:        /TCP

Endpoints:         10.244.0.2:,10.244.0.3:

Session Affinity:  None

Events:            <none>

[root@k8smaster ~]# kubectl run client --image=busybox --replicas= --replicas= -it --restart=Never

If you don't see a command prompt, try pressing enter.

/ # cat /etc/resolv.conf

nameserver 10.96.0.10

search default.svc.cluster.local svc.cluster.local cluster.local

options ndots:
7、get pod时查看label(service 与pod 之间是通过label关联的)
[root@k8smaster ~]# kubectl get pods --show-labels -o wide

NAME                          READY     STATUS    RESTARTS   AGE       IP           NODE       LABELS

nginx-deploy-5b595999-d9lv5   /       Running             15m       10.244.2.4   k8snode2   pod-template-hash=,run=nginx-deploy
8、kubectl edit #可以编辑运行的service,不过当前版本应该只可以查看不支持编辑
[root@k8smaster ~]# kubectl edit svc nginx

Edit cancelled, no changes made.
9、svc还有负载均衡的功能
[root@k8smaster ~]# kubectl run myapp --image=ikubernetes/myapp:v1 --replicas=

deployment.apps/myapp created

[root@k8smaster ~]# kubectl get pods

NAME                          READY     STATUS    RESTARTS   AGE

myapp-848b5b879b-5hg7h        /       Running             2m

myapp-848b5b879b-ptqjd        /       Running             2m

nginx-deploy-5b595999-d9lv5   /       Running             56m

[root@k8smaster ~]# kubectl get pods -o wide

NAME                          READY     STATUS    RESTARTS   AGE       IP           NODE

myapp-848b5b879b-5hg7h        /       Running             3m        10.244.2.5   k8snode2

myapp-848b5b879b-ptqjd        /       Running             3m        10.244.1.4   k8snode1

nginx-deploy-5b595999-d9lv5   /       Running             57m       10.244.2.4   k8snode2

^C[root@k8smaster ~]# kubectl get deployment -o wide -w #持续监控

NAME           DESIRED   CURRENT   UP-TO-DATE   AVAILABLE   AGE       CONTAINERS     IMAGES                 SELECTOR

myapp                                                   4m        myapp          ikubernetes/myapp:v1   run=myapp

nginx-deploy                                            4h        nginx-deploy   nginx:1.14-alpine      run=nginx-deploy
创建svc并查看转发情况
[root@k8smaster ~]# kubectl expose deployment myapp --name=myapp --port=

service/myapp exposed

[root@k8smaster ~]# kubectl get svc

NAME         TYPE        CLUSTER-IP       EXTERNAL-IP   PORT(S)   AGE

kubernetes   ClusterIP   10.96.0.1        <none>        /TCP   22h

myapp        ClusterIP   10.106.171.207   <none>        /TCP    12s

nginx        ClusterIP   10.103.127.92    <none>        /TCP    1h

[root@k8smaster ~]# kubectl describe svc myapp

Name:              myapp

Namespace:         default

Labels:            run=myapp

Annotations:       <none>

Selector:          run=myapp

Type:              ClusterIP

IP:                10.106.171.207

Port:              <unset>  /TCP

TargetPort:        /TCP

Endpoints:         10.244.1.4:,10.244.2.5:

Session Affinity:  None

Events:            <none>

[root@k8smaster ~]# curl 10.106.171.207/hostname.html

myapp-848b5b879b-ptqjd

[root@k8smaster ~]# curl 10.106.171.207/hostname.html

myapp-848b5b879b-ptqjd

[root@k8smaster ~]# curl 10.106.171.207/hostname.html

myapp-848b5b879b-ptqjd

[root@k8smaster ~]# curl 10.106.171.207/hostname.html

myapp-848b5b879b-ptqjd

[root@k8smaster ~]# curl 10.106.171.207/hostname.html

myapp-848b5b879b-ptqjd

[root@k8smaster ~]# curl 10.106.171.207/hostname.html

myapp-848b5b879b-ptqjd

[root@k8smaster ~]# curl 10.106.171.207/hostname.html

myapp-848b5b879b-5hg7h

[root@k8smaster ~]# curl 10.106.171.207/hostname.html

myapp-848b5b879b-5hg7h

[root@k8smaster ~]# curl 10.106.171.207/hostname.html

myapp-848b5b879b-5hg7h

[root@k8smaster ~]# curl 10.106.171.207/hostname.html

myapp-848b5b879b-5hg7h

[root@k8smaster ~]# curl 10.106.171.207/hostname.html
10、kubectl scale #动态改变副本数
[root@k8smaster ~]# kubectl scale --replicas= deployment myapp

deployment.extensions/myapp scaled

[root@k8smaster ~]# kubectl get pods

NAME                          READY     STATUS    RESTARTS   AGE

myapp-848b5b879b-5hg7h        /       Running             22m

myapp-848b5b879b-6fvr5        /       Running             30s

myapp-848b5b879b-dpwpj        /       Running             30s

myapp-848b5b879b-f77xt        /       Running             30s

myapp-848b5b879b-ptqjd        /       Running             22m

nginx-deploy-5b595999-d9lv5   /       Running             1h

[root@k8smaster ~]# while true; do curl 10.106.171.207/hostname.html;sleep ; done

myapp-848b5b879b-ptqjd

myapp-848b5b879b-5hg7h

myapp-848b5b879b-dpwpj

myapp-848b5b879b-6fvr5

myapp-848b5b879b-dpwpj

myapp-848b5b879b-f77xt

myapp-848b5b879b-dpwpj

myapp-848b5b879b-5hg7h

myapp-848b5b879b-dpwpj

myapp-848b5b879b-f77xt

myapp-848b5b879b-dpwpj

^C

[root@k8smaster ~]# kubectl scale --replicas= deployment myapp

deployment.extensions/myapp scaled

[root@k8smaster ~]# kubectl get pods

NAME                          READY     STATUS    RESTARTS   AGE

myapp-848b5b879b-5hg7h        /       Running             25m

myapp-848b5b879b-dpwpj        /       Running             3m

myapp-848b5b879b-ptqjd        /       Running             25m

nginx-deploy-5b595999-d9lv5   /       Running             1h

[root@k8smaster ~]# while true; do curl 10.106.171.207/hostname.html;sleep ; done

myapp-848b5b879b-ptqjd

myapp-848b5b879b-dpwpj

myapp-848b5b879b-ptqjd

myapp-848b5b879b-5hg7h

myapp-848b5b879b-ptqjd

^C
11、kubelet set image 滚动升级更新
先查看各pod以及其镜像,然后滚动更新后发现pod名称和镜像都发生了改变
[root@k8smaster ~]# kubectl get pods

NAME                          READY     STATUS    RESTARTS   AGE

myapp-848b5b879b-5hg7h        /       Running             30m

myapp-848b5b879b-dpwpj        /       Running             8m

myapp-848b5b879b-ptqjd        /       Running             30m

nginx-deploy-5b595999-d9lv5   /       Running             1h

[root@k8smaster ~]# kubectl describe myapp-848b5b879b-5hg7h

error: the server doesn't have a resource type "myapp-848b5b879b-5hg7h"

[root@k8smaster ~]# kubectl describe pod myapp-848b5b879b-5hg7h

Name:               myapp-848b5b879b-5hg7h

Namespace:          default

Priority:

PriorityClassName:  <none>

Node:               k8snode2/192.168.10.12

Start Time:         Wed,  May  :: +

Labels:             pod-template-hash=

                    run=myapp

Annotations:        <none>

Status:             Running

IP:                 10.244.2.5

Controlled By:      ReplicaSet/myapp-848b5b879b

Containers:

  myapp:

    Container ID:   docker://54587de57edd701951f1e0492504a17be62c9fa18002f5bfc58b252ed536b029

    Image:          ikubernetes/myapp:v1

    Image ID:       docker-pullable://ikubernetes/myapp@sha256:9c3dc30b5219788b2b8a4b065f548b922a34479577befb54b03330999d30d513

    Port:           <none>

    Host Port:      <none>

    State:          Running

      Started:      Wed,  May  :: +

    Ready:          True

    Restart Count:

    Environment:    <none>

    Mounts:

      /var/run/secrets/kubernetes.io/serviceaccount from default-token-jvtl7 (ro)

Conditions:

  Type              Status

  Initialized       True

  Ready             True

  ContainersReady   True

  PodScheduled      True

Volumes:

  default-token-jvtl7:

    Type:        Secret (a volume populated by a Secret)

    SecretName:  default-token-jvtl7

    Optional:    false

QoS Class:       BestEffort

Node-Selectors:  <none>

Tolerations:     node.kubernetes.io/not-ready:NoExecute for 300s

                 node.kubernetes.io/unreachable:NoExecute for 300s

Events:

  Type    Reason     Age   From               Message

  ----    ------     ----  ----               -------

  Normal  Pulling    18h   kubelet, k8snode2  pulling image "ikubernetes/myapp:v1"

  Normal  Pulled     18h   kubelet, k8snode2  Successfully pulled image "ikubernetes/myapp:v1"

  Normal  Created    18h   kubelet, k8snode2  Created container

  Normal  Started    18h   kubelet, k8snode2  Started container

  Normal  Scheduled  30m   default-scheduler  Successfully assigned default/myapp-848b5b879b-5hg7h to k8snode2

[root@k8smaster ~]# kubectl set image deployment myapp myapp=ikubernetes/myapp:v2

deployment.extensions/myapp image updated

[root@k8smaster ~]# kubectl rollout status deployment myapp #查看滚动更新状态

deployment "myapp" successfully rolled out

[root@k8smaster ~]# kubectl get pods

NAME                          READY     STATUS    RESTARTS   AGE

myapp-74c94dcb8c-ccqzs        /       Running             2m

myapp-74c94dcb8c-jmj4p        /       Running             2m

myapp-74c94dcb8c-lc2n6        /       Running             2m

nginx-deploy-5b595999-d9lv5   /       Running             1h
另启动一个shell 访问镜像,可以看到动态更新效果
[root@k8smaster ~]# while true; do curl 10.106.171.207;sleep ; done

Hello MyApp | Version: v1 | <a href="hostname.html">Pod Name</a>

Hello MyApp | Version: v1 | <a href="hostname.html">Pod Name</a>

Hello MyApp | Version: v1 | <a href="hostname.html">Pod Name</a>

Hello MyApp | Version: v1 | <a href="hostname.html">Pod Name</a>

Hello MyApp | Version: v1 | <a href="hostname.html">Pod Name</a>

Hello MyApp | Version: v1 | <a href="hostname.html">Pod Name</a>

Hello MyApp | Version: v1 | <a href="hostname.html">Pod Name</a>

Hello MyApp | Version: v1 | <a href="hostname.html">Pod Name</a>

Hello MyApp | Version: v1 | <a href="hostname.html">Pod Name</a>

Hello MyApp | Version: v1 | <a href="hostname.html">Pod Name</a>

Hello MyApp | Version: v1 | <a href="hostname.html">Pod Name</a>

Hello MyApp | Version: v1 | <a href="hostname.html">Pod Name</a>

Hello MyApp | Version: v1 | <a href="hostname.html">Pod Name</a>

Hello MyApp | Version: v1 | <a href="hostname.html">Pod Name</a>

Hello MyApp | Version: v1 | <a href="hostname.html">Pod Name</a>

Hello MyApp | Version: v1 | <a href="hostname.html">Pod Name</a>

Hello MyApp | Version: v1 | <a href="hostname.html">Pod Name</a>

Hello MyApp | Version: v1 | <a href="hostname.html">Pod Name</a>

Hello MyApp | Version: v1 | <a href="hostname.html">Pod Name</a>

Hello MyApp | Version: v1 | <a href="hostname.html">Pod Name</a>

Hello MyApp | Version: v1 | <a href="hostname.html">Pod Name</a>

Hello MyApp | Version: v1 | <a href="hostname.html">Pod Name</a>

Hello MyApp | Version: v1 | <a href="hostname.html">Pod Name</a>

Hello MyApp | Version: v1 | <a href="hostname.html">Pod Name</a>

Hello MyApp | Version: v1 | <a href="hostname.html">Pod Name</a>

Hello MyApp | Version: v1 | <a href="hostname.html">Pod Name</a>

Hello MyApp | Version: v1 | <a href="hostname.html">Pod Name</a>

Hello MyApp | Version: v2 | <a href="hostname.html">Pod Name</a>

Hello MyApp | Version: v2 | <a href="hostname.html">Pod Name</a>

Hello MyApp | Version: v2 | <a href="hostname.html">Pod Name</a>

Hello MyApp | Version: v1 | <a href="hostname.html">Pod Name</a>

Hello MyApp | Version: v1 | <a href="hostname.html">Pod Name</a>

Hello MyApp | Version: v2 | <a href="hostname.html">Pod Name</a>

Hello MyApp | Version: v1 | <a href="hostname.html">Pod Name</a>

Hello MyApp | Version: v2 | <a href="hostname.html">Pod Name</a>

Hello MyApp | Version: v2 | <a href="hostname.html">Pod Name</a>

Hello MyApp | Version: v2 | <a href="hostname.html">Pod Name</a>

Hello MyApp | Version: v2 | <a href="hostname.html">Pod Name</a>

Hello MyApp | Version: v2 | <a href="hostname.html">Pod Name</a>

Hello MyApp | Version: v2 | <a href="hostname.html">Pod Name</a>

Hello MyApp | Version: v2 | <a href="hostname.html">Pod Name</a>

Hello MyApp | Version: v2 | <a href="hostname.html">Pod Name</a>

Hello MyApp | Version: v2 | <a href="hostname.html">Pod Name</a>

Hello MyApp | Version: v2 | <a href="hostname.html">Pod Name</a>

Hello MyApp | Version: v2 | <a href="hostname.html">Pod Name</a>

Hello MyApp | Version: v2 | <a href="hostname.html">Pod Name</a>
12、kubectl rollout #版本回退(回滚)
[root@k8smaster ~]# curl 10.106.171.207

Hello MyApp | Version: v2 | <a href="hostname.html">Pod Name</a>

[root@k8smaster ~]# kubectl get pods

NAME                          READY     STATUS    RESTARTS   AGE

myapp-74c94dcb8c-8l4n7        /       Running             11s

myapp-74c94dcb8c-dzlfx        /       Running             14s

myapp-74c94dcb8c-tsd2s        /       Running             12s

nginx-deploy-5b595999-d9lv5   /       Running             1h

[root@k8smaster ~]# kubectl rollout undo deployment myapp #不加镜像版本默认回退到上一个版本

deployment.extensions/myapp

[root@k8smaster ~]# kubectl get pods

NAME                          READY     STATUS        RESTARTS   AGE

myapp-74c94dcb8c-8l4n7        /       Terminating             22s

myapp-74c94dcb8c-dzlfx        /       Terminating             25s

myapp-74c94dcb8c-tsd2s        /       Terminating             23s

myapp-848b5b879b-5k4s4        /       Running                 5s

myapp-848b5b879b-bzblz        /       Running                 3s

myapp-848b5b879b-hzbf5        /       Running                 2s

nginx-deploy-5b595999-d9lv5   /       Running                 1h

[root@k8smaster ~]# kubectl get pods

NAME                          READY     STATUS    RESTARTS   AGE

myapp-848b5b879b-5k4s4        /       Running             13s

myapp-848b5b879b-bzblz        /       Running             11s

myapp-848b5b879b-hzbf5        /       Running             10s

nginx-deploy-5b595999-d9lv5   /       Running             1h

[root@k8smaster ~]# curl 10.106.171.207

Hello MyApp | Version: v1 | <a href="hostname.html">Pod Name</a>
还可以自动扩缩容,不过需要和资源监控配合。
13、可以通过iptables -vnL查看iptables规则,可以看到service是出现在其中的。
14、通过修改svc 的type属性为NodePort 可以在外部访问到对应的pod 服务
[root@k8smaster ~]# kubectl get svc

NAME         TYPE        CLUSTER-IP       EXTERNAL-IP   PORT(S)   AGE

kubernetes   ClusterIP   10.96.0.1        <none>        /TCP   23h

myapp        ClusterIP   10.106.171.207   <none>        /TCP    50m

nginx        ClusterIP   10.103.127.92    <none>        /TCP    2h

[root@k8smaster ~]# kubectl edit svc myapp

service/myapp edited

#打开后内容如下

# Please edit the object below. Lines beginning with a '#' will be ignored,

# and an empty file will abort the edit. If an error occurs while saving this file will be

# reopened with the relevant failures.

#

apiVersion: v1

kind: Service

metadata:

  creationTimestamp: --09T08::47Z

  labels:

    run: myapp

  name: myapp

  namespace: default

  resourceVersion: ""

  selfLink: /api/v1/namespaces/default/services/myapp

  uid: 776ef2c3--11e9-be24-000c29d142be

spec:

  clusterIP: 10.106.171.207

  externalTrafficPolicy: Cluster

  ports:

  - nodePort:

    port:

    protocol: TCP

    targetPort:

  selector:

    run: myapp

  sessionAffinity: None

  type: NodePort #此处由ClusterIP改为NodePort

status:

  loadBalancer: {}

[root@k8smaster ~]# kubectl get svc

NAME         TYPE        CLUSTER-IP       EXTERNAL-IP   PORT(S)        AGE

kubernetes   ClusterIP   10.96.0.1        <none>        /TCP        23h

myapp        NodePort    10.106.171.207   <none>        :/TCP   51m

nginx        ClusterIP   10.103.127.92    <none>        /TCP         2h

[root@k8smaster ~]# curl 192.168.10.10:

Hello MyApp | Version: v1 | <a href="hostname.html">Pod Name</a>
最新文章
- 查找数据库中重复的值的数据,having的使用,count(1),sum等聚会函数
- Handler "BlockViewHandler" has a bad module "ManagedPipelineHandler" in its module list
- .Net相关
- BZOJ3898 : 打的士
- iOS杂谈-图片拉伸的实现
- BZOJ 1600
- A fatal error has been detected by the Java Runtime Environment(jdk 1.6的一个BUG)
- append appendChild appendTo区别
- Ubuntu中Eclipse安装与配置
- MVC 5 的 EF6 Code First 入门
- 通过递归方法对一个单词所有的组合进行列举(java)
- Linux怎么设置PostgreSQL远程访问
- Android应用程序基础
- 集合之HashSet(含JDK1.8源码分析)
- raid的一些简单知识
- vue 使用 proxyTable 解决跨域问题
- hdu 3033(好题,分组背包)
- drupal
- MySql频繁查询、插入数据
- 对C语言进行调试的最好方法是什么?
热门文章
- Ubuntu修改文件权限以及更换文件所有者
- 使用PHP开发HR系统(6)
- SAS学习笔记61 set和union的区别
- numpy模块之axis(转)
- GOF 的23种JAVA常用设计模式总结 01 设计模式的概念分类和功能
- 深度学习 Bottleneck layer / Bottleneck feature
- RabbitMQ实战
- Expanded, SingleChildScrollView, CustomScrollView, container, height, width
- Programming Principles and Practice Using C++ Notes2
- day26-python之封装