python mysql数据库操作
一、pymysql 模块安装(本文博客推荐:https://www.cnblogs.com/clschao/articles/10023248.html)
pip3 install pymysql
二、pymysql 方法介绍及其简单使用(增删改查:conn.commit( ))
#注:以下出现的cursor都表示游标
1、conn=pymysql.connect(host=,port=,user=,password=,database=,charset=) 连接mysql服务器
2、cursor=conn.cursor() 创建游标,如cmd中的 mysql> ,返回数据为元组
cursor=conn.cursor(cursor=pymysql.cursor.DictCursor) #创建游标,返回数据元素为字典
3、cursor.execute( "mysql语句") 执行mysql 语句, 参数为字符串类型的maysql语句,cursor是游标
4、cursor.fetchone( ) 获取一个数据
cursor.fetchmany(n ) 获取 n个数据
cursor.fetchall( ) 获取从游标位置到最后的所有的数据
5、cursor.scroll( n,'absolute') 绝对路径下游标往下跳过n条数据
cursor.scroll( n,'relative') 绝对路径下游标往下跳过n条数据
6、cursor.close( ) 关闭游标
conn.close( ) 关闭连接
import pymysql

conn=pymysql.connect(

    host='127.0.0.1',

    port=3306,

    user='root',

    password='',

    database='day03',

    charset='utf8'

) #前提先启动mysql服务器

#输出数据的时候,根据游标往后取值

cursor=conn.cursor() #创建游标 mysql>

mysql_cmd="select * from employee;" #命令语句str

cursor.execute(mysql_cmd)  #执行命令行语句

print(cursor.fetchone()) #获取一条数据

print("------------xxxx-------------")

cursor.scroll(3,'relative') #相对路径游标往下跳过条数据

print(cursor.fetchall()) #获取所有数据

cursor.scroll(3,'absolute') #绝对路径游标往下跳过条数据

print(cursor.fetchone())  #获取一条数据
一、mysql注入(登陆)
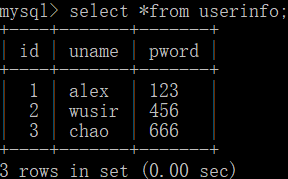
数据表单userinfo:
import pymysql #与数据库建立连接:host,post,user,password,database,charset;
conn=pymysql.connect(
host='127.0.0.1',
port=3306,
user='root',
password='',
database='day04',
charset='utf8'
) #输入需要匹配的元素
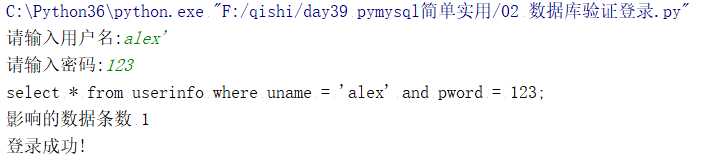
username=input("请输入用户名") #如:alex'
password=input("请输入密码") #如:123' #建立游标 mysql>
cursor=conn.cursor() #默认输出元组(( ,),( ,)...) verify="select * from userinfo where uname = '%s and pword = %s;"%(username,password) #数据类型 都是字符串char(20) print(verify) ret=cursor.execute(verify) print("影响的数据条数",ret)
if ret:
print("登录成功!")
else:
print("登录失败!!!")
cursor.close() #关闭游标
conn.close() #关闭连接
1、普通用户登陆

2、只知道账户进行登陆(bug登陆)

3、账户密码都不知,我TMD还是要登陆。(bid_bug)

总结咱们刚才说的两种sql注入的语句

#1、sql注入之:用户存在,绕过密码

chao' -- 任意字符

#2、sql注入之:用户不存在,绕过用户与密码

xxx' or 1=1 -- 任意字符
满满的bug,登陆形同虚设,解决方案提供两个;
(1):re 表达式
(2):mysql提供了数据处理机制(cursor.execute(mysl语句,[参数]))|cursor.executemany(mysl语句,[参数1,参数2...]))
仅需优化两条语句:

verify="select * from userinfo where uname = %s and pword = %s;" #数据类型  都为字符串char(20)

ret=cursor.execute(verify,[username,password])
import pymysql

#与数据库建立连接:host,post,user,password,database,charset;

conn=pymysql.connect(

    host='127.0.0.1',

    port=3306,

    user='root',

    password='',

    database='day04',

    charset='utf8'

)

#输入需要匹配的元素

username=input("请输入用户名:") #如:alex'

password=input("请输入密码:")   #如:123

#建立游标 mysql>

cursor=conn.cursor() #默认输出元组(( ,),( ,)...)

verify="select * from userinfo where uname = %s and pword = %s;" #数据类型  都为字符串char(20)

print(verify)

ret=cursor.execute(verify,[username,password])

print("影响的数据条数",ret)

if ret:

    print("登录成功!")

else:

    print("登录失败!!!")
mysql注入优化
三、增删改:conn.commit( ) 把执行的结果写入数据库 (此步骤必不可少,否则操作无效)
查操作在上面已经说完了,我们来看一下增删改,也要注意,sql语句不要自己拼接,交给excute来拼接
import pymysql

#链接

conn=pymysql.connect(host='localhost',port='',user='root',password='',database='crm',charset='utf8')

#游标

cursor=conn.cursor()

#执行sql语句

#part1

# sql='insert into userinfo(name,password) values("root","123456");'

# res=cursor.execute(sql) #执行sql语句,返回sql影响成功的行数

# print(res)

# print(cursor.lastrowid) #返回的是你插入的这条记录是到了第几条了

#part2

# sql='insert into userinfo(name,password) values(%s,%s);'

# res=cursor.execute(sql,("root","123456")) #执行sql语句,返回sql影响成功的行数

# print(res)

#还可以进行更改操作:

#res=cursor.excute("update userinfo set username='taibaisb' where id=2")

#print(res) #结果为1

#part3

sql='insert into userinfo(name,password) values(%s,%s);'

res=cursor.executemany(sql,[("root",""),("lhf",""),("eee","")]) #执行sql语句,返回sql影响成功的行数,一次插多条记录

print(res)

#上面的几步,虽然都有返回结果,也就是那个受影响的函数res,但是你去数据库里面一看,并没有保存到数据库里面,

conn.commit() #必须执行conn.commit,注意是conn,不是cursor,执行这句提交后才发现表中插入记录成功,没有这句,上面的这几步操作其实都没有成功保存。

cursor.close()

conn.close()
四、查:fetchone,fetchmany,fetchall
import pymysql

#链接

conn=pymysql.connect(host='localhost',user='root',password='',database='egon')

#游标

cursor=conn.cursor()

#执行sql语句

sql='select * from userinfo;'

rows=cursor.execute(sql) #执行sql语句,返回sql影响成功的行数rows,将结果放入一个集合,等待被查询

# cursor.scroll(3,mode='absolute') # 相对绝对位置移动

# cursor.scroll(3,mode='relative') # 相对当前位置移动

res1=cursor.fetchone()

res2=cursor.fetchone()

res3=cursor.fetchone()

res4=cursor.fetchmany(2)

res5=cursor.fetchall()

print(res1)

print(res2)

print(res3)

print(res4)

print(res5)

print('%s rows in set (0.00 sec)' %rows)

conn.commit() #提交后才发现表中插入记录成功

cursor.close()

conn.close()

'''

(1, 'root', '123456')

(2, 'root', '123456')

(3, 'root', '123456')

((4, 'root', '123456'), (5, 'root', '123456'))

((6, 'root', '123456'), (7, 'lhf', '12356'), (8, 'eee', '156'))

rows in set (0.00 sec)
'''
最新文章
- 新手学习Python时常见的错误
- iOS - 用 UIBezierPath 实现果冻效果
- BZOJ 4551: [Tjoi2016&Heoi2016]树
- asp.net mvc ClaimsIdentity 授权研究 (还是测试版 有bug)
- C# 获取wave文件信息【转】
- ASP.NET中常用的几个李天平开源公共类LTP.Common,Maticsoft.DBUtility,LtpPageControl (转)
- Entity Framework Power Tools安装和使用
- 安全测试常见的10个问题 ZT
- TSS 任务状态段
- Git新建本地分支与远程分支关联问题:git branch --set-upstream
- 邮件发送 java
- Linux环境下配置JDK,java环境
- 移动端造json假数据时的坑(转义符问题)
- Eclipse 主题
- JavaScript函数节流和函数防抖之间的区别
- June. 26th 2018, Week 26th. Tuesday
- 超哥笔记 --nginx入门(6)
- 【mmall】Guava库学习Collections
- 从零开始学习渗透Node.js应用程序
- try 、catch 、finally 、throw 测试js错误
热门文章
- CNN大战验证码
- 网上看到一份详细sql游标说明 《转载 https://www.cnblogs.com/xiongzaiqiren/p/sql-cursor.html》
- JavaScript Date 对象的异常现象-new Date('0001-01-01 00:00:00')
- MyBatis学习总结(二)——MyBatis核心配置文件与输入输出映射
- Ubuntu 安装 JDK8 的两种方式
- .NET页面导出Excel
- 从零开始学安全(十)●TCP/IP协议栈
- 详解-制作根文件系统,并使用yaffs,jffs,nfs挂载系统(2)
- python中的魔法属性
- 如何给localStorage设置一个过期时间?