安装Apache、Nginx和PHP-基于Centos7环境
使用的软件:putty或Xshell都可。
一、搭建Apache
1、编译安装
(1)、安装编译器
yum install -y gcc
(2)安装Opensll
查询官网得到OpenSSL下载网址https://www.openssl.org/source/openssl-1.1.1k.tar.gz,
使用下面指令下载安装
wget https://www.openssl.org/source/openssl-1.1.1k.tar.gz
解压压缩包
tar -zxvf openssl-1.1.1k.tar.gz
进入解压好的文件
cd opensll-1.1.1k
使用默认配置
./config --prefix=/usr/local/openssl

./config -t
安装opensll
make && make install
最后检查
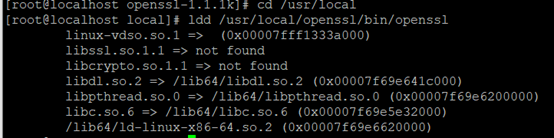
cd /usr/local
ldd /usr/local/opensll/bin/opensll
会出现下列信息
(3)安装http服务
先检查是否已经安装
rpm -qa httpd
安装httpd
yum install httpd* -y
2、测试检验
(1)使防火墙不阻挡Apache的方法
方法一:关闭防火墙(不推荐)
查看防火墙状态
systemctl status firewalld.service
关闭防火墙(下图成功)
systemctl stop firewalld.service

方法二:让防火墙认可其服务和端口
firewall-cmd --add-service=http --permanent
success
使更改生效
firewall-cmd --reload
success
让防火墙认可http、https和80/tcp
firewall-cmd --permanent --add-service=http

firewall-cmd --permanent --add-service=https

firewall-cmd --permanent --zone=public --add-port=80/tcp
再添加一个8080/tcp端口,为后面的Nginx留一个端口。
firewall-cmd --permanent --zone=public --add-port=8080/tcp
使更改生效
firewall-cmd --reload
查看防火墙开放的端口、服务。
 firewall-cmd --permanent --zone=public --list-ports

firewall-cmd --permanent --zone=public --list-services
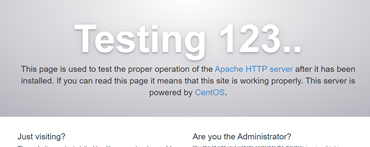
(2)测试Apache
开启httpd服务
systemctl start httpd.service
查看状态
systemctl status httpd.service
最后使用浏览器搜索自己IP地址(即:http://你的IP)可以看到Apache的基本测试页面
3、关于Apache的一些基本操作设置
systemctl stop httpd.service 停止Apache服务
systemctl restart httpd.service 重启
systemctl enable httpd.service 开机启动
systemctl disable httpd.service 开机不启动
systemctl list-unit-files | grep httpd 检查Apache是否已经安装了开机自动启动
二、搭建Nginx
1、编译安装
(1)搭建环境
安装c++编译器
yum install gcc-c++ -y
安装PCRE pcre-devel
PCRE(Perl Compatible Regular Expressions) 是一个Perl库,包括 perl 兼容的正则表达式库。nginx 的 http 模块使用 pcre 来解析正则表达式,所以需要在 linux 上安装 pcre 库,pcre-devel 是使用 pcre 开发的一个二次开发库。nginx也需要此库。
yum install -y pcre pcre-devel
zlib安装
zlib 库提供了很多种压缩和解压缩的方式, nginx 使用 zlib 对 http 包的内容进行 gzip ,所以需要在 Centos 上安装 zlib 库。
yum install -y zlib zlib-devel
OpenSLL库安装
OpenSSL 是一个强大的安全套接字层密码库,囊括主要的密码算法、常用的密钥和证书封装管理功能及 SSL 协议,并提供丰富的应用程序供测试或其它目的使用。nginx 不仅支持 http 协议,还支持 https,所以需要在 Centos 安装 OpenSSL 库。
yum install -y openssl openssl-devel
(2)下载安装
先在官网上寻找所需要的 .tar.gz压缩包 :https://nginx.org/en/download.html (这里我下载的是nginx-1.12.2.tar.gz)
wget https://nginx.org/download/nginx-1.12.2.tar.gz
命令解压
tar -zxvf nginx-1.12.2.tar.gz
进入解压好的文件
cd nginx-1.12.2
简单配置
./configure --prefix=/usr/local/nginx --with-http_ssl_module
编译安装
make&&make install
查看安装路径
whereis nginx
2、基本操作
先进入这个文件,每一次操作都要进入这个文件才能进行
cd /usr/local/nginx/sbin/
在进入这个文件夹后,可以进行一下操作
./nginx                开启nginx

./nginx -s stop            停止nginx

./nginx -s quit            退出nginx

./nginx -s reload        重启nginx
3、测试nginx
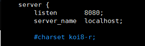
先修改nginx的使用端口为8080/tcp,不与Apache冲突
vim /usr/local/nginx/conf/nginx.conf
修改文件,将下面的80换成8080端口(此处已修改)
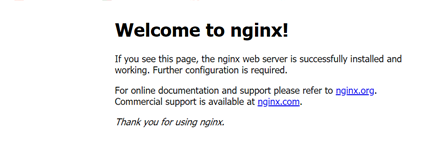
启动nginx
cd /usr/local/nginx/sbin/

./nginx
使用浏览器搜索你的IP加上端口(即:http://你的IP:8080)
三、搭建PHP
1、编译安装
先在官网上寻找所需要的 .tar.gz压缩包 :https://www.php.net/downloads(这里我下载的是php.7.4.8.tar.gz)
wget https://www.php.net/distributions/php-7.4.8.tar.gz
随后解压配置
tar -zxvf php-7.4.8.tar.gz
cd php-7.4.8/
配置
./configure --prefix=/usr/local/php -with-config-file-path=/usr/local/php/etc --enable-fpm
重点来了:在配置PHP中往往会有许多问题导致配置失败,所以在遇到某些问题时解决它然后再次配置,注意要再次配置,直到成功!!!
下面时我查找的问题与解决办法的集合,如果遇到里面没有的请找度娘!!!
(1) configure: error: Please reinstall the BZip2 distribution
yum install bzip2 bzip2-devel
(2) configure: error: Package requirements (libcurl >= 7.15.5) were not met:No package 'libcurl' found
yum install libcurl libcurl-devel -y
(3)configure: error: xslt-config not found. Please reinstall the libxslt >= 1.1.0 distribution
yum install libxslt libxslt-devel -y
(4)configure: error: Package requirements (sqlite3 > 3.7.4) were not met:
yum install sqlite-devel -y
(5)configure: error: GNU MP Library version 4.2 or greater required.
yum install gmp-devel -y
(6)configure: error: Package requirements (oniguruma) were not met: No package 'oniguruma' found
yum install oniguruma-devel -y
(7)configure: error: Please reinstall readline - I cannot find readline.h
yum install readline-devel -y
(8)configure: error: Package requirements (libpcre2-8 >= 10.30) were not met: No package 'libpcre2-8' found
wget https://ftp.pcre.org/pub/pcre/pcre2-10.34.tar.bz2

tar xjvf pcre2-10.34.tar.bz2

cd pcre2-10.34

./configure --prefix=/usr/local/pcre2 \--enable-pcre2-16 \--enable-pcre2-32 \--enable-jit \--enable-jit-sealloc

make && make install

export PKG_CONFIG_PATH=/usr/local/pcre2/lib/pkgconfig/

cd ..
(9)configure: error: DBA: Could not find necessary header file(s).
yum install gdbm-devel -y
(10)configure: error: Package requirements (libzip >= 0.11 libzip != 1.3.1 libzip != 1.7.0) were not met:No package 'libzip' found
yum remove libzip libzip-devel


wget https://hqidi.com/big/libzip-1.2.0.tar.gz


tar -zxvf libzip-1.2.0.tar.gz


cd libzip-1.2.0


./configure


make && make install

cd ..
(11)configure: error: Package requirements (libxml-2.0 >= 2.7.6) were not met: No package 'libxml-2.0' found
yum install libxml2-devel -y
(12)configure: error: Package requirements (libpng) were not met: No package 'libpng' found
yum install libpng-devel -y
(13)configure: error: Package requirements (libjpeg) were not met:No package 'libjpeg' found
yum install libjpeg-devel -y
(14)configure: error: Package requirements (freetype2) were not met:No package 'freetype2' found
yum install freetype-devel -y
(15)configure: error: Package requirements (icu-uc >= 50.1 icu-io icu-i18n) were not met:
No package 'icu-uc' found
No package 'icu-io' found
No package 'icu-i18n' found
yum install libicu-devel -y
配置成功图
编译安装
make && make install
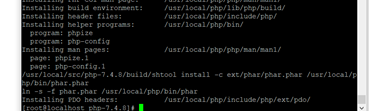
添加环境变量
export PATH=$PATH:/usr/local/php/bin
查看版本信息
php -v

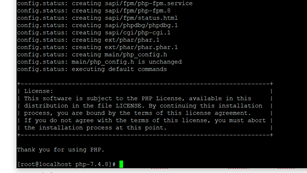
拷贝PHP初始化配置文件
cp php.ini-development /usr/local/php/php.ini

cp sapi/fpm/init.d.php-fpm /etc/init.d/php-fpm

cd /usr/local/php/etc

cp php-fpm.conf.default php-fpm.conf

chmod +x /etc/init.d/php-fpm
2、配置PHP和nginx,实现Nginx转发到PHP处理
打开nginx配置文件
vim /usr/local/nginx/conf/nginx.conf
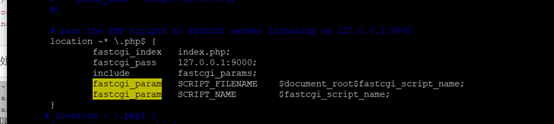
在 index.htm 后面加上 index.php
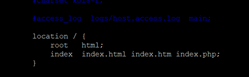
再把下面改成这样
进入编译安装的php目录并配置文件
cd /usr/local/php

cp etc/php-fpm.d/www.conf{.default,}
创建www-data用户组
groupadd www-data
创建www-data用户
useradd -g www-data -s /sbin/nologin www-data
设置PHP www的用户和用户组为www-data(将nobody改成www-data)
vim etc/php-fpm.d/www.conf

配置php-fpm的pid
vim etc/php-fpm.conf
将pid = 后面的地址改成这样

3、测试
rm /usr/local/nginx/html/index.html 删除Nginx的默认首页面
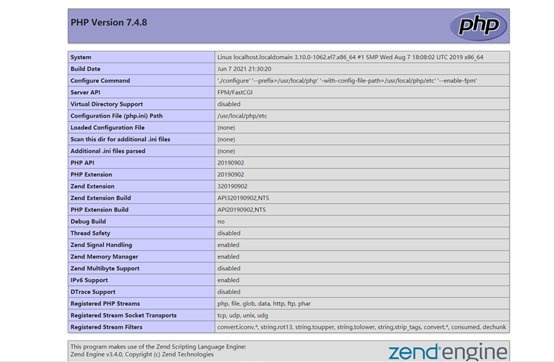
echo "<?php phpinfo(); ?>" >> /usr/local/nginx/html/index.php 在Nginx的 html文件下创建并写入这个文件
/usr/local/nginx/sbin/nginx 启动Nginx
/usr/local/php/sbin/php-fpm 启动PHP
使用浏览器搜索你的IP加端口(即:http://你的IP:8080)
到此就结束了,本随笔只适用于学习和讨论,是小枫用于学习检查和分享的。不做其他用途!!!
谢谢大家!
最新文章
- virtualBox安装Centos7之后
- Spring(Model)
- NetMQ(四): 推拉模式 Push-Pull
- CMS模板引擎:XHtmlAction
- 数据库连接池:Druid
- Sort merge join、Nested loops、Hash join(三种连接类型)
- swoole 教程
- CODEVS1380 没有上司的舞会 (树形DP)
- 有关按位DP
- EBS OAF开发中实现參数式弹出窗体
- 头文件intrins.h
- svn自动备份并上传到ftp
- webAppbuilder微件使用教程2 常用微件介绍
- 华为C8812E 手机logcat不出日志解决方案
- C语言程序设计第三次作业--选择结构(1)
- 用python代码模拟登录网站
- Linq指令执行分析
- C# 使用PrintDocument类打印标签
- SQL 本地数据库
- Smooth Face Tracking with OpenCV
热门文章
- window 10 删除文件夹需要管理员权限
- 开箱即用的Vite-Vue3工程化模板
- C++逆向分析----虚函数与多层继承
- python模块导入原理
- GPUImage移植总结
- 如何理解PaaS平台,与SaaS、IaaS有什么区别?
- Javac·编码GBK的不可映射字符
- Journey to the future begins
- [bug] java.sql.SQLException: Unknown initial character set index '255' received from server. Initial cl...
- Linux系统(控制节点)部署环境