第五章 Gateway--服务网关
欧克 ,我接着上篇第四章 Sentinel–服务容错,继续写下去 开始网关之旅
5.1网关简介
大家都都知道在微服务架构中,一个系统会被拆分为很多个微服务。那么作为客户端要如何去调用
这么多的微服务呢?如果没有网关的存在,我们只能在客户端记录每个微服务的地址,然后分别去
用。
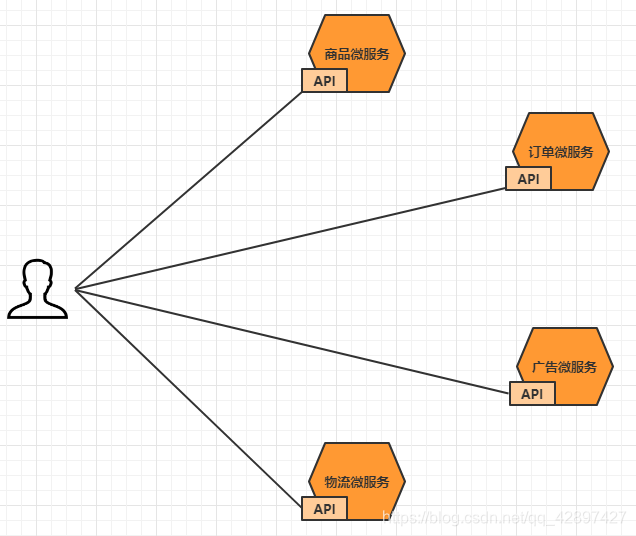
这样的架构,会存在着诸多的问题:
- 客户端多次请求不同的微服务,增加客户端代码或配置编写的复杂性
- 认证复杂,每个服务都需要独立认证。
- 存在跨域请求,在一定场景下处理相对复杂。
上面的这些问题可以借助API网关来解决。
所谓的API网关,就是指系统的统一入口,它封装了应用程序的内部结构,为客户端提供统一服务,一些与业务本身功能无关的公共逻辑可以在这里实现,诸如认证、鉴权、监控、路由转发等等。
添加上API网关之后,系统的架构图变成了如下所示:
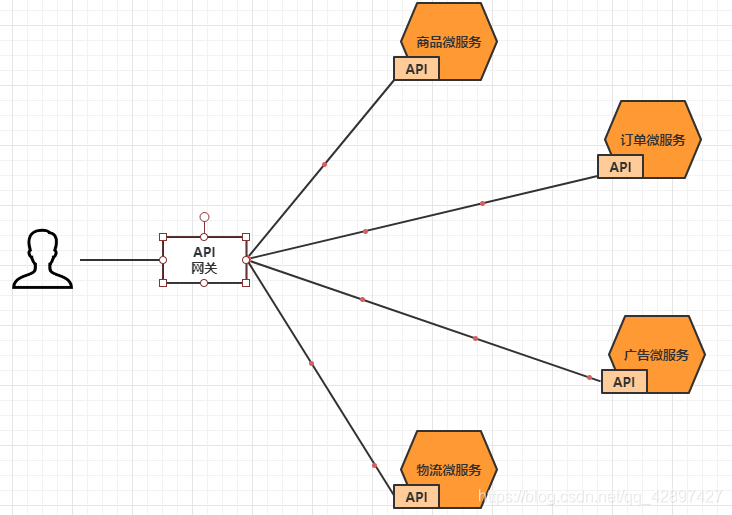
我们也可以观察下,我们现在的整体架构图:
在业界比较流行的网关,有下面这些:
Ngnix+lua
使用nginx的反向代理和负载均衡可实现对api服务器的负载均衡及高可用
lua是一种脚本语言,可以来编写一些简单的逻辑, nginx支持lua脚本Kong
基于Nginx+Lua开发,性能高,稳定,有多个可用的插件(限流、鉴权等等)可以开箱即用。问题:
只支持Http协议;二次开发,自由扩展困难;提供管理API,缺乏更易用的管控、配置方式。Zuul Netflix 开源的网关,功能丰富,使用JAVA开发,易于二次开发 问题:缺乏管控,无法动态配
置;依赖组件较多;处理Http请求依赖的是Web容器,性能不如NginxSpring Cloud Gateway
Spring公司为了替换Zuul而开发的网关服务,将在下面具体介绍。
注意:SpringCloud alibaba技术栈中并没有提供自己的网关,我们可以采用Spring Cloud Gateway来做网关
5.2 Gateway简介
Spring Cloud Gateway是Spring公司基于Spring 5.0,Spring Boot 2.0 和 Project Reactor 等技术开发的网关,它旨在为微服务架构提供一种简单有效的统一的 API 路由管理方式。它的目标是替代
Netflix Zuul,其不仅提供统一的路由方式,并且基于 Filter 链的方式提供了网关基本的功能,例如:安全,监控和限流。
优点:
- 性能强劲:是第一代网关Zuul的1.6倍
- 功能强大:内置了很多实用的功能,例如转发、监控、限流等
- 设计优雅,容易扩展
缺点:
- 其实现依赖Netty与WebFlux,不是传统的Servlet编程模型,学习成本高
- 不能将其部署在Tomcat、Jetty等Servlet容器里,只能打成jar包执行
- 需要Spring Boot 2.0及以上的版本,才支持
5.3 Gateway快速入门
要求: 通过浏览器访问api网关,然后通过网关将请求转发到商品微服务
5.3.1 基础版
第1步:创建一个api-gateway 的模块,导入相关依赖
<?xml version="1.0" encoding="UTF-8"?>

<project xmlns="http://maven.apache.org/POM/4.0.0"

         xmlns:xsi="http://www.w3.org/2001/XMLSchema-instance"

         xsi:schemaLocation="http://maven.apache.org/POM/4.0.0 http://maven.apache.org/xsd/maven-4.0.0.xsd">

    <parent>

        <artifactId>springcloud-alibaba</artifactId>

        <groupId>com.spiritmark.cloud</groupId>

        <version>1.0-SNAPSHOT</version>

    </parent>

    <modelVersion>4.0.0</modelVersion>

<artifactId>api-gateway</artifactId>

    <dependencies>

        <!-- gateway 网关-->

        <dependency>

            <groupId>org.springframework.cloud</groupId>

            <artifactId>spring-cloud-starter-gateway</artifactId>

        </dependency>

    </dependencies>

</project>
第2步: 创建主类
@SpringBootApplication

public class GatewayApplication {

    public static void main(String[] args) {

        SpringApplication.run(GatewayApplication.class, args);

    }

}
第3步: 添加配置文件
server:

  port: 7000

spring:

  application:

    name: api-gateway

  cloud:

    gateway:

      routes: # 路由数组[路由 就是指定当请求满足什么条件的时候转到哪个微服务]

        - id: product_route # 当前路由的标识, 要求唯一

          uri: http://localhost:8081 # 请求要转发到的地址

          order: 1 # 路由的优先级,数字越小级别越高

          predicates: # 断言(就是路由转发要满足的条件)

            - Path=/product-serv/** # 当请求路径满足Path指定的规则时,才进行路由转发

          filters: # 过滤器,请求在传递过程中可以通过过滤器对其进行一定的修改

            - StripPrefix=1 # 转发之前去掉1层路径
第4步: 启动项目, 并通过网关去访问微服务
5.3.2 增强版
现在在配置文件中写死了转发路径的地址, 前面我们已经分析过地址写死带来的问题, 接下来我们从注册中心获取此地址。
  <dependency>

            <groupId>com.alibaba.cloud</groupId>

            <artifactId>spring-cloud-starter-alibaba-nacos-discovery</artifactId>

        </dependency>
第2步:在主类上添加注解
import org.springframework.boot.SpringApplication;

import org.springframework.boot.autoconfigure.SpringBootApplication;

import org.springframework.cloud.client.discovery.EnableDiscoveryClient;

@SpringBootApplication

@EnableDiscoveryClient

public class ApiGatewayApplication {

    public static void main(String[] args) {

        SpringApplication.run(ApiGatewayApplication.class);

    }

}
第3步:修改配置文件
server:

  port: 7000

spring:

  application:

    name: api-gateway

  cloud:

    nacos:

      discovery:

        server-addr: 127.0.0.1:8848

    gateway:

      enabled: true

      routes:

        - id: product_route

          uri: lb://service-product # lb指的是从nacos中按照名称获取微服务,并遵循负载均衡策略

          predicates:

            - Path=/product-serve/**

          filters:

            - StripPrefix=1
第4步:测试

5.3.3 简写版
第1步: 去掉关于路由的配置
server:

  port: 7000

spring:

  application:

    name: api-gateway

  cloud:

    nacos:

      discovery:

        server-addr: 127.0.0.1:8848

    gateway:

      discovery:

        locator:

          enabled: true
第2步: 启动项目,并通过网关去访问微服务
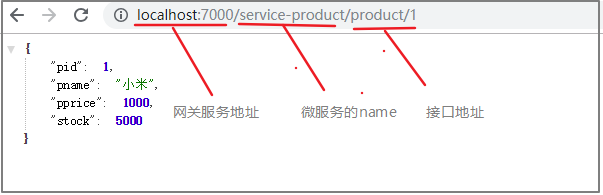
这时候,就发现只要按照网关地址/微服务/接口的格式去访问,就可以得到成功响应。
5.4 Gateway核心架构
5.4.1 基本概念
路由(Route) 是 gateway 中最基本的组件之一,表示一个具体的路由信息载体。主要定义了下面的几个
信息:
- id,路由标识符,区别于其他 Route
- uri,路由指向的目的地 uri,即客户端请求最终被转发到的微服务。
- order,用于多个 Route 之间的排序,数值越小排序越靠前,匹配优先级越高。
- predicate,断言的作用是进行条件判断,只有断言都返回真,才会真正的执行路由。
**filter**,过滤器用于修改请求和响应信息。
5.4.2 执行流程
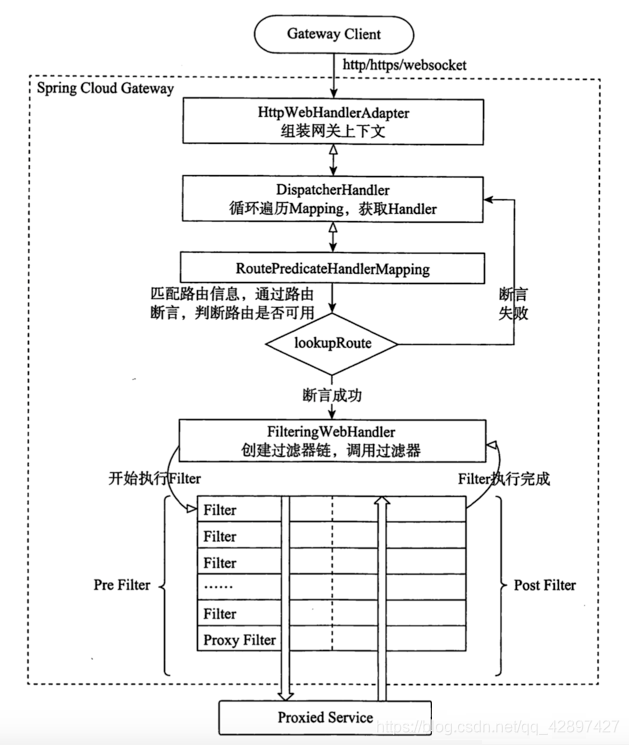
执行流程大体如下:
- Gateway Client向Gateway Server发送请求
- 请求首先会被HttpWebHandlerAdapter进行提取组装成网关上下文
- 然后网关的上下文会传递到DispatcherHandler,它负责将请求分发给
RoutePredicateHandlerMapping - RoutePredicateHandlerMapping负责路由查找,并根据路由断言判断路由是否可用
- 如果过断言成功,由FilteringWebHandler创建过滤器链并调用
- 请求会一次经过PreFilter–微服务–PostFilter的方法,最终返回响应
5.5 断言
Predicate(断言, 谓词) 用于进行条件判断,只有断言都返回真,才会真正的执行路由。
断言就是说: 在 什么条件下 才能进行路由转发
5.5.1 内置路由断言工厂
SpringCloud Gateway包括许多内置的断言工厂,所有这些断言都与HTTP请求的不同属性匹配。具体如下:
- 基于Datetime类型的断言工厂
此类型的断言根据时间做判断,主要有三个:
AfterRoutePredicateFactory: 接收一个日期参数,判断请求日期是否晚于指定日期BeforeRoutePredicateFactory: 接收一个日期参数,判断请求日期是否早于指定日期BetweenRoutePredicateFactory: 接收两个日期参数,判断请求日期是否在指定时间段内
-After=2019-12-31T23:59:59.789+08:00[Asia/Shanghai]
基于远程地址的断言工厂 RemoteAddrRoutePredicateFactory
接收一个IP地址段,判断请求主机地址是否在地址段中
-RemoteAddr=192.168.1.1/24
- 基于Cookie的断言工厂
CookieRoutePredicateFactory:接收两个参数,cookie 名字和一个正则表达式。 判断请求
cookie是否具有给定名称且值与正则表达式匹配。
-Cookie=chocolate, ch.
- 基于Header的断言工厂
HeaderRoutePredicateFactory:接收两个参数,标题名称和正则表达式。 判断请求Header是否
具有给定名称且值与正则表达式匹配。
-Header=X-Request-Id, \d+
- 基于Host的断言工厂
HostRoutePredicateFactory:接收一个参数,主机名模式。判断请求的Host是否满足匹配规则。
-Host=**.testhost.org
- 基于Method请求方法的断言工厂
MethodRoutePredicateFactory:接收一个参数,判断请求类型是否跟指定的类型匹配。
-Method=GET
- 基于Path请求路径的断言工厂
PathRoutePredicateFactory:接收一个参数,判断请求的URI部分是否满足路径规则。
-Path=/foo/{segment}
- 基于Query请求参数的断言工厂
QueryRoutePredicateFactory :接收两个参数,请求param和正则表达式, 判断请求参数是否具
有给定名称且值与正则表达式匹配。
-Query=baz, ba.
基于路由权重的断言工厂
WeightRoutePredicateFactory:接收一个[组名,权重], 然后对于同一个组内的路由按照权重转发
routes:
-id: weight_route1 uri: host1 predicates:
-Path=/product/**
-Weight=group3, 1
-id: weight_route2 uri: host2 predicates:
-Path=/product/**
-Weight= group3, 9
内置路由断言工厂的使用
接下来我们验证几个内置断言的使用:
server:

  port: 7000

spring:

  application:

    name: api-gateway

  cloud:

    nacos:

      discovery:

        server-addr: 127.0.0.1:8848

    gateway:

      discovery:

        locator:

          enabled: true

      routes:

        - id: product_route

          uri: lb://service-product

          predicates:

            - Path=/product-serv/**

            - Before=2020-03-28T00:00:00.000+08:00  #限制请求时间在2019-03-28之前

            - Method=POST #限制请求方式为POST

          filters:

            - StripPrefix=1
5.5.2 自定义路由断言工厂
条件 :我们来设定一个场景: 假设我们的应用仅仅让age在(min,max)之间的人来访问。
server:

  port: 7000

spring:

  application:

    name: api-gateway

  cloud:

    nacos:

      discovery:

        server-addr: 127.0.0.1:8848

    gateway:

      discovery:

        locator:

          enabled: true

      routes:

        - id: product-route

          uri: lb://service-product

          predicates:

            - Path=/product-serv/**

            - Age=18,60 #

          filters:

            - StripPrefix=1
第2步:自定义一个断言工厂, 实现断言方法
package com.spiritmark.predicates;

import lombok.Data;

import lombok.NoArgsConstructor;

import org.apache.commons.lang3.StringUtils;

import org.springframework.cloud.gateway.handler.predicate.AbstractRoutePredicateFactory;

import org.springframework.stereotype.Component;

import org.springframework.web.server.ServerWebExchange;

import java.util.Arrays;

import java.util.List;

import java.util.function.Predicate;

//这是一个自定义的路由断言工厂类,要求有两个

//1 名字必须是 配置+RoutePredicateFactory

//2 必须继承AbstractRoutePredicateFactory<配置类>

@Component

public class AgeRoutePredicateFactory extends AbstractRoutePredicateFactory<AgeRoutePredicateFactory.Config> {

    //构造函数

    public AgeRoutePredicateFactory() {

        super(AgeRoutePredicateFactory.Config.class);

    }

    //读取配置文件的中参数值 给他赋值到配置类中的属性上

    public List<String> shortcutFieldOrder() {

        //这个位置的顺序必须跟配置文件中的值的顺序对应

        return Arrays.asList("minAge", "maxAge");

    }

    //断言逻辑

    public Predicate<ServerWebExchange> apply(AgeRoutePredicateFactory.Config config) {

        return new Predicate<ServerWebExchange>() {

            @Override

            public boolean test(ServerWebExchange serverWebExchange) {

                //1 接收前台传入的age参数

                String ageStr = serverWebExchange.getRequest().getQueryParams().getFirst("age");

                //2 先判断是否为空

                if (StringUtils.isNotEmpty(ageStr)) {

                    //3 如果不为空,再进行路由逻辑判断

                    int age = Integer.parseInt(ageStr);

                    if (age < config.getMaxAge() && age > config.getMinAge()) {

                        return true;

                    } else {

                        return false;

                    }

                }

                return false;

            }

        };

    }

    //配置类,用于接收配置文件中的对应参数

    @Data

    @NoArgsConstructor

    public static class Config {

        private int minAge;//18

        private int maxAge;//60

    }

}
第4步:启动测试
#测试发现当age在(20,60)可以访问,其它范围不能访问
http://localhost:7000/product-serv/product/1?age=30
http://localhost:7000/product-serv/product/1?age=10
5.6 过滤器
三个知识点:
- 1 作用: 过滤器就是在请求的传递过程中,对请求和响应做一些手脚
- 2 生命周期: Pre Post
- 3 分类: 局部过滤器(作用在某一个路由上) 全局过滤器(作用全部路由上)
在Gateway中, Filter的生命周期只有两个:“pre” 和 “post”。
PRE: 这种过滤器在请求被路由之前调用。我们可利用这种过滤器实现身份验证、在集群中选择请求的微服务、记录调试信息等。- POST: 这种过滤器在路由到微服务以后执行。这种过滤器可用来为响应添加标准的HTTP
Header、收集统计信息和指标、将响应从微服务发送给客户端等。
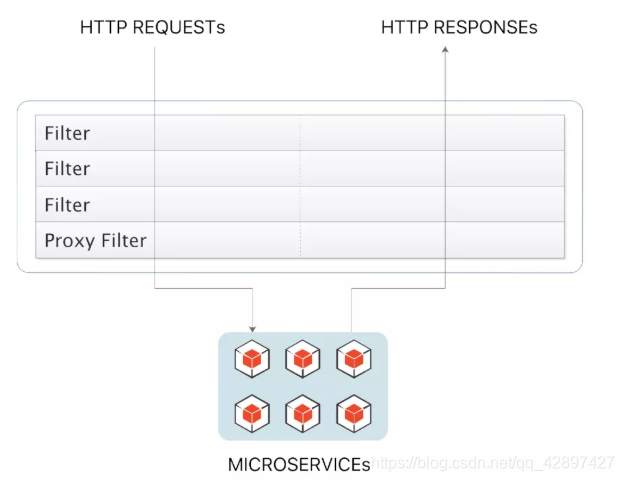
Gateway 的Filter从作用范围可分为两种: GatewayFilter与GlobalFilter。
- GatewayFilter:应用到单个路由或者一个分组的路由上。
- GlobalFilter:应用到所有的路由上。
5.6.1 局部过滤器
局部过滤器是针对单个路由的过滤器。
5.6.1.1 内置局部过滤器
在SpringCloud Gateway中内置了很多不同类型的网关路由过滤器。具体如下:
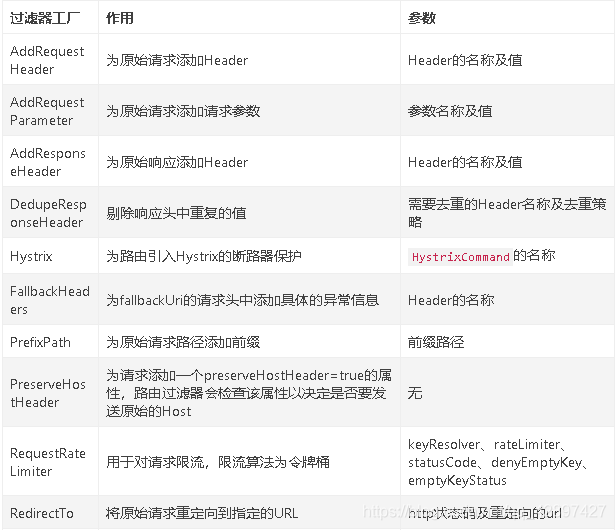
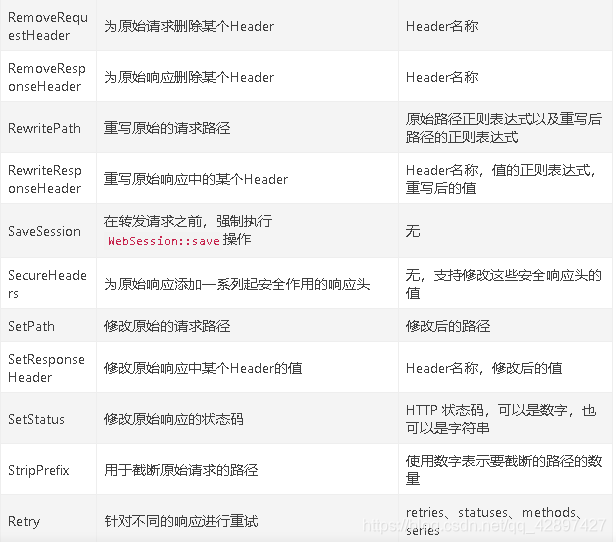
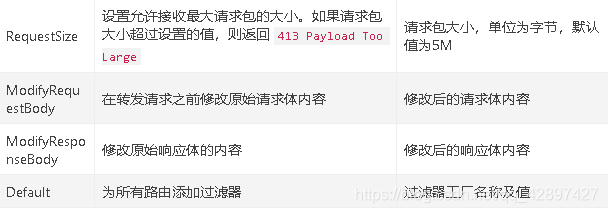
内置局部过滤器的使用
server:

  port: 7000

spring:

  application:

    name: api-gateway

  cloud:

    nacos:

      discovery:

        server-addr: 127.0.0.1:8848

    gateway:

      discovery:

        locator:

          enabled: true

      routes:

        - id: product-route

          uri: lb://service-product

          predicates:

            - Path=/product-serv/**

          filters:

            - StripPrefix=1

            - SetStatus=2000 # 修改返回状态
5.6.1.2 自定义局部过滤器
第1步:在配置文件中,添加一个Log的过滤器配置
server:

  port: 7000

spring:

  application:

    name: gateway

  cloud:

    nacos:

      discovery:

        server-addr: 127.0.0.1:8848

    gateway:

      discovery:

        locator:

          enabled: true

      routes:

        - id: consumer

          uri: lb://consumer

          predicates:

            - Path=/consumer-serv/**

          filters:

            - StripPrefix=1

            - Log=true,false # 修改返回状态
第2步:自定义一个过滤器工厂,实现方法
package com.spiritmark.filters;

import lombok.Data;

import lombok.NoArgsConstructor;

import org.springframework.cloud.gateway.filter.GatewayFilter;

import org.springframework.cloud.gateway.filter.GatewayFilterChain;

import org.springframework.cloud.gateway.filter.factory.AbstractGatewayFilterFactory;

import org.springframework.stereotype.Component;

import org.springframework.web.server.ServerWebExchange;

import reactor.core.publisher.Mono;

import java.util.Arrays;

import java.util.List;

//自定义局部过滤器

//@Component

public class LogGatewayFilterFactory

        extends AbstractGatewayFilterFactory<LogGatewayFilterFactory.Config> {

    //构造函数

    public LogGatewayFilterFactory() {

        super(LogGatewayFilterFactory.Config.class);

    }

    //读取配置文件中的参数 赋值到 配置类中

    @Override

    public List<String> shortcutFieldOrder() {

        return Arrays.asList("consoleLog", "cacheLog");

    }

    //过滤器逻辑

    @Override

    public GatewayFilter apply(LogGatewayFilterFactory.Config config) {

        return new GatewayFilter() {

            @Override

            public Mono<Void> filter(ServerWebExchange exchange, GatewayFilterChain chain) {

                if (config.isCacheLog()) {

                    System.out.println("cacheLog已经开启了....");

                }

                if (config.isConsoleLog()) {

                    System.out.println("consoleLog已经开启了....");

                }

                return chain.filter(exchange);

            }

        };

    }

    //配置类 接收配置参数

    @Data

    @NoArgsConstructor

    public static class Config {

        private boolean consoleLog;

        private boolean cacheLog;

    }

}
第3步:启动测试
5.6.2 全局过滤器
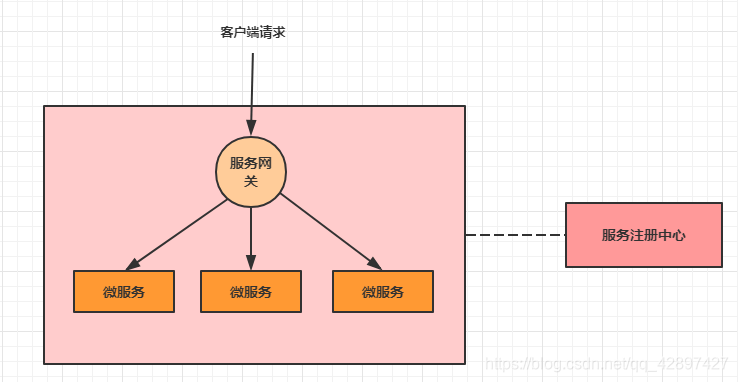
全局过滤器作用于所有路由, 无需配置。通过全局过滤器可以实现对权限的统一校验,安全性验证等功能。
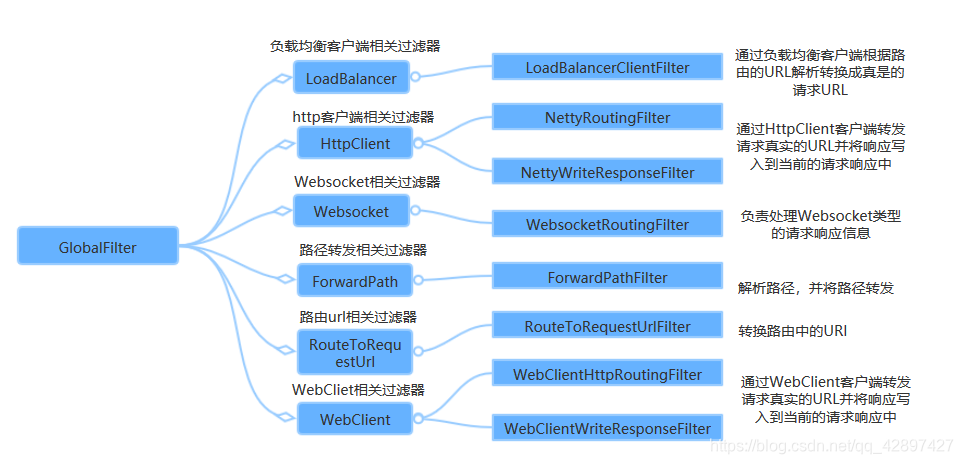
5.6.2.1 内置全局过滤器
SpringCloud Gateway 内部也是通过一系列的内置全局过滤器对整个路由转发进行处理如下:
5.6.2.2 自定义全局过滤器
内置的过滤器已经可以完成大部分的功能,但是对于企业开发的一些业务功能处理,还是需要我们
自己编写过滤器来实现的,那么我们一起通过代码的形式自定义一个过滤器,去完成统一的权限校验。
开发中的鉴权逻辑:
- 当客户端第一次请求服务时,服务端对用户进行信息认证(登录)
- 认证通过,将用户信息进行加密形成token,返回给客户端,作为登录凭证
- 以后每次请求,客户端都携带认证的token
- 服务端对token进行解密,判断是否有效。
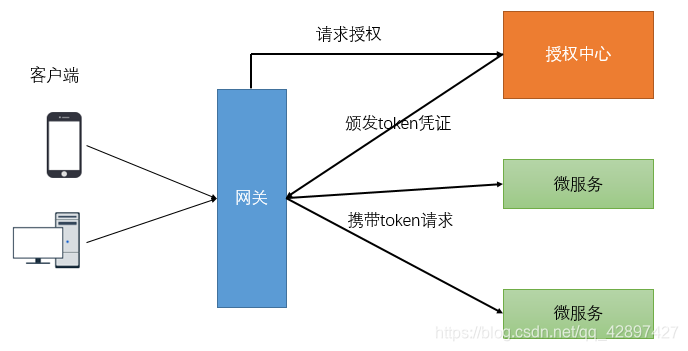
如上图,对于验证用户是否已经登录鉴权的过程可以在网关统一检验。
检验的标准就是请求中是否携带token凭证以及token的正确性。
下面的我们自定义一个GlobalFilter,去校验所有请求的请求参数中是否包含“token”,如何不包含请求参数“token”则不转发路由,否则执行正常的逻辑。
package com.spiritmark.filters;

import org.apache.commons.lang3.StringUtils;

import org.springframework.cloud.gateway.filter.GatewayFilterChain;

import org.springframework.cloud.gateway.filter.GlobalFilter;

import org.springframework.core.Ordered;

import org.springframework.http.HttpStatus;

import org.springframework.stereotype.Component;

import org.springframework.web.server.ServerWebExchange;

import reactor.core.publisher.Mono;

//自定义全局过滤器需要实现GlobalFilter和Ordered接口

@Component

public class AuthGlobalFilter implements GlobalFilter, Ordered {

    //完成判断逻辑

    @Override

    public Mono<Void> filter(ServerWebExchange exchange, GatewayFilterChain chain) {

        String token = exchange.getRequest().getQueryParams().getFirst("token");

        if (!StringUtils.equals(token, "admin")) {

            System.out.println("鉴权失败");

            exchange.getResponse().setStatusCode(HttpStatus.UNAUTHORIZED);

            return exchange.getResponse().setComplete();

        }

        //调用chain.filter继续向下游执行

        return chain.filter(exchange);

    }

    //顺序,数值越小,优先级越高

    @Override

    public int getOrder() {

        return 0;

    }

}
5.7 网关限流
网关是所有请求的公共入口,所以可以在网关进行限流,而且限流的方式也很多,我们本次采用前面学过的Sentinel组件来实现网关的限流。Sentinel支持对SpringCloud Gateway、Zuul等主流网关进行限流。
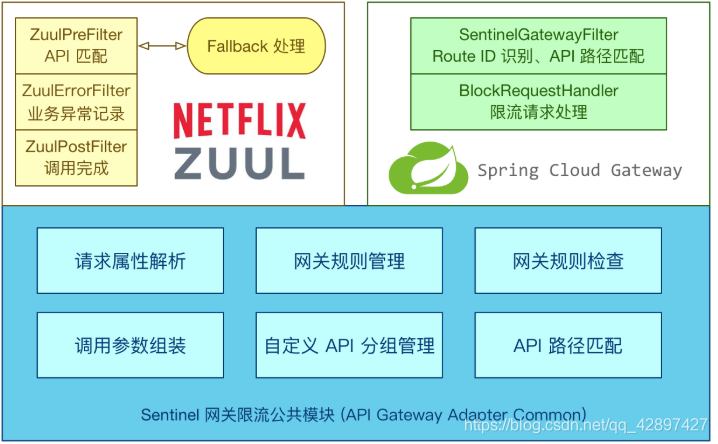
从1.6.0版本开始,Sentinel提供了SpringCloud Gateway的适配模块,可以提供两种资源维度的限流:
- route维度:即在Spring配置文件中配置的路由条目,资源名为对应的routeId
- 自定义API维度:用户可以利用Sentinel提供的API来自定义一些API分组
1 导入依赖
  <dependency>

            <groupId>com.alibaba.csp</groupId>

            <artifactId>sentinel-spring-cloud-gateway-adapter</artifactId>

        </dependency>
2 编写配置类
基于Sentinel 的Gateway限流是通过其提供的Filter来完成的,使用时只需注入对应的
SentinelGatewayFilter实例以及 SentinelGatewayBlockExceptionHandler 实例即可。
import com.alibaba.csp.sentinel.adapter.gateway.common.SentinelGatewayConstants;

import com.alibaba.csp.sentinel.adapter.gateway.common.api.ApiDefinition;

import com.alibaba.csp.sentinel.adapter.gateway.common.api.ApiPathPredicateItem;

import com.alibaba.csp.sentinel.adapter.gateway.common.api.ApiPredicateItem;

import com.alibaba.csp.sentinel.adapter.gateway.common.api.GatewayApiDefinitionManager;

import com.alibaba.csp.sentinel.adapter.gateway.common.rule.GatewayFlowRule;

import com.alibaba.csp.sentinel.adapter.gateway.common.rule.GatewayRuleManager;

import com.alibaba.csp.sentinel.adapter.gateway.sc.SentinelGatewayFilter;

import com.alibaba.csp.sentinel.adapter.gateway.sc.callback.BlockRequestHandler;

import com.alibaba.csp.sentinel.adapter.gateway.sc.callback.GatewayCallbackManager;

import com.alibaba.csp.sentinel.adapter.gateway.sc.exception.SentinelGatewayBlockExceptionHandler;

import org.springframework.beans.factory.ObjectProvider;

import org.springframework.cloud.gateway.filter.GlobalFilter;

import org.springframework.context.annotation.Bean;

import org.springframework.context.annotation.Configuration;

import org.springframework.core.Ordered;

import org.springframework.core.annotation.Order;

import org.springframework.http.HttpStatus;

import org.springframework.http.MediaType;

import org.springframework.http.codec.ServerCodecConfigurer;

import org.springframework.web.reactive.function.BodyInserters;

import org.springframework.web.reactive.function.server.ServerResponse;

import org.springframework.web.reactive.result.view.ViewResolver;

import org.springframework.web.server.ServerWebExchange;

import reactor.core.publisher.Mono;

import javax.annotation.PostConstruct;

import java.util.*;

@Configuration

public class GatewayConfiguration {

    private final List<ViewResolver> viewResolvers;

    private final ServerCodecConfigurer serverCodecConfigurer;

    public GatewayConfiguration(ObjectProvider<List<ViewResolver>> viewResolversProvider,

                                ServerCodecConfigurer serverCodecConfigurer) {

        this.viewResolvers = viewResolversProvider.getIfAvailable(Collections::emptyList);

        this.serverCodecConfigurer = serverCodecConfigurer;

    }

    // 初始化一个限流的过滤器

    @Bean

    @Order(Ordered.HIGHEST_PRECEDENCE)

    public GlobalFilter sentinelGatewayFilter() {

        return new SentinelGatewayFilter();

    }

    // 配置初始化的限流参数

    @PostConstruct

    public void initGatewayRules() {

     Set<GatewayFlowRule> rules = new HashSet<>();

        rules.add(

                new GatewayFlowRule("product_route") //资源名称,对应路由id

                        .setCount(1) // 限流阈值

                        .setIntervalSec(1) // 统计时间窗口,单位是秒,默认是 1 秒

        );

        GatewayRuleManager.loadRules(rules);

    }

    // 配置限流的异常处理器

    @Bean

    @Order(Ordered.HIGHEST_PRECEDENCE)

    public SentinelGatewayBlockExceptionHandler sentinelGatewayBlockExceptionHandler() {

        return new SentinelGatewayBlockExceptionHandler(viewResolvers, serverCodecConfigurer);

    }

    // 自定义限流异常页面

    @PostConstruct

    public void initBlockHandlers() {

        BlockRequestHandler blockRequestHandler = new BlockRequestHandler() {

            public Mono<ServerResponse> handleRequest(ServerWebExchange serverWebExchange, Throwable throwable) {

                Map map = new HashMap<>();

                map.put("code", 0);

                map.put("message", "接口被限流了");

                return ServerResponse.status(HttpStatus.OK).

                        contentType(MediaType.APPLICATION_JSON_UTF8).

                        body(BodyInserters.fromObject(map));

            }

        };

        GatewayCallbackManager.setBlockHandler(blockRequestHandler);

    }

}
3 测试
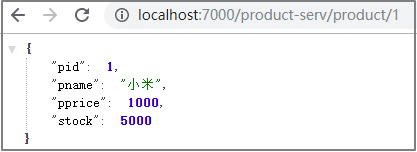
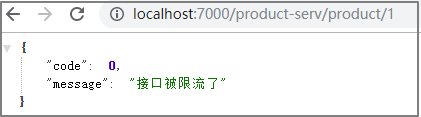
在一秒钟内多次访问http://localhost:7000/product-serv/product/1就可以看到限流启作用了。
4 自定义API分组
自定义API分组是一种更细粒度的限流规则定义
    @PostConstruct

    public void initGatewayRules() {

        Set<GatewayFlowRule> rules = new HashSet<>();

        rules.add(new GatewayFlowRule("product_api1").setCount(1).setIntervalSec(1));

        rules.add(new GatewayFlowRule("product_api2").setCount(1).setIntervalSec(1));

        GatewayRuleManager.loadRules(rules);

    }

 //自定义API分组

    @PostConstruct

    private void initCustomizedApis() {

        Set<ApiDefinition> definitions = new HashSet<>();

        ApiDefinition api1 = new ApiDefinition("product_api1")

                .setPredicateItems(new HashSet<ApiPredicateItem>() {{

                    // 以/product-serv/product/api1 开头的请求

                    add(new ApiPathPredicateItem().setPattern("/product-serv/product/api1/**").

                            setMatchStrategy(SentinelGatewayConstants.URL_MATCH_STRATEGY_PREFIX));

                }});

        ApiDefinition api2 = new ApiDefinition("product_api2")

                .setPredicateItems(new HashSet<ApiPredicateItem>() {{

                    // 以/product-serv/product/api2/demo1 完成的url路径匹配

                    add(new ApiPathPredicateItem().setPattern("/product-serv/product/api2/demo1"));

                }});

        definitions.add(api1);

        definitions.add(api2);

        GatewayApiDefinitionManager.loadApiDefinitions(definitions);

    }
网关 到这里 就告一段落,想要更加深入的学习可以持续关注 Gateway的动态
最新文章
- ASP.NET MVC Model绑定(一)
- Android学习笔记——MixLayout
- httpd服务安装
- 源码阅读笔记 - 1 MSVC2015中的std::sort
- ADO.NET 3.5高级编程:应用LINQ&Entity Framework
- zepto的tap事件的穿透分析
- Android面试题整理【转载】
- POJ 2763
- MySQL 5.7.9 免安装配置
- Linux网络编程1——小端模式与大端模式
- Android如何获取系统高度、标题栏和状态栏高度
- Map.putAll方法——追加另一个Map对象到当前Map集合(转)
- CodeForces 489D Unbearable Controversy of Being
- I.MX6 git patch
- Add an IPv6 route through an interface
- 简单JavaSE数据类型入门
- Unix/Linux环境C编程入门教程(8) FreeBSD CCPP开发环境搭建
- learn C on the mac 读后笔记
- 布局常见问题之css实现多行文本溢出显示省略号(…)全攻略
- Head First 设计模式 第6章 命令模式