Linux驱动开发十六.input系统——3.系统自带的input驱动
前面两章我们通过input子系统构建了一个按键类型的输入设备的驱动,其实Linux的内核还提供了一套基于GPIO的按键驱动程序,和LED设备一样,我们只需要在编译内核的过程中进行配置然后在设备树中定义好设备节点就可以直接使用了。
配置内核
在使用内核提供的input子系统驱动前要将驱动使能,可以按照下面说明中的路径进行配置

从上面的介绍可以看到,这个配置在.config里时CONFIG_KEYBOARD_GPIO,在该配置被使能以后,.config文件下的这个配置值就会变成y

并且可以从定位下面哪行Defined看到具体的配置(drivers/input/keyboard/Kconfig)
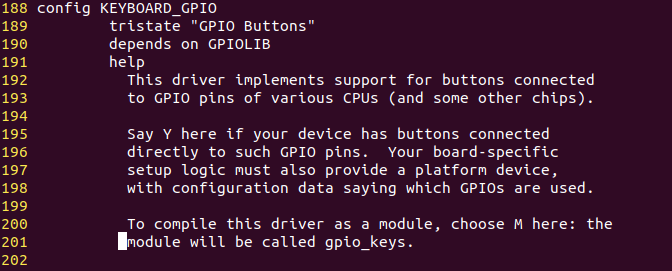
并且在drivers/input/keyboard路径下的Makefile里,可以看到我们配置的CONFIG_KEYBOARD_GPIO对应的规则文件

也就是说我们需要关注的就是gpio_keys.c这个文件。
从这个gpio_keys.c文件里,我们可以看出来,其实这个驱动也是一个platform驱动,和platform_dev设备的匹配规则也可以在文件中找到

上面就是platform_driver的定义,在没有设备树的情况下我们可以直接定义一个platform设备,设备的name属性的值就是gpio-keys。如果在设备树下,匹配的规则要去找of_match_table里面的gpio_keys_of_match变量

也就是说,我们这个设备树的节点必须是gpio-keys。
设备树配置
设备树的配置我们可以先看下参考文档Documentation/devicetree/bindings/input/gpio-keys.txt
Device-Tree bindings for input/gpio_keys.c keyboard driver

Required properties:

    - compatible = "gpio-keys";

Optional properties:

    - autorepeat: Boolean, Enable auto repeat feature of Linux input

      subsystem.

Each button (key) is represented as a sub-node of "gpio-keys":

Subnode properties:

    - gpios: OF device-tree gpio specification.

    - interrupts: the interrupt line for that input.

    - label: Descriptive name of the key.

    - linux,code: Keycode to emit.

Note that either "interrupts" or "gpios" properties can be omitted, but not

both at the same time. Specifying both properties is allowed.

Optional subnode-properties:

    - linux,input-type: Specify event type this button/key generates.

      If not specified defaults to <1> == EV_KEY.

    - debounce-interval: Debouncing interval time in milliseconds.

      If not specified defaults to 5.

    - gpio-key,wakeup: Boolean, button can wake-up the system.

    - linux,can-disable: Boolean, indicates that button is connected

      to dedicated (not shared) interrupt which can be disabled to

      suppress events from the button.

Example nodes:

    gpio_keys {

            compatible = "gpio-keys";

            #address-cells = <1>;

            #size-cells = <0>;

            autorepeat;

            button@21 {

                label = "GPIO Key UP";

                linux,code = <v103>;

                gpios = <&gpio1 0 1>;

            };

            button@22 {

                label = "GPIO Key DOWN";

                linux,code = <108>;

                interrupts = <1 IRQ_TYPE_LEVEL_HIGH 7>;

            };

            ...
上面的范例已经给的很清楚了,我们只需要按照上面的套路,去完善设备树就可以了。
gpio_keys {

    compatible = "gpio-keys";

    #address-cells = <1>;

    #cell-cells = <0>;

    pinctrl-names = "default";

    pinctrl-0 = <&pinctrl_key>;

    key0 {

        label = "GPIO KEY Enter";

        linux,code = <KEY_ENTER>;

        gpios = <&gpio1 18 GPIO_ACTIVE_LOW>;

    };

};
我们把按键的键值模拟成回车键,因为在下面我们要做的驱动是LCD屏幕,但是屏幕在一定时间后会熄屏,在没有键盘的时候就需要用到按键模仿回车键去重新点亮屏幕。
编译设备树,用新的设备树文件启动开发板,可以在dev/input路径下看到有两个event文件,具体哪个文件是咱们的按键设备不一定,只能通过hexdump挨个试验一下
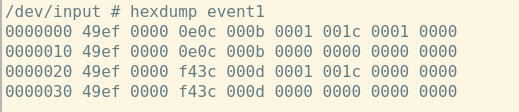
运行指令以后按下按键,看看有没有信息打印出来。如果有数据打印,就是这个文件。KEY_ENTER的值是28
#define KEY_ENTER 28
换算下来就是0x1C,和打印出来的数据一致(倒数第3列)。
这样就用到了内核自带的按键驱动。但是现在还不能像回车键一样使用按键,后面再看看吧!
最新文章
- 学习ceph官网的ceph块设备命令(一)
- python tm_isdst = -1, 0, 1 datetime module
- 65. Reverse Integer && Palindrome Number
- Netty多线程处理机制
- tomcat 设置默认编码格式
- HashMap通过value反查key
- CURL_INIT()
- C# 网络编程 Part.1
- 自己定义UITabBarController
- 在web浏览器中判断app是否安装并直接打开
- C# 批量插入数据方法
- 20165323 学习基础和C语言基础调查
- java futureTask的使用
- ORACLE-osi分层模型.md
- Spring Cloud Eureka 实现服务注册与发现
- 【BOM】浏览器对象模型
- Codeforces.959E.Mahmoud and Ehab and the xor-MST(思路)
- $(function(){}) ,$(document).ready(function(){}),window.onload = function(){...},$(window).load(function(){...})区别
- rlwrap插件,实现sqlplus上下翻页
- linux用户修改用户shell