Net中Attribute特性的高级使用及自定义验证实现
好久没写博客了,今天在百忙之中抽空来写篇文章,记录一下最近深入学习Attribute特性的笔记及心得。~~
一、什么是特性?
特性(Attribute)是用于在运行时传递程序中各种元素(比如类、方法、结构、枚举、组件等)的行为信息的声明性标签。您可以通过使用特性向程序添加声明性信息。一个声明性标签是通过放置在它所应用的元素前面的方括号([ ])来描述的。
特性(Attribute)用于添加元数据,如编译器指令和注释、描述、方法、类等其他信息。在.Net 框架提供了两种类型的特性:预定义特性和自定义特性。
1.预定义特性
在.net框架内提供了三种预定义特性,经常使用特性或对特性有了解的朋友肯定见到过或用过。
- AttributeUsage
- Conditional
- obsolete
AttributeUsage
预定义特性 AttributeUsage 描述了如何使用一个自定义特性类。它规定了特性可应用到的项目的类型。使用AttributeUsage 特性有个前提,该类必须继承Attribute抽象类。
例如:
[AttributeUsage(AttributeTargets.Property)]//只能标记在属性上

public class MyCustomAttribute: Attribute

{

}
AttributeUsage 使用语法详细如下:
[AttributeUsage(AttributeTargets.Property,AllowMultiple = true,Inherited = true)]
[AttributeUsage(

   validon,

   AllowMultiple=allowmultiple,

   Inherited=inherited

)]
其中:
- 参数 validon 规定特性可被放置的语言元素。它是枚举器 AttributeTargets 的值的组合。默认值是 AttributeTargets.All。
- 参数 allowmultiple(可选的)为该特性的 AllowMultiple 属性(property)提供一个布尔值。如果为 true,则该特性是多用的。默认值是 false(单用的)。
- 参数 inherited(可选的)为该特性的 Inherited 属性(property)提供一个布尔值。如果为 true,则该特性可被派生类继承。默认值是 false(不被继承)。
例如:
[AttributeUsage(AttributeTargets.Class |//特性只能运用于类上

AttributeTargets.Constructor |//特性只能运用于构造函数上

AttributeTargets.Field |//特性只能运用于字段上

AttributeTargets.Method |//特性只能运用于方法上

AttributeTargets.Property, //特性只能运用于属性上

AllowMultiple = true)]//true:可以为程序元素指定有多个实例
Conditional
这个预定义特性标记了一个条件方法,其执行依赖于它顶的预处理标识符。
它会引起方法调用的条件编译,取决于指定的值,比如 Debug 或 Trace。例如,当调试代码时显示变量的值。
规定该特性的语法如下:
[Conditional(conditionalSymbol)]
 public class MyTest

    {

        [Conditional("DEBUG")]

        public static void Message(string msg)

        {

            Console.WriteLine(msg);

        }

    }

 class Program

    {

        static void function1()

        {

            MyTest.Message("In Function 1.");

            function2();

        }

        static void function2()

        {

            MyTest.Message("In Function 2.");

        }

        static void Main(string[] args)

        {

            MyTest.Message("In Main function.");

            function1();

            Console.ReadLine();

       }

}
当上面的代码被编译和执行时,它会产生下列结果:

Obsolete
这个预定义特性标记了不应被使用的程序实体。它可以让您通知编译器丢弃某个特定的目标元素。例如,当一个新方法被用在一个类中,但是您仍然想要保持类中的旧方法,您可以通过显示一个应该使用新方法,而不是旧方法的消息,来把它标记为 obsolete(过时的)。
规定该特性的语法如下:
[Obsolete(message)]

[Obsolete(message, iserror)]
其中:
- 参数 message,是一个字符串,描述项目为什么过时的原因以及该替代使用什么。
- 参数 iserror,是一个布尔值。如果该值为 true,编译器应把该项目的使用当作一个错误。默认值是 false(编译器生成一个警告)。
下面的实例演示了该特性:
 public class MyTest

    {

        [Obsolete("该方法已过期,你可使用xxx最新方法")]

        public static void Message(string msg)

        {

            Console.WriteLine(msg);

        }

    }
当编译程序时会出现如下效果,通常该特性用于在方法过期上、版本变更等等

 public class MyTest

    {

        [Obsolete("该方法已经不可使用,请使用最新XXX方法",true)]

        public static void Message(string msg)

        {

            Console.WriteLine(msg);

        }

    }
当编译程序时会出现如下效果,可导致程序无法生成

以上是三种预定义特性的介绍
2.自定义特性
.Net 框架允许创建自定义特性,用于存储声明性的信息,且可在运行时被检索。该信息根据设计标准和应用程序需要,可与任何目标元素相关。
创建并使用自定义特性包含四个步骤:
- 声明自定义特性
- 构建自定义特性
- 在目标程序元素上应用自定义特性
- 通过反射访问特性
最后一个步骤包含编写一个简单的程序来读取元数据以便查找各种符号。元数据是用于描述其他数据的数据和信息。该程序应使用反射来在运行时访问特性。我们将在下一章详细讨论这点。
声明自定义特性
一个新的自定义特性应派生自 System.Attribute 类。例如:
/// <summary>

    /// 自定义日志打印

    /// </summary>

    [AttributeUsage(AttributeTargets.Method)]

    public class PrintLogAttribute: Attribute

    {

        private string _userName;

        private string _msg;

        public PrintLogAttribute(string userNaame, string msg)

        {

            this._userName = userNaame;

            this._msg = msg;

            Console.WriteLine($"{userNaame}于【{DateTime.Now.ToString("yyyy-MM-dd")}】{msg}");

        }

        public string GetMsg()

        {

            return $"{this._userName}于【{DateTime.Now.ToString("yyyy-MM-dd")}】{this._msg}";

        }

    }
 public  class PrintLogTest

    {

        [PrintLog("张三","学习Attribute")]

        public   void Study()

        {

            Console.WriteLine("张三在学习....");

        }

        [PrintLog("张三", "SayHello")]

        public  string SayHello()

        {

            return "hello";

        }

    }
 class Program

    {

        static void Main(string[] args)

        {

            PrintLogTest test=new PrintLogTest();

            Console.ReadKey();

        }

    }
执行Main方法,然后你会发现啥事都没发生,what?那这特性有个锤子用。当然不是,想要获取标记的内容就需要用到反射,获取方法如下:
class Program

    {

        static void Main(string[] args)

        {

            PrintLogTest test=new PrintLogTest();

            test.Study();

            Type type = test.GetType();

            var methods = type.GetMethods();//获取所有公开方法

            foreach (MemberInfo item in methods)

            {

                if (item.IsDefined(typeof(PrintLogAttribute), true))//判断该方法是否被PrintLogAttribute标记

                {

                    PrintLogAttribute attribute = item.GetCustomAttribute(typeof(PrintLogAttribute)) as PrintLogAttribute;//实例化PrintLogAttribute

                    var msg = attribute.GetMsg();

                    Console.WriteLine($"得到标记信息:{msg}");

                }

            }

            Console.ReadKey();

        }

    }
执行Main方法,执行如下:
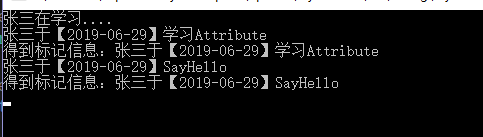
从执行结果发现,我们拿到了我们想要信息。那么在实际过程中有哪些用途呢?接下来就进入文章主题。
二、Attribute特性实际妙用?
在实际开发中,我们经常看到如MVC中标记在方法上的 [HttpGet] [HttpPost][HttpDelete][HttpPut] ,序列化时标记在类上的 [Serializable] ,使用EF是标记属性的 [Key] ,以及之前wepApi文章中的三大过滤的简单使用都使用到了特性,具体可查看【WebApi 过滤器的使用,开发接口必备利器】,使用特性的地方随处可见。那么特性到底有什么妙用?接下来通过一个实例来体现出Attribute特性的妙用。
众所周知,在开发中参数校验是必不可少的一个环节,什么参数不能为空、必须是手机格式、必须是邮箱格式,长度不能小于xx等等。这种校验在前端和后端都可以校验,对于一个后端开发者来说,有些校验放在前端有种把银行卡放到别人身上一样,总感觉不安全。所有后端进行校验总会让人很放心。
之前没有特性是后端校验代码是这样写的,如下:
 /// <summary>

    /// 建一个用户实体

    /// </summary>

    public class UserEntity

    {

        /// <summary>

        /// 姓名

        /// </summary>

        public string Name { get; set; }

        /// <summary>

        /// 年龄

        /// </summary>

        public int Age { get; set; }

        /// <summary>

        /// 家庭地址

        /// </summary>

        public string Address { get; set; }

        /// <summary>

        /// 性别

        /// </summary>

        public string Sex { get; set; }

        /// <summary>

        /// 手机号码

        /// </summary>

        public string PhoneNum { get; set; }

        /// <summary>

        /// 电子邮箱

        /// </summary>

        public string Email { get; set; }

    }
假如后台处理的时候传一个UserEntity过来,里面的参数都是必填,那么就需要进行校验了,普通的做法就是
 UserEntity entity=new UserEntity();

            if (entity != null)

            {

                if (string.IsNullOrWhiteSpace(entity.Name))

                {

                    throw new Exception("姓名不能为空");

                }

                if (entity.Age<=||entity.Age>)

                {

                    throw new Exception("年龄不合法");

                }

                if (string.IsNullOrWhiteSpace(entity.Address))

                {

                    throw new Exception("家庭地址不能为空");

                }

                .....

            }
字段多了后这种代码看着就繁琐,这还不包括手机格式验证、电子邮件验证等等,看着就不想写了,当然还有一种是在实体里面进行验证,验证实现就不一一列出,效果都是差不多。
看着以上即繁琐又恶心的代码,有什么方法可以解决呢?这下特性的用途就可以体现得淋漓尽致了。
使用特性后的验证写法如下:
先添加RequiredAttribute、StringLengthAttribute两个自定义验证特性
    /// <summary>

    /// 自定义验证,验证不为空

    /// </summary>

    [AttributeUsage(AttributeTargets.Property)]

    public class RequiredAttribute:Attribute

    {

    }

    /// <summary>

    /// 自定义验证,验证字符长度

    /// </summary>

    [AttributeUsage(AttributeTargets.Property)]

    public class StringLengthAttribute: Attribute

    {

        public int _MaxLength;

        public int _MinLength;

        /// <summary>

        ///

        /// </summary>

        /// <param name="MinLength">最小长度</param>

        /// <param name="MaxLength">最大长度</param>

        public StringLengthAttribute(int MinLength,int MaxLength)

        {

            this._MaxLength = MaxLength;

            this._MinLength = MinLength;

        }

    }
添加一个用于校验的CustomValidateExtend类
 public  class CustomValidateExtend

    {

        /// <summary>

        /// 校验

        /// </summary>

        /// <typeparam name="T"></typeparam>

        /// <returns></returns>

        public static bool Validate<T>(T entity) where T:class

        {

            Type type = entity.GetType();

            PropertyInfo[] properties = type.GetProperties();//通过反射获取所有属性

            foreach (var item in properties)

            {

                if (item.IsDefined(typeof(RequiredAttribute), true))//判断该属性是否被RequiredAttribute特性进行标识

                {

                    //字段被RequiredAttribute标识了

                    var value=item.GetValue(entity);//反射获取属性值

                    if (value == null || string.IsNullOrWhiteSpace(value.ToString()))//如果字段值为null 或""  "  ",则验证不通过

                    {

                        return false;

                    }

                }

                if (item.IsDefined(typeof(StringLengthAttribute), true))//判断该属性是否被StringLengthAttribute特性进行标识

                {

                    //字段被StringLengthAttribute标识了

                    var value = item.GetValue(entity);//反射获取属性值

                    //反射实例化StringLengthAttribute

                    StringLengthAttribute attribute =item.GetCustomAttribute(typeof(StringLengthAttribute), true) as StringLengthAttribute;

                    if (attribute == null)

                    {

                        throw new Exception("StringLengthAttribute not instantiate");

                    }

                    if (value == null || value.ToString().Length < attribute._MinLength ||value.ToString().Length > attribute._MaxLength)

                    {

                        return false;

                    }

                }

            }

            return true;

        }

    }
在用户实体类中我们给Name、PhoneNum分别添加Required、StringLength特性标记
 public class UserEntity

    {

        /// <summary>

        /// 姓名

        /// </summary>

        [Required]

        public string Name { get; set; }

        /// <summary>

        /// 年龄

        /// </summary>

        public int Age { get; set; }

        /// <summary>

        /// 家庭地址

        /// </summary>

        public string Address { get; set; }

        /// <summary>

        /// 性别

        /// </summary>

        public string Sex { get; set; }

        /// <summary>

        /// 手机号码

        /// </summary>
        [Required]

        [StringLength(, )]

        public string PhoneNum { get; set; }

        /// <summary>

        /// 电子邮箱

        /// </summary>

        public string Email { get; set; }

    }
调用 CustomValidateExtend 中的 Validate 校验方法
 class Program

    {

        static void Main(string[] args)

        {

            UserEntity entity=new UserEntity();

            entity.Name = "张三";

            entity.PhoneNum = "";

            var validateResult =CustomValidateExtend.Validate(entity);

            if (validateResult)

            {

                Console.WriteLine("验证通过");

            }

            else

            {

                Console.WriteLine("验证不通过");

            }

            Console.ReadKey();

        }

    }
执行结果验证通过,把Name赋值为空或PhoneNum的长度小于或大于11,结果为验证不通过,目前为止,基于特性校验已经初步实现,对于追求完美的开发人员来说以下代码看着就不是很舒服。
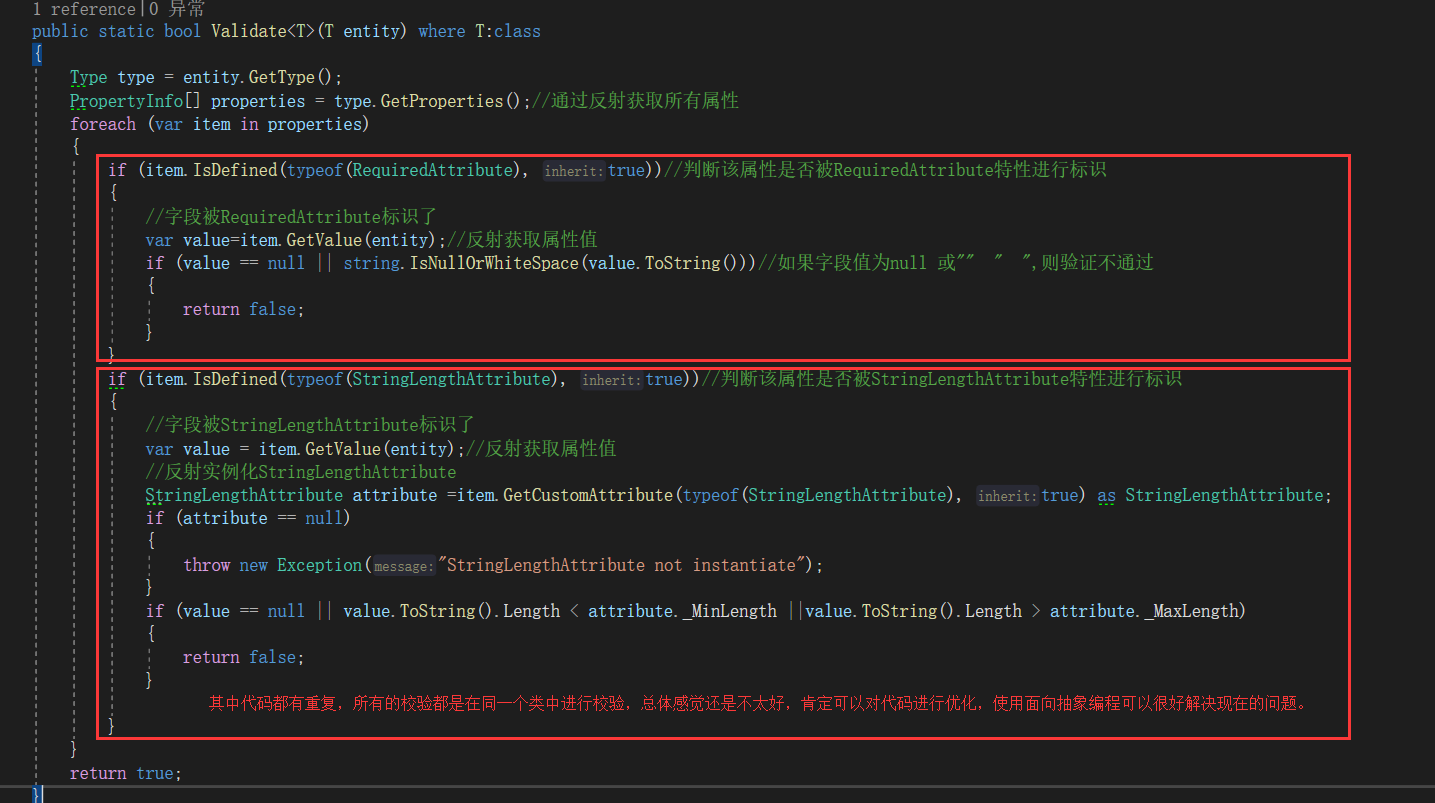
代码再次升级,我们就使用面向抽象编程的思想进行优化,添加一个AbstractCustomAttribute抽象类,所有的校验类都继承AbstractCustomAttribute
    /// <summary>

    ///

    /// </summary>

    public abstract class AbstractCustomAttribute: Attribute//继承Attribute特性类

    {

        /// <summary>

        /// 定义校验抽象方法

        /// </summary>

        /// <param name="value">需要校验的值</param>

        /// <returns></returns>

        public abstract bool Validate(object value);

    }
升级之后的RequiredAttribute、StringLengthAttribute自定义验证特性代码如下:
    /// <summary>

    /// 自定义验证,验证不为空

    /// </summary>

    [AttributeUsage(AttributeTargets.Property)]

    public class RequiredAttribute : AbstractCustomAttribute

    {

        /// <summary>

        /// 重写Validate校验方法

        /// </summary>

        /// <param name="value">需要校验的参数</param>

        /// <returns></returns>

        public override bool Validate(object value)

        {

            return value != null && !string.IsNullOrWhiteSpace(value.ToString());

        }

    }

    /// <summary>

    /// 自定义验证,验证字符长度

    /// </summary>

    [AttributeUsage(AttributeTargets.Property)]

    public class StringLengthAttribute: AbstractCustomAttribute

    {

        private int _MaxLength;

        private int _MinLength;

        /// <summary>

        ///

        /// </summary>

        /// <param name="MinLength">最小长度</param>

        /// <param name="MaxLength">最大长度</param>

        public StringLengthAttribute(int MinLength,int MaxLength)

        {

            this._MaxLength = MaxLength;

            this._MinLength = MinLength;

        }

        /// <summary>

        /// 重写Validate校验方法

        /// </summary>

        /// <param name="value">需要校验的参数</param>

        /// <returns></returns>

        public override bool Validate(object value)

        {

            return value != null && value.ToString().Length >= _MinLength && value.ToString().Length <= _MaxLength;

        }

    }
升级后CustomValidateExtend类,重点
 public static class CustomValidateExtend

    {

        /// <summary>

        /// 校验

        /// </summary>

        /// <typeparam name="T"></typeparam>

        /// <returns></returns>

        public static bool Validate<T>(this T entity) where T:class

        {

            Type type = entity.GetType();

            foreach (var item in type.GetProperties())

            {

                if (item.IsDefined(typeof(AbstractCustomAttribute), true))//此处是重点

                {

                    //此处是重点

                    foreach (AbstractCustomAttribute attribute in item.GetCustomAttributes(typeof(AbstractCustomAttribute), true))

                    {

                        if (attribute == null)

                        {

                            throw new Exception("StringLengthAttribute not instantiate");

                        }

                        if (!attribute.Validate(item.GetValue(entity)))

                        {

                            return false;

                        }

                    }

                }

            }

            return true;

        }

    }
执行校验方法
 class Program

    {

        static void Main(string[] args)

        {

            UserEntity entity=new UserEntity();

            entity.Name = "张三";

            entity.PhoneNum = "";

            var validateResult = entity.Validate();//校验方法

            if (validateResult)

            {

                Console.WriteLine("验证通过");

            }

            else

            {

                Console.WriteLine("验证不通过");

            }

            Console.ReadKey();

        }

    }
因为手机号少了一位,所有校验不通过。二次升级已完成,看看代码,瞬间心情舒畅。细心的朋友会发现,校验返回的都是true跟false,每次遇到校验不通过的字段后下面的都不再校验了,想要返回所有未校验通过的字段,并告诉调用者,一次性把所有字段都按照格式填好,这样才是我们想要的效果。
当然这样肯定是可以做到的,不要返回true跟false就行了,再次封装有一下就可以达到效果了。
为了写升级代码,我添加了一个ValidateResultEntity实体类型,代码如下:
    /// <summary>

    /// 校验结果实体类

    /// </summary>

    public class ValidateResultEntity

    {

        /// <summary>

        /// 是否校验成功

        /// </summary>

        public bool IsValidateSuccess { get; set; }

        /// <summary>

        /// 校验不通过的字段信息存储字段

        /// </summary>

        public List<FieidEntity> ValidateMessage { get; set; }

    }

    /// <summary>

    /// 字段信息

    /// </summary>

    public class FieidEntity

    {

        /// <summary>

        /// 字段名称

        /// </summary>

        public string FieidName { get; set; }

        /// <summary>

        /// 字段类型

        /// </summary>

        public string FieidType { get; set; }

        /// <summary>

        /// 验证错误时提示信息

        /// </summary>

        public string ErrorMessage { get; set; }

    }
终极版的RequiredAttribute、StringLengthAttribute自定义验证特性代码如下:
    /// <summary>

    /// 自定义验证,验证不为空

    /// </summary>

    [AttributeUsage(AttributeTargets.Property)]

    public class RequiredAttribute : AbstractCustomAttribute

    {

        private string _ErrorMessage = "";

        public RequiredAttribute()

        {

        }

        public RequiredAttribute(string ErrorMessage)

        {

            this._ErrorMessage = ErrorMessage;

        }

        /// <summary>

        /// 重写Validate校验方法

        /// </summary>

        /// <param name="value">需要校验的参数</param>

        /// <returns></returns>

        public override FieidEntity Validate(object value)

        {

            if (value != null && !string.IsNullOrWhiteSpace(value.ToString()))

            {

                return null;

            }

            return new FieidEntity()

            {

                ErrorMessage = string.IsNullOrWhiteSpace(_ErrorMessage) ? "字段不能为空" : _ErrorMessage,

            };

        }

    }

    /// <summary>

    /// 自定义验证,验证字符长度

    /// </summary>

    [AttributeUsage(AttributeTargets.Property)]

    public class StringLengthAttribute: AbstractCustomAttribute

    {

        private int _MaxLength;

        private int _MinLength;

        private string _ErrorMessage;

        /// <summary>

        ///

        /// </summary>

        /// <param name="MinLength">最小长度</param>

        /// <param name="MaxLength">最大长度</param>

        public StringLengthAttribute(int MinLength,int MaxLength,string ErrorMessage="")

        {

            this._MaxLength = MaxLength;

            this._MinLength = MinLength;

            this._ErrorMessage = ErrorMessage;

        }

        /// <summary>

        /// 重写Validate校验方法

        /// </summary>

        /// <param name="value">需要校验的参数</param>

        /// <returns></returns>

        public override FieidEntity Validate(object value)

        {

            if (value != null && value.ToString().Length >= _MinLength && value.ToString().Length <= _MaxLength)

            {

                return null;

            }

            return new FieidEntity()

            {

                ErrorMessage = string.IsNullOrWhiteSpace(_ErrorMessage) ? $"字段长度必须大于等于{_MinLength}并且小于等于{_MaxLength}" : _ErrorMessage,

            };

        }

    }
终极版的CustomValidateExtend类
 public static class CustomValidateExtend

    {

        /// <summary>

        /// 校验

        /// </summary>

        /// <typeparam name="T"></typeparam>

        /// <returns></returns>

        public static ValidateResultEntity Validate<T>(this T entity) where T:class

        {

            ValidateResultEntity validate=new ValidateResultEntity();

            validate.IsValidateSuccess= true;

            List<FieidEntity> fieidList = new List<FieidEntity>();

            Type type = entity.GetType();

            foreach (var item in type.GetProperties())

            {

                if (item.IsDefined(typeof(AbstractCustomAttribute), true))//此处是重点

                {

                    //此处是重点

                    foreach (AbstractCustomAttribute attribute in item.GetCustomAttributes(typeof(AbstractCustomAttribute), true))

                    {

                        if (attribute == null)

                        {

                            throw new Exception("AbstractCustomAttribute not instantiate");

                        }

                        var result = attribute.Validate(item.GetValue(entity));

                        if (result != null)//校验不通过

                        {

                            result.FieidName = item.Name;//获取字段名称

                            result.FieidType = item.PropertyType.Name;//获取字段类型

                            fieidList.Add(result);//信息加入集合

                            break;//此处为了防止字段被多个校验特性标注,只输出第一个验证不通过的校验信息

                        }

                    }

                }

            }

            if (fieidList.Count > )

            {

                validate.ValidateMessage = fieidList;

                validate.IsValidateSuccess = false;

            }

            return validate;

        }

    }
修改UserEntity实体类,添加自定义验证失败的错误信息
    /// <summary>

    ///

    /// </summary>

    public class UserEntity

    {

        /// <summary>

        /// 姓名

        /// </summary>

        [Required("姓名不能为空")]

        public string Name { get; set; }

        /// <summary>

        /// 年龄

        /// </summary>

        public int Age { get; set; }

        /// <summary>

        /// 家庭地址

        /// </summary>

        public string Address { get; set; }

        /// <summary>

        /// 性别

        /// </summary>

        public string Sex { get; set; }

        /// <summary>

        /// 手机号码

        /// </summary>

        [Required]

        [StringLength(, ,"手机号码必须等于11位")]

        public string PhoneNum { get; set; }

        /// <summary>

        /// 电子邮箱

        /// </summary>

        public string Email { get; set; }

    }
测试代码:
 class Program

    {

        static void Main(string[] args)

        {

            UserEntity entity=new UserEntity();

            //entity.Name = "张三";

            //entity.PhoneNum = "1887065752";

            var validateResult = entity.Validate();//校验方法

            if (validateResult.IsValidateSuccess)

            {

                Console.WriteLine("验证通过");

            }

            else

            {

                Console.WriteLine("验证不通过");

                Console.WriteLine("================================================================");

                var data=JsonConvert.SerializeObject(validateResult.ValidateMessage);

                Console.WriteLine(data);//打印验证不通过的字段信息

            }

            Console.ReadKey();

        }

    }
测试结果如下:
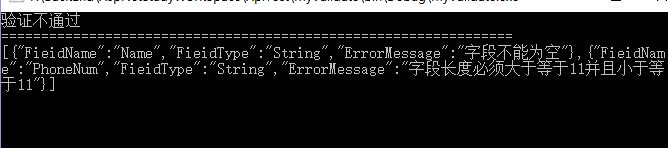
最终我们做到了通过特性进行校验字段数据,不再写那种繁琐又臭又长的判断代码了。以上代码还可以继续优化,还可以使用泛型缓存提高其性能。
最后介绍一波微软的模型验证,原理类似,最近个人用于WebAPI上,
引用【System.ComponentModel.DataAnnotations】
里面有:
- [Required]
- [Range]
- ........
详情可查看【模型验证】
使用ActionFilterAttribute过滤器我们可以进行校验操作,核心代码如下:
        /// <summary>

        /// 接口请求前操作,使用ActionFilterAttribute过滤器

        /// </summary>

        /// <param name="actionContext"></param>

        public override void OnActionExecuting(HttpActionContext actionContext)

        {

            if (!actionContext.ModelState.IsValid)

            {

                var data=new Dictionary<string,string>();

                if (actionContext.ModelState.Keys.Count > )

                {

                    for (var i=;i<actionContext.ModelState.Keys.Count;i++)

                    {

                        if (actionContext.ModelState.Values.ElementAt(i).Errors.Count > )

                        {

                            data.Add(actionContext.ModelState.Keys.ElementAt(i), actionContext.ModelState.Values.ElementAt(i).Errors.First().ErrorMessage);

                        }

                    }

                }

                actionContext.Response = actionContext.Request.CreateResponse(HttpStatusCode.BadRequest, new

                {

                    StatusCode = HttpStatusCode.BadRequest,

                    Data = "",

                    Message = "参数验证问题或必填参数未填写,请核对",

                    Details = data

                });

            }

        }
得出来的效果类似。
如果您有更好的建议和想法欢迎提出,共同进步!
当你想在你的代码中找到一个错误时,这很难;当你认为你的代码是不会有错误时,这就更难了。
最新文章
- Android开发案例 - 图库
- Struts2 回顾总结
- Visual Studio 2013 和 ASP.NET 预览
- 数据结构和算法 – 12.高级查找算法(下)
- [整理]C#反射(Reflection)详解
- linux 条件变量
- HDU-1036 Average is not Fast Enough!
- #pragma 预处理指令
- Activity的onSaveInstanceState()和onRestoreInstanceState()以及API详解
- jboss7.1.0配置数据库(mysql)
- 防止ajax重复提交
- 一个3年Java程序员的坎与选择
- django之模型层(model)--建表、查询、删除基础
- Bootstrap modal模态框关闭时,combobox input下拉框仍然保留在页面上
- 艾妮记账本微信小程序开发(失败版)
- C# 计算位置居中
- ElasticSearch 2 (4) - API Convention
- 在linux中配置环境变量
- 线性表 顺序存储 链式存储 ---java实现
- 使用WCF实现消息推送