java并发编程之美-阅读记录10
同步器
10.1CountDownLatch
在开发过程中经常会遇到在主线程中开启多个子线程去并行执行任务,并且主线程需要等待子线程执行完毕后在进行汇总。在CountDownLatch出现之前使用线程的join方法,但是join方法不灵活。
1、案例:
package com.nxz.blog.otherTest;

import java.util.concurrent.CountDownLatch;

public class TestThread006 {

    private static CountDownLatch countDownLatch = new CountDownLatch(2);

    public static void main(String[] args) throws InterruptedException {

        Thread t1 = new Thread(new Runnable() {

            @Override

            public void run() {

                try {

                    Thread.sleep(1000);

                } catch (InterruptedException e) {

                    e.printStackTrace();

                }finally {

                    countDownLatch.countDown();

                }

                System.out.println("子线程1执行完毕");

                // 注意下边代码

                try {

                    Thread.sleep(1000);

                } catch (InterruptedException e) {

                    e.printStackTrace();

                }

                System.out.println("不需要子线程执行完毕,只需要调用countdown后,主线程就可以继续执行");

            }

        });

        Thread t2 = new Thread(new Runnable() {

            @Override

            public void run() {

                try {

                    Thread.sleep(1000);

                } catch (InterruptedException e) {

                    e.printStackTrace();

                }finally {

                    countDownLatch.countDown();

                }

                System.out.println("子线程2执行完毕");

            }

        });

        t2.start();

        t1.start();

        System.out.println("等待子线程执行完毕");

        countDownLatch.await();

        System.out.println("全都执行完毕");

    }

}
执行结果:
等待子线程执行完毕

子线程1执行完毕

子线程2执行完毕

全都执行完毕
不需要子线程执行完毕,只需要调用countdown后,主线程就可以继续执行
在上边代码中,创建了一个CountDownLatch,构造函数的参数为2,当主线程调用CountDownLatch.await();方法后,主线程会等待两个子线程执行完毕后,在子线程中必须调用countDownLatch.countDown()方法,来时计数器减1,当CountDownLatch减两次后,即计数器为0是,阻塞在await方法就可以返回,主线程就可以继续向下执行了。
上边的代码使用ExecutorService改写:
package com.nxz.blog.otherTest;

import java.util.concurrent.CountDownLatch;

import java.util.concurrent.ExecutorService;

import java.util.concurrent.Executors;

public class TestThread007 {

    private static CountDownLatch countDownLatch = new CountDownLatch(2);

    public static void main(String[] args) throws InterruptedException {

        ExecutorService executorService =

                Executors.newFixedThreadPool(2);

        executorService.execute(new Runnable() {

            @Override

            public void run() {

                try {

                    Thread.sleep(1000);

                } catch (InterruptedException e) {

                    e.printStackTrace();

                } finally {

                    countDownLatch.countDown();

                }

                System.out.println("子线程1执行完毕");

                try {

                    Thread.sleep(1000);

                } catch (InterruptedException e) {

                    e.printStackTrace();

                }

                System.out.println("当子线程调用countdown之后,主线程await方法就会方法(只要计数器为0)");

            }

        });

        executorService.execute(new Runnable() {

            @Override

            public void run() {

                try {

                    Thread.sleep(1000);

                } catch (InterruptedException e) {

                    e.printStackTrace();

                } finally {

                    countDownLatch.countDown();

                }

                System.out.println("子线程2执行完毕");

            }

        });

        System.out.println("等待子线程执行");

        countDownLatch.await();

        System.out.println("全都执行完毕");

        executorService.shutdown();//这个方法需要调用,如果不调用的话,主线程会一直运行,因为线程池并未结束(用户线程)

    }

}
执行结果:
等待子线程执行

子线程2执行完毕

子线程1执行完毕

全都执行完毕

当子线程调用countdown之后,主线程await方法就会方法(只要计数器为0)
join方法和CountDownLatch区别:
当调用线程的join方法后,主线程会一直等待子线程执行完毕后,主线程才能继续执行;而CountDownLatch的await方法,则是当子线程调用了countDown方法后(如果计数器降为0),无论子线程中是否执行完,主线程都会继续向下执行,并不一定等待子线程执行完所有的代码。
2、CountDownLatch怎么实现的
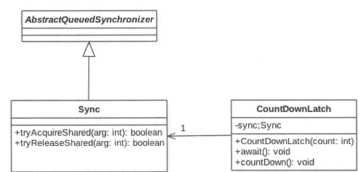
类图:
有类图可以看到,CountDownLatch是通过AQS来实现的。
 、
、
通过构造函数,可以明显的看到,计数器最终会赋值给state这个内存可见的变量
    // 构造,参数:计数器的大小

    public CountDownLatch(int count) {

        if (count < 0) throw new IllegalArgumentException("count < 0");

        this.sync = new Sync(count);

    }

    private static final class Sync extends AbstractQueuedSynchronizer {

        Sync(int count) {

            setState(count);

        }

        protected int tryAcquireShared(int acquires) {
       // 判断当前state(即CountDownLatch中的计数器)的值,如果为0是,返回1,否则-1

            return (getState() == 0) ? 1 : -1;

        }

        protected boolean tryReleaseShared(int releases) {

            // Decrement count; signal when transition to zero

            for (;;) {

                int c = getState();// 获取当前的state的值

                if (c == 0) // 防止state减为负数

                    return false;

                int nextc = c-1;

                if (compareAndSetState(c, nextc))  // CAS操作,设置新的state

                    return nextc == 0;

            }

        }

    }
3、await方法
    // 调用await方法,其实就是调用的AQS中的获取共享资源的方法(可中断的)

    public void await() throws InterruptedException {

        sync.acquireSharedInterruptibly(1);

    }

    // 这个方法为AQS中的方法,而tryAcquireShared方法则是子类实现的方法,即Sync中的方法

    public final void acquireSharedInterruptibly(int arg)

            throws InterruptedException {

        if (Thread.interrupted())

            throw new InterruptedException();
        // 这个if条件会判断AQS中的state的值(即CountDownLatch中的计数器的值),如果state==0,返回1,否则返回-1,如果返回1,则直接返回(即不阻塞主线程),如果返回-1时,则会阻塞线程

        if (tryAcquireShared(arg) < 0)

            doAcquireSharedInterruptibly(arg); // 将线程假如阻塞队列,并且自旋判断state是否为0,为0是await方法会返回。

    }
4、countdown方法
    public void countDown() {

        sync.releaseShared(1);

    }

    public final boolean releaseShared(int arg) {

        // 这个tryRealeaseShared也是调用的子类的方法,即上边Sync中的

        if (tryReleaseShared(arg)) {

            doReleaseShared();

            return true;

        }

        return false;

    }
10.2CyclicBarrier
CountDownLatch在一定程度上优化了join方法,但是CountDownLatch的计数器一点变为0,当下次调用await时就不不起作用,即不能重复使用。而CyclicBarrier则优化了这一点,使屏障点可以重复使用,
1、案例
由执行结果可以看出屏障CyclicBarrier可以重复使用,当子线程执行自己的任务后,回调用await方法,此时子线程阻塞,并且计数器减1,当第二个子线程通样调用await时,进入屏障,此时计数器再减为0,这时候会执行CyclicBarrier构造函数中的任务,执行完毕后,会唤醒第二个线程继续向下执行,这时候第一个阻塞的线程也会继续向下执行。
下边这个例子说明当所有线程到达屏障点后,才能一块继续向下执行。同时也表明屏障点是可以重复使用的
package com.nxz.blog.otherTest;

import java.util.concurrent.BrokenBarrierException;

import java.util.concurrent.CyclicBarrier;

import java.util.concurrent.ExecutorService;

import java.util.concurrent.Executors;

public class TestThread008 {

    // 第一个参数是计数器大小,第二个参数是当计数器为0时,执行的任务

    private static CyclicBarrier cyclicBarrier = new CyclicBarrier(2, new Runnable() {

        @Override

        public void run() {

            System.out.println("全部子线程到达屏障点,所有子线程继续向下执行。。。");

        }

    });

    public static void main(String[] args) {

        ExecutorService executorService =

                Executors.newFixedThreadPool(2);

        executorService.execute(new Runnable() {

            @Override

            public void run() {

                System.out.println("子线程1执行--到达屏障点");

                try {

                    cyclicBarrier.await();

                } catch (InterruptedException e) {

                    e.printStackTrace();

                } catch (BrokenBarrierException e) {

                    e.printStackTrace();

                }

                System.out.println("子线程1继续向下执行");

            }

        });

        executorService.execute(new Runnable() {

            @Override

            public void run() {

                System.out.println("子线程2执行--到达屏障点");

                try {

                    cyclicBarrier.await();

                } catch (InterruptedException e) {

                    e.printStackTrace();

                } catch (BrokenBarrierException e) {

                    e.printStackTrace();

                }

                System.out.println("子线程2继续向下执行");

            }

        });

        //$$$$$$$$$$$$$$$$$$$$$$$$$$$$]

        executorService.execute(new Runnable() {

            @Override

            public void run() {

                System.out.println("子线程3执行--到达屏障点");

                try {

                    cyclicBarrier.await();

                } catch (InterruptedException e) {

                    e.printStackTrace();

                } catch (BrokenBarrierException e) {

                    e.printStackTrace();

                }

                System.out.println("子线程3继续向下执行");

            }

        });

        executorService.execute(new Runnable() {

            @Override

            public void run() {

                System.out.println("子线程4执行--到达屏障点");

                try {

                    cyclicBarrier.await();

                } catch (InterruptedException e) {

                    e.printStackTrace();

                } catch (BrokenBarrierException e) {

                    e.printStackTrace();

                }

                System.out.println("子线程4继续向下执行");

            }

        });

        executorService.shutdown();

    }

}

执行结果:

子线程1执行--到达屏障点

子线程2执行--到达屏障点

全部子线程到达屏障点,所有子线程继续向下执行。。。

子线程2继续向下执行

子线程1继续向下执行

子线程3执行--到达屏障点

子线程4执行--到达屏障点

全部子线程到达屏障点,所有子线程继续向下执行。。。

子线程4继续向下执行

子线程3继续向下执行
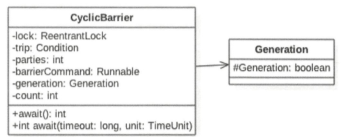
2、类图
有类图可以看出,CyclicBarrier是基于独占锁实现的,本质还是基于AQS的。parties用来记录线程数,这里表示多少线程调用了await方法后,所有线程才能从屏障点继续向下执行。而count一开始等于parties,每当有线程调用await方法就递减1,当count=0时,就表示所有线程到达屏障点。
    /** 用来保证操作count的原子性*/

    private final ReentrantLock lock = new ReentrantLock();

    /** 条件变量,用于支持线程间的await和signal操作*/

    private final Condition trip = lock.newCondition();

    /** 容量,需要到达屏障点的个数*/

    private final int parties;

    /* 所有线程都到达屏障点后,需要执行的任务 */

    private final Runnable barrierCommand;

    /** 该对象内部维护这一个broken变量,用来表示当前屏障是否被打破*/

    private Generation generation = new Generation();

    public CyclicBarrier(int parties, Runnable barrierAction) {

        if (parties <= 0) throw new IllegalArgumentException();

        this.parties = parties;

        this.count = parties;

        this.barrierCommand = barrierAction;

    }
3、await方法
   // 当线程调用该方法时,线程会阻塞,当满足这几个条件是才返回:

    //1、有parties个线程调用的await方法,也就是线程都到达了屏障点;//2、当其他线程调用的当前线程的interupt方法中断了当前线程,即破会了屏障,此时屏障会失效3、generation对象中的broken设置为true时,会跑出异常,并返回

   public int await() throws InterruptedException, BrokenBarrierException {

        try {

            return dowait(false, 0L);

        } catch (TimeoutException toe) {

            throw new Error(toe); // cannot happen

        }

    }

   // 阻塞一定时间后返回

    public int await(long timeout, TimeUnit unit)

        throws InterruptedException,

               BrokenBarrierException,

               TimeoutException {

        return dowait(true, unit.toNanos(timeout));

    }

   // 核心方法

    private int dowait(boolean timed, long nanos)

        throws InterruptedException, BrokenBarrierException,

               TimeoutException {

        final ReentrantLock lock = this.lock;

        lock.lock();

        try {

            final Generation g = generation;

            if (g.broken)

                throw new BrokenBarrierException();

            if (Thread.interrupted()) {

                breakBarrier();

                throw new InterruptedException();

            }

            // 以下为关键代码

            int index = --count;

            // 如果此时count为0,则进入线程唤醒阶段

            if (index == 0) {  // tripped

                boolean ranAction = false;

                try {

                    // 当前线程直接执行,即使异常了,也会调用breakBarrier方法来唤醒其他等待的线程

                    final Runnable command = barrierCommand;

                    if (command != null)

                        command.run();

                    ranAction = true;

                    nextGeneration();// 唤醒 调用signalAll

                    return 0;

                } finally {

                    if (!ranAction)

                        breakBarrier();// 唤醒 调用signalAll

                }

            }

            // loop until tripped, broken, interrupted, or timed out

            // 阻塞

            for (;;) {

                try {

                    // 如果没有时间限制,即timed=false,则直接调用condition.await方法,释放锁,并阻塞线程

                    if (!timed)

                        trip.await();

                    else if (nanos > 0L)

                        nanos = trip.awaitNanos(nanos);

                } catch (InterruptedException ie) {

                    // 出现异常了,即其他线程调用了interupt中断方法

                    if (g == generation && ! g.broken) {

                        breakBarrier();

                        throw ie;

                    } else {

                        // We're about to finish waiting even if we had not

                        // been interrupted, so this interrupt is deemed to

                        // "belong" to subsequent execution.

                        Thread.currentThread().interrupt();

                    }

                }

                if (g.broken)

                    throw new BrokenBarrierException();

                if (g != generation)

                    return index;

                if (timed && nanos <= 0L) {

                    breakBarrier();

                    throw new TimeoutException();

                }

            }

        } finally {

            lock.unlock();

        }

    }
10.3Semaphore信号量
Semaphore信号量也是java中的同步器,和CountDownLatch和CyclicBarrier不同的是,它内部设计的计数器是递增的,并且在一开始初始化Semaphore时可以指定一个初始值,但是它并不需要知道需要同步的线程的个数,而是在需要同步的时候调用acquire方法时指定需要同步的线程个数。
1、案例
package com.nxz.blog.otherTest;

import java.util.concurrent.ExecutorService;

import java.util.concurrent.Executors;

import java.util.concurrent.Semaphore;

public class TestThread009 {

    private static Semaphore semaphore = new Semaphore(0);

    public static void main(String[] args) throws InterruptedException {

        ExecutorService executorService = Executors.newFixedThreadPool(2);

        executorService.execute(new Runnable() {

            @Override

            public void run() {

                System.out.println(Thread.currentThread() + "执行完");
          // 每当调用了一次release方法后,许可就会累加1

                semaphore.release();

            }

        });

        executorService.execute(new Runnable() {

            @Override

            public void run() {

                System.out.println(Thread.currentThread() + "执行完");

                semaphore.release();

            }

        });

        // 当将permits设置为比2大的值时,代码会阻塞在该处,不能够向下执行(假如是3的话,就代表它需要3个permits许可,而只有两个线程释放了两个许可,main不能继续执行

        semaphore.acquire(2);

        System.out.println("main执行完");

        executorService.shutdown();

    }

}
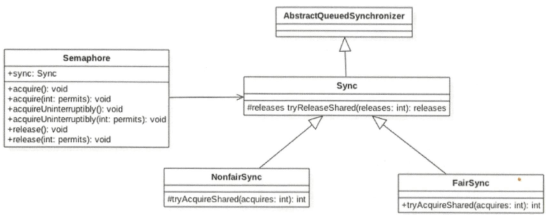
1、类图
由类图可以看出 ,Semaphore也是基于AQS实现的。Sync只是对AQS的修饰,并且该类有两个实现类,用来指定获取信号量的时候是否使用公平策略。
最新文章
- linux sudo 命令
- js的this和面向对象编程
- 使用.net的Cache框架快速实现Cache操作
- Android配置----小米手机通过wifi连接ADB调试Android应用
- JAVA常用数据结构及原理分析
- 关于Freelists和Freelist Groups的研究【转】
- java多线程:并发包中的信号量和计数栓的编程模型
- 在MFC程序中使用AnyCAD图形控件
- python知识:json格式文本;异常处理;字符串处理;unicode类型和str类型转换
- Android 高级UI设计笔记21:Android SegmentView(分段选择控件)
- 在hadoop 的任务中设置 map数量
- UISegmentedControl 踩坑
- 初识Redux-Saga
- python第10天(下)
- A problem has been detected and windows has been shut down to prevent damage to your computer.他么啥意思?看这里!【蓝屏】
- Windows 2003 Server R2 x64 IIS6.0 eWebEditor无法显示的问题
- zynq基础-->linux下软件应用
- 每天CSS学习之text-shadow
- oracleXE数据库没有公开wm_concat函数, 需要手动添加
- c++笔试题贪吃蛇问题