Flask - 请求处理流程和上下文源码分析
Flask - 请求处理流程和上下文
镇楼图:
WSGI
WSGI(全称Web Server Gateway Interface),是为 Python 语言定义的Web服务器和Web应用程序之间的一种简单而通用的接口,它封装了接受HTTP请求、解析HTTP请求、发送HTTP,响应等等的这些底层的代码和操作,使开发者可以高效的编写Web应用。
一个简单的使用WSGI的App例子:
def application(environ, start_response):

    start_response('200 OK', [('Content-Type', 'text/html')])

    return [b'<h1>Hello, I Am WSGI!</h1>']
environ: 一个包含全部HTTP请求信息的字典,由WSGI Server解包HTTP请求生成。
start_response: 一个WSGI Server提供的函数,调用可以发送响应的状态码和HTTP报文头, 函数在返回前必须调用一次start_response()。
application()应当返回一个可以迭代的对象(HTTP正文)。
application()函数由WSGI Server直接调用和提供参数。
Python内置了一个WSGIREF的WSGI Server,不过性能不是很好,一般只用在开发环境。可以选择其他的如Gunicorn。
WSGI Server 和 App交互图:

Flask的上下文对象及源码解析
Flask有两种Context(上下文),分别是
1.RequestContext 请求上下文
Request 请求的对象,封装了Http请求(environ)的内容
Session 根据请求中的cookie,重新载入该访问者相关的会话信息。
2.AppContext 程序上下文
g 处理请求时用作临时存储的对象。每次请求都会重设这个变量
current_app 当前激活程序的程序实例
Flask处理请求流程:

0. 请求入口
if __name__ == '__main__':

    app.run()
.
def run(self, host=None, port=None, debug=None,

        load_dotenv=True, **options):

    # Change this into a no-op if the server is invoked from the

    # command line. Have a look at cli.py for more information.

    if os.environ.get('FLASK_RUN_FROM_CLI') == 'true':

        from .debughelpers import explain_ignored_app_run

        explain_ignored_app_run()

        return

    if get_load_dotenv(load_dotenv):

        cli.load_dotenv()

        # if set, let env vars override previous values

        if 'FLASK_ENV' in os.environ:

            self.env = get_env()

            self.debug = get_debug_flag()

        elif 'FLASK_DEBUG' in os.environ:

            self.debug = get_debug_flag()

    # debug passed to method overrides all other sources

    if debug is not None:

        self.debug = bool(debug)

    _host = '127.0.0.1'

    _port = 5000

    server_name = self.config.get('SERVER_NAME')

    sn_host, sn_port = None, None

    if server_name:

        sn_host, _, sn_port = server_name.partition(':')

    host = host or sn_host or _host

    port = int(port or sn_port or _port)

    options.setdefault('use_reloader', self.debug)

    options.setdefault('use_debugger', self.debug)

    options.setdefault('threaded', True)

    cli.show_server_banner(self.env, self.debug, self.name, False)

    from werkzeug.serving import run_simple

    try:

        run_simple(host, port, self, **options)

    finally:

        # reset the first request information if the development server

        # reset normally.  This makes it possible to restart the server

        # without reloader and that stuff from an interactive shell.

        self._got_first_request = False
.
def __call__(self, environ, start_response):

    """The WSGI server calls the Flask application object as the

    WSGI application. This calls :meth:`wsgi_app` which can be

    wrapped to applying middleware."""

    return self.wsgi_app(environ, start_response)
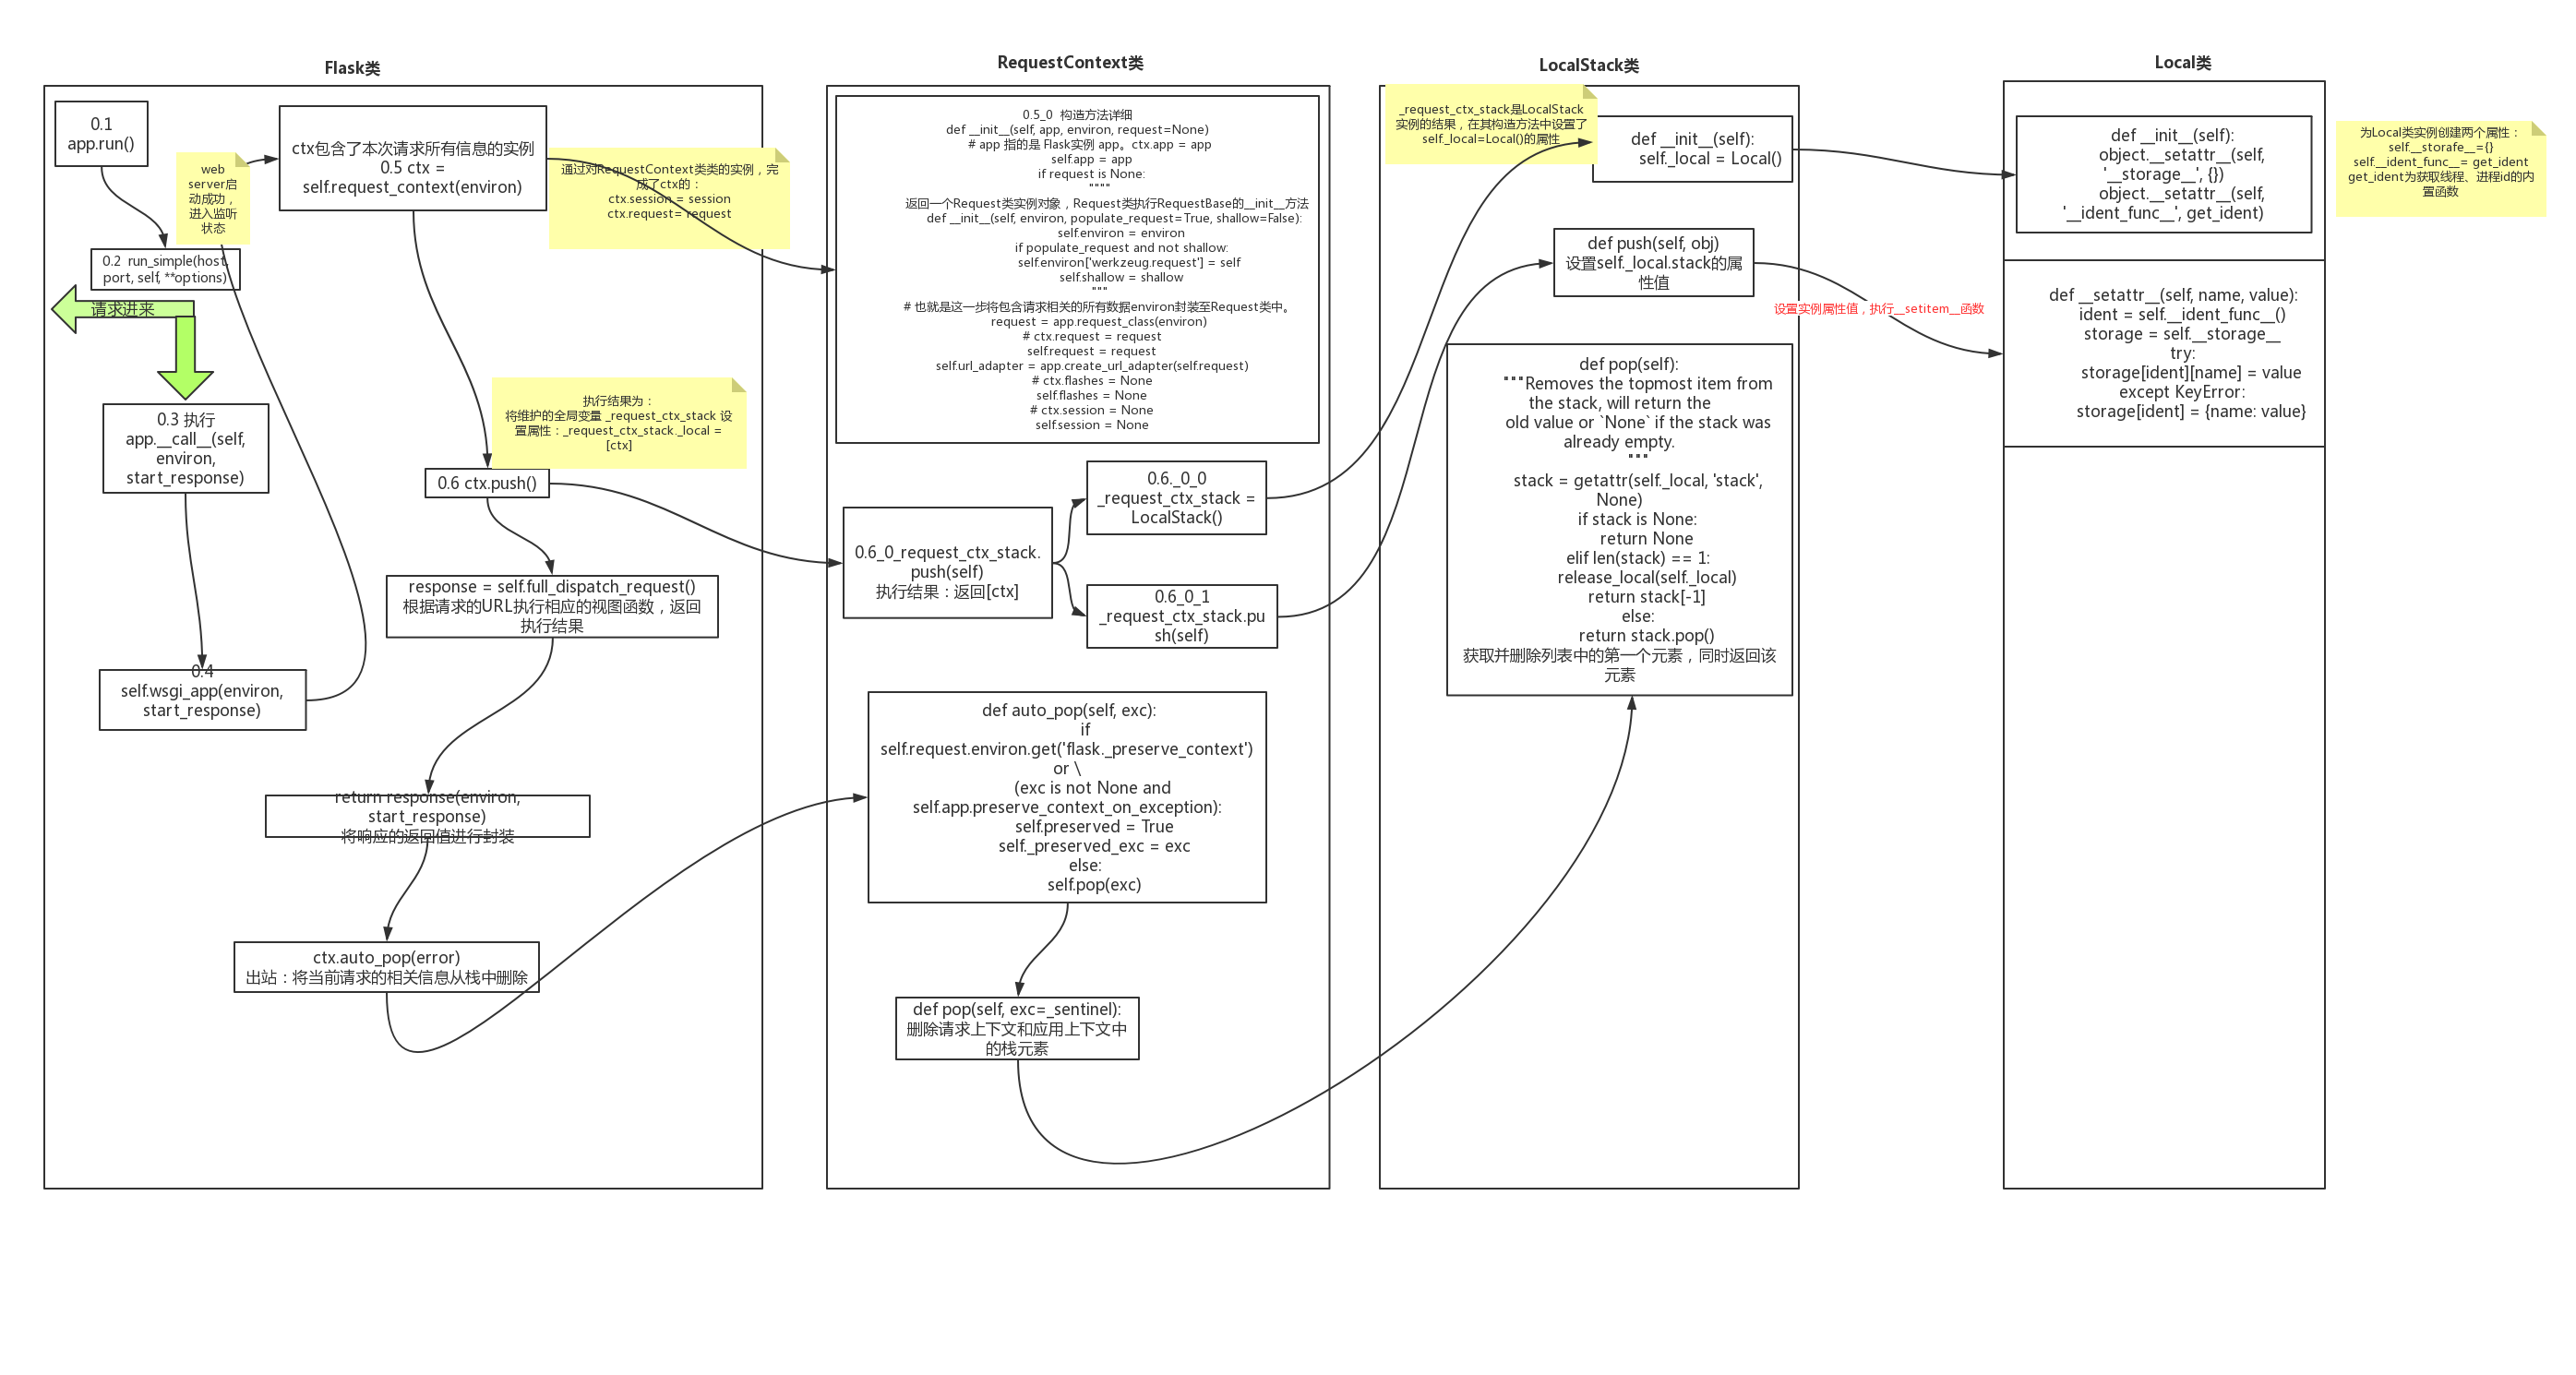
首先每次请求进来之后,对于每次请求进来之后,都会执行Flask类实例的__call__方法, 用来返回实例化的类 return self.wsgi_app(environ, start_response)
然后在上下文中, 要完成的操作是:
对原生请求进行封装,生成视图函数可操作的request对象
获取请求中的cookie信息,生成Session对象
执行预处理函数和视图函数
返回响应结果
以下为上下文源码,后续对各部分代码进行分别阐述:
def wsgi_app(self, environ, start_response):

    #  生成 ctx.request , request.session,请求上下文,即请求先关的数据都封装到了 ctx这个对象中去

    ctx = self.request_context(environ)

    error = None

    try:

        try:

            # 将ctx入栈,但是内部也将应用上下文入栈

            ctx.push()

            # 对请求的url进行视图函数的匹配,执行视图函数,返回响应信息(cookie)

            response = self.full_dispatch_request()

        except Exception as e:

            # 若发生错误将错误信息最为相应信息进行返回

            error = e

            response = self.handle_exception(e)

        except:

            error = sys.exc_info()[1]

            raise

        # 封装响应信息

        return response(environ, start_response)

    finally:

        if self.should_ignore_error(error):

            error = None

        # 出栈,删除本次请求的相关信息

        ctx.auto_pop(error)
1.请求上下文对象的创建
#  生成 ctx.request , request.session,请求上下文,即请求先关的数据都封装到了 ctx这个对象中去

ctx = self.request_context(environ)
生成RequestContext类实例,该实例包含了本次请求的request和Session信息
def request_context(self, environ):

    return RequestContext(self, environ)
对生成的类实例进行初始化,并且将传入的原生请求信息environ封装值Request类实例中。此时,request为封装之后的Request实例,Session为None
class RequestContext(object):
def __init__(self, app, environ, request=None):

    self.app = app

    if request is None:

        request = app.request_class(environ)

    self.request = request

    self.url_adapter = app.create_url_adapter(self.request)

    self.flashes = None

    self.session = None

    self._after_request_functions = []

    self.match_request()
request_class = Request
2. 将请求上下文和应用上下文入栈
将ctx入栈,但是内部也将应用上下文入栈
ctx.push()
def push(self):

    # 获取到的  top  == ctx

    top = _request_ctx_stack.top

    if top is not None and top.preserved:

        top.pop(top._preserved_exc)

    # Before we push the request context we have to ensure that there

    # is an application context.

    """

        _request_ctx_stack 和 _app_ctx_stack 都是 Local 类的实例

    """

    # 获取 应用上下文的栈顶元素,得到 app_ctx

    app_ctx = _app_ctx_stack.top

    if app_ctx is None or app_ctx.app != self.app:

        # self.app == Fask()

        # 得到 一个 AppContext类的实例对象,得到一个 应用上下文对象 app_ctx,此时 app_ctx拥有以下属性: app_ctx.app = app, app_ctx.g = app.app_ctx_globals_class()

        app_ctx = self.app.app_context()

        # 将 app_ctx 入栈,应用上下文入栈

        app_ctx.push()

        self._implicit_app_ctx_stack.append(app_ctx)

    else:

        self._implicit_app_ctx_stack.append(None)

    if hasattr(sys, 'exc_clear'):

        sys.exc_clear()

    # self 指的是 ctx,即将ctx入栈,即 _request_ctx_stack._local.stack = [ctx]。请求上下文入栈

    _request_ctx_stack.push(self)

    # 由于每次请求都会初始化创建你ctx,因此session都为None

    if self.session is None:

        # SecureCookieSessionInterface()

        # session_interface = SecureCookieSessionInterface(),即session_interface就是一个SecureCookieSessionInterface类的实例对象

        session_interface = self.app.session_interface

        # 第一次访问:生成一个 字典(容器) 返回至 self.session

        self.session = session_interface.open_session(

            self.app, self.request

        )

        if self.session is None:

            self.session = session_interface.make_null_session(self.app)
首先,应用上下文入栈,这里不多做解释说明,其执行流程与请求上下文相同,请参考下文对与请求上下文的入栈流程分析。
其次,请求上下文入栈。执行 _request_ctx_stack.push(self) ,我们先看看 _request_ctx_stack 是什么。由 _request_ctx_stack = LocalStack() 可知 _request_ctx_stack 是 LocalStack 类实例对象,进入 LocalStack 的构造方法中
 def __init__(self):

        self._local = Local()
即在类实例化过程中,为 _request_ctx_stack 实例对象创建 _local 属性,该属性的值是 Local 类实例,进入其构造方法中,在该方法中为每一个 Local 类实例创建 __storage__ 和 __ident_func__ 属性:
class Local(object):

    __slots__ = ('__storage__', '__ident_func__')

    def __init__(self):

        object.__setattr__(self, '__storage__', {})

        object.__setattr__(self, '__ident_func__', get_ident)
至此,完成了对 _request_ctx_stack实例对象创建的流程分析,但是需要注意的是,该实例对象并不是在每次请求之后才创建完成的,而是在flask项目启动之后就会被立即创建,该对象对于每次的请求都会调用该对象的push方法进行请求上下文的入栈,也就是说 _request_ctx_stack 是一个单例对象,该单例对象可以在任何的地方被调用,其他的单例对象还有:
"""

    注意:

        在项目启动之后,global里的代码就已经执行完毕,而且也只会执行一次,因此这里面的变量是针对所有请求所使用的,但是根据不同线程id用来存放各自的值

"""

#  生成 请求上下文栈对象,将请求上下文对象 ctx 保存到 _request_ctx_stack._local.stack = [ctx]中

_request_ctx_stack = LocalStack()

# 生成应用上下文栈对象,将应用上下文对象 app_ctx 保存到  _app_ctx_stack._local.stack = [app_ctx]中

_app_ctx_stack = LocalStack()

# current_app.__local = app

current_app = LocalProxy(_find_app)

# 获取ctx.request

request = LocalProxy(partial(_lookup_req_object, 'request'))

# 获取 ctx.session

session = LocalProxy(partial(_lookup_req_object, 'session'))

# 维护此次请求的一个全局变量,其实就是一个字典

g = LocalProxy(partial(_lookup_app_object, 'g'))
对于以上的单例对象,在项目启动之后被创建,在项目停止后被销毁,与请求是否进来无任何关系。现在我们知道了 _request_ctx_stack 的创建流程,我们返回之前对请求上下文的入栈操作 _request_ctx_stack.push(self) (self指的是ctx),进入push方法:
def push(self, obj):

    # obj == ctx

    """Pushes a new item to the stack"""

    rv = getattr(self._local, 'stack', None)

    if rv is None:

        self._local.stack = rv = []

    rv.append(obj)

    return rv
在上述流程中,首先使用反射获取 _request_ctx_stack._local.stack 的值,也就是获取请求栈的值。项目刚启动,在第一次请求进来之前,请求栈的为空,则代码继续向下执行将当前请求的ctx追加至请求栈中,并且返回请求栈的值。这里着重说一下入栈之前的流程和入栈之后的数据结构:执行 self._local.stack = rv = [] ,会调用 Local 类的 setattr 方法
def __setattr__(self, name, value):

        ident = self.__ident_func__()

        storage = self.__storage__

        try:

            storage[ident][name] = valueexcept KeyError:

            storage[ident] = {name: value}
self.__ident_func__() 为获取当前此次请求的协程id或者线程id, self.__storage__ 为一个字典对象,在项目启动后的第一个请求进来之后会发生 storage[ident][name] = value 的异常错误,抛出异常被下面捕获,因此执行 storage[ident] = {name: value} (以此次协程id或线程id为key,该key的value为一个字典,在字典中存储一个键值对"stack":[ctx]),即此数据结构为:
_request_ctx_stack._local.stack={

        线程id或协程id: {

            'stack': [ctx]

        }

}
同时, self._local.stack = [ctx]。至此,完成请求上下文的入栈操作,应用上下文与请求上下文的入栈流程相同,这里不在赘述。至此完成了请求入栈的操作,我们需要知道在上述过程中使用到的四个类: RequestContext (请求上下文类,实例对象ctx中包含了request,Session两个属性)、 Request (对请求的元信息environ进行封装)、 LocalStack (使用该类实例对象 _request_ctx_stack ,维护请求上下文对象ctx的入栈和出栈操作,相当于请求上下文对象的管理者)、 Local (堆栈类,真正存放请求上下文的类),如果你还是对着几个类关系还是不明白,请看我为你准备的图:

返回 wsgi_app 函数,继续向下执行 response = self.full_dispatch_request() 函数
3.根据请求的URl执行响应的视图函数,返回执行结果
response = self.full_dispatch_request()
def full_dispatch_request(self):

    #  将 _got_first_request =  True,依次执行定义的 before_first_request 函数

    self.try_trigger_before_first_request_functions()

    try:

        # 触发 request_started 信号

        request_started.send(self)

        #  执行钩子函数:before_request,before_first_request

        rv = self.preprocess_request()

        # 如果执行的before_request,before_first_request函数没有返回值,则继续执行视图函数。若有返回值,则不执行视图函数

        if rv is None:

            # 执行此url对应的别名的视图函数并执行该函数,返回视图函数的返回值,得到相应信息

            rv = self.dispatch_request()

    except Exception as e:

        # 如果发生错误,则将异常信息作为返回值进行返回

        rv = self.handle_user_exception(e)

    # 封装返回信息并返回,包括 session

    return self.finalize_request(rv)
将请求上下文和应用上下文入栈
在函数的内部首先执行预处理函数再执行视图函数,返回预处理函数或视图函数的返回值至浏览器。
返回 wsgi_app 函数中,继续向下执行 ctx.auto_pop(error) 函数,完成对请求上下文和应用上下文的出栈操作:
def auto_pop(self, exc):

    if self.request.environ.get('flask._preserve_context') or \

       (exc is not None and self.app.preserve_context_on_exception):

        self.preserved = True

        self._preserved_exc = exc

    else:

        self.pop(exc)
.
def pop(self, exc=_sentinel):

    """Pops the request context and unbinds it by doing that.  This will

    also trigger the execution of functions registered by the

    :meth:`~flask.Flask.teardown_request` decorator.

    .. versionchanged:: 0.9

       Added the `exc` argument.

    """

    app_ctx = self._implicit_app_ctx_stack.pop()

    try:

        clear_request = False

        if not self._implicit_app_ctx_stack:

            self.preserved = False

            self._preserved_exc = None

            if exc is _sentinel:

                exc = sys.exc_info()[1]

            self.app.do_teardown_request(exc)

            # If this interpreter supports clearing the exception information

            # we do that now.  This will only go into effect on Python 2.x,

            # on 3.x it disappears automatically at the end of the exception

            # stack.

            if hasattr(sys, 'exc_clear'):

                sys.exc_clear()

            request_close = getattr(self.request, 'close', None)

            if request_close is not None:

                request_close()

            clear_request = True

    finally:

        # 请求上下文出栈

        rv = _request_ctx_stack.pop()

        # get rid of circular dependencies at the end of the request

        # so that we don't require the GC to be active.

        if clear_request:

            rv.request.environ['werkzeug.request'] = None

        # Get rid of the app as well if necessary.

        if app_ctx is not None:

            # 应用上下文出栈

            app_ctx.pop(exc)

        assert rv is self, 'Popped wrong request context.  ' \

            '(%r instead of %r)' % (rv, self)
.
def pop(self):

    """Removes the topmost item from the stack, will return the

    old value or `None` if the stack was already empty.

    """

    stack = getattr(self._local, 'stack', None)

    if stack is None:

        return None

    elif len(stack) == 1:

        release_local(self._local)

        return stack[-1]

    else:

        # 获取并删除列表中的第一个元素,同时返回该元素

        return stack.pop()
stack获取到的是请求栈或应用栈的列表,栈的长度为1,则进入 elif 控制语句中,首先执行 release_local(self._local) :
def release_local(local):

    local.__release_local__()
local=self._local ,即执行 Local 类的 __release_local__ 方法,进入该方法:
def __release_local__(self):

    # 将 self.__storage__ 所维护的字典中删除当前协程或线程id为key的元素

    self.__storage__.pop(self.__ident_func__(), None)
从上面的语句中可以很明显看出,要执行的操作就是将以当前协程或线程id为key的元素从字典 self.__storage__ 中删除,返回至pop函数中的elif控制语句,最终将列表中的最后一个元素返回。注意,最终 _request_ctx_stack._local 的请求栈和应用栈列表中至少会存在一个元素。
感谢博主(https://www.cnblogs.com/liuyinzhou/p/9769490.html)
对本文的大力支持!!!
最新文章
- JS原生ajax与Jquery插件ajax深入学习
- NopCommerce 增加 Customer Settings
- wed应用程序开发原理
- JSONObject
- cassandra-replication_factor 和 consistency level
- Java-JDK配环境,eclipse工具认识
- 轻松搞定面试中的二叉树题目(java&python)
- servlet会话技术:Cookie
- Branch Prediction
- 使用Nginx实现灰度发布
- pyqt4 写动画不能播放问题集合
- js创建并下载文件
- .NetCore 下开发独立的(RPL)含有界面的组件包 (四)授权过滤
- Chrome调试WebView时Inspect出现空白的解决方法(使用离线包不Fan墙)
- C# 注册机功能开发,机器码设计
- Android 拍摄(横\竖屏)视频的懒人之路
- How to check WWN and Multipathing on Windows Server
- SQL IF while 游标
- OpenCV 基础笔记
- win10系统下cmd输入一下安装的软件命令提示拒绝访问解决办法