Android开发初体验
本文通过开发一个应用来学习Android基本概念及构成应用的UI组件。
开发的应用名叫GeoQuiz,它能给出一道道地理知识问题。用户点击true或false按钮回答问题,应用即时做出反馈
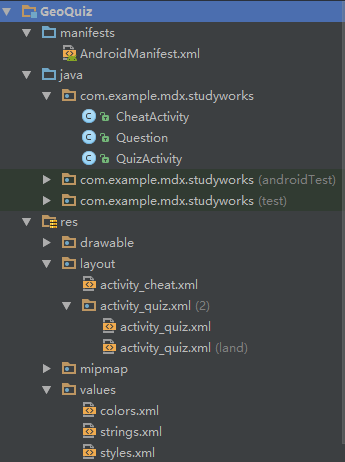
第一步请先自行创建一个新项目,目录如下
1. 用户界面设计
- 在XML文件(activity_quiz.xml)中定义组件
<LinearLayout

    xmlns:android="http://schemas.android.com/apk/res/android"

    android:layout_width="match_parent"

    android:layout_height="match_parent"

    android:gravity="center"

    android:orientation="vertical">

    <TextView

        android:id="@+id/question_text_view"

        android:layout_width="wrap_content"

        android:layout_height="wrap_content"

        android:padding="24dp" />

    <LinearLayout

        android:layout_width="wrap_content"

        android:layout_height="wrap_content"

        android:orientation="horizontal">

        <Button

            android:id="@+id/true_button"

            android:layout_width="wrap_content"

            android:layout_height="wrap_content"

            android:text="@string/true_button"/>

        <Button

            android:id="@+id/false_button"

            android:layout_width="wrap_content"

            android:layout_height="wrap_content"

            android:text="@string/false_button"/>

    </LinearLayout>

    <Button

        android:id="@+id/cheat_button"

        android:layout_width="wrap_content"

        android:layout_height="wrap_content"

        android:text="@string/cheat_button"/>

    <LinearLayout

        android:layout_width="wrap_content"

        android:layout_height="wrap_content"

        android:orientation="horizontal">

        <Button

            android:id="@+id/pre_button"

            android:layout_width="wrap_content"

            android:layout_height="wrap_content"

            android:text="@string/pre_button"

            android:drawableLeft="@drawable/arrow_left"/>

        <ImageButton

            android:id="@+id/next_button"

            android:layout_width="wrap_content"

            android:layout_height="wrap_content"

            android:src="@drawable/arrow_right"

            android:contentDescription="@string/next_button"/>

    </LinearLayout>

</LinearLayout>
activity_quiz.xml 效果图

- 创建字符串资源
最好不要硬编码设置组件的文本信息,如:android:text="True"。较好的做法是将文字内容放置在独立的字符串资源XML文件中,然后引用它们,如:android:text="@string/true_button"。
找到app/res/values目录,打开string.xml文件
添加字符串资源
<resources>

    <string name="app_name">GeoQuiz</string>

    <string name="true_button">True</string>

    <string name="false_button">False</string>

    <string name="pre_button">Pre</string>

    <string name="next_button">Next</string>

    <string name="correct_toast">Correct!</string>

    <string name="incorrect_toast">Incorrect!</string>

    <string name="question_oceans">The Pacific Ocean is larger than

the Atlantic Ocean.</string>

    <string name="question_mideast">The Suez Canal connects the Red Sea

and the Indian Ocean.</string>

    <string name="question_africa">The source of the Nile River is in Egypt.</string>

    <string name="question_americas">The Amazon River is the longest river in the Americas.</string>

    <string name="question_asia">Lake Baikal is the world\'s oldest and deepest

freshwater lake.</string>

    <string name="warning_text">Are you sure you want to do this?</string>

    <string name="show_answer_button">SHOW ANSWER</string>

    <string name="cheat_button">CHEAT!</string>

    <string name="judgment_toast">Cheating is wrong.</string>

    <string name="fist_page">This is the first page!</string>

</resources>
2. 从布局XML到视图对象
- activity子类的实例创建后,onCreate(Bundle)方法会被调用,同时需要获取并管理用户界面,可再调用setContentView(int layoutResID),根据传入的布局资源ID参数,生成指定布局视图并将其放在屏幕上,布局文件包含的组件也随之以各自的属性定义完成实例化。
public class QuizActivity extends AppCompatActivity {

    @Override

    protected void onCreate(Bundle savedInstanceState) {

        super.onCreate(savedInstanceState);

        setContentView(R.layout.activity_quiz);

    }

}
- 资源和资源ID
- 使用资源ID在代码中获取相应的资源。activity_quiz.xml布局的资源ID为R.layout.activity_quiz。
- 应用当前所有的资源放置在R.java文件中。切换至Project视图,展开目录app/build/generated/source/r.debug即可看到。R.java文件在Android项目编译过程中自动生成,修改布局或字符串等资源后,需再次运行应用,才会得到更新。
- 为需要的组件添加资源ID。如:android:id="@+id/idName"。
- 组件的应用
    private Button mTrueButton;//在activity_quiz.java添加成员变量

    @Override

    protected void onCreate(Bundle savedInstanceState) {

        ......

         mTrueButton=(Button)findViewById(R.id.true_button);//引用组件

         mTrueButton.setOnClickListener(new View.OnClickListener(){

            @Override

            public void onClick(View v) {

                //设置监听事件

            }

        });

    }
3. 创建提示消息
Android的toast是用来通知用户的简短弹出消息。调用Toast类的以下方法可创建toast:
public static Toast makeText(Context context,int resId,int durattion)
- Context参数通常是Activity的一个实例(Activity本身就是Context的子类)。
- 第二个参数是toast要显示字符串消息的资源ID。
- 第三个参数用来指定toast消息的停留时间。通常是Toast常量中的一个。
//举个例子来说

Toast.makeText(QuizActivity.this,R.string.incorrect_toast,Toast.LENGTH_SHORT).show();
4. Android与MVC设计模式
- 应用对象按模型、控制器和视图的类别分为三部分。Android应用基于模型-
控制器-视图(Model-View-Controller,MVC)的架构模式进行设计。MVC设计模式表明,应用的任何对象,归根结底都属于模型对象、视图对象以及控制对象中的一种。
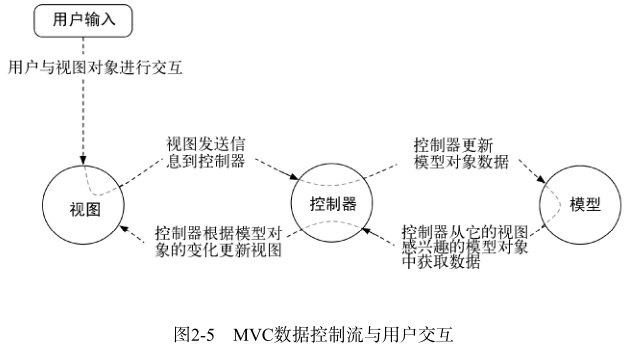
- 我们使用 QuizActivity 创建 Question 数组对象。继而通过与 TextView 以及三个 Button 的交互,在屏幕上显示地理知识问题,并根据用户的回答作出反馈,如图2-4所示。

- 模型层 Question类代码
public class Question {

    private int mTextResId;//保存地理知识问题字符串的资源ID。资源ID总是int类型

    private boolean mAnswerTrue;//问题答案

    public Question(int textResId,boolean answerTrue){

        mTextResId=textResId;

        mAnswerTrue=answerTrue;

    }

    public int getTextResId() {

        return mTextResId;

    }

    public void setTextResId(int textResId) {

        mTextResId = textResId;

    }

    public boolean isAnswerTrue() {

        return mAnswerTrue;

    }

    public void setAnswerTrue(boolean answerTrue) {

        mAnswerTrue = answerTrue;

    }

}
对于有前缀m的成员变量生成getter与setter方法
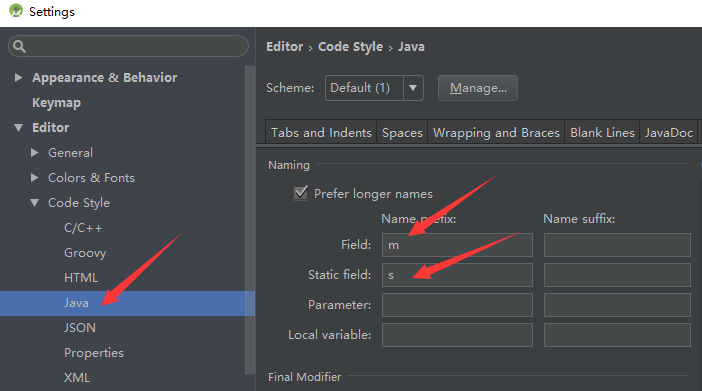
首先,配置Android Studio识别成员变量的 m 前缀。
打开Android Studio首选项对话框(Mac用户选择Android Studio菜单,Windows用户选择File →
Settings菜单)。分别展开Editor和Code Style选项,在Java选项下选择CodeGeneration选项页。在Naming表单中,选择Fields行,添加m作为fields的前缀。若要添加静态变量前缀s,则添加 s 作为Static Fields的前缀。如下图。
- 控制器层QuizActivity.java
public class QuizActivity extends AppCompatActivity {

    private ImageButton mNextButton;

    private TextView mQuestionTextView;

    private Question[] mQuestionBank=new Question[]{

            new Question(R.string.question_oceans,true),

            new Question(R.string.question_mideast,false),

            new Question(R.string.question_africa,false),

            new Question(R.string.question_americas,true),

            new Question(R.string.question_asia,true)

    };

    private int mCurrentIndex=0;

}
5. 添加图片资源
1.将图片添加到drawable对应目录中,后缀名为.png、.jpg、.gif的文件都会自动获得资源ID
- mdpi:中等像素密度屏幕(约160dpi)
- hdpi:高等像素密度屏幕(约240dpi)
- xhdpi:超高像素密度屏幕(约320dpi)
- xxdpi:超超高像素密度屏幕(约480dpi)
2. 在XML文件中引用资源
- 为next按钮增加图片(activity_quiz.xml)
 <Button

          android:id="@+id/next_button"

          android:layout_width="wrap_content"

          android:layout_height="wrap_content"

          android:text="@string/next_button"

          android:drawableLeft="@drawable/arrow_righ

          android:drawablePadding="4dp"/>
以@string/开头的定义是引用字符串资源
以@drawable/开头的定义是引用drawable资源
ImageButton组件继承自ImageView。Button组件则继承自TextView。ImageView和TextView继承自View
也可以ImageButton组件替换Button组件。删除next按钮的text以及drawable属性定义,并添加ImageView属性。
 <ImageButton

          android:id="@+id/next_button"

          android:layout_width="wrap_content"

          android:layout_height="wrap_content"

          android:src="@drawable/arrow_right"

          android:contentDescription="@string/next_button"/>
6. activity的生命周期

设备旋转时,系统会销毁当前QuizActivity实例,然后创建一个新的QuizActivity实例。所以每次旋转设备用户每次都会从第一题开始,现在来修正这个缺陷。
- 创建水平模式布局
右键单击res目录选择New->Android resource directory。资源类型选择layout,保持Source set的main选项不变,选择待选资源列表中的Orientation,然后单击>>按钮将其移动到已选资源特征区域。
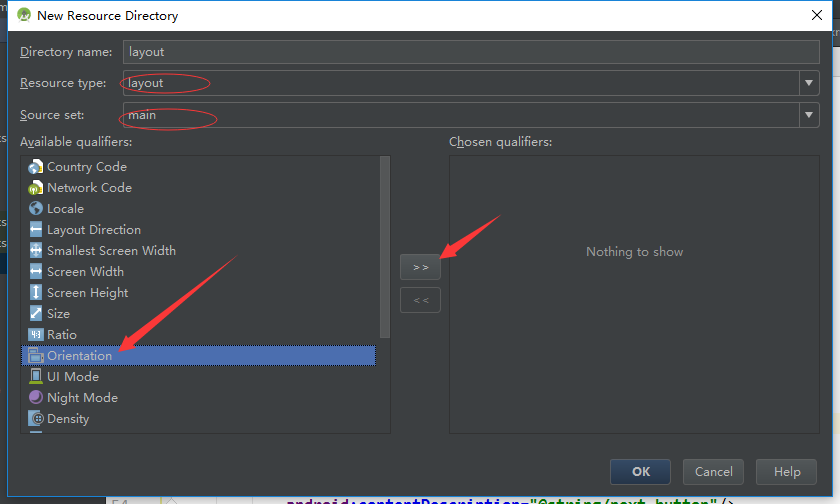
最后,确认选中Screen orientation下拉列表中的Landscape选项,并确保目录名显示为layout-land
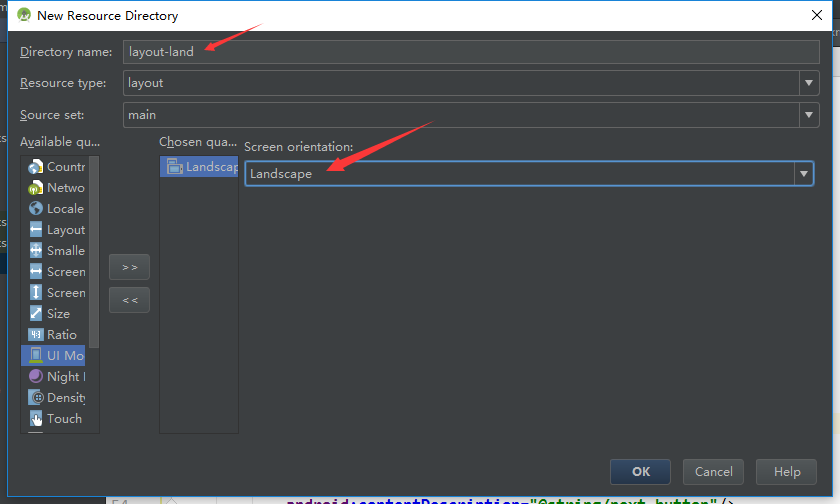
这里的-land后缀名是配置修饰符的另一个使用例子。Android依靠res子目录的配置修饰符定位最佳资源以匹配当前设备配置。设备处于水平方向时,Android会找到并使用res/layout-land目录下的布局资源。其它情况下,它会默认使用res/layout目录下的布局资源。
- 将res/layout目录下的activity_quiz.xml文件复制到res/layout-land目录。
注意:两个布局文件的文件名必须相同,这样它们才能以同一个资源ID被引用
- 水平模式布局修改(layout-land/activity_quiz.xml)
FrameLayout替换了最上层的LinearLayout。FrameLayout是最简单的ViewGroup组件,它一概不管如何安排其子视图的位置。FrameLayout子视图的位置排列取决于它们各自的android:layout_gravity属性。
<FrameLayout

    xmlns:android="http://schemas.android.com/apk/res/android"

    android:layout_width="match_parent"

    android:layout_height="match_parent">

    <TextView

        android:id="@+id/question_text_view"

        android:layout_width="wrap_content"

        android:layout_height="wrap_content"

        android:layout_gravity="center_horizontal"

        android:padding="24dp" />

    <LinearLayout

        android:layout_width="wrap_content"

        android:layout_height="wrap_content"

        android:layout_gravity="center_vertical|center_horizontal"

        android:orientation="horizontal">

        <Button

            android:id="@+id/true_button"

            android:layout_width="wrap_content"

            android:layout_height="wrap_content"

            android:text="@string/true_button"/>

        <Button

            android:id="@+id/false_button"

            android:layout_width="wrap_content"

            android:layout_height="wrap_content"

            android:text="@string/false_button"/>

    </LinearLayout>

    <Button

        android:id="@+id/cheat_button"

        android:layout_width="wrap_content"

        android:layout_height="wrap_content"

        android:layout_gravity="bottom|center"

        android:text="@string/cheat_button"/>

    <Button

        android:id="@+id/pre_button"

        android:layout_width="wrap_content"

        android:layout_height="wrap_content"

        android:layout_gravity="bottom|left"

        android:text="@string/pre_button"

        android:drawableLeft="@drawable/arrow_left"

        android:drawablePadding="4dp"/>

    <ImageButton

        android:id="@+id/next_button"

        android:layout_width="wrap_content"

        android:layout_height="wrap_content"

        android:layout_gravity="bottom|right"

        android:src="@drawable/arrow_right"

        android:contentDescription="@string/next_button"/>

</FrameLayout>
- 保存数据以应对设备旋转
覆盖以下Activity方法
protected void onSaveInstanceState(Bundle outState)
- 该方法通常在onStop()方法之前由系统调用,除非用户按后退键。
- 该方法的默认实现要求所有activity视图将自身数据状态保存在Bundle对象中。Bundle是存储字符串键与限定类型值之间映射关系(键值对)的一种结构。
public class QuizActivity extends AppCompatActivity {

    ......

    private int mCurrentIndex=0;

    private static final String KEY_INDEX="index";

    @Override

    protected void onSaveInstanceState(Bundle savedInstanceState) {

        super.onSaveInstanceState(savedInstanceState);

        savedInstanceState.putInt(KEY_INDEX,mCurrentIndex);

    }

    @Override

    protected void onCreate(Bundle savedInstanceState) {

        super.onCreate(savedInstanceState);

        setContentView(R.layout.activity_quiz);

        if(savedInstanceState!=null){

            mCurrentIndex=savedInstanceState.getInt(KEY_INDEX,0);

        }

        ......

    }

    ......

}
7. 日志
public static int d(String tag,String msg)//输出日志信息d:debug
方法的第一个参数通常是以类名为值的TAG常量传入
public class QuizActivity extends AppCompatActivity {

    private static final String TAG="QuizActivity";

    ......

    @Override

    protected void onCreate(Bundle savedInstanceState) {

        super.onCreate(savedInstanceState);

        Log.d(TAG,"onCreate(Bundle) called");

        setContentView(R.layout.activity_quiz);

        ......

    }

}
| 日志级别 | 方法 | 说明 |
|---|---|---|
| ERROR | Log.e(...) | 错误 |
| WARNING | Log.w(...) | 警告 |
| INFO | Log.i(...) | 信息型消息 |
| DEBUG | Log.w(...) | 调试输出 |
| VERBOSE | Log.v(...) | 仅用于开发 |
所有的日志记录方法都有两种参数签名:string类型的tag参数和msg参数;除tag和msg参数外再加上Throwable实例参数
9. 第二个activity
新activity将带来第二个用户界面,方便用户偷看问题的答案
第二个activity的布局组件的定义(activity_cheat.xml)
<LinearLayout

    xmlns:android="http://schemas.android.com/apk/res/android"

    xmlns:tools="http://schemas.android.com/tools"

    android:layout_width="match_parent"

    android:layout_height="match_parent"

    android:gravity="center"

    android:orientation="vertical"

    tools:context="com.example.mdx.studyworks.CheatActivity">

    <TextView

        android:layout_width="wrap_content"

        android:layout_height="wrap_content"

        android:padding="24dp"

        android:text="@string/warning_text"/>

    <TextView

        android:id="@+id/answer_text_view"

        android:layout_width="wrap_content"

        android:layout_height="wrap_content"

        android:padding="24dp"

        tools:text="Answer"/>

    <Button

        android:id="@+id/show_answer_button"

        android:layout_width="wrap_content"

        android:layout_height="wrap_content"

        android:text="@string/show_answer_button"/>

</LinearLayout>
activity_cheat.xml 效果图
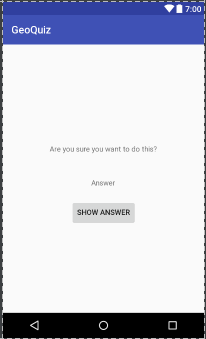
- 注意用于显示答案的TextView组件,它的tools和tools:text属性的命名空间比较特别。该命名空间可以覆盖某个组件的任何属性。这样,可在预览中看到效果,而在运行时Answer文字不会显现出来。
- 应用的所有activity都必须在manifest配置文件中声明,这样操作系统才能找到它们。
//在manifest配置文件中声明CheatActivity

<activity android:name=".CheatActivity">

        </activity>
启动activity
public void startActivity(Intent intent)
activity调用startActivity(Intent)方法时,调用请求实际发给了操作系统的ActivityManager。ActivityManager负责创建Activity实例并调用其onCreate(Bundle)方法
public Intent(Context pageContext,Class<?> cls)
传入该方法的Class类型参数告诉ActivityManager应该启动哪个activity
Context参数告诉ActivityManager在哪里可以找到它
    mCheatButton=(Button)findViewById(R.id.cheat_button);

    mCheatButton.setOnClickListener(new View.OnClickListener() {

        @Override

        public void onClick(View v) {

            //从QuizActivity启动CheatActivity

            Intent i=new Intent(QuizActivity.this,CheatActivity.class);

            startActivity(i);

        }

    });
activity间数据传递
- 使用 intent extra
将extra数据信息添加给intent,调用Intent.putExtra(...)方法
public Intent putExtra(String name,boolean value)
 Intent i=new Intent(QuizActivity.this,CheatActivity.class);

 i.putExtra(EXTRA_ANSWER_IS_TRUE,answerIsTrue);

 startActivity(i)
从extra获取数据
public boolean getBooleanExtra(String name,boolean defaultValue)
mAnswerIsTrue=getIntent().getBooleanExtra(EXTRA_ANSWER_IS_TRUE,false);
Activity.getIntent()方法返回了由startActivity(Intent)方法转发的Intent对象
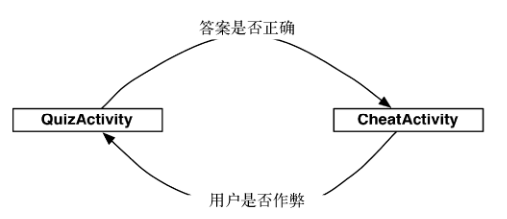
- 从子activity获取返回结果
//父activity

/*第二个参数是请求码,*/

public void startActivityForResult(Intent intent,int requestCode)

//子activity发送返回信息给父activity,有2种方法

public final void setResult(int resultCode)

public final void setResult(int resultCode,Intent data)
resultCode可以是以下任意一个预定义常量
- Activity.RESULT_OK ,即1
- Activity.RESULT_CANCELED ,即0
如需自定义结果代码,还可使用另一个常量:RESULT_FIRST_USER
//父,QuizActivity

 private static final int REQUEST_CODE_CHEAT=0;

 mCheatButton.setOnClickListener(new View.OnClickListener() {

       @Override

       public void onClick(View v) {

            boolean answerIsTrue=mQuestionBank[mCurrentIndex].isAnswerTrue();

            Intent i=new Intent(QuizActivity.this,CheatActivity.class);

            i.putExtra(EXTRA_ANSWER_IS_TRUE,answerIsTrue);

            startActivityForResult(i,REQUEST_CODE_CHEAT);

        }

});

//处理返回结果

@Override

    protected void onActivityResult(int requestCode, int resultCode, Intent data) {

        //super.onActivityResult(requestCode, resultCode, data);

        //结果码不一致

        if (resultCode!= Activity.RESULT_OK){

            return;

        }

        //结果码一致

        if (requestCode==REQUEST_CODE_CHEAT){

            if (data==null){

                return;

            }

            //解析结果intent

            mIsCheater=data.getBooleanExtra(EXTRA_ANSWER_SHOW,false);

        }

    }
//子,CheatActivity

 Intent data=new Intent();

 data.putExtra(EXTRA_ANSWER_SHOW,isAnswerShown);

 setResult(RESULT_OK,data);//设置返回结果
10. activity的使用与管理
被指定为应用的第一个activity
<!--指定第一个activity是QuizActivity-->

<activity android:name=".QuizActivity">

    <intent-filter>

        <action android:name="android.intent.action.MAIN"/>

        <category android:name="android.intent.category.LAUNCHER"/>

    </intent-filter>

</activity>
最新文章
- 使用libjpeg.framework压缩UIImage
- SharePoint 2013 激活标题字段外的Menu菜单
- NTFS 权限讲解 ACL
- tinyxml学习2
- CART
- 带宽计算-大B与小b的区别
- mac上java开发环境
- QSqlDatabase::addDatabase第一次运行的时候,生成SQLite文件的同时会产生一个默认连接
- Quill编辑器介绍及扩展
- tkinter第二章(添加图片,背景图片)
- HTTP请求中怎样选择Get和Post方式
- 【bzoj4568 scoi2016】幸运数字
- [ExtJS5学习笔记]第四节 欢迎来到extjs5-手把手教你实现你的第一个应用
- 结合Mybatis源码看设计模式——外观模式
- React生命周期详解
- 剑指offer面试题17:合并两个排序的链表
- SIP 认证
- 实验吧—隐写术——WP之 SB!SB!SB!
- JUC——线程同步锁(Condition精准控制)
- tomcat进程意外退出的问题分析(转)