JAVA并发-CountDownLatch
2024-09-08 08:45:47
源码:
内部类Sync
private static final class Sync extends AbstractQueuedSynchronizer {

        private static final long serialVersionUID = 4982264981922014374L;

        //调用AQS类的setState设置状态位

        Sync(int count) {

            setState(count);

        }

        int getCount() {

            return getState();

        }

        protected int tryAcquireShared(int acquires) {

            return (getState() == 0) ? 1 : -1;

        }

        protected boolean tryReleaseShared(int releases) {

            // Decrement count; signal when transition to zero

            for (;;) {

                int c = getState();

                if (c == 0)

                    return false;

                int nextc = c-1;

                if (compareAndSetState(c, nextc))

                    return nextc == 0;

            }

        }

    }
CountDownLatch初始化
    public CountDownLatch(int count) {

        if (count < 0) throw new IllegalArgumentException("count < 0");

        this.sync = new Sync(count);

    }
可以设置AQS中的state为count
阻塞分析
await
 public void await() throws InterruptedException {

        sync.acquireSharedInterruptibly(1);

    }
acquireSharedInterruptibly
   public final void acquireSharedInterruptibly(int arg)

            throws InterruptedException {

        if (Thread.interrupted())

            throw new InterruptedException();

        if (tryAcquireShared(arg) < 0)

            doAcquireSharedInterruptibly(arg);

    }
具体如下:
1、检测中断标志位
2、调用tryAcquireShared方法来检查AQS标志位state是否等于0,如果state等于0,则说明不需要等待,立即返回,否则进行3
3、调用doAcquireSharedInterruptibly方法进入AQS同步队列进行等待,并不断的自旋检测是否需要唤醒
doAcquireSharedInterruptibly
  private void doAcquireSharedInterruptibly(int arg)

        throws InterruptedException {

        final Node node = addWaiter(Node.SHARED);//加入队列尾部

        boolean failed = true;//是否成功标志

        try {

            for (;;) {

                final Node p = node.predecessor();//前驱

                //如果到head的下一个,因为head是拿到资源的线程,此时node被唤醒,很可能是head用完资源来唤醒自己的

                if (p == head) {

                    int r = tryAcquireShared(arg);

                    if (r >= 0) { //如果大于零,则说明需要唤醒

                        setHeadAndPropagate(node, r);//将head指向自己,还有剩余资源可以再唤醒之后的线程

                        p.next = null; // help GC

                        failed = false;

                        return;

                    }

                }

                //判断状态,寻找安全点,进入waiting状态,等着被unpark()或interrupt()

                if (shouldParkAfterFailedAcquire(p, node) &&

                    parkAndCheckInterrupt())

                    throw new InterruptedException();

            }

        } finally {

            if (failed)

                cancelAcquire(node);

        }

    }
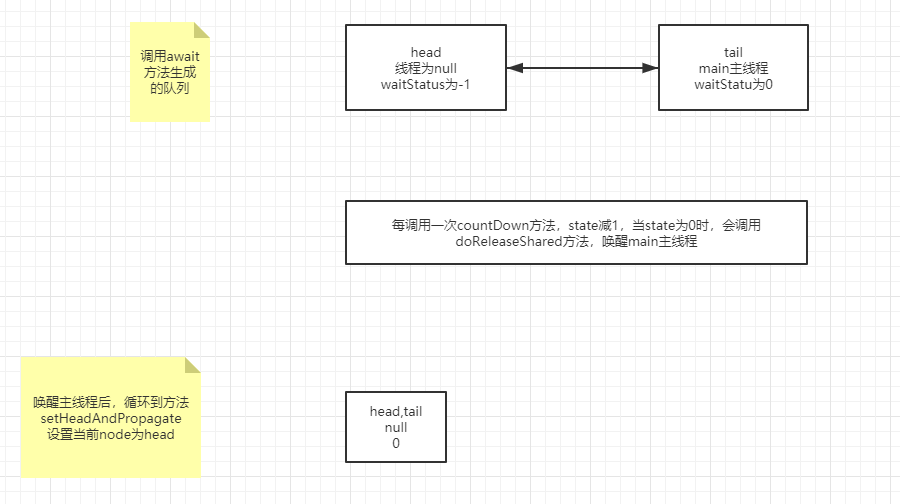
addWaiter(Node.SHARED),这里将会新增两个node
第一轮循环创建一个new Node(),空节点,线程也为空
第二轮将Node.SHARED加入到队列中,prev指向head
在最后一次release之前,tryAcquireShared会为-1
shouldParkAfterFailedAcquire(Node, Node)
1、源码:

    /**

     * Checks and updates status for a node that failed to acquire.

     * Returns true if thread should block. This is the main signal

     * control in all acquire loops.  Requires that pred == node.prev.

     *

     * @param pred node's predecessor holding status

     * @param node the node

     * @return {@code true} if thread should block

     */

    private static boolean shouldParkAfterFailedAcquire(Node pred, Node node) {

        int ws = pred.waitStatus; // 获取前驱结点的状态值

        if (ws == Node.SIGNAL) // 若前驱结点的状态为SIGNAL状态的话,那么该结点就不要想事了,直接返回true准备休息

            /*

             * This node has already set status asking a release

             * to signal it, so it can safely park.

             */

            return true;

        if (ws > 0) {

            /*

             * Predecessor was cancelled. Skip over predecessors and

             * indicate retry.

             */

            // 若前驱结点的状态为CANCELLED状态的话,那么就一直向前遍历,直到找到一个不为CANCELLED状态的结点

            do {

                node.prev = pred = pred.prev;

            } while (pred.waitStatus > 0);

            pred.next = node;

        } else {

            /*

             * waitStatus must be 0 or PROPAGATE.  Indicate that we

             * need a signal, but don't park yet.  Caller will need to

             * retry to make sure it cannot acquire before parking.

             */

             // 剩下的结点状态,则设置其为SIGNAL状态,然后返回false标志等外层循环再次判断

            compareAndSetWaitStatus(pred, ws, Node.SIGNAL);

        }

        return false;

    }

2、shouldParkAfterFailedAcquire主要是检测前驱结点状态,前驱结点为SIGNAL的话,则新结点可以安安心心休息了;

   如果前驱结点大于零,说明前驱结点处于CANCELLED状态,那么则以入参pred前驱为起点,一直往前找,直到找到最近一个正常等待状态的结点;

   如果前驱结点小于零,那么就将前驱结点设置为SIGNAL状态,然后返回false依赖acquireQueued的自旋再次判断是否需要进行休息;
第一次进入,ws为0
compareAndSetWaitStatus将pred的waitStatus设置为Node.SIGNAL
第二次进入就直接return true
parkAndCheckInterrupt()
1、源码:

    /**

     * Convenience method to park and then check if interrupted

     *

     * @return {@code true} if interrupted

     */

    private final boolean parkAndCheckInterrupt() {

        LockSupport.park(this); // 阻塞等待

        return Thread.interrupted(); // 被唤醒后查看是否有被中断过否?

    }

2、parkAndCheckInterrupt首先调用park让线程进入等待状态,然后当park阻塞被唤醒后,再次检测是否曾经被中断过;

   而被唤醒有两种情况,一个是利用unpark唤醒,一个是利用interrupt唤醒;
main线程会进入上述代码,阻塞main线程。
释放分析
countDown
    public void countDown() {

        sync.releaseShared(1);

    }

    public final boolean releaseShared(int arg) {

        if (tryReleaseShared(arg)) {

            doReleaseShared();

            return true;

        }

        return false;

    }
Sync内部类中的tryReleaseShared
 protected boolean tryReleaseShared(int releases) {

            // Decrement count; signal when transition to zero

            for (;;) {

                int c = getState();

                if (c == 0)

                    return false;

                int nextc = c-1;

                if (compareAndSetState(c, nextc))

                    return nextc == 0;

            }

        }
可见只有最后一次release的时候才会进入到doReleaseShared
doReleaseShared
    private void doReleaseShared() {

        for (;;) {

            Node h = head;

            if (h != null && h != tail) {

                int ws = h.waitStatus;

                if (ws == Node.SIGNAL) {

                    if (!compareAndSetWaitStatus(h, Node.SIGNAL, 0))

                        continue;            // loop to recheck cases

                    unparkSuccessor(h);

                }

                else if (ws == 0 &&

                         !compareAndSetWaitStatus(h, 0, Node.PROPAGATE))

                    continue;                // loop on failed CAS

            }

            if (h == head)                   // loop if head changed

                break;

        }

    }
进入上述代码时,head的waitStatus在上述shouldParkAfterFailedAcquire中设置为了Node.SIGNAL
所以这里会调用unparkSuccessor(h)
unparkSuccessor
 private void unparkSuccessor(Node node) {

        /*

         * If status is negative (i.e., possibly needing signal) try

         * to clear in anticipation of signalling.  It is OK if this

         * fails or if status is changed by waiting thread.

         */

        int ws = node.waitStatus;

        if (ws < 0)

            compareAndSetWaitStatus(node, ws, 0);

        /*

         * Thread to unpark is held in successor, which is normally

         * just the next node.  But if cancelled or apparently null,

         * traverse backwards from tail to find the actual

         * non-cancelled successor.

         */

        Node s = node.next;

        if (s == null || s.waitStatus > 0) {

            s = null;

            for (Node t = tail; t != null && t != node; t = t.prev)

                if (t.waitStatus <= 0)

                    s = t;

        }

        if (s != null)

            LockSupport.unpark(s.thread);

    }
这里s=node.next,node为head,s的线程为main线程,这里释放main线程。
流程
参考:
【JUC】JDK1.8源码分析之CountDownLatch(五)
最新文章
- ios initialize和init等方法
- Android NDK 开发(四)java传递数据到C【转】
- [添加用户]解决useradd 用户后没有添加用户Home目录的情况,Linux改变文件或目录的访问权限命令,linux修改用户密码
- C# 操作 Excel 常见问题收集和整理(定期更新,欢迎交流)
- 342. Power of Four
- [Design Pattern] Filter Pattern 简单案例
- 随记一个C的时间加减
- 移动端 web开发心得
- c语言的内存分析
- 【自然语言处理篇】--以NLTK为基础讲解自然语⾔处理的原理和基础知识
- PyTorch in Action: A Step by Step Tutorial
- 【个人杂谈】MacBook Pro的使用心得
- Tarjan总结(缩点+割点(边)+双联通+LCA+相关模板)
- 利用nginx进行集群部署
- 工具方法 .js
- Android Studio报错Error:Failed to open zip file. Gradle's dependency cache may be corrupt
- 2015-10-19 sql1
- Cordova - 解决升级NDK之后无法编译!
- osx安装启动mysql
- Oracle RMAN 学习