Vuex原理详解
一、Vuex是什么
Vuex是专门为Vuejs应用程序设计的状态管理工具。它采用集中式存储管理应用的所有组件的状态,并以相应的规则保证状态以一种可预测的方式发生改变。它集中于MVC模式中的Model层,规定所有数据操作必须通过 action - mutation - statechange 的流程来进行,再结合Vue的数据视图双向绑定特效来实现页面的展示更新。
1.Vuex框架运行流程

如图我们可以看到Vuex为Vue Components建立起了一个完整的生态圈,包括开发中的api调用,vuex的简单分析:
Vue组件接收交互行为,调用dispatch方法触发action相关处理,若页面状态需要改变,则调用commit方法提交mutation修改state,通过getters获取到state新值,提供了mapState、MapGetters、MapActions、mapMutations等辅助函数给开发在vm中处理store,重新渲染Vue Components,页面随之更新。
二、目录结构介绍
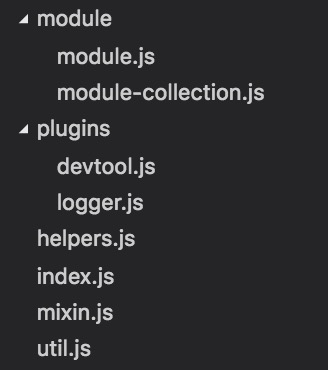
Vuex提供了非常强大的状态管理功能,源码代码量却不多,目录结构的划分也很清晰。先大体介绍下各个目录文件的功能:
module:提供module对象与module对象树的创建功能;
plugins:提供开发辅助插件,如“时间穿梭”功能,state修改的日志记录功能等;
helpers.js:提供action、mutation以及getters的查找API;
index.js:是源码主入口文件,提供store的各module构建安装;
mixin.js:提供了store在Vue实例上的装载注入;
util.js:提供了工具方法如find、deepCopy、forEachValue以及assert等方法。
三、初始化装载与注入
了解大概的目录及对应功能后,下面开始进行源码分析。
1.装载实例
先看一个简单的:
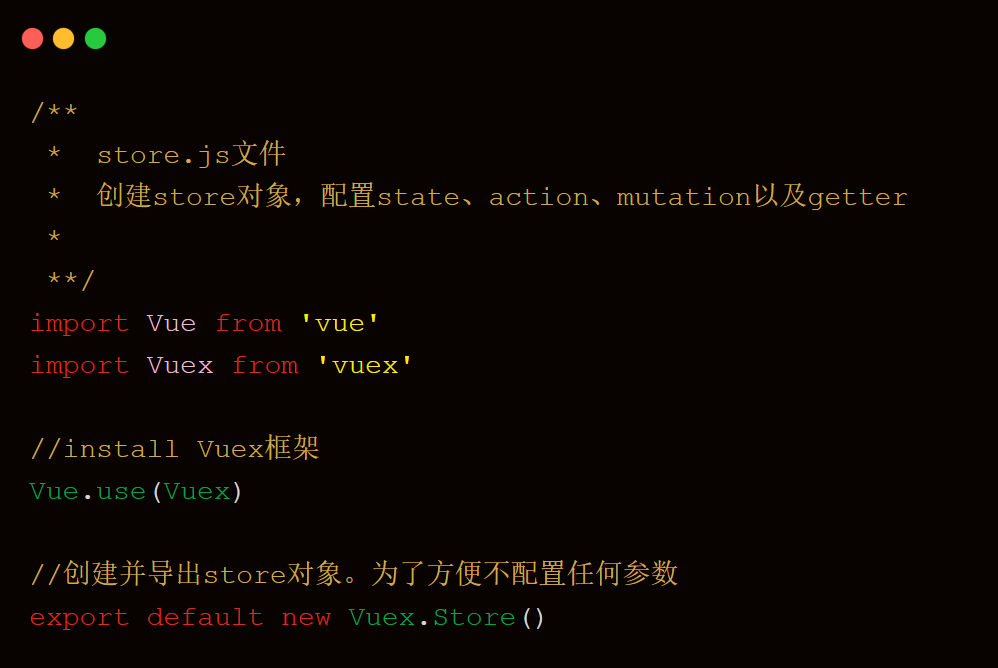
store.js文件中,加载Vue框架,创建并导出一个空配置的store对象实例。
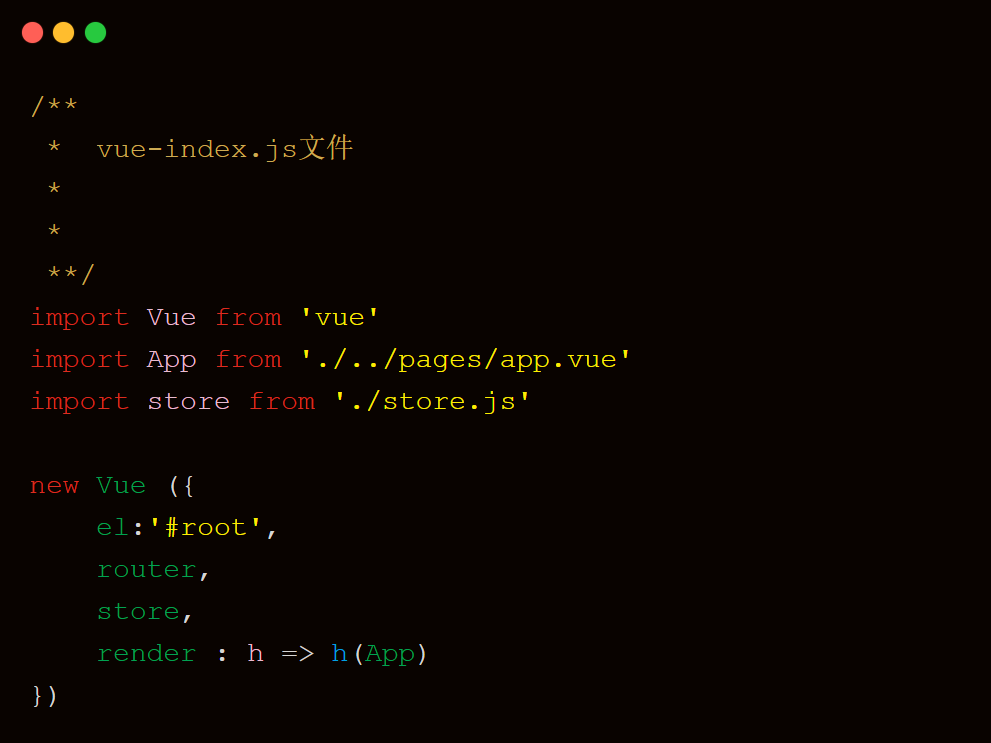
然后在index.js中,正常初始化一个页面根级别的Vue组件,传入这个自定义的store对象。
那么问题来了,使用Vuex只需要Vue.use(Vuex),并在Vue的配置中传入一个store对象的实例,store是如何实现注入的?
2.装载分析
index.js文件代码执行开头,定义局部变量,用于判断是否已经装载和减少全局作用域查找。
let Vue
然后判断若处于浏览器环境下且加载过Vue,则执行install方法。
//auto install in dist mode
if(typeof window !== 'undefined' && window.Vue) {
  install(window.Vue)
}
install方法将Vuex装载到Vue对象上, Vue.use(Vuex) 也是通过它执行,先看下Vue.use方法实现:
function (plugin:Function | Object) {
  /* istanbul ignore if */
  if(plugin.installed) {
    return
  }
  // additional parameters
  const args = toArray(arguments,1)
  args.unshift(this)
  if(typeof plugin.install === 'function') {
    //实际执行插件的install方法
    plugin.install.apply(plugin , args)
  }else {
    plugin.apply(null , args)
  }
  plugin.installed = true
  return this
}
如果是首次加载,将局部Vue变量赋值为全局的Vue对象,并执行applyMixin方法,install实现如下:
function install (_Vue) {
  if(Vue) {
    console.error (
      '[vuex] already installed. Vue.use(Vuex) should be called only once.'
    )
    return
  }
  Vue = _Vue
  applyMixin(Vue)
}
来看下applyMinxin方法内部代码。如果是2.x以上版本,可以使用hook的形式进行注入,或使用封装并替换Vue对象原型的_init方法,实现注入。
export default function (Vue) {
  //获取vue版本号
  const version = Number(Vue.version.split('.')[0])
  //判断版本是否大于2
  if(version >= 2) {
    const useInit = Vue.config._lifecycleHooks.indexOf('init') > -1
    Vue.mixin(useInit ? { init: vuexInit } : { beforeCreate: vuexInit })
  } else {
    // override init and inject vuex init procedure
    // for 1.x backwards compatibility.
    const _init = Vue.prototype._init
    Vue.prototype._init = function (options = {}) {
      options.init = options.init
      ? [vuexInit].concat(options.init)
      : vuexInit
      _init.call(this, options)
    }
  }
}
function vuexInit () {
  //通过 this.$options 对象获取任何数据和方法
  const options = this.$options
  //store injection
  if(options.store) {
    this.$store = options.store
  } else if (options.parent && options.parent.$store) {
    this.$store = options.parent.$store
  }
}
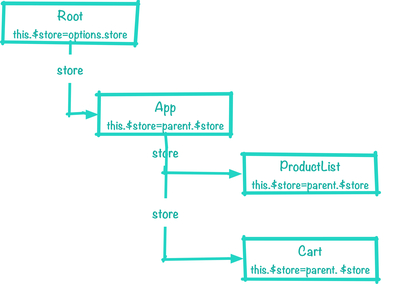
这段代码的作用就是在 Vue 的生命周期中的初始化(1.0 版本是 init,2.0 版本是 beforeCreated)钩子前插入一段 Vuex 初始化代码。这里做的事情很简单——将初始化Vue根组件时传入的store设置到this对象的$store属性上,子组件从其父组件引用$store属性,层层嵌套进行设置,在任意组件中执行this.$store都能找到装载的那个store对象。
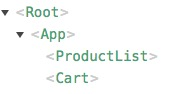
几张图理解下store的传递。
页面Vue结构:
对应store流向:
四、store对象构造
上面对Vuex框架的装载以及注入自定义store对象进行了分析,接下来详细分析store对象的内部功能和具体实现,那么问题又来了,为什么actions、getters、mutations中能从arguments[0]中拿到store的相关数据?
store对象实现逻辑比较复杂,先看下构造方法的整体逻辑流程来帮助后面的理解:
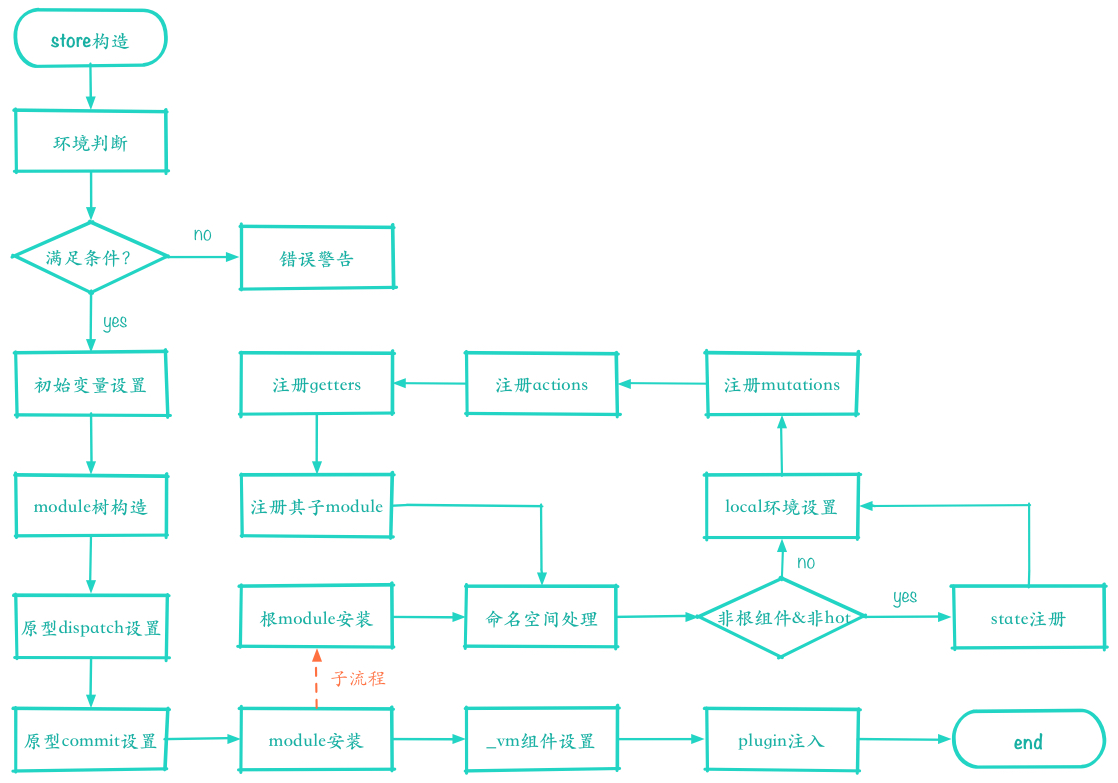
4.1 环境判断
开始分析store的构造函数,分小节逐函数逐行的分析其功能。
constructor (options = {}) {
  assert(Vue, `must call Vue.use(Vuex) before creating a store instance.`)
  assert(typeof Promise !== 'undefined', `vuex requires a Promise polyfill in this browser.`)
}
在store构造函数中执行环境判断,以下都是Vuex工作的必要条件:
1.已经执行安装函数进行装载;
2.支持Promise语法
assert函数是一个简单的断言函数的实现,一行代码即可实现
function assert (condition, msg) {
  if(!condition) throw new Error(`[vuex] ${msg}`)
}
4.2 数据初始化、module树构造
环境判断后,根据new构造传入的options或默认值,初始化内部数据。
const {
  state = {},
  plugins = [],
  strict = false
} = options

//store状态初始化
this._committing = false  // 是否在进行提交状态标识
this._actions = Object.create(null)  // actions操作对象
this._mutations = Object.create(null)  // mutations操作对象
this._wrappedGetters = Object.create(null)  // 封装后的getters集合对象
this._modules = new ModuleCollection(options)  // vuex支持store分模块传入,存储分析后的modules
this._modulesNamespaceMap = Object.create(null)  // 模块命名空间
this._subscribers = []  // 订阅函数集合,Vuex提供了subscribe功能
this._watcherVM = new Vue()  // Vue组件用于watch监视变化
调用 new Vuex.store(options)时传入的options对象,用于构造ModuleCollection类,下面看看其功能
constructor(rawRootModule) {
  // register root module (Vuex.store options)
  this.root = new Module(rawRootModule, false)

  // register all nested modules
  if(rawRootModule.modules) {
    forEachValue(rawRootModule.modules, (rawModule, key) => {
      this.register([key], rawModule, false)
    })
  }
}
ModuleCollection主要将传入的options对象整个构造为一个modele对象,并循环调用 this.register([key], rawModule, false) 为其中的modules属性进行模块注册,使其都成为module对象,最后options对象被构造成一个完整的组件树。ModuleCollection类还提供了modules的更替功能,详细实现可以查看源文件 module-collection.js
4.3 dispatch与commit设置
继续回到store的构造函数代码。
// bind commit and dispatch to self
const store = this;
const { dispatch, commit } = this;

this.dispatch = function boundDispatch (type, payload) {
  return dispatch.call(store, type, payload)
}

this.commit = function boundCommit (type, payload, options) {
  return commit.call(store, type, payload, options)
}
封装替换原型中的dispatch和commit方法,将this指向当前store对象。
dispatch和commit方法具体实现如下:
dispatch (_type, _payload) {
  //check object-style dispatch
  const {
    type,
    payload
  } = unifyObjectStyle(_type, _payload)  // 配置参数处理

  // 当前type下所有action处理函数集合
  const entry = this._actions[type]
  if (!entry) {
    console.error(`[vuex] unknown action type: ${type}`)
    return
  }
  return entry.length > 1
    ? Promise.all(entry.map(handler => handler(payload)))
    : entry[0](payload)
}
前面提到,dispatch的功能是触发并传递一些参数(payload)给对应的type的action。因为其支持2种调用方法,所以在dispatch中,先进行参数(payload)给对应type的action。因为其支持2种调用方法,所以在dispatch中,先进行参数的适配处理,然后判断action type是否存在,若存在就逐个执行(注:)
抄的这里,还没抄完
最新文章
- iOS之2016面试题一
- matlab:启动后无法调用工具包
- Android笔记——四大组件详解与总结
- java+hadoop+spark+hbase+scala+kafka+zookeeper配置环境变量记录备忘
- WebBrowser控件跨域访问页面内容
- WordPress插件制作笔记(二)---Second Plugins Demo
- 音乐TV2015校园招聘A第二大发行量(对中国科学院大学站)
- 使用pip安装报错的处理方法
- Linux运维:安装CentOS7.2-图解
- Linux下安装ActiveMQ CPP
- [Swift]LeetCode709. 转换成小写字母 | To Lower Case
- jQuery事件委托
- LeetCode第20题
- 做SEO都需要具备哪些方面的知识
- 运行ntpdate报错:Temporary failure in name resolution
- 等待事件对应的p1,p2,p3含义
- jenkins 判断是手动触发还是定时器触发
- Integer类小细节随笔记录
- BZOJ1876:[SDOI2009]SuperGCD——C++高精度良心题解
- [GO]切片和底层数组的关系