安装mysql教程
linux下安装mysql
方式一:源码包安装
环境介绍:本安装教程基于虚拟机CentOS7.6版本进行安装,mysql版本为5.7版本。
一、卸载已安装的mysql服务
由于我原本在虚拟机已安装过mysql,所以这里我需要先卸载掉mysql才能进行实验安装教程,若你从未安装过mysql无需进行这一步操作。
查看是否安装有mysql服务可以通过以下命令:
[root@localhost ~]# rpm -qa | grep mysql

mysql80-community-release-el7-.noarch

mysql-community-client-5.7.-.el7.x86_64

mysql-community-libs-5.7.-.el7.x86_64

mysql-community-server-5.7.-.el7.x86_64

mysql-community-common-5.7.-.el7.x86_64

mysql-community-libs-compat-5.7.-.el7.x86_64

[root@localhost ~]#
查看mysql是否正在运行,若在运行,应先将服务停止再进行卸载
[root@localhost ~]# service mysqld status

Redirecting to /bin/systemctl status mysqld.service

● mysqld.service - MySQL Server

   Loaded: loaded (/usr/lib/systemd/system/mysqld.service; enabled; vendor preset: disabled)

   Active: inactive (dead) since Sat -- :: CST; 28s ago

     Docs: man:mysqld()

           http://dev.mysql.com/doc/refman/en/using-systemd.html

  Process:  ExecStart=/usr/sbin/mysqld --daemonize --pid-file=/var/run/mysqld/mysqld.pid $MYSQLD_OPTS (code=exited, status=/SUCCESS)

  Process:  ExecStartPre=/usr/bin/mysqld_pre_systemd (code=exited, status=/SUCCESS)

 Main PID:  (code=exited, status=/SUCCESS)

Jul  :: localhost.localdomain systemd[]: Starting MySQL Server...

Jul  :: localhost.localdomain systemd[]: Started MySQL Server.

Jul  :: localhost.localdomain systemd[]: Stopping MySQL Server...

Jul  :: localhost.localdomain systemd[]: Stopped MySQL Server.

[root@localhost ~]# service mysqld stop
开始卸载
[root@localhost ~]# rpm -e $(rpm -qa | grep mysql-)

error: Failed dependencies:

    libmysqlclient.so.()(64bit) is needed by (installed) postfix-:2.10.-.el7.x86_64

    libmysqlclient.so.(libmysqlclient_18)(64bit) is needed by (installed) postfix-:2.10.-.el7.x86_64

[root@localhost ~]#
由于有些库被其他服务依赖无法卸载,需要先卸载依赖该库的服务。这里我们直接用--nodeps参数忽略依赖
[root@localhost ~]# rpm -e $(rpm -qa | grep mysql-) --nodeps

[root@localhost ~]#
[root@localhost ~]# rpm -qa | grep mysql
[root@localhost ~]#
卸载完成
二、下载源码包
官网mysql5.7源码包下载地址:https://cdn.mysql.com//Downloads/MySQL-5.7/mysql-5.7.26.tar.gz
下载完成后,我们根据官方的安装文档一步一步来操作。
警告:文档提示对于用yum安装过mysql的linux环境,需要彻底的卸载干净,将原有的数据库文件以及配置文件删除。
rpm -qa | grep -i mysql

rpm -qa | grep -i mariadb

rpm -e postfix mariadb-libs redhat-lsb-core
[root@localhost src]# rm -rf /var/lib/mysql

[root@localhost src]# rm -rf /var/log/mysqld.log
[root@localhost src]# rm -rf /etc/my.cnf
重要:mysql依赖于libaio库,对于5.7.19以及之后的mysql,它将依赖于libnuma库,可以通过yum来进行搜索安装。
源码安装所需工具
1. CMake,用来在所有平台构建框架,可从 http://www.cmake.org下载
2. 一个C++编译器
3. boost C++库,版本为Boost 1.59.0,boost安装好后需要指定它的目录位置,cmake . -DWITH_BOOST=/usr/local/boost_1_59_0
4. ncurses库
5. bison库
三、正式开始安装
安装Boost 1.59.0,下载地址:https://nchc.dl.sourceforge.net/project/boost/boost/1.59.0/boost_1_59_0.tar.gz
需要先下载编译器才能编译
[root@localhost ~]# yum install -y gcc-c++ gcc

---省略安装过程---
解压缩编译安装(好像不用安装,只要cmake参数指定该目录就行)
[root@localhost src]# tar -xzf boost_1_59_0.tar.gz

[root@localhost src]# cd boost_1_59_0

[root@localhost boost_1_59_0]#

[root@localhost boost_1_59_0]# ./bootstrap.sh --prefix=/usr/local/boost/

[root@localhost boost_1_59_0]# ./b2 install

编译过程时间较长. . .

common.copy /usr/local/boost/lib/libboost_timer.a

gcc.compile.c++ bin.v2/libs/test/build/gcc-4.8./release/link-static/threading-multi/test_main.o

gcc.archive bin.v2/libs/test/build/gcc-4.8./release/link-static/threading-multi/libboost_test_exec_monitor.a

common.copy /usr/local/boost/lib/libboost_test_exec_monitor.a

...failed updating  targets...

...skipped  targets...

...updated  targets...

[root@localhost boost_1_59_0]#
安装依赖库
[root@localhost src]# yum install -y cmake numactl-libs ncurses ncurses-devel bison
解压缩源码包,进入源码包配置环境参数
[root@localhost mysql-5.7.26]# tar xf mysql-5.7.26.tar.gz
[root@localhost mysql-5.7.]# cmake . -DWITH_BOOST=/usr/local/src/boost_1_59_0 \
> -DCMAKE_INSTALL_PREFIX=/usr/local/mysql \

> -DMYSQL_DATADIR=/var/mysql/data \

> -DSYSCONFDIR=/etc \

> -DDEFAULT_CHARSET=utf8mb4 \

> -DDEFAULT_COLLATION=utf8mb4_bin
开始编译安装,时间可能比较长
[root@localhost mysql-5.7.]# make && make install
创建mysql用户和组,以及文件所有者
[root@localhost mysql-5.7.]# useradd -r -s /bin/false mysql

[root@localhost mysql-5.7.]# ll -d /usr/local/mysql

drwxr-xr-x.  root root  Jul  : /usr/local/mysql

[root@localhost mysql-5.7.]# chown -R mysql:mysql /usr/local/mysql/
[root@localhost mysql]# mkdir -p /var/mysql/data
[root@localhost mysql]# chown -R mysql:mysql /var/mysql/data
初始化服务程序
shell> bin/mysqld --initialize --user=mysql

shell> bin/mysql_ssl_rsa_setup

shell> bin/mysqld_safe --user=mysql &
shell> cp support-files/mysql.server /etc/init.d/mysql.server
初始化时会有日志显示出来,里面就有数据库的初始密码,需要登录数据库重置密码
[root@localhost mysql]# bin/mysqld --initialize --user=mysql

--23T07::.024968Z  [Warning] TIMESTAMP with implicit DEFAULT value is deprecated. Please use --explicit_defaults_for_timestamp server option (see documentation for more details).

--23T07::.707093Z  [Warning] InnoDB: New log files created, LSN=

--23T07::.825200Z  [Warning] InnoDB: Creating foreign key constraint system tables.

--23T07::.887278Z  [Warning] No existing UUID has been found, so we assume that this is the first time that this server has been started. Generating a new UUID: 395372bf-ad1f-11e9--000c2966b1a5.

--23T07::.894216Z  [Warning] Gtid table is not ready to be used. Table 'mysql.gtid_executed' cannot be opened.

--23T07::.898770Z  [Note] A temporary password is generated for root@localhost: ZhsIqjl1!aL*
添加命令进环境变量
vim /etc/profile.d/mysql.sh

export PATH=$PATH:/usr/local/mysql/bin
shell> source /etc/profile.d/mysql.sh
进入数据库,修改初始密码
[root@localhost mysql]# mysql -uroot -p

Enter password:

Welcome to the MySQL monitor.  Commands end with ; or \g.

Your MySQL connection id is

Server version: 5.7.

Copyright (c) , , Oracle and/or its affiliates. All rights reserved.

Oracle is a registered trademark of Oracle Corporation and/or its

affiliates. Other names may be trademarks of their respective

owners.

Type 'help;' or '\h' for help. Type '\c' to clear the current input statement.

mysql> ALTER USER 'root'@'localhost' IDENTIFIED BY 'MyNewPass4!';

Query OK,  rows affected (0.00 sec)

mysql> show databases;

+--------------------+

| Database           |

+--------------------+

| information_schema |

| mysql              |

| performance_schema |

| sys                |

+--------------------+

 rows in set (0.00 sec)

mysql>
设置开机启动服务
[root@localhost mysql]# chkconfig mysql.server on

[root@localhost mysql]# service mysql.server status  # 查看mysql启动状态

 SUCCESS! MySQL running ()

[root@localhost mysql]#
由于5.7版本后都没有初始的my.cnf文件,需要自己创建,我们创建/etc/my.cnf文件
vim /etc/my.cnf

[mysqld]

log-error=/var/log/mysqld.log
方式二:yum 安装mysql
下载mysql安装源
yum localinstall https://dev.mysql.com/get/mysql80-community-release-el7-3.noarch.rpm
选择安装mysql版本,这里我们安装5.7版本
yum-config-manager --disable mysql80-community

yum-config-manager --enable mysql57-community
开始安装
yum install mysql-community-server
开启服务,并设置自启
service mysqld start

systemctl enable mysqld
查看初始密码
grep 'temporary password' /var/log/mysqld.log
Windows下安装mysql
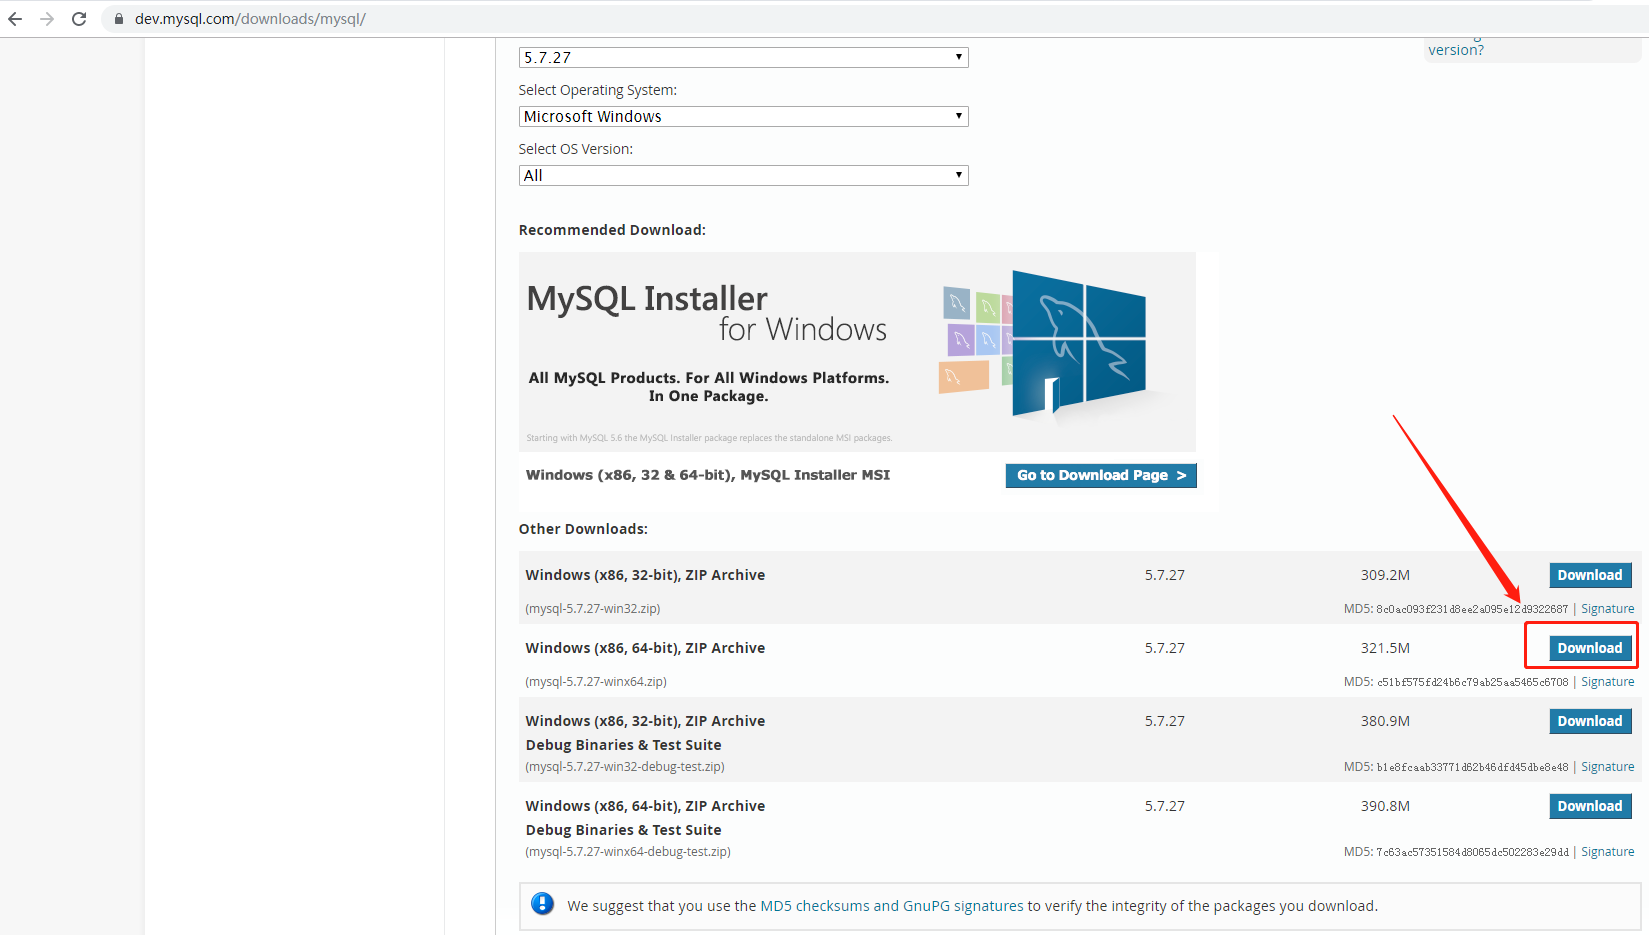
下载mysql压缩包
进入安装包目录,创建data文件夹,进入命令行界面,记住是在bin目录下
mysqld --initialize-insecure    # 不安全初始化
# 或者
mysqld --initialize  # 安全初始化,会有初始密码
mysqld --install # 安装
net start mysql  # 开启服务
mysql -uroot -p    # 登录
若是安全初始化,需要在日志中查看初始密码,日志在安装目录/data/下,以.err结尾的文件,里面有一行有temporary password就是初始密码
如果要在任何目录都能连接mysql,需要将bin/目录添加入环境变量,window中mysql的配置文件为安装包目录下自主创建my.ini文件
至此,mysql安装教程结束。
忘记密码修改方法
首先关闭mysql服务
net stop mysql  # window
# 或者
service mysql stop  # linux
启动忽略模式,会进入阻塞状态
mysqld --skip-grant-tables
打开另一终端进行登录,无需密码,登录后修改密码
mysql -uroot -p

update mysql.user set authentication_string=password('') where user='root' and host='localhost';  # 修改密码
总结:
这是我第一次源码包安装mysql,发现自己还是对于linux不太熟悉,很多常见目录不知道用途,编译的过程中也遇到了很多的报错
主要是通过搜索引擎解决的,遇到报错先看报错信息,很多报错信息都是很容易看懂的,试着自己解决下报错确实会有很大的成就感,
通过这次安装,也知道了源码包安装是多么的繁琐,之前用yum安装简直是太方便了,不过用源码包安装才能让自己对这个软件的环境
更加的熟悉。
最新文章
- Fis3的前端模块化之路[基础篇]
- 谷歌input框黄色背景问题
- PDF 补丁丁 0.4.2.1063 测试版发布:新增检查新版本功能
- python报错:SyntaxError: Non-ASCII character '\xe5'的解决方法
- jquery获取当前时间
- C# 整形数组排序
- Oracle 面试宝典 - General Questions
- 分享注册AltiumDesignerLive官网账号注册方法教程
- IOS UITextField &UITextView
- log4cxx 使用代码进行配置
- Bootstrap入门(十七)组件11:分页与标签
- 获取select中的值
- h5手机查看
- ReSharper导致Visual Studio缓慢?
- centos查看系统/硬件信息及运维常用命令
- Ollydbg中的内存断点和硬件断点的区别
- Can't find model 'en'
- easyui再学习的一部分代码
- Coursera-AndrewNg(吴恩达)机器学习笔记——第四周编程作业(多分类与神经网络)
- SpringBoot日记——错误页处理的配置篇