从零搭建DotnetCore2.0
没时间介绍了,废话不说先上车

以下所有扯淡都是建立在.NETCore2.0环境已经搭建好
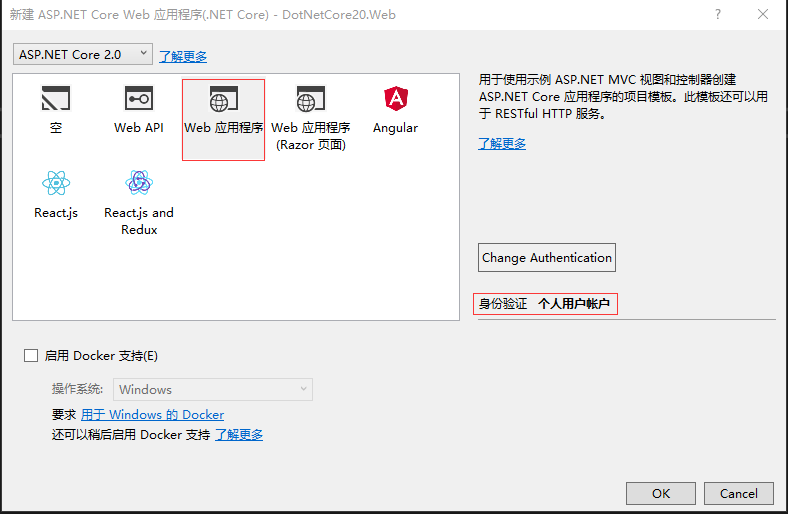
右键解决方案>新建项目>
选择Web>ASP.NETCoreWeb应用程序(.NET Core)

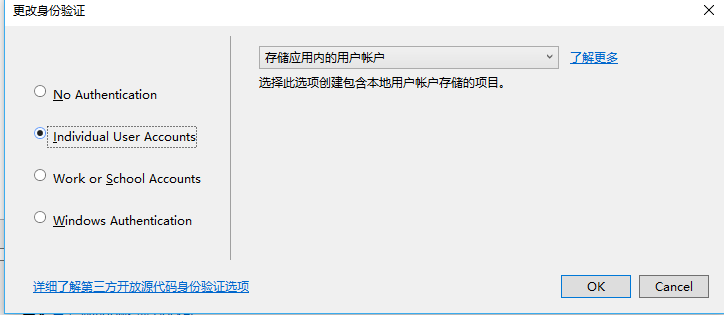
选择Web应用程序,暂时不选择启用Docker,身份验证选择个人用户账户(会自动生成一系列和用户认证的代码)
随后生代码层次目录如下:

其中会包含身份信息的相关实现,比如相关实体信息(user)之类的,如果想对扩展微软自动的生成的用户实体类,可在Models中的ApplicationUser下扩展,
在此ApplicationUser中添加属性即可:比如添加叫WeChatId属性,添加后如下:
using System;

using System.Collections.Generic;

using System.Linq;

using System.Threading.Tasks;

using Microsoft.AspNetCore.Identity;

namespace DotNetCore20.Web.Models

{

    // Add profile data for application users by adding properties to the ApplicationUser class

    public class ApplicationUser : IdentityUser

    {

        /// <summary>

        /// 微信Id

        /// </summary>

        public string WeChatId { get; set; }

    }

}
在之后生成运行并迁移,数据库的AspNetUsers中就会多出WeChatId 属性.
一:安装引用
nugnet恢复引用失效时,可在程序包管理控制台输入:
dotnet restore 即可

会发现在恢复指令后在NuGet中会有一个Microsoft.VisualStudio.Web.CodeGeneration.Design的报错,信息如下:
已使用“.NETPortable,Version=v0.0,Profile=Profile259, .NETFramework,Version=v4.6.1”而不是项目目标框架“.NETCoreApp,Version=v2.0”还原了包“Microsoft.Composition 1.0.27”。这可能会导致兼容性问题
这个库是ASP.NET Core的代码生成工具。包含用于生成控制器和视图的dotnet-aspnet-codegenerator命令,暂时可先卸载,不影响项目运行.
对项目类库的引用有以下几种方式
1.Nuget去安装(官网https://www.nuget.org/packages/)
2.右键依赖项点击菜单中的添加引用
3.可在程序包管理控制台输入:Install-Package 引用类库名称
4.可右键编辑csproj工程文件进行添加,然后执行dotnet restore
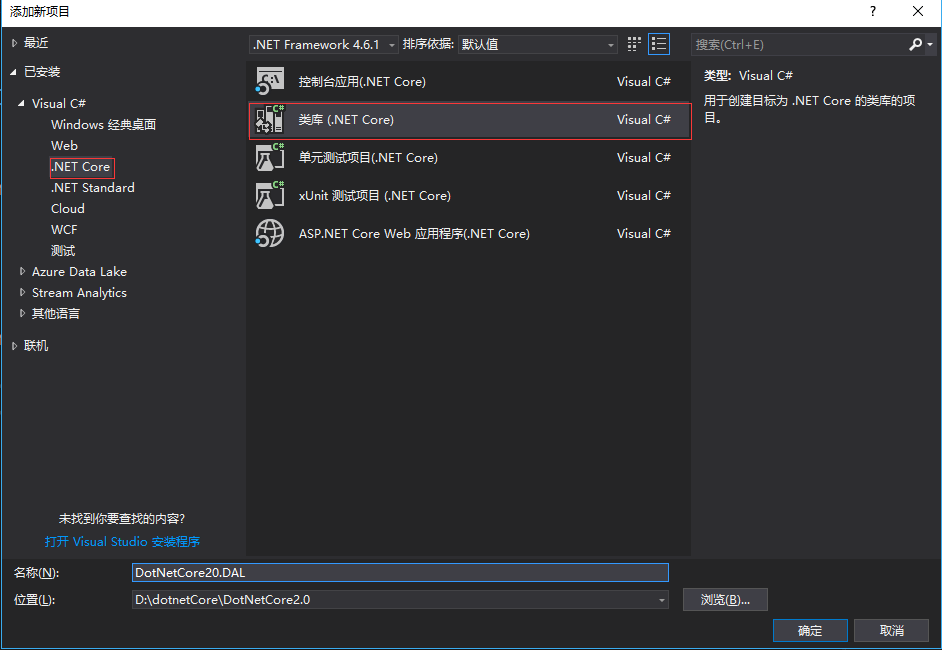
二.创建实体程序集
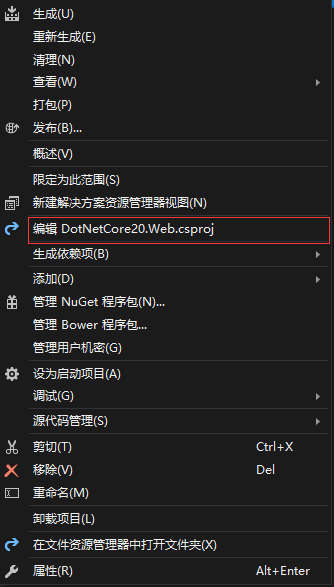
右键解决方案>添加项目>

首先创建抽象类,供Entity实体继承,主要为每个实体提供公用属性
using System;

using System.Collections.Generic;

using System.ComponentModel.DataAnnotations;

using System.Runtime.Serialization;

using System.Text;

namespace DotNetCore20.Entity.Core

{

    /// <summary>

    /// DB表基底

    /// </summary>

    [Serializable]

    public abstract partial class BaseEntity

    {

        /// <summary>

        /// Id

        /// </summary>

        [DataMember]

        public long Id { get; set; }

        /// <summary>

        /// DB 資料版號

        /// </summary>

        [Timestamp]

        public byte[] RowVersion { get; set; }

        /// <summary>

        /// 创建时间

        /// </summary>

        [DataMember]

        public DateTime CreateTime { get; set; }

        /// <summary>

        /// 更新时间

        /// </summary>

        [DataMember]

        public DateTime UpdateTime { get; set; }

        /// <summary>

        /// 状态

        /// </summary>

        [DataMember]

        public EnumState State { get; set; }

    }

    /// <summary>

    /// 状态

    /// </summary>

    public enum EnumState

    {

        /// <summary>

        /// 删除

        /// </summary>

        Delete = ,

        /// <summary>

        /// 正常

        /// </summary>

        Normal = ,

    }

}
添加一个UserExtend用户扩展类(Entity):
using DotNetCore20.Entity.Core;

using System;

using System.Runtime.Serialization;

namespace DotNetCore20.Entity

{

    [DataContract]

    public class UserExtend : BaseEntity

    {

        /// <summary>

        /// 用户Id

        /// </summary>

        [DataMember]

        public long UserId { get; set; }

        /// <summary>

        /// 昵称

        /// </summary>

        [DataMember]

        public long NickName { get; set; }

    }

}
三.创建数据层
添加引用
DAL层需要用到EF实体映射相关和我们自己前面定义的Entity中的UserExtend实体表,所以要添加相关引用,DotNetCore20.Entity和 Microsoft.EntityFrameworkCore.Tools
快捷键:Ctrl+Alt+o 打开程序包管理器输入以下:
install-package Microsoft.EntityFrameworkCore.Tools

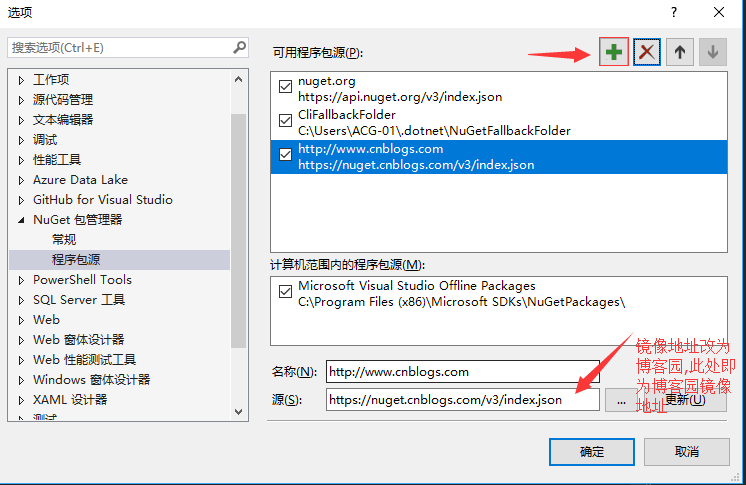
如果是网络限制下载失败,推荐把nuget镜像改为博客园资源,方法如下:
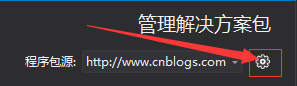
右键解决方案>管理解决方案的nuget程序包.显示如下:
新建一个数据上下文类,目录结构如下:
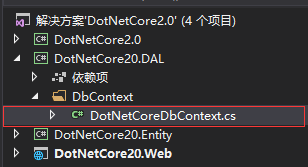
DotNetCoreDbContext内部代码改为以下:
using DotNetCore20.Entity;

using Microsoft.EntityFrameworkCore;

namespace DotNetCore20.DAL.DbContext

{

    public class DotNetCoreDbContext : Microsoft.EntityFrameworkCore.DbContext

    {

        public DotNetCoreDbContext(DbContextOptions<DotNetCoreDbContext> options) : base(options)

        {

        }

        public DbSet<UserExtend> UserExtend { get; set; }

    }

}
在此基本的实体映射相关的代码都完毕,现在还有一步,就是数据库连接字符串的配置
首先打开appsettings.json文件,在ConnectionStrings节点下增加以下
"DotNetCoreConnection": "Server=(localdb)\\mssqllocaldb;Database=DotNetCoreDb;Trusted_Connection=True;MultipleActiveResultSets=true"
增加后如下:
{

    "ConnectionStrings": {

        "DefaultConnection": "Server=(localdb)\\mssqllocaldb;Database=DotNetCoreDefaultDb;Trusted_Connection=True;MultipleActiveResultSets=true",

        "DotNetCoreConnection": "Server=(localdb)\\mssqllocaldb;Database=DotNetCoreDb;Trusted_Connection=True;MultipleActiveResultSets=true"

    },

  "Logging": {

    "IncludeScopes": false,

    "Debug": {

      "LogLevel": {

        "Default": "Warning"

      }

    },

    "Console": {

      "LogLevel": {

        "Default": "Warning"

      }

    }

  }

}
再打开web网站下的Startup文件,在ConfigureServices方法中添加一下行:
//自定义数据库连接字符串

            services.AddDbContext<DotNetCoreDbContext>(options =>

                options.UseSqlServer(Configuration.GetConnectionString("DotNetCoreConnection")));
增加后如下:
using System;

using System.Collections.Generic;

using System.Linq;

using System.Threading.Tasks;

using Microsoft.AspNetCore.Builder;

using Microsoft.AspNetCore.Diagnostics.EntityFrameworkCore;

using Microsoft.AspNetCore.Identity;

using Microsoft.AspNetCore.Http;

using Microsoft.EntityFrameworkCore;

using Microsoft.AspNetCore.Hosting;

using Microsoft.Extensions.Configuration;

using Microsoft.Extensions.DependencyInjection;

using Microsoft.Extensions.Options;

using DotNetCore20.Web.Data;

using DotNetCore20.Web.Models;

using DotNetCore20.Web.Services;

using DotNetCore20.DAL.DbContext;

namespace DotNetCore20.Web

{

    public class Startup

    {

        public Startup(IConfiguration configuration)

        {

            Configuration = configuration;

        }

        public IConfiguration Configuration { get; }

        // This method gets called by the runtime. Use this method to add services to the container.

        public void ConfigureServices(IServiceCollection services)

        {

            services.AddDbContext<ApplicationDbContext>(options =>

                options.UseSqlServer(Configuration.GetConnectionString("DefaultConnection")));

            //自定义数据库连接字符串

            services.AddDbContext<DotNetCoreDbContext>(options =>

                options.UseSqlServer(Configuration.GetConnectionString("DotNetCoreConnection")));

            services.AddIdentity<ApplicationUser, IdentityRole>()

                .AddEntityFrameworkStores<ApplicationDbContext>()

                .AddDefaultTokenProviders();

            // Add application services.

            services.AddTransient<IEmailSender, AuthMessageSender>();

            services.AddTransient<ISmsSender, AuthMessageSender>();

            services.AddMvc();

        }

        // This method gets called by the runtime. Use this method to configure the HTTP request pipeline.

        public void Configure(IApplicationBuilder app, IHostingEnvironment env)

        {

            if (env.IsDevelopment())

            {

                app.UseDeveloperExceptionPage();

                app.UseBrowserLink();

                app.UseDatabaseErrorPage();

            }

            else

            {

                app.UseExceptionHandler("/Home/Error");

            }

            app.UseStaticFiles();

            app.UseAuthentication();

            app.UseMvc(routes =>

            {

                routes.MapRoute(

                    name: "default",

                    template: "{controller=Home}/{action=Index}/{id?}");

            });

        }

    }

}
运行程序,点击登陆(只要访问数据库的操作都可),出现错误页面:
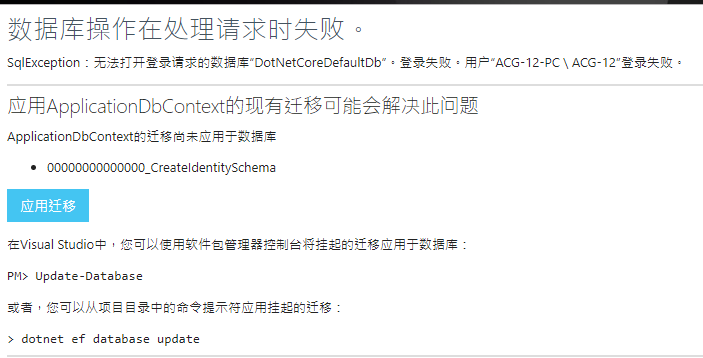
点击应用迁移 ,即自动迁移数据库.
由于两个数据库,只会自动迁移关于用户的表AspNetUsers,
所以还得VS中程序包管理器中下命令迁移.
Add-Migration firstMigration -Context DotNetCoreDbContext
以上命令执行后再执行以下命令:
Update-Database -Context DotNetCoreDbContext;
然后查看数据库会发现多出两个数据库,
以DotNetCoreDefaultDb生成的为例,会生成如下表:

其中AspNetUsers就中会有之前添加的WeChatId字段

然后再次运行程序:

这样一个完整的 Asp.NetCore2.0网站就初步运行起来了
下一篇将在DAL层增加Repository和UnitWorks,完成简单crud的统一管理
最新文章
- thinkphp数据的查询和截取
- ehcache注解全面解析---打酱油的日子
- highchart 添加新的series
- Xamarin的不归路-安卓模拟器启动慢&没有虚拟键盘
- 课程上线 -“新手入门 : Windows Phone 8.1 开发”
- html传参数
- C# SQLite编程总结
- jquery为新增元素添加事件
- 很好的UI动效设计参考
- oracle sql获取随机数
- soap
- 关于IE条件注释(译)
- Python补充01 序列的方法
- C++11中新特性之:lambda 表达式
- [Codeforces Round #254 div1] C.DZY Loves Colors 【线段树】
- TDD(测试驱动开发)学习二:创建第一个TDD程序
- VR全景智慧城市-提前进入商家观景,涵盖实体行业
- accp8.0转换教材第10章Ajax和jQuery理解与练习
- WOW.js 使用教程
- Tsql2008查询性能优化第一章---APPLY