CNN识别验证码1
之前学习python的时候,想尝试用requests实现自动登陆,但是现在网站登陆都会有验证码保护,主要是为了防止暴力破解,任意用户注册。最近接触深度学习,cnn能够进行图像识别,能够进行验证码识别。
主要步骤:
1、采样制作样本文件
2、根据样本文件类型创建识别模型
3、对样本文件分为训练样本和测试样本来训练识别模型
4、保存识别模型和验证
第一步生成验证码,保存文件为generate_captcha.py:
 #-*- coding:utf-8 -*-

 from captcha.image import ImageCaptcha

 from PIL import Image

 import numpy as np

 import random

 import string

 class generateCaptcha():

     def __init__(self,

                  width = 160,#验证码图片的宽

                  height = 60,#验证码图片的高

                  char_num = 4,#验证码字符个数

                  characters = string.digits + string.ascii_uppercase + string.ascii_lowercase):#验证码组成,数字+大写字母+小写字母

         self.width = width

         self.height = height

         self.char_num = char_num

         self.characters = characters

         self.classes = len(characters)  #10+26+26=62

     def gen_captcha(self,batch_size = 50):

         X = np.zeros([batch_size,self.height,self.width,1])

         img = np.zeros((self.height,self.width),dtype=np.uint8)

         Y = np.zeros([batch_size,self.char_num,self.classes])

         image = ImageCaptcha(width = self.width,height = self.height)

         while True:

             for i in range(batch_size):

                 captcha_str = ''.join(random.sample(self.characters,self.char_num))

                 img = image.generate_image(captcha_str).convert('L')

                 img = np.array(img.getdata())

                 X[i] = np.reshape(img,[self.height,self.width,1])/255.0

                 for j,ch in enumerate(captcha_str):

                     Y[i,j,self.characters.find(ch)] = 1

             Y = np.reshape(Y,(batch_size,self.char_num*self.classes))

             yield X,Y

     def decode_captcha(self,y):

         y = np.reshape(y,(len(y),self.char_num,self.classes))

         return ''.join(self.characters[x] for x in np.argmax(y,axis = 2)[0,:])

     def get_parameter(self):

         return self.width,self.height,self.char_num,self.characters,self.classes

     def gen_test_captcha(self):

         image = ImageCaptcha(width = self.width,height = self.height)

         captcha_str = ''.join(random.sample(self.characters,self.char_num))

         img = image.generate_image(captcha_str)

         img.save(captcha_str + '.jpg')

         X = np.zeros([1,self.height,self.width,1])

         Y = np.zeros([1,self.char_num,self.classes])

         img = img.convert('L')

         img = np.array(img.getdata())

         X[0] = np.reshape(img,[self.height,self.width,1])/255.0

         for j,ch in enumerate(captcha_str):

             Y[0,j,self.characters.find(ch)] = 1

         Y = np.reshape(Y,(1,self.char_num*self.classes))

         return X,Y
返回参数的含义:
- X:一个 mini-batch 的训练数据,其 shape 为 [ batch_size, height, width, 1 ],batch_size 表示每批次多少个训练数据,height 表示验证码图片的高,width 表示验证码图片的宽,1 表示图片的通道。
- Y:X 中每个训练数据属于哪一类验证码,其形状为 [ batch_size, class ] ,对验证码中每个字符进行 One-Hot 编码,所以 class 大小为 4*62。
调用这个类的时候会生成这样的验证码图片:

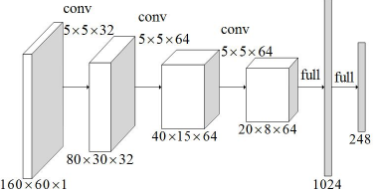
第二步创建识别模型
这里用到了 5 层网络,前 3 层为卷积层,第 4、5 层为全连接层。对 4 层隐藏层都进行 dropout。网络结构如下所示: input——>conv——>pool——>dropout——>conv——>pool——>dropout——>conv——>pool——>dropout——>fully connected layer——>dropout——>fully connected layer——>output
主要代码(captcha_model.py):
 # -*- coding: utf-8 -*

 import tensorflow as tf

 import math

 class captchaModel():

     def __init__(self,

                  width = 160,

                  height = 60,

                  char_num = 4,

                  classes = 62):

         self.width = width

         self.height = height

         self.char_num = char_num

         self.classes = classes

     def conv2d(self,x, W):

         return tf.nn.conv2d(x, W, strides=[1, 1, 1, 1], padding='SAME')  #步长是1,卷积的时候图片大小没有缩小。最大池化的时候图片减为一半。

     def max_pool_2x2(self,x):

         return tf.nn.max_pool(x, ksize=[1, 2, 2, 1],                      #用2*2的过滤器

                               strides=[1, 2, 2, 1], padding='SAME')       #最大池化步长是2

     def weight_variable(self,shape):

         initial = tf.truncated_normal(shape, stddev=0.1)

         return tf.Variable(initial)

     def bias_variable(self,shape):

         initial = tf.constant(0.1, shape=shape)

         return tf.Variable(initial)

     def create_model(self,x_images,keep_prob):

         #first layer

         w_conv1 = self.weight_variable([5, 5, 1, 32])   #通过过滤器计算权重值5*5*32

         b_conv1 = self.bias_variable([32])               #32是[5,5,1,32]中的32的输出。a[1]=Relu(w[1]a[0]+b[1]),因为w[1]a[0]是32,矩阵相加。

         h_conv1 = tf.nn.relu(tf.nn.bias_add(self.conv2d(x_images, w_conv1), b_conv1))

         h_pool1 = self.max_pool_2x2(h_conv1)

         h_dropout1 = tf.nn.dropout(h_pool1,keep_prob)

         conv_width = math.ceil(self.width/2)

         conv_height = math.ceil(self.height/2)

         #second layer

         w_conv2 = self.weight_variable([5, 5, 32, 64])

         b_conv2 = self.bias_variable([64])

         h_conv2 = tf.nn.relu(tf.nn.bias_add(self.conv2d(h_dropout1, w_conv2), b_conv2))

         h_pool2 = self.max_pool_2x2(h_conv2)

         h_dropout2 = tf.nn.dropout(h_pool2,keep_prob)

         conv_width = math.ceil(conv_width/2)

         conv_height = math.ceil(conv_height/2)

         #third layer

         w_conv3 = self.weight_variable([5, 5, 64, 64])

         b_conv3 = self.bias_variable([64])

         h_conv3 = tf.nn.relu(tf.nn.bias_add(self.conv2d(h_dropout2, w_conv3), b_conv3))

         h_pool3 = self.max_pool_2x2(h_conv3)

         h_dropout3 = tf.nn.dropout(h_pool3,keep_prob)

         conv_width = math.ceil(conv_width/2)

         conv_height = math.ceil(conv_height/2)

         #first fully layer

         conv_width = int(conv_width)

         conv_height = int(conv_height)

         w_fc1 = self.weight_variable([64*conv_width*conv_height,1024])  #64*20*8

         b_fc1 = self.bias_variable([1024])

         h_dropout3_flat = tf.reshape(h_dropout3,[-1,64*conv_width*conv_height])

         h_fc1 = tf.nn.relu(tf.nn.bias_add(tf.matmul(h_dropout3_flat, w_fc1), b_fc1))

         h_fc1_drop = tf.nn.dropout(h_fc1, keep_prob)

         #second fully layer

         w_fc2 = self.weight_variable([1024,self.char_num*self.classes])

         b_fc2 = self.bias_variable([self.char_num*self.classes])

         y_conv = tf.add(tf.matmul(h_fc1_drop, w_fc2), b_fc2)

         return y_conv
第三步,有了样本和模型可以训练识别模型
每 100 次循环采用 100 个测试样本检查识别准确度,当准确度大于 99% 时,训练结束,采用 GPU 需要 4-5 个小时左右,CPU 大概需要 20 个小时左右。
主要代码(train_captcha.py):
 #-*- coding:utf-8 -*-

 import tensorflow as tf

 import numpy as np

 import string

 import generate_captcha

 import captcha_model

 if __name__ == '__main__':

     captcha = generate_captcha.generateCaptcha()

     width,height,char_num,characters,classes = captcha.get_parameter()

     x = tf.placeholder(tf.float32, [None, height,width,1]) #占位符

     y_ = tf.placeholder(tf.float32, [None, char_num*classes])

     keep_prob = tf.placeholder(tf.float32)

     model = captcha_model.captchaModel(width,height,char_num,classes)

     y_conv = model.create_model(x,keep_prob)

     cross_entropy = tf.reduce_mean(tf.nn.sigmoid_cross_entropy_with_logits(labels=y_,logits=y_conv))#將tensor取平均,第二個參數代表沿著那一維取平均

     train_step = tf.train.AdamOptimizer(1e-4).minimize(cross_entropy)  #优化器

     predict = tf.reshape(y_conv, [-1,char_num, classes])    #y_conv通过模型获得的

     real = tf.reshape(y_,[-1,char_num, classes])

     correct_prediction = tf.equal(tf.argmax(predict,2), tf.argmax(real,2))

     correct_prediction = tf.cast(correct_prediction, tf.float32)

     accuracy = tf.reduce_mean(correct_prediction)

     saver = tf.train.Saver()

     with tf.Session() as sess:

         sess.run(tf.global_variables_initializer())

         step = 1

         while True:

             batch_x,batch_y = next(captcha.gen_captcha(64))

             _,loss = sess.run([train_step,cross_entropy],feed_dict={x: batch_x, y_: batch_y, keep_prob: 0.75})

             print ('step:%d,loss:%f' % (step,loss))

             if step % 100 == 0:

                 batch_x_test,batch_y_test = next(captcha.gen_captcha(100))

                 acc = sess.run(accuracy, feed_dict={x: batch_x_test, y_: batch_y_test, keep_prob: 1.})

                 print ('###############################################step:%d,accuracy:%f' % (step,acc))

                 if acc > 0.99:                      #准确率

                     saver.save(sess,"capcha_model.ckpt")  #保存模型文件

                     break

             step += 1
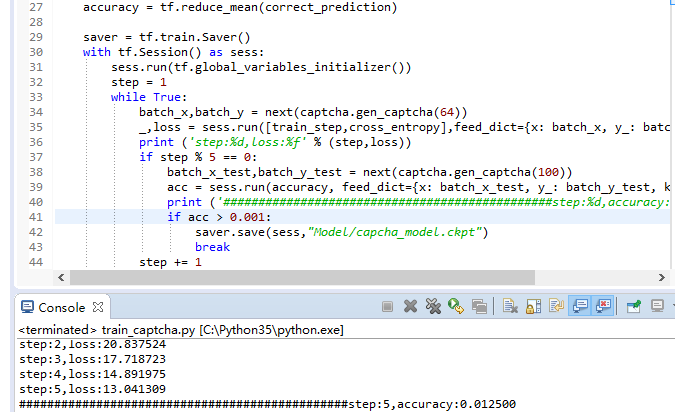
进行训练,查看训练过程(这里为了快速得到模型,我们将acc改的很小。训练模型也不准确):
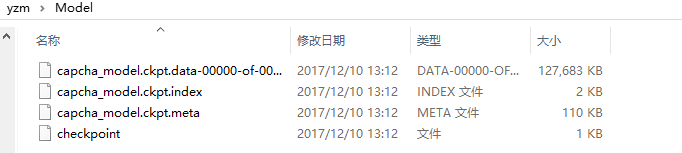
当训练好后会生成以下模型文件,其中checkpoint保存模型路劲和一些模型信息,方便下次训练:
第四步,进行预测:
主要代码(predict_captcha.py):
 #-*- coding:utf-8 -*-

 from PIL import Image, ImageFilter

 import tensorflow as tf

 import numpy as np

 import string

 import sys

 import generate_captcha

 import captcha_model

 if __name__ == '__main__':

     captcha = generate_captcha.generateCaptcha()

     width,height,char_num,characters,classes = captcha.get_parameter()

     gray_image = Image.open('./captcha/0hwn.jpg').convert('L')        #要预测的验证码图片位置

 #     gray_image = Image.open(sys.argv[1]).convert('L')

     img = np.array(gray_image.getdata())

     test_x = np.reshape(img,[height,width,1])/255.0

     x = tf.placeholder(tf.float32, [None, height,width,1])

     keep_prob = tf.placeholder(tf.float32)

     model = captcha_model.captchaModel(width,height,char_num,classes)

     y_conv = model.create_model(x,keep_prob)

     predict = tf.argmax(tf.reshape(y_conv, [-1,char_num, classes]),2)

     init_op = tf.global_variables_initializer()

     saver = tf.train.Saver()

     gpu_options = tf.GPUOptions(per_process_gpu_memory_fraction=0.95)

     with tf.Session(config=tf.ConfigProto(log_device_placement=False,gpu_options=gpu_options)) as sess:

         sess.run(init_op)

         saver.restore(sess, "./capcha_model.ckpt")   #训练好模型文件的位置

         pre_list =  sess.run(predict,feed_dict={x: [test_x], keep_prob: 1})

         for i in pre_list:

             s = ''

             for j in i:

                 s += characters[j]

             print(s)
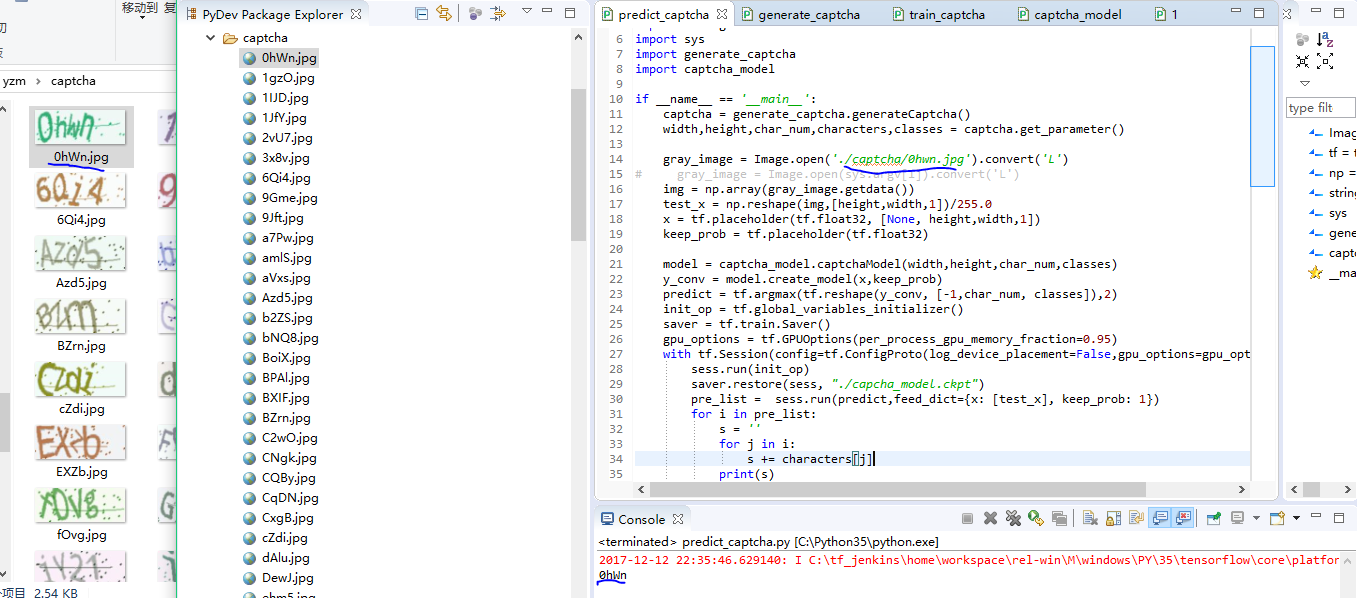
查看结果:
参考链接:
https://xianzhi.aliyun.com/forum/topic/1470/
https://xianzhi.aliyun.com/forum/topic/1505/
https://xianzhi.aliyun.com/forum/topic/1552/
https://cloud.tencent.com/developer/labs/lab/10325
最新文章
- Write thread-safe servlets [reproduced]
- poj 1195:Mobile phones(二维线段树,矩阵求和)
- 解决sublime text3中的输入法不根随光标问题
- 萝卜叶万能助手SEO网络营销简介
- android硬件调试之无法识别android设备解决办法
- Java爬虫工程师技能列表
- 即时定位与地图构建SLAM(Simultaneous Localization and Mapping)
- lucene 专业名词作用整理
- Team Homework #3
- yum cdh4
- 两分钟让你明白cocos2dx的屏幕适配策略
- 使用jquery-mockjax模拟ajax请求做前台測试
- SD卡初始化以及命令详解
- 面向亿万级用户的QQ一般做什么?——兴趣部落的Web同构直出分享
- 用过的一些Android设备调试特性注意点(挖坑帖)
- CentOS7 安装redis4:
- WebApi使用JWT认证
- OSGI企业应用开发(十一)Bundle资源获取途径
- 打造自己的 JavaScript 武器库
- 文件系统、服务、防火墙、SELINUX——安全四大金刚