批量装机工具cobbler简介及其安装使用
前言:如果仅有几台机器的话,使用U盘或者光盘装起来还不是很费事,一旦数量到了一定程度,使用手动方法就是一件费时费力的事,PXE+kistart就可以解决这个问题,降低难度,加快速度,而cobbler更优于PXE+kistart的解决方案,难度甚至降到普通的修补匠都可以胜任的工作(cobbler的英译意思,夸张了),总的来说,降低工作中的复杂度是一件非常有意义的事情,它相比它的前辈,它的优越之处在哪里呢?它的功能是如何实现的呢?下面我们来简单的介绍一下:
Cobbler是一个Linux服务器安装的服务,可以通过网络启动(PXE)的方式来快速安装、重装物理服务器和虚拟机,同时还可以管理DHCP,DNS等。Cobbler可以使用命令行方式管理,也提供了基于Web的界面管理工具(cobbler-web),还提供了API接口,可以方便二次开发使用。Cobbler是较早前的kickstart的升级版,优点是比较容易配置,还自带web界面比较易于管理。
在搭建过程中借鉴了CSDN惨绿少年、linux公社Masuri、博客园linuxliu等同仁的技术文章,在此表示感谢!基于其各自的表达内容所长与不足,撰文对cobbler的搭建与使用进行介绍,如有不足,欢迎指正:
一、基本环境准备:
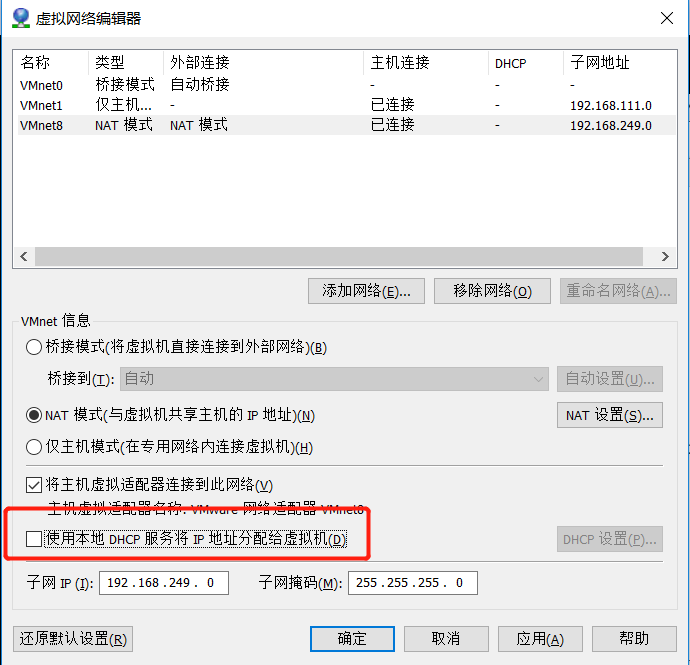
1.测试平台:vmware workstation之上的linux系统,配置如下图,值得注意的是,我选择了NAT的网络模式。在同仁的文章中,有使用主机模式来进行测试的,这样做也可以,但安装软件包的时候,就需要修改网卡配置和更换虚拟机的网络模式,是非常麻烦的。

2.修改NAT网络模式的dhcp服务,将其关闭,自己搭建的dhcp服务器的ip地址池与NAT模式的网段相同,这样既可以完成测试,也不需要进行ip的更换等操作,网关与DNS也可以由虚拟网络编辑器来承担,非常的方便。我的NAT网络是网关与DNS为192.168.249.2,虚拟网络编辑器的地址池为192.168.249.128-192.168.249.254,所以本地的dhcp配置可以避开这个范围。
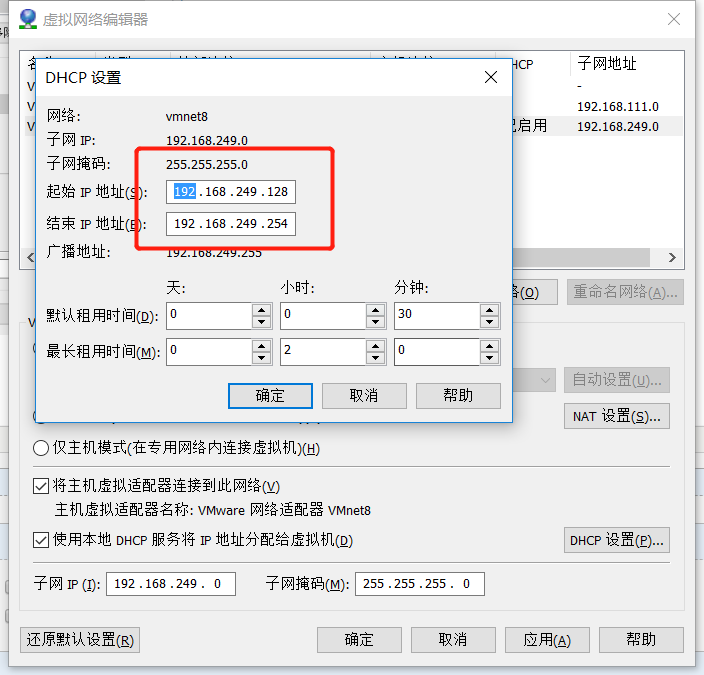
关闭虚拟网络编辑器的dhcp功能,虚拟网络编辑器的地址池如图:
3.系统环境准备:
[root@localhost ~]# cat /etc/redhat-release

CentOS Linux release 7.6. (Core)

[root@localhost ~]# uname -r

3.10.-957.21..el7.x86_64

[root@localhost ~]# systemctl stop firewalld
[root@localhost ~]# systemctl stop NetworkManager
[root@localhost ~]# ifconfig ens33 | awk 'NR==2 {print $2}' 192.168.249.10
[root@localhost ~]# cat /etc/selinux/config | awk 'NR==7'
SELINUX=disabled
[root@localhost ~]# cat /etc/sysconfig/network-scripts/ifcfg-ens33
TYPE=Ethernet
PROXY_METHOD=none
BROWSER_ONLY=no
BOOTPROTO=static
DEFROUTE=yes
IPV4_FAILURE_FATAL=no
IPV6INIT=yes
IPV6_AUTOCONF=yes
IPV6_DEFROUTE=yes
IPV6_FAILURE_FATAL=no
IPV6_ADDR_GEN_MODE=stable-privacy
NAME=ens33
UUID=a76470a8-756d-4726-b527-aa321f621586
DEVICE=ens33
ONBOOT=yes
IPADDR=192.168.249.10
NETMASK=255.255.255.0
GATEWAY=192.168.249.2
4.更换yum源为阿里源
[root@localhost ~]# cd /etc/yum.repos.d/

[root@localhost yum.repos.d]# rm -rf *

[root@localhost yum.repos.d]# wget  http://mirrors.aliyun.com/repo/Centos-7.repo

[root@localhost yum.repos.d]# yum makecache
ok,到此环境基本准备完成!
二、组件安装:
1.安装基本的工具:
[root@localhost ~]# yum -y install wget net-tools curl epel-release
2.安装功能组件:
[root@localhost ~]# yum install cobbler cobbler-web dhcp tftp-server pykickstart httpd rsync xinetd -y #安装完成了检查一下,这些包一个都不能少
3.修改cobbler主配置文件:
[root@localhost ~]# sed -i 's/^server: 127.0.0.1/server: 192.168.249.10/' /etc/cobbler/settings    #修改server的IP为本地的IP

[root@localhost ~]# sed -i 's/^next_server: 127.0.0.1/next_server: 192.168.249.10/' /etc/cobbler/settings    #修改tftp的ip为本地的IP

[root@localhost ~]# sed -i 's/manage_dhcp: 0/manage_dhcp: 1/' /etc/cobbler/settings    #启用dhcp

[root@localhost ~]# sed -i 's#yes#no#' /etc/xinetd.d/tftp    #启用tftp

[root@localhost ~]# sed -i 's/pxe_just_once: 0/pxe_just_once: 1/' /etc/cobbler/settings  #修改参数,防止系统循环安装
4.先启动http与cobbler:
[root@localhost ~]# systemctl start httpd cobblerd
5.生成通过cobbler服务安装系统的默认root密码,并替换(会出现一串加密字符,把字符添加到cobbler主配置文件相应的位置):
[root@localhost ~]# openssl passwd - -salt '' ''

$$$wOSEtcyiP2N/IfIl15W6Z0

6.下载cobbler引导操作系统的必须文件:
[root@localhost ~]# cobbler get-loaders

task started: --02_220712_get_loaders

task started (id=Download Bootloader Content, time=Mon Sep   :: )

downloading https://cobbler.github.io/loaders/README to /var/lib/cobbler/loaders/README

downloading https://cobbler.github.io/loaders/COPYING.elilo to /var/lib/cobbler/loaders/COPYING.elilo

downloading https://cobbler.github.io/loaders/COPYING.yaboot to /var/lib/cobbler/loaders/COPYING.yaboot

downloading https://cobbler.github.io/loaders/COPYING.syslinux to /var/lib/cobbler/loaders/COPYING.syslinux

downloading https://cobbler.github.io/loaders/elilo-3.8-ia64.efi to /var/lib/cobbler/loaders/elilo-ia64.efi

downloading https://cobbler.github.io/loaders/yaboot-1.3.17 to /var/lib/cobbler/loaders/yaboot

downloading https://cobbler.github.io/loaders/pxelinux.0-3.86 to /var/lib/cobbler/loaders/pxelinux.0

downloading https://cobbler.github.io/loaders/menu.c32-3.86 to /var/lib/cobbler/loaders/menu.c32

downloading https://cobbler.github.io/loaders/grub-0.97-x86.efi to /var/lib/cobbler/loaders/grub-x86.efi

downloading https://cobbler.github.io/loaders/grub-0.97-x86_64.efi to /var/lib/cobbler/loaders/grub-x86_64.efi

*** TASK COMPLETE ***
PS:我在做的时候,这一步报错了,说是python文件不完整,实际上呢,根本原因是第三步修改/etc/cobbler/settings时,server与next-server对应的IP不是本地ens33网卡的IP,这一步只要网络没有问题,IP地址没有问题,是不会报错的。
7.修改dhcp文件,配置本地dhcp地址池。
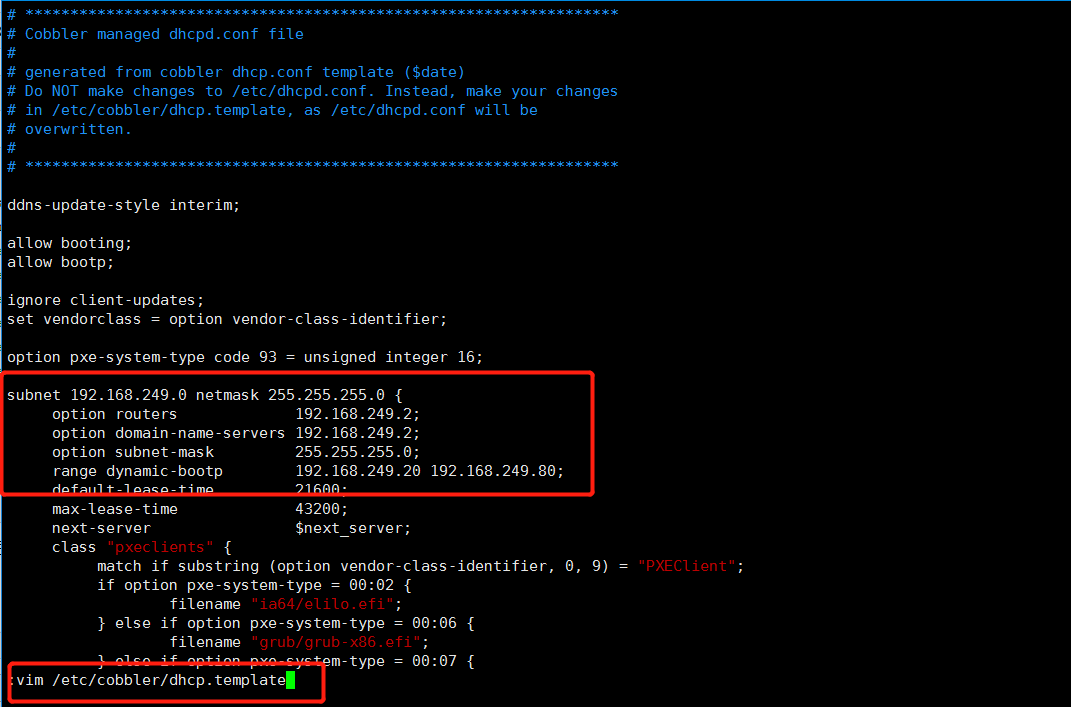
这一步呢,基本上没有问题,但一般出问题就在这里,启动之后status查看dhcp服务的状态,如果错误那么就需要排查,先关闭networkmanager服务,且一般网卡/网口只留一个,dhcp服务的网关与dns由虚拟网络编辑器来提供,子网掩码也是正常的24/0,虚拟网络编辑器的地址池为192.168.249.128-192.168.249.254,所以我们避开这个网段。
8.同步cobbler的配置到dhcp服务。
[root@localhost ~]# cobbler sync

task started: --02_221653_sync

task started (id=Sync, time=Mon Sep   :: )

running pre-sync triggers

cleaning trees

removing: /var/lib/tftpboot/grub/images

copying bootloaders

trying hardlink /var/lib/cobbler/loaders/pxelinux. -> /var/lib/tftpboot/pxelinux.

trying hardlink /var/lib/cobbler/loaders/menu.c32 -> /var/lib/tftpboot/menu.c32

trying hardlink /var/lib/cobbler/loaders/yaboot -> /var/lib/tftpboot/yaboot

trying hardlink /usr/share/syslinux/memdisk -> /var/lib/tftpboot/memdisk

trying hardlink /var/lib/cobbler/loaders/grub-x86.efi -> /var/lib/tftpboot/grub/grub-x86.efi

trying hardlink /var/lib/cobbler/loaders/grub-x86_64.efi -> /var/lib/tftpboot/grub/grub-x86_64.efi

copying distros to tftpboot

copying images

generating PXE configuration files

generating PXE menu structure

rendering DHCP files

generating /etc/dhcp/dhcpd.conf

rendering TFTPD files

generating /etc/xinetd.d/tftp

cleaning link caches

running post-sync triggers

running python triggers from /var/lib/cobbler/triggers/sync/post/*

running python trigger cobbler.modules.sync_post_restart_services

running: dhcpd -t -q

received on stdout:

received on stderr:

running: service dhcpd restart

received on stdout:

received on stderr: Redirecting to /bin/systemctl restart dhcpd.service

running shell triggers from /var/lib/cobbler/triggers/sync/post/*

running python triggers from /var/lib/cobbler/triggers/change/*

running python trigger cobbler.modules.manage_genders

running python trigger cobbler.modules.scm_track

running shell triggers from /var/lib/cobbler/triggers/change/*

*** TASK COMPLETE ***
9.基本的配置就是这些,然后重启下这些组件服务,并配置开机启动,然后使用cobbler自带的工具命令检查一下配置。
[root@localhost ~]# systemctl restart httpd cobblerd xinetd rsyncd tftp dhcpd

[root@localhost ~]# systemctl enable httpd cobblerd xinetd rsyncd tftp dhcpd

Created symlink from /etc/systemd/system/multi-user.target.wants/httpd.service to /usr/lib/systemd/system/httpd.service.

Created symlink from /etc/systemd/system/multi-user.target.wants/cobblerd.service to /usr/lib/systemd/system/cobblerd.service.

Created symlink from /etc/systemd/system/multi-user.target.wants/rsyncd.service to /usr/lib/systemd/system/rsyncd.service.

Created symlink from /etc/systemd/system/sockets.target.wants/tftp.socket to /usr/lib/systemd/system/tftp.socket.
Created symlink from /etc/systemd/system/multi-user.target.wants/dhcpd.service to /usr/lib/systemd/system/dhcpd.service.
[root@localhost ~]# cobbler check
The following are potential configuration items that you may want to fix:
1 : debmirror package is not installed, it will be required to manage debian deployments and repositories
2 : fencing tools were not found, and are required to use the (optional) power management features. install cman or fence-agents to use them
Restart cobblerd and then run 'cobbler sync' to apply changes.
#这两个问题:1是debian系统,2是fence系统,说明我们的配置没有问题
10.挂载镜像,之前呢,我们已经将镜像挂载到了系统本地,现在先把镜像挂载到/mnt目录下,然后再将mnt目录导入cobbler的目录位置:
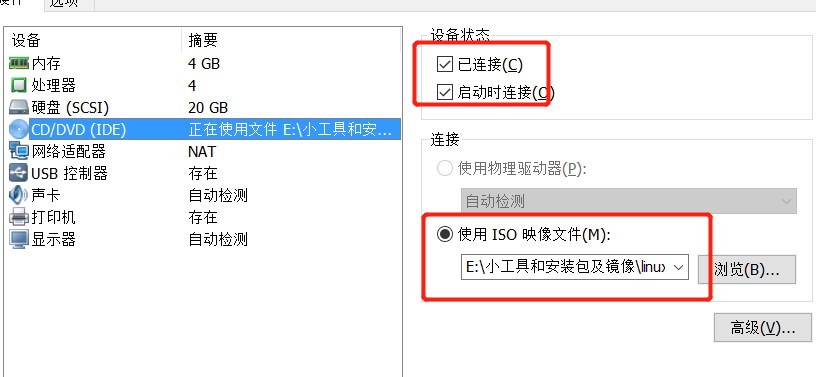
[root@localhost ~]# mount /dev/cdrom /mnt

mount: /dev/sr0 is write-protected, mounting read-only

[root@localhost ~]# cobbler import --path=/mnt/ --name=CentOS-7.6--x86_64 --arch=x86_64

task started: --02_222411_import

task started (id=Media import, time=Mon Sep   :: )

#因为镜像文件比较大,所以需要较长的时间。
# --path 镜像路径# --name 为安装源定义一个名字# --arch 指定安装源是32位、64位、ia64, 目前支持的选项有: x86│x86_64│ia64# 安装源的唯一标示就是根据name参数来定义,本例导入成功后,安装源的唯一标示就是:CentOS-7.1-x86_64,如果重复,系统会提示导入失败
11.检查一下镜像:
[root@localhost ~]# cobbler list

distros:

   CentOS-7.6--x86_64

profiles:

   CentOS-7.6--x86_64

systems:

repos:

images:

mgmtclasses:

packages:

files:
ok,镜像也没有问题,然后呢,我们就可以使用cobbler来进行无人值守安装。
12.检测结果:

PS:这个界面的内容我们是可以手动调整的,配置文件为/etc/cobbler/pxe/pxedefault.template
ok,没有问题,同一网络模式下可以看到centos的镜像,并且也从dhcp服务中获取到了ip地址,选择镜像安装的话,就没有问题了,安装好之后的密码就是我们之前设置的123456。这个虚拟机,我们可以保留着,如果需要进行批量装机的话,我们可以选择网络模式为桥接,然后将本地虚拟机的IP修改为192.168.249.2即可,网关服务由本地网卡来承担,dns的话,就没有办法了,毕竟我们只是想装系统而已。
三、使用KS进行定制化安装。
1.在安装系统的时候,像分区,安装基础软件包这些个工作量也不小,但我们可以使用ks文件来进行定制化的安装,在导入第一个镜像的时候,在/var/lib/cobbler/kickstarts/目录下会生成sample_end.ks文件,这个文件就是安装系统时的默认配置文件,我们可以进行修改,来完成自己的个性化配置,配置文件详解如下:
| 关键字 | 含义 |
|---|---|
install |
告知安装程序,这是一次全新安装,而不是升级upgrade。 |
url --url=" " |
通过FTP或HTTP从远程服务器上的安装树中安装。url --url="http://10.0.0.7/CentOS-6.7/"url --url ftp://<username>:<password>@<server>/<dir> |
nfs |
从指定的NFS服务器安装。nfs --server=nfsserver.example.com --dir=/tmp/install-tree |
text|graphical |
tesxt:使用文本模式安装。 graphical:在图形模式下根据kickstart执行安装,默认该选项 |
lang |
设置在安装过程中使用的语言以及系统的缺省语言。lang en_US.UTF-8 |
keyboard |
设置系统键盘类型。keyboard us |
zerombr |
清除mbr引导信息。 |
bootloader |
系统引导相关配置。bootloader --location=mbr --driveorder=sda --append="crashkernel=auto rhgb quiet"--location=,指定引导记录被写入的位置.有效的值如下:mbr(缺省),partition(在包含内核的分区的第一个扇区安装引导装载程序)或none(不安装引导装载程序)。--driveorder,指定在BIOS引导顺序中居首的驱动器。--append=,指定内核参数.要指定多个参数,使用空格分隔它们。 |
network |
为通过网络的kickstart安装以及所安装的系统配置联网信息。network --bootproto=dhcp --device=eth0 --onboot=yes --noipv6 --hostname=CentOS6--bootproto=[dhcp/bootp/static]中的一种,缺省值是dhcp。bootp和dhcp被认为是相同的。static方法要求在kickstart文件里输入所有的网络信息。network --bootproto=static --ip=10.0.0.100 --netmask=255.255.255.0 --gateway=10.0.0.2 --nameserver=10.0.0.2请注意所有配置信息都必须在一行上指定,不能使用反斜线来换行。 --ip=,要安装的机器的IP地址.--gateway=,IP地址格式的默认网关.--netmask=,安装的系统的子网掩码.--hostname=,安装的系统的主机名.--onboot=,是否在引导时启用该设备.--noipv6=,禁用此设备的IPv6.--nameserver=,配置dns解析. |
timezone |
设置系统时区。timezone --utc Asia/Shanghai |
authconfig |
系统认证信息。authconfig --enableshadow --passalgo=sha512设置密码加密方式为 sha512 启用shadow文件。 |
rootpw |
root密码 |
clearpart |
清空分区。clearpart --all --initlabel--all 从系统中清除所有分区,--initlable 初始化磁盘标签 |
part |
磁盘分区。 --ondisk,指明使用的磁盘 |
firstboot |
负责协助配置redhat一些重要的信息。firstboot --disable |
selinux |
关闭selinux。selinux --disabled |
firewall |
关闭防火墙。firewall --disabled |
logging |
设置日志级别。logging --level=info |
reboot |
设定安装完成后重启,此选项必须存在,不然kickstart显示一条消息,并等待用户按任意键后才重新引导,也可以选择halt关机。 |
以一个ks.cfg 文件为例
- install
- url --url="http://10.0.0.7/CentOS-6.7/"
- text
- lang en_US.UTF-
- keyboard us
- zerombr
- bootloader --location=mbr --driveorder=sda --append="crashkernel=auto rhgb quiet"
- network --bootproto=dhcp --device=eth0 --onboot=yes --noipv6 --hostname=CentOS6
- timezone --utc Asia/Shanghai
- authconfig --enableshadow --passalgo=sha512
- rootpw --iscrypted $$X20eRtuZhkHznTb4$dK0BJByOSAWSDD8jccLVFz0CscijS9ldMWwpoCw/ZEjYw2BTQYGWlgKsn945fFTjRC658UXjuocwJbAjVI5D6/
- clearpart --all --initlabel
- part /boot --fstype=ext4 --asprimary --size=
- part swap --size=
- part / --fstype=ext4 --grow --asprimary --size=
- firstboot --disable
- selinux --disabled
- firewall --disabled
- logging --level=info
- reboot
- %packages
- @base
- @compat-libraries
- @debugging
- @development
- tree
- nmap
- sysstat
- lrzsz
- dos2unix
- telnet
- %post
- wget -O /tmp/optimization.sh http://*.*.*.*/ks_config/optimization.sh &>/dev/null
- /bin/sh /tmp/optimization.sh
- %end
配置文件中的%packages指的是安装系统时,安装的软件包,截止到%end,%post指的是系统安装完成后执行的命令,一般的命令或者脚本都是在这个范围里,有的ks文件还会有%pre,它的意思是在系统安装前执行的命令,因为系统尚未安装,所以能够执行的命令也是非常少的,所以呢基本的命令或者脚本都是放在%post这个区间来做。
这里再给大家介绍两个命令:
[root@localhost kickstarts]# cobbler profile report    #查看镜像对应的ks配置文件

Name                           : CentOS-7.6--x86_64

TFTP Boot Files                : {}

Comment                        :

DHCP Tag                       : default

Distribution                   : CentOS-7.6--x86_64

Enable gPXE?                   :

Enable PXE Menu?               :

Fetchable Files                : {}

Kernel Options                 : {}

Kernel Options (Post Install)  : {}

Kickstart                      : /var/lib/cobbler/kickstarts/sample_end.ks

Kickstart Metadata             : {}

Management Classes             : []

Management Parameters          : <<inherit>>

Name Servers                   : []

Name Servers Search Path       : []

Owners                         : ['admin']

Parent Profile                 :

Internal proxy                 :

Red Hat Management Key         : <<inherit>>

Red Hat Management Server      : <<inherit>>

Repos                          : []

Server Override                : <<inherit>>

Template Files                 : {}

Virt Auto Boot                 :

Virt Bridge                    : xenbr0

Virt CPUs                      :

Virt Disk Driver Type          : raw

Virt File Size(GB)             :

Virt Path                      :

Virt RAM (MB)                  :

Virt Type                      : kvm

[root@localhost kickstarts]# cobbler profile edit --name=CentOS-7.6--x86_64 --kickstart=/var/lib/cobbler/kickstarts/ks.cfg    #为镜像配置默认的ks文件
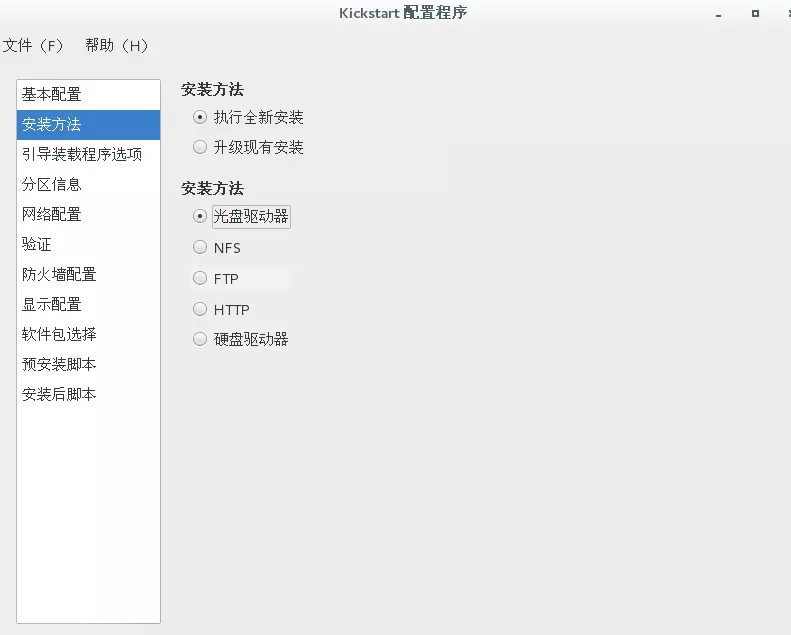
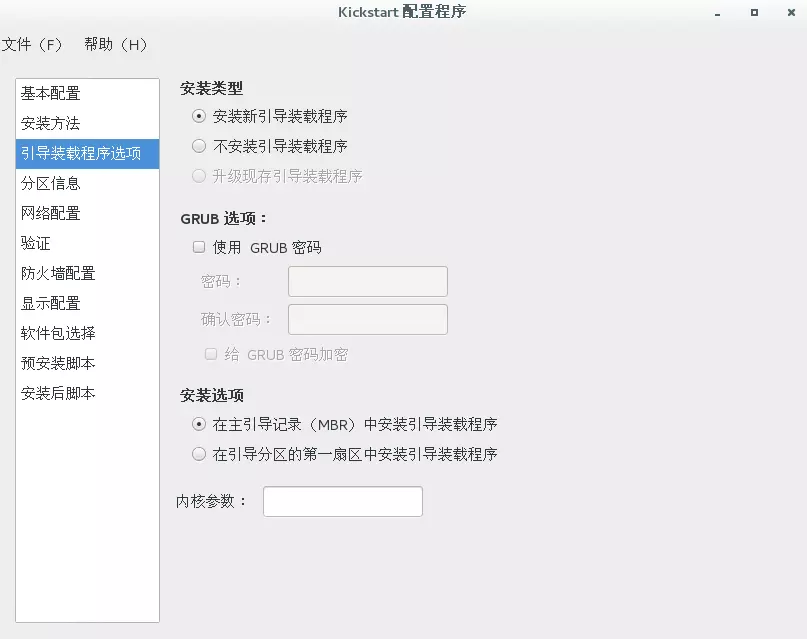
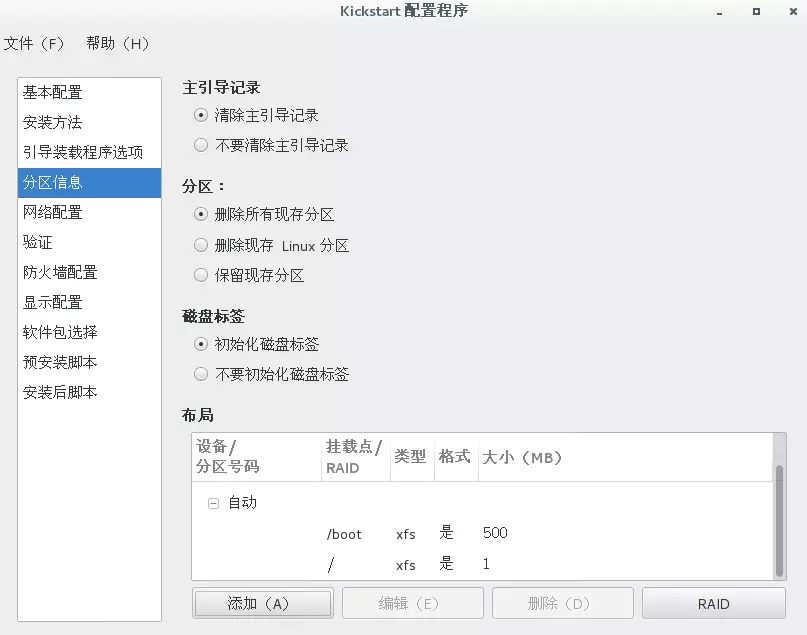
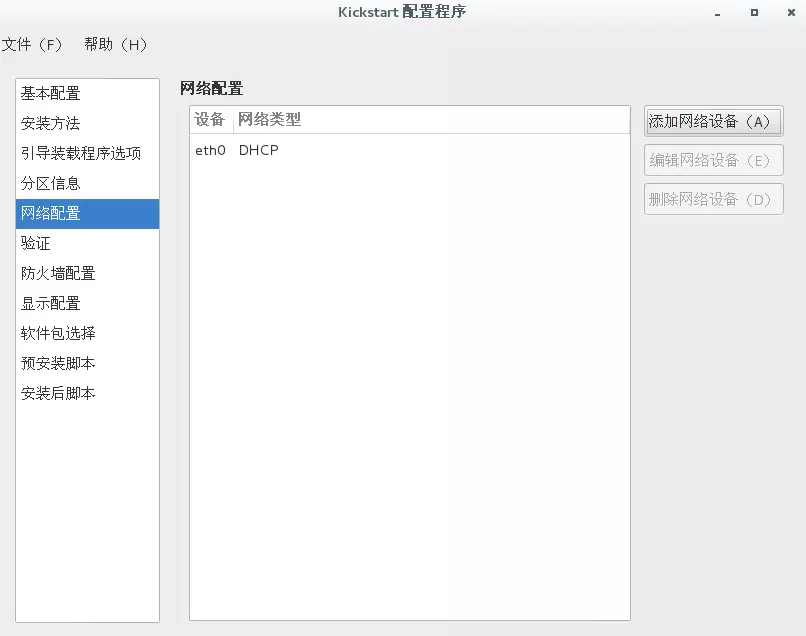
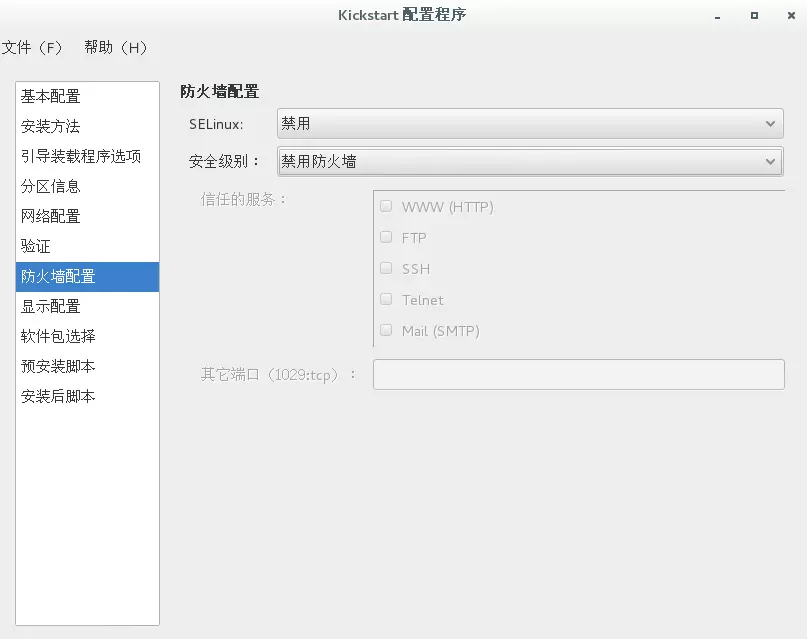
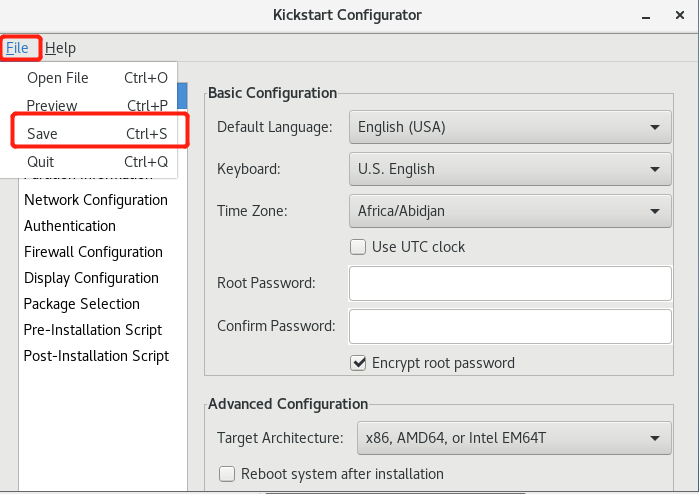
至于ks文件,可以使用kickstart的图形化工具来生成,工具安装命令如下:
[root@localhost ~]# yum install system-config-kickstart
使用教程如下,在图形化界面输入system-config-kickstart:
PS:使用cobbler安装的机器,内存不能少于2G,否则就会报错,至于其他的配置,如果是虚拟情况,也尽量配置高点。


四、Cobbler-web配置管理与报错解决:
1.先说报错吧,安装后web访问https://192.168.249.10/cobbler_web,结果出现了报错,如下:
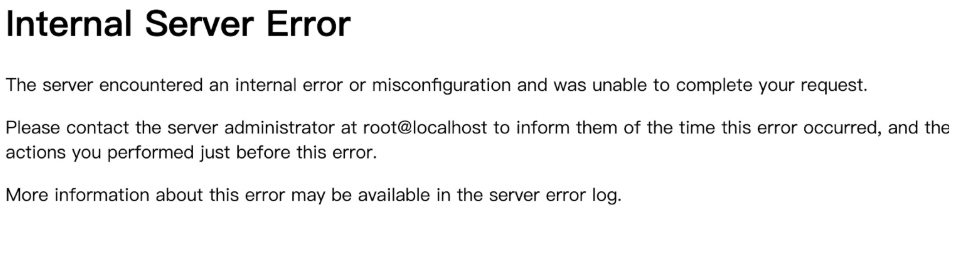
2.在网上找了下,果然不止我一个人遇到了这个问题,解决方法如下:
[root@localhost ~]# wget https://bootstrap.pypa.io/get-pip.py

[root@localhost ~]# python get-pip.py

DEPRECATION: Python 2.7 will reach the end of its life on January 1st, . Please upgrade your Python as Python 2.7 won'of pip will drop support for Python 2.7. More details about Python 2 support in pip, can be found at https://pip.pypa.io/eport

Collecting pip

  Downloading https://files.pythonhosted.org/packages/30/db/9e38760b32e3e7f40cce46dd5fb107b8c73840df38f0046d8e6514e675a1/p

     |████████████████████████████████| .4MB 57kB/s

Collecting wheel

  Downloading https://files.pythonhosted.org/packages/00/83/b4a77d044e78ad1a45610eb88f745be2fd2c6d658f9798a15e384b7d57c9/wheel-0.33.6-py2.py3-none-any.whl

Installing collected packages: pip, wheel

Successfully installed pip-19.2. wheel-0.33.

[root@localhost ~]# pip install Django==1.8.

DEPRECATION: Python 2.7 will reach the end of its life on January 1st, . Please upgrade your Python as Python 2.7 won't be maintained after that date. A future version of pip will drop support for Python 2.7. More details about Python 2 support in pip, can be found at https://pip.pypa.io/en/latest/development/release-process/#python-2-support

Collecting Django==1.8.

  Downloading https://files.pythonhosted.org/packages/a7/a2/f4e7926062f5c61d98e87b9d0365ca1a0fab6be599dbea90ce2fab27f395/Django-1.8.9-py2.py3-none-any.whl (6.2MB)

     |████████████████████████████████| .2MB 56kB/s

Installing collected packages: Django

  Found existing installation: Django 1.11.

    Uninstalling Django-1.11.:

      Successfully uninstalled Django-1.11.

Successfully installed Django-1.8.

[root@localhost ~]# systemctl restart httpd cobblerd
ok,果然解决了问题,在此感谢51CTO JasonMingHao 博主:

访问的账号密码为:cobbler/cobbler(没错,账号密码都一样)
3.管理选项详解:
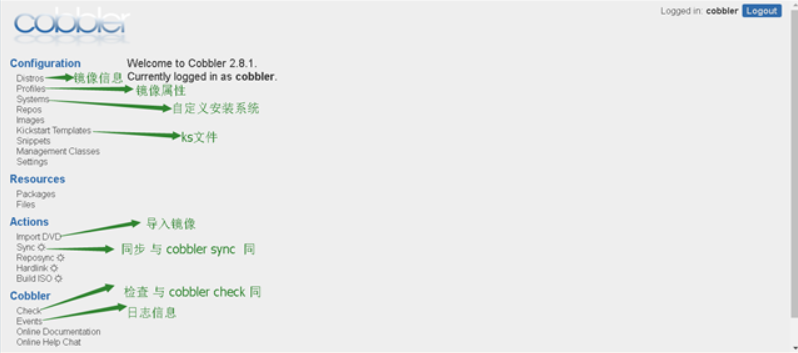
咳咳,坦白了,这张图是我盗来的,再次感谢CSDN惨绿少年博主,具体的操作功能和命令行的操作实际上是一致的,具体的操作使用web端感觉也就那样子,都习惯命令行了,ok,cobbler教程到此结束,如有不足,欢迎私信,一起进步!
最后:附上文章的参考链接
https://www.linuxidc.com/Linux/2018-03/151347.htm
https://www.linuxidc.com/Linux/2019-05/158647.htm
https://www.cnblogs.com/linuxliu/p/7668048.html
https://blog.csdn.net/admin_root1/article/details/78911718
https://blog.51cto.com/13746824/2148981
https://blog.whsir.com/post-3157.html
最新文章
- 设计模式--单例模式Singleton(创建型)
- 解决 vs2010 联接sql 2005 时 报错未能加载文件或程序集“Microsoft.SqlServer.Management.Sdk.Sfc
- 了解Browserify
- c# tcp备忘及networkstream.length此流不支持查找解决
- mongodb c#语法基础
- ubuntu下安装与卸载qt的方法
- Swift游戏实战-跑酷熊猫 00 游戏预览
- 水晶报表连接Oracle做数据报表笔记
- Hadoop--有关Hadoop的启动
- ThinkPHP - Widget 工具
- CodeForces 659F Polycarp and Hay
- Android3.0 以前的Fragment支持
- 物理提取大绝招”Advanced ADB”???
- 权限大全-linux基础
- POJ 2371
- C语言程序设计I—第九周教学
- UNIX网络编程 第8章 基本UDP套接字编程
- MyEclipse Web项目调试
- Python VIL Service Bin
- 【WAN】PPPOE宽带上网功能详解