Centos7服务器搭建网络家园和论坛
2024-09-03 19:59:35
环境:Centos7
工具:mysql,php,httpd
目的:熟练掌握httpd服务器搭建和个服务器之间的配合。
有兴趣的朋友可以来实践一下,我会提供各种源码进行搭建。
网络家园和论坛源码:https://www.lanzous.com/i3yqq3c


(1)准备一台centos服务器,我是在虚拟机搭建的centos7.
(2)关闭防火墙和selinux等(centos7关闭防火墙和selinux)
(3)搭建myql数据库(MySQL的rpm安装教程)
(4)搭建httpd服务器(centos7自带httpd,只需要启动即可用)

(5)安装PHP服务器
- 安装
[root@wei ~]# yum install php –y
安装php-mysql
[root@wei ~]# yum install php-mysql –y
2.测试php和apache协同
测试协同
[root@localhost ~]# cd /var/www/html/[root@localhost html]# vim phpinfo.php
<?php
phpinfo();
?>
- 测试php和MySQL协同
[root@localhost html]# vim php_mysql.php

<?php

$servername = "localhost";

$username = "admin";

$password = "123456";

// 创建连接

//$con = mysql_connect($servername,$username,$password);

$conn = new mysqli($servername, $username, $password);

// 检测连接

if ($conn->connect_error) {

    die("连接失败: " . $conn->connect_error);

}

echo "连接成功";

?>

(6)部署应用
1.上传代码(代码在上面)(代码上传到/var/www/html/目录)

2.解压
安装解压软件:
[root@localhost html]# yum install unzip –y3.配置
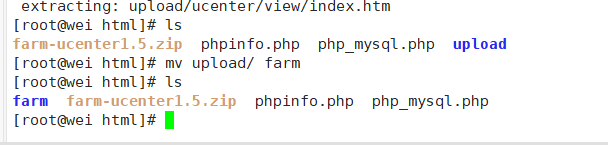
改名:
[root@wei html]# mv upload/ farm
在线安装:
http://192.168.196.131/farm/install/index.php
1.问题一

修改/etc/php.ini, 将short_open_tag = On
vim /etc/php.ini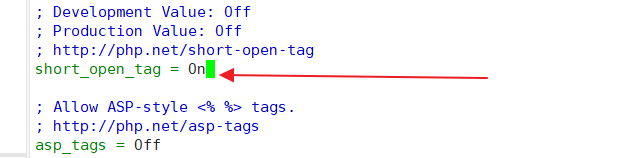
修改完毕,重启httpd服务。
[root@wei html]# systemctl restart httpd
2.问题二

修改目录权限:
[root@localhost html]# chmod -R 777 farm让后进项下面步骤,进行在线安装
步骤一:

步骤二:
创建farm数据库和用户
[root@wei html]# mysql -u root -proot ##登录数据库

Warning: Using a password on the command line interface can be insecure.

Welcome to the MySQL monitor.  Commands end with ; or \g.

Your MySQL connection id is 6

Server version: 5.6.44 MySQL Community Server (GPL)

Copyright (c) 2000, 2019, Oracle and/or its affiliates. All rights reserved.

Oracle is a registered trademark of Oracle Corporation and/or its

affiliates. Other names may be trademarks of their respective

owners.

Type 'help;' or '\h' for help. Type '\c' to clear the current input statement.

mysql> create database farm;   ##创建farm数据库

Query OK, 1 row affected (0.00 sec)

mysql> grant all on farm.* to farm@'localhost' identified by 'farm';  #创建用户,进行授权

Query OK, 0 rows affected (0.00 sec)

mysql> flush privileges;  ##刷新权限表

Query OK, 0 rows affected (0.00 sec)

步骤三:
进行安装


步骤四:
进行测试
http://192.168.196.131/farm/bbs/


http://192.168.196.131/farm/home/space.php?do=home

最新文章
- 使用dispatch_semaphore_t实现event的基本功能
- 关于js原型继承
- Mysql调试存储过程最简单的方法
- 技术英文单词贴--C
- hdu 1598 find the most comfortable road(枚举+卡鲁斯卡尔最小生成树)
- FSMC stm32
- [Python笔记]第十六篇:web框架之Tornado
- Yii2 国际化的问题 zh-CN
- [补档][COGS 426]血帆海盗
- ES6的Iterator遍历器
- mysql进阶(十四) 批量更新与批量更新多条记录的不同值实现方法
- CesiumJS 添加会动的GIF
- jq修改hover样式
- python中闭包的理解
- log4j2 Filter用法详解
- 图解HTTP第六章
- debian删除i386的包
- Luogu P4211 [LNOI2014]LCA
- LOJ #2434. 「ZJOI2018」历史(LCT)
- Sqlserver的Transaction做Rollback的时候要小心(转载)