JAVA NIO 之 Selector 组件
2024-08-30 02:59:21
NIO 重要功能就是实现多路复用。Selector是SelectableChannel对象的多路复用器。一些基础知识:
选择器(Selector):选择器类管理着一个被注册的通道集合的信息和它们的就绪状态。
可选择通道(SelectableChannel):这个抽象类提供了实现通道的可选择性所需要的公共方法。它是所有支持就绪检查的通道类的
父类。例如:ServerSocketChannel、SocketChannel。可选择通道可以被注册到选择器上。
选择键(SelectionKey):选择键封装了特定的通道与特定的选择器的注册关系。
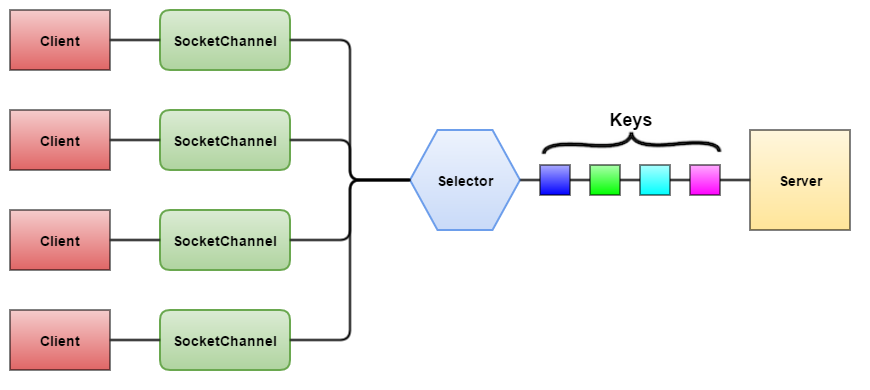
前面的一篇文章NIO简介中介绍了传统io的同步阻塞服务器实现,现在来看看NIO多路复用服务器的实现。NIO 利用单线程轮询事件机制,定位就绪的Channel,决定执行什么,
仅仅 select()方法阶段是阻塞的。这样一个选择器避免了之前的多个客服端时切换线程的问题。下面的一张图能描述这种场景:
代码实现:
服务器server:
public class SelectSockets {

    private static int PORT_NUMBER = 9011;

    /**

     * allocateDirect(1024) 此方法创建的buffer无法调用array();直接内存

     */

    private ByteBuffer buffer = ByteBuffer.allocate(1024);

    public static void main(String[] argv) throws Exception {

        new SelectSockets().go(argv);

    }

    public void go(String[] argv) throws Exception {

        System.out.println("Listening on port " + PORT_NUMBER);

        // 创建ServerSocketChannel

        ServerSocketChannel serverChannel = ServerSocketChannel.open();

        // 获得ServerSocket

        ServerSocket serverSocket = serverChannel.socket();

        // 创建Selector

        Selector selector = Selector.open();

        // 绑定

        serverSocket.bind(new InetSocketAddress(PORT_NUMBER));

        // false设置为非阻塞模式

        serverChannel.configureBlocking(false);

        // 注册通道

        ////ServerSocketChannel只能注册SelectionKey.OP_ACCEPT;register(Selector sel, int ops)的ops参数可以通过serverSocketChannel.validOps()获取。

        serverChannel.register(selector, SelectionKey.OP_ACCEPT);

        while (true) {

            //选择器select有三种方式,这种带时间的表示,没有连接阻塞10秒后继续或者有连接进来时继续

            int n = selector.select(10000);

            if (n == 0) {

                continue;

            }

            //selectedKeys()已选择的键

            Iterator it = selector.selectedKeys().iterator();

            while (it.hasNext()) {

                SelectionKey key = (SelectionKey) it.next();

                //检查是否有效

                if (!key.isValid()) {

                    continue;

                }

                //accept

                if (key.isAcceptable()) {

                    ServerSocketChannel server = (ServerSocketChannel) key.channel();

                    SocketChannel channel = server.accept();

                    System.out.println ("Incoming connection from: "+ channel.socket().getRemoteSocketAddress( ));

                    registerChannel(selector, channel, SelectionKey.OP_READ);

                    buffer.clear();

                    buffer.put("你好,我是服务器!\r\n".getBytes());

                    buffer.flip();

                    channel.write(buffer);

                }

                //if(key.isReadable())等价于if((key.readyOps( ) & SelectionKey.OP_READ) != 0)

                if (key.isReadable()) {

                    readHandler(key);

                }

                it.remove();

            }

        }

    }

    /**

     * 设置感兴趣的通道属性

     * @param selector

     * @param channel

     * @param ops

     * @throws Exception

     */

    protected void registerChannel(Selector selector, SelectableChannel channel, int ops) throws Exception {

        if (channel == null) {

            return;

        }

        channel.configureBlocking(false);

        channel.register(selector, ops);

    }

    /**

     * 处理读取数据

     * @param key

     * @throws Exception

     */

    protected void readHandler(SelectionKey key) throws Exception {

        SocketChannel socketChannel = (SocketChannel) key.channel();

        int count;

        StringBuilder sb = new StringBuilder();

        ByteBuffer tmpByteBuffer = ByteBuffer.allocate(1024);

        //读取客服端消息

        while ((count = socketChannel.read(tmpByteBuffer)) > 0) {

            tmpByteBuffer.flip();

            sb.append(new String(tmpByteBuffer.array()));

            // 这里可以回写给客服端

            while (tmpByteBuffer.hasRemaining()) {

                socketChannel.write(tmpByteBuffer);

            }

            tmpByteBuffer.clear();

        }

        System.out.println("客服端"+socketChannel.socket().getRemoteSocketAddress()+"说:"+sb.toString());

        if (count < 0) {

            // Close channel on EOF, invalidates the key

            socketChannel.close();

        }

    }

}
客服端:
/**

 * @author monkjavaer

 * @date 2018/10/23 22:23

 */

public class Client {

    private static final int BUFFER_SIZE = 1024;

    private static  int PORT = 9011;

    private static String[] messages =

            {"今天读到一句话,觉得很好:但行好事,莫问前程。"};

    public static void main(String[] args) {

        try {

            InetAddress inetAddress = InetAddress.getLocalHost();

            InetSocketAddress address =new InetSocketAddress(inetAddress, PORT);

            SocketChannel socketChannel = SocketChannel.open(address);

            for (String msg: messages) {

                ByteBuffer myBuffer=ByteBuffer.allocate(BUFFER_SIZE);

                myBuffer.put(msg.getBytes());

                myBuffer.flip();

                int bytesWritten = socketChannel.write(myBuffer);

                logger(String.format("Sending Message...: %s\nbytesWritten...: %d",msg, bytesWritten));

            }

            logger("Closing Client connection...");

            socketChannel.close();

        } catch (IOException e) {

            logger(e.getMessage());

            e.printStackTrace();

        }

    }

    public static void logger(String msg) {

        System.out.println(msg);

    }

}
也可以用telnet命令测试:
telnet 127.0.0.1 9011
最新文章
- CentOS7中升级Docker版本
- dubbo+zookeeper简单环境搭建
- Android 连接webservice(利用谷歌提供的jar包)
- 刀哥多线程之调度组gcd-12-group
- linux 命令行发送邮件及附件
- win8 或 win2008 系统 TFS 打开或获取源代码非常慢
- 使用$.getJSON实现跨域ajax请求
- 201521123045 《Java程序设计》第8周学习总结
- procotol.go 源码阅读
- Vue+Django2.0 restframework打造前后端分离的生鲜电商项目(3)
- jenkins主从从服务器发布脚本执行成功但总提示失败 FATAL: Remote call on XXXX failed
- 8天学通MongoDB——第一天 基础入门(转)
- java.io.ByteArrayOutputStream 源码分析
- codevs 1423 骑士 - Tarjan - 动态规划
- drools7 (二、agenda-group 的使用)
- px em rem 字体单位问题
- importlib应用 - django
- tableview直接滚动至最后一行
- [BZOJ2821]作诗
- 栈帧示意图:stack pointer、frame pointer