SSM商城项目(九)
1. 学习计划
1、Activemq整合springMQ的应用场景
2、添加商品同步索引库
3、商品详情页面动态展示
4、展示详情页面使用缓存
2. Activemq整合spring
2.1. 使用方法
在e3-manager-service工程下。
第一步:引用相关的jar包。
        <dependency>

            <groupId>org.springframework</groupId>

            <artifactId>spring-jms</artifactId>

        </dependency>

        <dependency>

            <groupId>org.springframework</groupId>

            <artifactId>spring-context-support</artifactId>

        </dependency>
第二步:配置Activemq整合spring。配置ConnectionFactory,配置生产者。
使用JMSTemplate对象。发送消息。
配置Destination。
<?xml version="1.0" encoding="UTF-8"?>

<beans xmlns="http://www.springframework.org/schema/beans"

    xmlns:context="http://www.springframework.org/schema/context" xmlns:p="http://www.springframework.org/schema/p"

    xmlns:aop="http://www.springframework.org/schema/aop" xmlns:tx="http://www.springframework.org/schema/tx"

    xmlns:xsi="http://www.w3.org/2001/XMLSchema-instance"

    xsi:schemaLocation="http://www.springframework.org/schema/beans http://www.springframework.org/schema/beans/spring-beans-4.2.xsd

    http://www.springframework.org/schema/context http://www.springframework.org/schema/context/spring-context-4.2.xsd

    http://www.springframework.org/schema/aop http://www.springframework.org/schema/aop/spring-aop-4.2.xsd http://www.springframework.org/schema/tx http://www.springframework.org/schema/tx/spring-tx-4.2.xsd

    http://www.springframework.org/schema/util http://www.springframework.org/schema/util/spring-util-4.2.xsd">

    <!-- 真正可以产生Connection的ConnectionFactory,由对应的 JMS服务厂商提供 -->

    <bean id="targetConnectionFactory" class="org.apache.activemq.ActiveMQConnectionFactory">

        <property name="brokerURL" value="tcp://192.168.25.128:61616" />

    </bean>

    <!-- Spring用于管理真正的ConnectionFactory的ConnectionFactory -->

    <bean id="connectionFactory"

        class="org.springframework.jms.connection.SingleConnectionFactory">

        <!-- 目标ConnectionFactory对应真实的可以产生JMS Connection的ConnectionFactory -->

        <property name="targetConnectionFactory" ref="targetConnectionFactory" />

    </bean>

    <!-- 配置生产者 -->

    <!-- Spring提供的JMS工具类,它可以进行消息发送、接收等 -->

    <bean id="jmsTemplate" class="org.springframework.jms.core.JmsTemplate">

        <!-- 这个connectionFactory对应的是我们定义的Spring提供的那个ConnectionFactory对象 -->

        <property name="connectionFactory" ref="connectionFactory" />

    </bean>

    <!--这个是队列目的地,点对点的 -->

    <bean id="queueDestination" class="org.apache.activemq.command.ActiveMQQueue">

        <constructor-arg>

            <value>spring-queue</value>

        </constructor-arg>

    </bean>

    <!--这个是主题目的地,一对多的 -->

    <bean id="topicDestination" class="org.apache.activemq.command.ActiveMQTopic">

        <constructor-arg value="itemAddTopic" />

    </bean>

</beans>
第三步:代码测试
package cn.e3mall.activemq;

import javax.jms.Destination;

import javax.jms.JMSException;

import javax.jms.Message;

import javax.jms.Session;

import javax.jms.TextMessage;

import org.junit.Test;

import org.springframework.context.ApplicationContext;

import org.springframework.context.support.ClassPathXmlApplicationContext;

import org.springframework.jms.core.JmsTemplate;

import org.springframework.jms.core.MessageCreator;

public class ActiveMqSpring {

    @Test

    public void testSpringActiveMq() throws Exception {

        //初始化spring容器

        ApplicationContext applicationContext = new ClassPathXmlApplicationContext("classpath:spring/applicationContext-activemq.xml");

        //从spring容器中获得JmsTemplate对象

        JmsTemplate jmsTemplate = applicationContext.getBean(JmsTemplate.class);

        //从spring容器中取Destination对象

        Destination destination = (Destination) applicationContext.getBean("queueDestination");

        //使用JmsTemplate对象发送消息。

        jmsTemplate.send(destination, new MessageCreator() {

            @Override

            public Message createMessage(Session session) throws JMSException {

                //创建一个消息对象并返回

                TextMessage textMessage = session.createTextMessage("spring activemq queue message");

                return textMessage;

            }

        });

    }

}
2.2. 代码测试
2.2.1. 发送消息
第一步:初始化一个spring容器
第二步:从容器中获得JMSTemplate对象。
第三步:从容器中获得一个Destination对象
第四步:使用JMSTemplate对象发送消息,需要知道Destination
    @Test

    public void testSpringActiveMq() throws Exception {

        //初始化spring容器

        ApplicationContext applicationContext = new ClassPathXmlApplicationContext("classpath:spring/applicationContext-activemq.xml");

        //从spring容器中获得JmsTemplate对象

        JmsTemplate jmsTemplate = applicationContext.getBean(JmsTemplate.class);

        //从spring容器中取Destination对象

        Destination destination = (Destination) applicationContext.getBean("queueDestination");

        //使用JmsTemplate对象发送消息。

        jmsTemplate.send(destination, new MessageCreator() {

            @Override

            public Message createMessage(Session session) throws JMSException {

                //创建一个消息对象并返回

                TextMessage textMessage = session.createTextMessage("spring activemq queue message");

                return textMessage;

            }

        });

    }
2.2.2. 接收消息
e3-search-Service中接收消息。
第一步:把Activemq相关的jar包添加到工程中
第二步:创建一个MessageListener的实现类。
public class MyMessageListener implements MessageListener {

    @Override

    public void onMessage(Message message) {

        try {

            TextMessage textMessage = (TextMessage) message;

            //取消息内容

            String text = textMessage.getText();

            System.out.println(text);

        } catch (JMSException e) {

            e.printStackTrace();

        }

    }

}
第三步:配置spring和Activemq整合。
<!-- 接收消息 -->

    <!-- 配置监听器 -->

    <bean id="myMessageListener" class="cn.e3mall.search.listener.MyMessageListener" />

    <!-- 消息监听容器 -->

    <bean class="org.springframework.jms.listener.DefaultMessageListenerContainer">

        <property name="connectionFactory" ref="connectionFactory" />

        <property name="destination" ref="queueDestination" />

        <property name="messageListener" ref="myMessageListener" />

    </bean>
第四步:测试代码。
package cn.e3mall.activemq;

import org.junit.Test;

import org.springframework.context.ApplicationContext;

import org.springframework.context.support.ClassPathXmlApplicationContext;

public class MessageConsumer {

    @Test

    public void testQueueConsumer() throws Exception {

        //初始化spring容器

        ApplicationContext applicationContext = new ClassPathXmlApplicationContext("classpath:spring/applicationContext-activemq.xml");

        //等待

        System.in.read();

    }

}
3. 添加商品同步索引库
3.1. Producer
e3-manager-server工程中发送消息。
当商品添加完成后发送一个TextMessage,包含一个商品id。
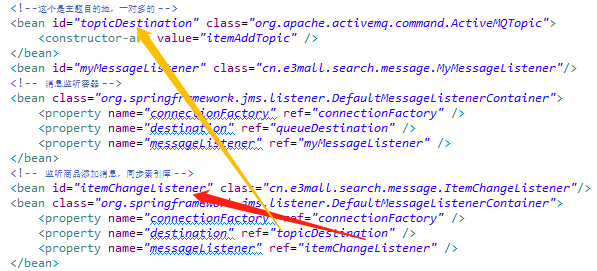
    <!--这个是主题目的地,一对多的 -->

    <bean id="topicDestination" class="org.apache.activemq.command.ActiveMQTopic">

        <constructor-arg value="itemAddTopic" />

    </bean>
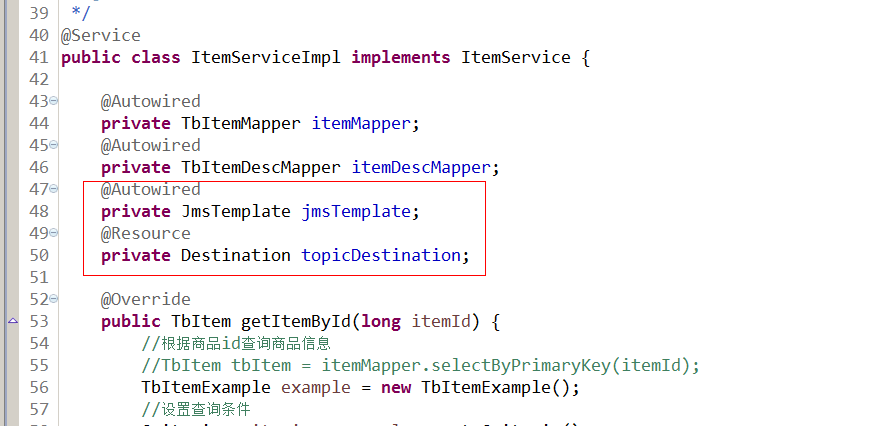
@Override

    public E3Result addItem(TbItem item, String desc) {

        // 1、生成商品id

        final long itemId=IDUtils.genItemId();

        // 2、补全TbItem对象的属性

        item.setId(itemId);

        //商品状态,1-正常,2-下架,3-删除

        item.setStatus((byte)1);

        item.setCreated(new Date());

        item.setUpdated(new Date());

        // 3、向商品表插入数据

        itemMapper.insert(item);

        // 4、创建一个TbItemDesc对象

        TbItemDesc itemDesc = new TbItemDesc();

        // 5、补全TbItemDesc的属性

        itemDesc.setItemId(itemId);

        itemDesc.setItemDesc(desc);

        itemDesc.setCreated(new Date());

        itemDesc.setUpdated(new Date());

        // 6、向商品描述表插入数据

       itemDescMapper.insert(itemDesc);

        //发送一个商品添加消息

             jmsTemplate.send(topicDestination, new MessageCreator() {

                 @Override

                 public Message createMessage(Session session) throws JMSException {

                     TextMessage textMessage = session.createTextMessage(itemId + "");

                     return textMessage;

                 }

             });

        // 7、E3Result.ok()

       return E3Result.ok();

    }
3.2. Consumer
e3-search-server工程
3.2.1. 功能分析
1、接收消息。需要创建MessageListener接口的实现类。
2、取消息,取商品id。
3、根据商品id查询数据库。
4、创建一SolrInputDocument对象。
5、使用SolrServer对象写入索引库。
6、返回成功,返回e3Result。
3.2.2. Dao层
根据商品id查询商品信息。
ItemMapper.java

ItemMapper.xml
<select id="getItemById" parameterType="long" resultType="cn.e3mall.common.pojo.SearchItem">

        SELECT

            a.id,

            a.title,

            a.sell_point,

            a.price,

            a.image,

            b. NAME category_name,

            c.item_desc

        FROM

            tb_item a

        JOIN tb_item_cat b ON a.cid = b.id

        JOIN tb_item_desc c ON a.id = c.item_id

        WHERE a.status = 1

          AND a.id=#{itemId}

    </select>
3.2.3. Service层
参数:商品ID
业务逻辑:
1、根据商品id查询商品信息。
2、创建一SolrInputDocument对象。
3、使用SolrServer对象写入索引库。
4、返回成功,返回e3Result。
返回值:e3Result
public E3Result addDocument(long itemId) throws Exception {

        // 1、根据商品id查询商品信息。

        SearchItem searchItem = itemMapper.getItemById(itemId);

        // 2、创建一SolrInputDocument对象。

        SolrInputDocument document = new SolrInputDocument();

        // 3、使用SolrServer对象写入索引库。

        document.addField("id", searchItem.getId());

        document.addField("item_title", searchItem.getTitle());

        document.addField("item_sell_point", searchItem.getSell_point());

        document.addField("item_price", searchItem.getPrice());

        document.addField("item_image", searchItem.getImage());

        document.addField("item_category_name", searchItem.getCategory_name());

        // 5、向索引库中添加文档。

        solrServer.add(document);

        solrServer.commit();

        // 4、返回成功,返回e3Result。

        return E3Result.ok();

    }
3.2.4. Listener
package cn.e3mall.search.message;

import javax.jms.Message;

import javax.jms.MessageListener;

import javax.jms.TextMessage;

import org.springframework.beans.factory.annotation.Autowired;

import cn.e3mall.search.service.impl.SearchServiceImpl;

public class ItemChangeListener implements MessageListener{

    @Autowired

    private SearchServiceImpl searchItemServiceImpl;

    @Override

    public void onMessage(Message message) {

        try {

            TextMessage textMessage = null;

            Long itemId = null;

            //取商品id

            if (message instanceof TextMessage) {

                textMessage = (TextMessage) message;

                itemId = Long.parseLong(textMessage.getText());

            }

            //向索引库添加文档

            searchItemServiceImpl.addDocument(itemId);

        } catch (Exception e) {

            e.printStackTrace();

        }

    }

}
3.2.5. Spring配置监听
<!-- 监听商品添加消息,同步索引库 -->

    <bean id="itemChangeListener" class="cn.e3mall.search.message.ItemChangeListener"/>

    <bean class="org.springframework.jms.listener.DefaultMessageListenerContainer">

        <property name="connectionFactory" ref="connectionFactory" />

        <property name="destination" ref="topicDestination" />

        <property name="messageListener" ref="itemAddMessageListener" />

    </bean>
3.2.6. 实现流程

4. 商品详情页面展示
创建一个商品详情页面展示的工程。是一个表现层工程。
4.1. 工程搭建
e3-item-web。打包方式war。可以参考e3-portal-web
pom.xml文件
<project xmlns="http://maven.apache.org/POM/4.0.0" xmlns:xsi="http://www.w3.org/2001/XMLSchema-instance"

    xsi:schemaLocation="http://maven.apache.org/POM/4.0.0 http://maven.apache.org/xsd/maven-4.0.0.xsd">

    <modelVersion>4.0.0</modelVersion>

    <parent>

        <groupId>cn.e3mall</groupId>

        <artifactId>e3-parent</artifactId>

        <version>0.0.1-SNAPSHOT</version>

    </parent>

    <groupId>cn.e3mall</groupId>

    <artifactId>e3-item-web</artifactId>

    <version>0.0.1-SNAPSHOT</version>

    <packaging>war</packaging>

    <dependencies>

        <dependency>

            <groupId>cn.e3mall</groupId>

            <artifactId>e3-manager-interface</artifactId>

            <version>0.0.1-SNAPSHOT</version>

        </dependency>

        <!-- Spring -->

        <dependency>

            <groupId>org.springframework</groupId>

            <artifactId>spring-context</artifactId>

        </dependency>

        <dependency>

            <groupId>org.springframework</groupId>

            <artifactId>spring-beans</artifactId>

        </dependency>

        <dependency>

            <groupId>org.springframework</groupId>

            <artifactId>spring-webmvc</artifactId>

        </dependency>

        <dependency>

            <groupId>org.springframework</groupId>

            <artifactId>spring-jdbc</artifactId>

        </dependency>

        <dependency>

            <groupId>org.springframework</groupId>

            <artifactId>spring-aspects</artifactId>

        </dependency>

        <dependency>

            <groupId>org.springframework</groupId>

            <artifactId>spring-jms</artifactId>

        </dependency>

        <dependency>

            <groupId>org.springframework</groupId>

            <artifactId>spring-context-support</artifactId>

        </dependency>

        <!-- JSP相关 -->

        <dependency>

            <groupId>jstl</groupId>

            <artifactId>jstl</artifactId>

        </dependency>

        <dependency>

            <groupId>javax.servlet</groupId>

            <artifactId>servlet-api</artifactId>

            <scope>provided</scope>

        </dependency>

        <dependency>

            <groupId>javax.servlet</groupId>

            <artifactId>jsp-api</artifactId>

            <scope>provided</scope>

        </dependency>

        <!-- dubbo相关 -->

        <dependency>

            <groupId>com.alibaba</groupId>

            <artifactId>dubbo</artifactId>

            <!-- 排除依赖 -->

            <exclusions>

                <exclusion>

                    <groupId>org.springframework</groupId>

                    <artifactId>spring</artifactId>

                </exclusion>

                <exclusion>

                    <groupId>org.jboss.netty</groupId>

                    <artifactId>netty</artifactId>

                </exclusion>

            </exclusions>

        </dependency>

        <dependency>

            <groupId>org.apache.zookeeper</groupId>

            <artifactId>zookeeper</artifactId>

        </dependency>

        <dependency>

            <groupId>com.github.sgroschupf</groupId>

            <artifactId>zkclient</artifactId>

        </dependency>

        <dependency>

            <groupId>junit</groupId>

            <artifactId>junit</artifactId>

        </dependency>

    </dependencies>

    <!-- 配置tomcat插件 -->

    <build>

        <plugins>

            <plugin>

                <groupId>org.apache.tomcat.maven</groupId>

                <artifactId>tomcat7-maven-plugin</artifactId>

                <configuration>

                    <port>8087</port>

                    <path>/</path>

                </configuration>

            </plugin>

        </plugins>

    </build>

</project>
4.2. 功能分析
在搜索结果页面点击商品图片或者商品标题,展示商品详情页面。

请求的url:/item/{itemId}
参数:商品id
返回值:String 逻辑视图
业务逻辑:
1、从url中取参数,商品id
2、根据商品id查询商品信息(tb_item)得到一个TbItem对象,缺少images属性,可以创建一个pojo继承TbItem,添加一个getImages方法。在e3-item-web工程中。
package cn.e3mall.item.pojo;

import cn.e3mall.pojo.TbItem;

public class Item extends TbItem {

    public String[] getImages() {

        String image2 = this.getImage();

        if (image2 != null && !"".equals(image2)) {

            String[] strings = image2.split(",");

            return strings;

        }

        return null;

    }

    public Item() {

    }

    public Item(TbItem tbItem) {

        this.setBarcode(tbItem.getBarcode());

        this.setCid(tbItem.getCid());

        this.setCreated(tbItem.getCreated());

        this.setId(tbItem.getId());

        this.setImage(tbItem.getImage());

        this.setNum(tbItem.getNum());

        this.setPrice(tbItem.getPrice());

        this.setSellPoint(tbItem.getSellPoint());

        this.setStatus(tbItem.getStatus());

        this.setTitle(tbItem.getTitle());

        this.setUpdated(tbItem.getUpdated());

    }

}
1、根据商品id查询商品描述。
2、展示到页面。
4.3. Dao层
查询tb_item, tb_item_desc两个表,都是单表查询。可以使用逆向工程。
4.4. Service层
1、根据商品id查询商品信息
参数:商品id
返回值:TbItem
    @Override

     public TbItem getItemById(long id){

         TbItem ti=itemMapper.selectByPrimaryKey(id);

         if(ti!=null){

             return ti;

         }

         return null;

     }
2、根据商品id查询商品描述
参数:商品id
返回值:TbItemDesc
    @Override

    public TbItemDesc getItemDescById(long itemId) {

        TbItemDesc itemDesc = itemDescMapper.selectByPrimaryKey(itemId);

        return itemDesc;

    }
发布服务,前面已经发布过了
4.5. 表现层
4.5.1. Controller
请求的url:/item/{itemId}
参数:商品id
返回值:String 逻辑视图
package cn.e3mall.item.controller;

import org.springframework.beans.factory.annotation.Autowired;

import org.springframework.stereotype.Controller;

import org.springframework.ui.Model;

import org.springframework.web.bind.annotation.PathVariable;

import org.springframework.web.bind.annotation.RequestMapping;

import cn.e3mall.item.pojo.Item;

import cn.e3mall.pojo.TbItem;

import cn.e3mall.pojo.TbItemDesc;

import cn.e3mall.service.ItemService;

@Controller

public class ItemController {

    @Autowired

    private ItemService itemService;

    @RequestMapping("/item/{itemId}")

    public String showItemInfo(@PathVariable Long itemId, Model model) {

        //跟据商品id查询商品信息

        TbItem tbItem = itemService.getItemById(itemId);

        //把TbItem转换成Item对象

        Item item = new Item(tbItem);

        //根据商品id查询商品描述

        TbItemDesc tbItemDesc = itemService.getItemDescById(itemId);

        //把数据传递给页面

        model.addAttribute("item", item);

        model.addAttribute("itemDesc", tbItemDesc);

        return "item";

    }

}
引用服务
springmvc.xml
<dubbo:reference interface="cn.e3mall.service.ItemService" id="itemService" />
4.6. 向业务逻辑中添加缓存
4.6.1. 缓存添加分析
使用redis做缓存。
业务逻辑:
1、根据商品id到缓存中命中
2、查到缓存,直接返回。
3、差不到,查询数据库
4、把数据放到缓存中
5、返回数据
缓存中缓存热点数据,提供缓存的使用率。需要设置缓存的有效期。一般是一天的时间,可以根据实际情况跳转。
需要使用String类型来保存商品数据。
可以加前缀方法对象redis中的key进行归类。
ITEM_INFO:123456:BASE
ITEM_INFO:123456:DESC
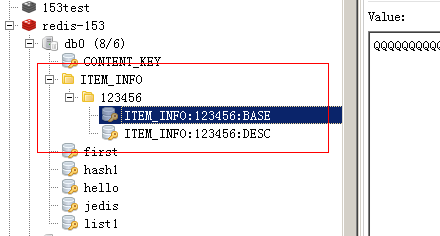

如果把二维表保存到redis中:
1、表名就是第一层
2、主键是第二层
3、字段名第三次
三层使用“:”分隔作为key,value就是字段中的内容。
4.6.2. 把redis相关的jar包添加到工程
            <dependency>

                <groupId>redis.clients</groupId>

                <artifactId>jedis</artifactId>

            </dependency>
4.6.3. 添加缓存
@Autowired

    private JedisClient jedisClient;

    @Override

     public TbItem getItemById(long id){

        try {

            //查询缓存

            String json = jedisClient.get("ITEM_INFO" + ":" + id + ":BASE");

            if (StringUtils.isNotBlank(json)) {

                //把json转换为java对象

                TbItem item = JsonUtils.jsonToPojo(json, TbItem.class);

                return item;

            }

        } catch (Exception e) {

            e.printStackTrace();

        }

        TbItemExample example = new TbItemExample();

        //设置查询条件

        Criteria criteria = example.createCriteria();

        criteria.andIdEqualTo(id);

        List<TbItem> list = itemMapper.selectByExample(example);

        if (list != null && list.size() > 0) {

            TbItem item = list.get(0);

             try {

                 //把数据保存到缓存

                 jedisClient.set("ITEM_INFO" + ":" + id + ":BASE", JsonUtils.objectToJson(item));

                 //设置缓存的有效期

                 jedisClient.expire("ITEM_INFO"+ ":" + id + ":BASE",3600);

             } catch (Exception e) {

                 e.printStackTrace();

             }

             return item;

         }

         return null;

     }
取商品描述添加缓存:
    @Override

    public TbItemDesc getItemDescById(long itemId) {

        try {

            String json = jedisClient.get("ITEM_INFO" + ":" + itemId + ":DESC");

            //判断缓存是否命中

            if (StringUtils.isNotBlank(json) ) {

                //转换为java对象

                TbItemDesc itemDesc = JsonUtils.jsonToPojo(json, TbItemDesc.class);

                return itemDesc;

            }

        } catch (Exception e) {

            e.printStackTrace();

        }

        TbItemDesc itemDesc = itemDescMapper.selectByPrimaryKey(itemId);

        try {

            jedisClient.set("ITEM_INFO" + ":" + itemId + ":DESC", JsonUtils.objectToJson(itemDesc));

            //设置过期时间

            jedisClient.expire("ITEM_INFO" + ":" + itemId + ":DESC", 3600);

        } catch (Exception e) {

            e.printStackTrace();

        }

        return itemDesc;

    }
总结
问题:No qualifying bean of type [cn.e3mall.common.jedis.JedisClient] found for dependency
解决:在applicationContext-redis.xml中配置redis
注意自己连的redis是集群版还是单机版的
最新文章
- js-权威指南学习笔记2
- python操作SQL
- EtherType
- 正式工作的前奏——一个Java程序员的实习总结(1)
- 繁华模拟赛 Vincent的城堡
- Activity初步,初学者必看
- linux常用svn命令(转载)
- 一张图讲解为什么需要自己搭建自己的git服务以及搭建的途径
- (一)Builder(建造者)模式
- Android常见漏洞
- Spring-----入门
- 解决python发送multipart/form-data请求上传文件的问题
- hive命令的三种执行方式
- [No000010B]Git4/9-时光机穿梭
- MYSQLi数据访问分页查询
- Android 7.0以上版本 系统解决拍照的问题 exposed beyond app through ClipData.Item.getUri()
- Traceroute(路由追踪)的原理及实现
- 如何基于TensorFlow使用LSTM和CNN实现时序分类任务
- [Mysql 查询语句]——集合函数
- Ubuntu16 安装Jira