Zookeeper的Watcher 机制的实现原理
事件机制:
Watcher 监听机制是 Zookeeper 中非常重要的特性,我们基于 zookeeper 上创建的节点,可以对这些节点绑定监听事件,比如可以监听节点数据变更、节点删除、子节点状态变更等事件,通过这个事件机制,可以基于 zookeeper实现分布式锁、集群管理等功能。
watcher 特性:当数据发生变化的时候, zookeeper 会产生一个 watcher 事件,并且会发送到客户端。但是客户端只会收到一次通知。如果后续这个节点再次发生变化,那么之前设置 watcher 的客户端不会再次收到消息。(watcher 是一次性的操作)。 可以通过循环监听去达到永久监听效果。
如何注册事件机制:
ZooKeeper 的 Watcher 机制,总的来说可以分为三个过程:客户端注册 Watcher、服务器处理 Watcher 和客户端回调 Watcher客户端。注册 watcher 有 3 种方式,getData、exists、getChildren;以如下代码为例
如何触发事件? 凡是事务类型的操作,都会触发监听事件。create /delete /setData,来看以下代码简单实现
public class WatcherDemo {

    public static void main(String[] args) throws IOException, InterruptedException, KeeperException {

        final CountDownLatch countDownLatch=new CountDownLatch();

        final ZooKeeper zooKeeper=

                 new ZooKeeper("192.168.254.135:2181," +

                         "192.168.254.136:2181,192.168.254.137:2181",

                        , new Watcher() {

                    @Override

                    public void process(WatchedEvent event) {

                        System.out.println("默认事件: "+event.getType());

                        if(Event.KeeperState.SyncConnected==event.getState()){

                            //如果收到了服务端的响应事件,连接成功

                            countDownLatch.countDown();

                        }

                    }

                });

        countDownLatch.await();

        zooKeeper.create("/zk-wuzz","".getBytes(),

                ZooDefs.Ids.OPEN_ACL_UNSAFE,CreateMode.PERSISTENT);

        //exists  getdata getchildren

        //通过exists绑定事件

        Stat stat=zooKeeper.exists("/zk-wuzz", new Watcher() {

            @Override

            public void process(WatchedEvent event) {

                System.out.println(event.getType()+"->"+event.getPath());

                try {

                    //再一次去绑定事件 ,但是这个走的是默认事件

                    zooKeeper.exists(event.getPath(),true);

                } catch (KeeperException e) {

                    e.printStackTrace();

                } catch (InterruptedException e) {

                    e.printStackTrace();

                }

            }

        });

        //通过修改的事务类型操作来触发监听事件

        stat=zooKeeper.setData("/zk-wuzz","".getBytes(),stat.getVersion());

        Thread.sleep();

        zooKeeper.delete("/zk-wuzz",stat.getVersion());

        System.in.read();

    }

}
以上就是 Watcher 的简单实现操作。接下来浅析一下这个 Watcher 实现的流程。
watcher 事件类型:
//org.apache.zookeeper.Watcher.Event.EventType
public enum EventType {

         None (-1), // 客户端连接状态发生变化的时候 会受到none事件

         NodeCreated (1), // 节点创建事件

         NodeDeleted (2), // 节点删除事件

         NodeDataChanged (3), // 节点数据变化

         NodeChildrenChanged (4); // 子节点被创建 删除触发该事件

}
事件的实现原理:
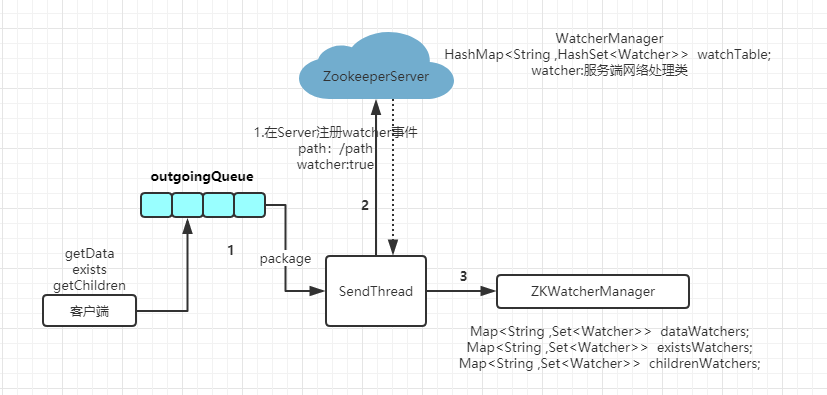
client 端连接后会注册一个事件,然后客户端会保存这个事件,通过zkWatcherManager 保存客户端的事件注册,通知服务端 Watcher 为 true,然后服务端会通过WahcerManager 会绑定path对应的事件。如下图:
请求发送:
接下去通过源码层面去熟悉一下这个 Watcher 的流程。由于我们demo 是通过exists 来注册事件,那么我们就通过 exists 来作为入口。先来看看ZooKeeper API 的初始化过程:
public ZooKeeper(String connectString, int sessionTimeout, Watcher watcher,

            boolean canBeReadOnly)

        throws IOException

    {

        LOG.info("Initiating client connection, connectString=" + connectString

                + " sessionTimeout=" + sessionTimeout + " watcher=" + watcher);

        //--在这里将 watcher 设置到ZKWatchManager

        watchManager.defaultWatcher = watcher;

        ConnectStringParser connectStringParser = new ConnectStringParser(

                connectString);

        HostProvider hostProvider = new StaticHostProvider(connectStringParser.getServerAddresses());

        //初始化了 ClientCnxn,并且调用 cnxn.start()方法

        cnxn = new ClientCnxn(connectStringParser.getChrootPath(),hostProvider, sessionTimeout, this, watchManager,getClientCnxnSocket(), canBeReadOnly);

        cnxn.start();

}
在创建一个 ZooKeeper 客户端对象实例时,我们通过 new Watcher()向构造方法中传入一个默认的 Watcher, 这个 Watcher 将作为整个 ZooKeeper 会话期间的默认Watcher,会一直被保存在客户端 ZKWatchManager 的 defaultWatcher 中.其中初始化了 ClientCnxn并且调用了其start 方法:
public ClientCnxn(String chrootPath, HostProvider hostProvider, int sessionTimeout, ZooKeeper zooKeeper,

        ClientWatchManager watcher, ClientCnxnSocket clientCnxnSocket,

        long sessionId, byte[] sessionPasswd, boolean canBeReadOnly) {

    this.zooKeeper = zooKeeper;

    this.watcher = watcher;

    this.sessionId = sessionId;

    this.sessionPasswd = sessionPasswd;

    this.sessionTimeout = sessionTimeout;//会话超时

    this.hostProvider = hostProvider;

    this.chrootPath = chrootPath;

    // 连接超时

    connectTimeout = sessionTimeout / hostProvider.size();

    readTimeout = sessionTimeout *  / ; //超时

    readOnly = canBeReadOnly;

    // 新建了一个发送线程

    sendThread = new SendThread(clientCnxnSocket);

    // 处理watcher回调event的线程

    eventThread = new EventThread();

}

//启动两个线程

public void start() {

    sendThread.start();

    eventThread.start();

}
ClientCnxn:是 Zookeeper 客户端和 Zookeeper 服务器端进行通信和事件通知处理的主要类,它内部包含两个类,
- SendThread :负责客户端和服务器端的数据通信, 也包括事件信息的传输
- EventThread : 主要在客户端回调注册的 Watchers 进行通知处理
接下去就是我们通过getData、exists、getChildren 注册事件的过程了,以exists为例:
public Stat exists(final String path, Watcher watcher)

        throws KeeperException, InterruptedException

    {

        final String clientPath = path;

        PathUtils.validatePath(clientPath);

     // 这个很关键,执行回调的时候会用到

        WatchRegistration wcb = null;

        if (watcher != null) {//不为空,将进行包装

            wcb = new ExistsWatchRegistration(watcher, clientPath);

        }

        final String serverPath = prependChroot(clientPath);

        //类似手写RPC中的一个请求类request

        //在这里 requesr就封装了两个东西 1.ZooDefs.OpCode.exists

        //还有一个是watch ->true

     RequestHeader h = new RequestHeader();

        h.setType(ZooDefs.OpCode.exists);

        ExistsRequest request = new ExistsRequest();

        request.setPath(serverPath);

        request.setWatch(watcher != null);

        SetDataResponse response = new SetDataResponse();

        //通过客户端的网络处理类去提交请求

        ReplyHeader r = cnxn.submitRequest(h, request, response, wcb);

        if (r.getErr() != ) {

            if (r.getErr() == KeeperException.Code.NONODE.intValue()) {

                return null;

            }

            throw KeeperException.create(KeeperException.Code.get(r.getErr()),

                    clientPath);

        }

        return response.getStat().getCzxid() == - ? null : response.getStat();

    }
其实这个方法内就做了两件事,初始化了ExistsWatchRegistration 以及封装了一个网络请求参数 ExistsRequest,接着通过 cnxn.submitRequest 发送请求:
public ReplyHeader submitRequest(RequestHeader h, Record request,

            Record response, WatchRegistration watchRegistration)

            throws InterruptedException {

        ReplyHeader r = new ReplyHeader();//应答消息头

        //组装请求入队

        Packet packet = queuePacket(h, r, request, response, null, null, null,

                    null, watchRegistration);

     //等待请求完成。否则阻塞

        synchronized (packet) {

            while (!packet.finished) {

                packet.wait();

            }

        }

        return r;

}
这里验证了我们之前流程图中对于请求进行封包都过程,紧接着会调用wait进入阻塞,一直的等待整个请求处理完毕,我们跟进 queuePacket:
Packet queuePacket(RequestHeader h, ReplyHeader r, Record request,

            Record response, AsyncCallback cb, String clientPath,

            String serverPath, Object ctx, WatchRegistration watchRegistration)

    {

        Packet packet = null;

       // 这个队列就是存放我们请求的队列,注意,我们还没有为包生成Xid。它是在发送时生成,通过实现ClientCnxnSocket::doIO(),数据包实际发送的地方。

        synchronized (outgoingQueue) {

            packet = new Packet(h, r, request, response, watchRegistration);

            packet.cb = cb;

            packet.ctx = ctx;

            packet.clientPath = clientPath;

            packet.serverPath = serverPath;

            if (!state.isAlive() || closing) {

                conLossPacket(packet);

            } else {

                // If the client is asking to close the session then

                // mark as closing

                if (h.getType() == OpCode.closeSession) {

                    closing = true;

                }//请求包入队

                outgoingQueue.add(packet);

            }

        }

     //唤醒selector

        sendThread.getClientCnxnSocket().wakeupCnxn();

        return packet;

}
这里加了个同步锁以避免并发问题,封装了一个 Packet 并将其加入到一个阻塞队列 outgoingQueue 中,最后调用 sendThread.getClientCnxnSocket().wakeupCnxn() 唤醒selector。看到这里,发现只是发送了数据,那哪里触发了对 outgoingQueue 队列的消息进行消费。再把组装的packeet 放入队列的时候用到的 cnxn.submitRequest(h, request, response, wcb);这个cnxn 是哪里来的呢? 在 zookeeper的构造函数中,我们初始化了一个ClientCnxn并且启动了两个线程:
public void start() {

    sendThread.start();

    eventThread.start();

}
对于当前场景来说,目前是需要将封装好的数据包发送出去,很显然走的是 SendThread,我们进入他的 Run 方法:
public void run() {

            clientCnxnSocket.introduce(this,sessionId);

            clientCnxnSocket.updateNow();

        //心跳相关

            clientCnxnSocket.updateLastSendAndHeard();

            int to;

            long lastPingRwServer = Time.currentElapsedTime();

            final int MAX_SEND_PING_INTERVAL = ; //10 seconds

            InetSocketAddress serverAddress = null;

            while (state.isAlive()) {

          //......七七八八一顿判断

          //发起网络请求

                clientCnxnSocket.doTransport(to, pendingQueue, outgoingQueue, ClientCnxn.this);

            }

            cleanup();

            clientCnxnSocket.close();

            if (state.isAlive()) {

                eventThread.queueEvent(new WatchedEvent(Event.EventType.None,

                        Event.KeeperState.Disconnected, null));

            }

}
这一步大部分的逻辑是进行校验判断连接状态,以及相关心跳维持得操作,最后会走 clientCnxnSocket.doTransport :
void doTransport(int waitTimeOut, List<Packet> pendingQueue, LinkedList<Packet> outgoingQueue,

                     ClientCnxn cnxn)

            throws IOException, InterruptedException {

        selector.select(waitTimeOut);

        Set<SelectionKey> selected;

        synchronized (this) {// 获取 selectKeys

            selected = selector.selectedKeys();

        }

        updateNow();//理解为时间常量

        for (SelectionKey k : selected) {//获取channel

            SocketChannel sc = ((SocketChannel) k.channel());

            // readyOps :获取此键上ready操作集合.即在当前通道上已经就绪的事件

            // SelectKey.OP_CONNECT 连接就绪事件,表示客户与服务器的连接已经建立成功

            // 两者的与计算不等于0

            if ((k.readyOps() & SelectionKey.OP_CONNECT) != ) {

                if (sc.finishConnect()) {

                    updateLastSendAndHeard();

                    sendThread.primeConnection();

                }

        // 读或者写通道准备完毕

            } else if ((k.readyOps() & (SelectionKey.OP_READ | SelectionKey.OP_WRITE)) != ) {

                //进行IO传输

                doIO(pendingQueue, outgoingQueue, cnxn);

            }

        }

        if (sendThread.getZkState().isConnected()) {

            synchronized(outgoingQueue) {

                if (findSendablePacket(outgoingQueue,

                        cnxn.sendThread.clientTunneledAuthenticationInProgress()) != null) {

                    enableWrite();

                }

            }

        }

        selected.clear();

    }
这里的代码相信很多小伙伴都不会很陌生,是 Java NIO相关操作的API,对于当前场景,这里我们是走 SelectionKey.OP_WRITE ,即 doIO(pendingQueue, outgoingQueue, cnxn) :
void doIO(List<Packet> pendingQueue, LinkedList<Packet> outgoingQueue, ClientCnxn cnxn)

      throws InterruptedException, IOException {

        SocketChannel sock = (SocketChannel) sockKey.channel();

        if (sock == null) {

            throw new IOException("Socket is null!");

        }

         // 可读状态

      // ....省略部分代码,对于目前来说是要将exsits指令发送出去,写出去

         // 可写状态

     if (sockKey.isWritable()) {

            synchronized(outgoingQueue) {//加锁

                // 发现传输包

                Packet p = findSendablePacket(outgoingQueue,

                        cnxn.sendThread.clientTunneledAuthenticationInProgress());

                if (p != null) {

                    updateLastSend();//心跳相关操作

                    // If we already started writing p, p.bb will already exist

                    if (p.bb == null) {

                        if ((p.requestHeader != null) &&

                                (p.requestHeader.getType() != OpCode.ping) &&

                                (p.requestHeader.getType() != OpCode.auth)) {

                            p.requestHeader.setXid(cnxn.getXid());

                        }

                        p.createBB();

                    }//将数据写入channel

                    sock.write(p.bb);

          // .......省略部分代码

            }

        }

    }

public void createBB() {

    try {

        ByteArrayOutputStream baos = new ByteArrayOutputStream();

        BinaryOutputArchive boa = BinaryOutputArchive.getArchive(baos);

        boa.writeInt(-, "len"); // We'll fill this in later

        if (requestHeader != null) {

            requestHeader.serialize(boa, "header");

        }

        if (request instanceof ConnectRequest) {

            request.serialize(boa, "connect");

            // append "am-I-allowed-to-be-readonly" flag

            boa.writeBool(readOnly, "readOnly");

        } else if (request != null) {

            request.serialize(boa, "request");

        }

        baos.close();

        this.bb = ByteBuffer.wrap(baos.toByteArray());

        this.bb.putInt(this.bb.capacity() - );

        this.bb.rewind();

    } catch (IOException e) {

        LOG.warn("Ignoring unexpected exception", e);

    }

}
序列化框架:jute.至此就将当前都操作发送至服务器端,当服务器端接收到请求进行下一步的处理.
服务端接收请求处理流程:
服务端有一个 NIOServerCnxn 类,在服务器端初始化的时候,在QuorumPeerMain.runFromConfig方法中:
ServerCnxnFactory cnxnFactory = ServerCnxnFactory.createFactory();
这里创建的 cnxnFactory 就是服务器端的网络请求处理类工厂对象,即 NIOServerCnxnFactory ,最后会调用 quorumPeer.start();启动,这里启动的就是 NIOServerCnxnFactory 里面都Run方法,我们跟进去看看:
public void run() {

       // socket 不是关闭状态

        while (!ss.socket().isClosed()) {

            try {//设置超时时间

                selector.select();

                Set<SelectionKey> selected;

                synchronized (this) {//跟刚刚一样,获取事件键列表

                    selected = selector.selectedKeys();

                }

                ArrayList<SelectionKey> selectedList = new ArrayList<SelectionKey>(

                        selected);

                Collections.shuffle(selectedList);

                for (SelectionKey k : selectedList) {//遍历事件keys

                    if ((k.readyOps() & SelectionKey.OP_ACCEPT) != ) {//就绪,等待连接

                        SocketChannel sc = ((ServerSocketChannel) k

                                .channel()).accept();

                        InetAddress ia = sc.socket().getInetAddress();

                        int cnxncount = getClientCnxnCount(ia);

                        if (maxClientCnxns >  && cnxncount >= maxClientCnxns){

                            LOG.warn("Too many connections from " + ia

                                     + " - max is " + maxClientCnxns );

                            sc.close();

                        } else {

                            LOG.info("Accepted socket connection from "

                                     + sc.socket().getRemoteSocketAddress());

                            sc.configureBlocking(false);

                            SelectionKey sk = sc.register(selector,

                                    SelectionKey.OP_READ);

                            NIOServerCnxn cnxn = createConnection(sc, sk);

                            sk.attach(cnxn);

                            addCnxn(cnxn);

                        }

            // 就绪读写事件

                    } else if ((k.readyOps() & (SelectionKey.OP_READ | SelectionKey.OP_WRITE)) != ) {

                        NIOServerCnxn c = (NIOServerCnxn) k.attachment();

                        c.doIO(k);

                    } else {

        ......//省略部分代码

    }
看到这里大家应该都清楚了,这里就是一个 selector 的循环监听,由于客户端发送过来,服务端负责处理,即对于服务器端是达到一个读事件,所以这里会走 c.doIO(k); 我们跟进去看看具体做了什么:
void doIO(SelectionKey k) throws InterruptedException {

        try {

            if (isSocketOpen() == false) {

                LOG.warn("trying to do i/o on a null socket for session:0x"

                         + Long.toHexString(sessionId));

                return;

            }// 可读

            if (k.isReadable()) {

                int rc = sock.read(incomingBuffer);

                if (rc < ) {

                    throw new EndOfStreamException(

                            "Unable to read additional data from client sessionid 0x"

                            + Long.toHexString(sessionId)

                            + ", likely client has closed socket");

                }// 返回剩余的可用长度,此长度为实际读取的数据长度 如果是0,代表读完了

                if (incomingBuffer.remaining() == ) {

                    boolean isPayload;

                    if (incomingBuffer == lenBuffer) { // start of next request

                        incomingBuffer.flip();

                        isPayload = readLength(k);

                        incomingBuffer.clear();

                    } else {

                        // continuation

                        isPayload = true;

                    }

                    if (isPayload) { // not the case for 4letterword

                        readPayload();

                    }

                    else {

                        // four letter words take care

                        // need not do anything else

                        return;

                    }

                }

            }

  ......//省略部分代码

}
这里进入依旧会判断是什么事件,我们这里重点看 isReadable,这里会从channel中读取请求数据,继而进入 readPayload();
private void readPayload() throws IOException, InterruptedException {

        if (incomingBuffer.remaining() != ) { // have we read length bytes?

            int rc = sock.read(incomingBuffer); // sock is non-blocking, so ok

            if (rc < ) {

                throw new EndOfStreamException(

                        "Unable to read additional data from client sessionid 0x"

                        + Long.toHexString(sessionId)

                        + ", likely client has closed socket");

            }

        }

     //判断是否有可读数据

        if (incomingBuffer.remaining() == ) { // have we read length bytes?

            packetReceived();

            incomingBuffer.flip();

            if (!initialized) {

                readConnectRequest();

            } else {

                readRequest();

            }

            lenBuffer.clear();

            incomingBuffer = lenBuffer;

        }

    }
这里会判断buffer中是否有可读数据,继而调用 readRequest() 去处理请求:
private void readRequest() throws IOException {

        zkServer.processPacket(this, incomingBuffer);

}
继而调用 zkServer.processPacket:
public void processPacket(ServerCnxn cnxn, ByteBuffer incomingBuffer) throws IOException {

        // We have the request, now process and setup for next

       //我们有了请求,现在处理并设置next

        InputStream bais = new ByteBufferInputStream(incomingBuffer);

        BinaryInputArchive bia = BinaryInputArchive.getArchive(bais);

        RequestHeader h = new RequestHeader();

        h.deserialize(bia, "header");

        incomingBuffer = incomingBuffer.slice();

        if (h.getType() == OpCode.auth) {

      ......

        } else {

            if (h.getType() == OpCode.sasl) {

                ......

            }

            else {// 由于exists方法一开始设置了 h.setType(ZooDefs.OpCode.exists);所以走这个流程

                Request si = new Request(cnxn, cnxn.getSessionId(), h.getXid(),

                  h.getType(), incomingBuffer, cnxn.getAuthInfo());

                si.setOwner(ServerCnxn.me);

                submitRequest(si);

            }

        }

        cnxn.incrOutstandingRequests(h);

    }
根据当前调用链会走else里得else的流程,所以会调到 submitRequest(si) :
public void submitRequest(Request si) {

        if (firstProcessor == null) {

            synchronized (this) {

                try {

                    // Since all requests are passed to the request

                    // processor it should wait for setting up the request

                    // processor chain. The state will be updated to RUNNING

                    // after the setup.

                    while (state == State.INITIAL) {

                        wait();

                    }

                } catch (InterruptedException e) {

                    LOG.warn("Unexpected interruption", e);

                }

                if (firstProcessor == null || state != State.RUNNING) {

                    throw new RuntimeException("Not started");

                }

            }

        }

        try {

            touch(si.cnxn);

            boolean validpacket = Request.isValid(si.type);

            if (validpacket) { // 链式处理

                firstProcessor.processRequest(si);

                if (si.cnxn != null) {

                    incInProcess();

                }

    // ...省略部分代码

    }
这里到了服务端的处理链都流程了,首先我们需要知道这个处理链是哪里初始化的呢?我们需要知道在整个调用链过程中采用的是责任链都设计模式,其中在ZK中每种角色以及部署方式都有其独特的调用链,我们先来看一下他是在哪里初始化的,在本类(ZookeeperServer)中搜索到如下方法:
protected void setupRequestProcessors() {

        RequestProcessor finalProcessor = new FinalRequestProcessor(this);

        RequestProcessor syncProcessor = new SyncRequestProcessor(this,

                finalProcessor);

        ((SyncRequestProcessor)syncProcessor).start();

        firstProcessor = new PrepRequestProcessor(this, syncProcessor);

        ((PrepRequestProcessor)firstProcessor).start();

}

public synchronized void startup() {

        if (sessionTracker == null) {

            createSessionTracker();

        }

        startSessionTracker();

        setupRequestProcessors();

        registerJMX();

        setState(State.RUNNING);

        notifyAll();

}
从代码中可以看出在 setupRequestProcessors初始化了该链路,其中由 startup() 进入初始化,而这个startup在我们跟leader选举的时候,服务端初始化中在 QuorumPeer 类中的Run方法中有调到,可以跟单机版的流程看一下,针对不同的角色,这里有4种不同的实现

我们来看看每种不同角色的调用链:standalone,单机部署:
protected void setupRequestProcessors() {

        // PrepRequestProcessor -> SyncRequestProcessor-> FinalRequestProcessor

        RequestProcessor finalProcessor = new FinalRequestProcessor(this);

        RequestProcessor syncProcessor = new SyncRequestProcessor(this,

                finalProcessor);

        ((SyncRequestProcessor)syncProcessor).start();

        firstProcessor = new PrepRequestProcessor(this, syncProcessor);

        ((PrepRequestProcessor)firstProcessor).start();

    }
集群部署 Leader :
protected void setupRequestProcessors() {

        // PrepRequestProcessor->ProposalRequestProcessor -> CommitProcessor

        // -> ToBeAppliedRequestProcessor ->FinalRequestProcessor

        RequestProcessor finalProcessor = new FinalRequestProcessor(this);

        RequestProcessor toBeAppliedProcessor = new Leader.ToBeAppliedRequestProcessor(

                finalProcessor, getLeader().toBeApplied);

        //提交相关

        commitProcessor = new CommitProcessor(toBeAppliedProcessor,

                Long.toString(getServerId()), false,

                getZooKeeperServerListener());

        commitProcessor.start();

        ////事务相关

        ProposalRequestProcessor proposalProcessor = new ProposalRequestProcessor(this,

                commitProcessor);

        proposalProcessor.initialize();

        firstProcessor = new PrepRequestProcessor(this, proposalProcessor);

        ((PrepRequestProcessor)firstProcessor).start();

    }
集群部署 Follower:
protected void setupRequestProcessors() {

        // FollowerRequestProcessor->CommitProcessor ->FinalRequestProcessor

        RequestProcessor finalProcessor = new FinalRequestProcessor(this);

        commitProcessor = new CommitProcessor(finalProcessor,

                Long.toString(getServerId()), true,

                getZooKeeperServerListener());

        commitProcessor.start();

        firstProcessor = new FollowerRequestProcessor(this, commitProcessor);

        ((FollowerRequestProcessor) firstProcessor).start();

        //同步应答相关

        syncProcessor = new SyncRequestProcessor(this,

                new SendAckRequestProcessor((Learner)getFollower()));

        syncProcessor.start();

    }
集群部署 Observer:
    protected void setupRequestProcessors() {

        RequestProcessor finalProcessor = new FinalRequestProcessor(this);

        commitProcessor = new CommitProcessor(finalProcessor,

                Long.toString(getServerId()), true,

                getZooKeeperServerListener());

        commitProcessor.start();

        firstProcessor = new ObserverRequestProcessor(this, commitProcessor);

        ((ObserverRequestProcessor) firstProcessor).start();

        if (syncRequestProcessorEnabled) {

            syncProcessor = new SyncRequestProcessor(this, null);

            syncProcessor.start();

        }

    }
这里 setupRequestProcessors 方法,对于不同的集群角色都有相对应都类去重写该方法,我们这里以单机部署的流程去处理对应流程:回到刚刚 submitRequest 方法中:
public void submitRequest(Request si) {

    //firstProcessor不可能是null

    try {

            touch(si.cnxn);

            boolean validpacket = Request.isValid(si.type);

            if (validpacket) {

                firstProcessor.processRequest(si);

                if (si.cnxn != null) {

                    incInProcess();

                }

    //.......

    }
我们根据单机版的调用链的顺序:PrepRequestProcessor -> SyncRequestProcessor-> FinalRequestProcessor。而这3个处理器的主要功能如下:
- PrepRequestProcessor:此请求处理器通常位于RequestProcessor的开头,等等可以看到,就exsits对应就一个Session的检查
- SyncRequestProcessor:此RequestProcessor将请求记录到磁盘。简单来说就是持久化的处理器
- FinalRequestProcessor:此请求处理程序实际应用与请求关联的任何事务,并为任何查询提供服务
首先进入PrepRequestProcessor.processRequest:
public void processRequest(Request request) {

        // request.addRQRec(">prep="+zks.outstandingChanges.size());

        submittedRequests.add(request);

}
很奇怪,processRequest 只是把 request 添加到submittedRequests中,根据前面的经验,很自然的想到这里又是一个异步操作。而submittedRequests又是一个阻塞队列LinkedBlockingQueue submittedRequests = new LinkedBlockingQueue();而 PrepRequestProcessor 这个类又继承了线程类,因此我们直接找到当前类中的方法如下:
public void run() {

        try {

            while (true) {

                Request request = submittedRequests.take();

                long traceMask = ZooTrace.CLIENT_REQUEST_TRACE_MASK;

                if (request.type == OpCode.ping) {

                    traceMask = ZooTrace.CLIENT_PING_TRACE_MASK;

                }

                if (LOG.isTraceEnabled()) {

                    ZooTrace.logRequest(LOG, traceMask, 'P', request, "");

                }

                if (Request.requestOfDeath == request) {

                    break;

                }// 调用 pRequest 进行预处理

                pRequest(request);

            }

        } catch (RequestProcessorException e) {

            if (e.getCause() instanceof XidRolloverException) {

                LOG.info(e.getCause().getMessage());

            }

            handleException(this.getName(), e);

        } catch (Exception e) {

            handleException(this.getName(), e);

        }

        LOG.info("PrepRequestProcessor exited loop!");

}

protected void pRequest(Request request) throws RequestProcessorException {

    // LOG.info("Prep>>> cxid = " + request.cxid + " type = " +

    // request.type + " id = 0x" + Long.toHexString(request.sessionId));

    request.hdr = null;

    request.txn = null;

    try {

        switch (request.type) {

     ......//省略部分代码

        case OpCode.sync:

        case OpCode.exists: //根据我们这个案例会走这个分支

        case OpCode.getData:

        case OpCode.getACL:

        case OpCode.getChildren:

        case OpCode.getChildren2:

        case OpCode.ping:

        case OpCode.setWatches:

            zks.sessionTracker.checkSession(request.sessionId,

                    request.getOwner());

            break;

   .....//省略部分代码

    request.zxid = zks.getZxid();

    nextProcessor.processRequest(request);

}
这里通过判断请求的类型进而调用处理,而在本场景中 case OpCode.exists: 会走检查 Session 而没有做其他操作,进而进入下一个调用链 SyncRequestProcessor.processRequest:
public void processRequest(Request request) {

        // request.addRQRec(">sync");

        queuedRequests.add(request);

}
又是一样的套路,进入其 Run方法:
public void run() {

        try {

            int logCount = ;

            // we do this in an attempt to ensure that not all of the servers

            // in the ensemble take a snapshot at the same time

            setRandRoll(r.nextInt(snapCount/));

            while (true) {

                Request si = null;

                if (toFlush.isEmpty()) {
             //出队

                    si = queuedRequests.take();

                } else {

                    si = queuedRequests.poll();

                    if (si == null) {

                        flush(toFlush);

                        continue;

                    }

                }

                if (si == requestOfDeath) {

                    break;

                }

                if (si != null) {
            //下面这块代码,粗略看来是触发快照操作,启动一个处理快照的线程

                    // track the number of records written to the log

                    if (zks.getZKDatabase().append(si)) {

                        logCount++;

                        if (logCount > (snapCount /  + randRoll)) {

                            setRandRoll(r.nextInt(snapCount/));

                            // roll the log

                            zks.getZKDatabase().rollLog();

                            // take a snapshot

                            if (snapInProcess != null && snapInProcess.isAlive()) {

                                LOG.warn("Too busy to snap, skipping");

                            } else {

                                snapInProcess = new ZooKeeperThread("Snapshot Thread") {

                                        public void run() {

                                            try {

                                                zks.takeSnapshot();

                                            } catch(Exception e) {

                                                LOG.warn("Unexpected exception", e);

                                            }

                                        }

                                    };

                                snapInProcess.start();

                            }

                            logCount = ;

                        }

                    } else if (toFlush.isEmpty()) {

                        // optimization for read heavy workloads

                        // iff this is a read, and there are no pending

                        // flushes (writes), then just pass this to the next

                        // processor

                        if (nextProcessor != null) {//调用下一个处理器

                            nextProcessor.processRequest(si);

                            if (nextProcessor instanceof Flushable) {

                                ((Flushable)nextProcessor).flush();

                            }

                        }

                        continue;

                    }

                    toFlush.add(si);

                    if (toFlush.size() > ) {

                        flush(toFlush);

                    }

                }

            }

    ......

    }
接着进入下一个调用链 FinalRequestProcessor.processRequest:
public void processRequest(Request request) {

      //省略部分代码 校验 相关

      switch (request.type) {

        //省略部分代码

        case OpCode.exists: {

                lastOp = "EXIS";

                // TODO we need to figure out the security requirement for this!

                ExistsRequest existsRequest = new ExistsRequest();

           // 反序列化 将 ByteBuffer 反序列化成为 ExitsRequest. 这个就是我们在客户端发起请求的时候传递过来的 Request 对象

                ByteBufferInputStream.byteBuffer2Record(request.request,existsRequest);

                // 得到请求的路径

                String path = existsRequest.getPath();

                if (path.indexOf('\0') != -) {

                    throw new KeeperException.BadArgumentsException();

                }

           // 终于找到一个很关键的代码,判断请求的 getWatch 是否存在,如果存在,则传递 cnxn ( servercnxn )

           // 对于 exists 请求,需要监听 data 变化事件,添加 watcher

                Stat stat = zks.getZKDatabase().statNode(path, existsRequest.getWatch() ? cnxn : null);

           // 在服务端内存数据库中根据路径得到结果进行组装,设置为 ExistsResponse

                rsp = new ExistsResponse(stat);

                break;

            }

    .....//省略部分代码

 }
这里的 cnxn 是 SverCnxn cnxn = request.cnxn在 processRequest(Request request) 方法内,推至前面 c.doIO(k) 的这个c 是通过 NIOServerCnxn c = (NIOServerCnxn) k.attachment() 获取到的。
最后将这个信息保存在服务器端:
public Stat statNode(String path, Watcher watcher)

            throws KeeperException.NoNodeException {

        Stat stat = new Stat();

        DataNode n = nodes.get(path);

        if (watcher != null) {

       //保存watch事件

            dataWatches.addWatch(path, watcher);

        }

        if (n == null) {

            throw new KeeperException.NoNodeException();

        }

        synchronized (n) {

            n.copyStat(stat);

            return stat;

        }

 }

//保存 watch 事件

public synchronized void addWatch(String path, Watcher watcher) {

    HashSet<Watcher> list = watchTable.get(path);

    if (list == null) {

        // don't waste memory if there are few watches on a node

        // rehash when the 4th entry is added, doubling size thereafter

        // seems like a good compromise

        list = new HashSet<Watcher>();

        watchTable.put(path, list);

    }

    list.add(watcher);

    HashSet<String> paths = watch2Paths.get(watcher);

    if (paths == null) {

        // cnxns typically have many watches, so use default cap here

        paths = new HashSet<String>();

        watch2Paths.put(watcher, paths);

    }

    paths.add(path);

}
至此,服务端处理完成。
客户端接收服务端处理完成的响应:
服务端处理完成以后,由于在 发送exsits的时候调用了doTransport ,本身调用这个方法之前的ClientCnxn 的 run方法是一直在轮询跑着的。所以在不断的轮询Selector ,所以这里不管是客户端的读还是写操作,都会进入ClientCnxnSocketNIO.doIO ,这里是接收服务端的返回:
void doIO(List<Packet> pendingQueue, LinkedList<Packet> outgoingQueue, ClientCnxn cnxn)

      throws InterruptedException, IOException {

        SocketChannel sock = (SocketChannel) sockKey.channel();

        if (sock == null) {

            throw new IOException("Socket is null!");

        }

        if (sockKey.isReadable()) {

            int rc = sock.read(incomingBuffer);

            if (rc < ) {

                throw new EndOfStreamException(

                        "Unable to read additional data from server sessionid 0x"

                                + Long.toHexString(sessionId)

                                + ", likely server has closed socket");

            }//判断是否有刻度数据

            if (!incomingBuffer.hasRemaining()) {

                incomingBuffer.flip();

                if (incomingBuffer == lenBuffer) {

                    recvCount++;

                    readLength();

                } else if (!initialized) {

                    readConnectResult();

                    enableRead();

                    if (findSendablePacket(outgoingQueue,

                            cnxn.sendThread.clientTunneledAuthenticationInProgress()) != null) {

                        // Since SASL authentication has completed (if client is configured to do so),

                        // outgoing packets waiting in the outgoingQueue can now be sent.

                        enableWrite();

                    }

                    lenBuffer.clear();

                    incomingBuffer = lenBuffer;

                    updateLastHeard();

                    initialized = true;

                } else {//读取响应

                    sendThread.readResponse(incomingBuffer);

                    lenBuffer.clear();

                    incomingBuffer = lenBuffer;

                    updateLastHeard();

                }

            }

        }
  ......//省略部分代码

       }

    }
根据当前场景我们现在是接收服务器响应应该走的是 read,最后会调用 sendThread.readResponse(incomingBuffer);来读取数据:
void readResponse(ByteBuffer incomingBuffer) throws IOException {

            ByteBufferInputStream bbis = new ByteBufferInputStream(

                    incomingBuffer);

            BinaryInputArchive bbia = BinaryInputArchive.getArchive(bbis);

            ReplyHeader replyHdr = new ReplyHeader();

            // 反序列化 header

            replyHdr.deserialize(bbia, "header");

            if (replyHdr.getXid() == -) {

                // -2 is the xid for pings

                if (LOG.isDebugEnabled()) {

                    LOG.debug("Got ping response for sessionid: 0x"

                            + Long.toHexString(sessionId)

                            + " after "

                            + ((System.nanoTime() - lastPingSentNs) / )

                            + "ms");

                }

                return;

            }

            if (replyHdr.getXid() == -) {

                // -4 is the xid for AuthPacket

                if(replyHdr.getErr() == KeeperException.Code.AUTHFAILED.intValue()) {

                    state = States.AUTH_FAILED;

                    eventThread.queueEvent( new WatchedEvent(Watcher.Event.EventType.None,

                            Watcher.Event.KeeperState.AuthFailed, null) );

                }

                if (LOG.isDebugEnabled()) {

                    LOG.debug("Got auth sessionid:0x"

                            + Long.toHexString(sessionId));

                }

                return;

            }

            if (replyHdr.getXid() == -) {

                // -1 means notification

                // 表示当前的消息类型为一个 notification( 意味着是服务端的一个响应事件)

                if (LOG.isDebugEnabled()) {

                    LOG.debug("Got notification sessionid:0x"

                        + Long.toHexString(sessionId));

                }

                WatcherEvent event = new WatcherEvent();

                // 反序列化响应信息

                event.deserialize(bbia, "response");

                // convert from a server path to a client path

                if (chrootPath != null) {

                    String serverPath = event.getPath();

                    if(serverPath.compareTo(chrootPath)==)

                        event.setPath("/");

                    else if (serverPath.length() > chrootPath.length())

                        event.setPath(serverPath.substring(chrootPath.length()));

                    else {

                        LOG.warn("Got server path " + event.getPath()

                                + " which is too short for chroot path "

                                + chrootPath);

                    }

                }

                WatchedEvent we = new WatchedEvent(event);

                if (LOG.isDebugEnabled()) {

                    LOG.debug("Got " + we + " for sessionid 0x"

                            + Long.toHexString(sessionId));

                }

                eventThread.queueEvent( we );

                return;

            }

            // If SASL authentication is currently in progress, construct and

            // send a response packet immediately, rather than queuing a

            // response as with other packets.

            if (clientTunneledAuthenticationInProgress()) {

                GetSASLRequest request = new GetSASLRequest();

                request.deserialize(bbia,"token");

                zooKeeperSaslClient.respondToServer(request.getToken(),

                  ClientCnxn.this);

                return;

            }

            Packet packet;

            synchronized (pendingQueue) {

                if (pendingQueue.size() == ) {

                    throw new IOException("Nothing in the queue, but got "

                            + replyHdr.getXid());

                }

                // 因为当前这个数据包已经收到了响应,所以讲它从 pendingQueued 中移除

                packet = pendingQueue.remove();

            }

            /*

             * Since requests are processed in order, we better get a response

             * to the first request!

             */

            try {// 校验数据包信息,校验成功后讲数据包信息进行更新(替换为服务端的信息)

                if (packet.requestHeader.getXid() != replyHdr.getXid()) {

                    packet.replyHeader.setErr(

                            KeeperException.Code.CONNECTIONLOSS.intValue());

                    throw new IOException("Xid out of order. Got Xid "

                            + replyHdr.getXid() + " with err " +

                            + replyHdr.getErr() +

                            " expected Xid "

                            + packet.requestHeader.getXid()

                            + " for a packet with details: "

                            + packet );

                }

                packet.replyHeader.setXid(replyHdr.getXid());

                packet.replyHeader.setErr(replyHdr.getErr());

                packet.replyHeader.setZxid(replyHdr.getZxid());

                if (replyHdr.getZxid() > ) {

                    lastZxid = replyHdr.getZxid();

                }

                if (packet.response != null && replyHdr.getErr() == ) {

                    packet.response.deserialize(bbia, "response");

                    // 获得服务端的响应,反序列化以后设置到 packet.response 属性中。

                    // 所以我们可以在 exists 方法的最后一行通过 packet.response 拿到改请求的返回结果

                }

                if (LOG.isDebugEnabled()) {

                    LOG.debug("Reading reply sessionid:0x"

                            + Long.toHexString(sessionId) + ", packet:: " + packet);

                }

            } finally {

                // 最后调用 finishPacket 方法完成处理

                finishPacket(packet);

            }

        }
这个方法里面主要的流程如下首先读取 header,如果其 xid == -2,表明是一个 ping 的 response,return。如果 xid 是 -4 ,表明是一个 AuthPacket 的 response return。如果 xid 是 -1,表明是一个 notification,此时要继续读取并构造一个 enent,通过EventThread.queueEvent 发送,return。其它情况下:从 pendingQueue 拿出一个 Packet,校验后更新 packet 信息,最后调用 finishPacket 注册本地事件:主要功能是把从 Packet 中取出对应的 Watcher 并注册到 ZKWatchManager 中去
private void finishPacket(Packet p) {
     // exists中初始化的 ExistsWatchRegistration

        if (p.watchRegistration != null) {
        // 将事件注册到 zkwatchemanager 中

            p.watchRegistration.register(p.replyHeader.getErr());

        }

        if (p.cb == null) {

            synchronized (p) {

                p.finished = true;

                p.notifyAll();

            }

        } else {

            p.finished = true;
        //处理时间的线程进行处理

            eventThread.queuePacket(p);

        }

    }
其中 watchRegistration 为 exists 方法中初始化的 ExistsWatchRegistration,调用其注册事件:
public void register(int rc) {

    if (shouldAddWatch(rc)) {

        Map<String, Set<Watcher>> watches = getWatches(rc);

        synchronized(watches) {

            Set<Watcher> watchers = watches.get(clientPath);

            if (watchers == null) {

                watchers = new HashSet<Watcher>();

                watches.put(clientPath, watchers);

            }

            watchers.add(watcher);//初始化客户端的时候自己定义的实现Watcher接口的类

        }

   }

}

//ExistsWatchRegistration.getWatches

protected Map<String, Set<Watcher>> getWatches(int rc) {

    return rc ==  ?  watchManager.dataWatches : watchManager.existWatches;

}
而这里的 ExistsWatchRegistration.getWatches 获取到的集合在本场景下是获取到的 dataWatches :
 private static class ZKWatchManager implements ClientWatchManager {

      private final Map<String, Set<Watcher>> dataWatches =

            new HashMap<String, Set<Watcher>>();

        private final Map<String, Set<Watcher>>  existWatches =

            new HashMap<String, Set<Watcher>>();

        private final Map<String, Set<Watcher>> childWatches =

            new HashMap<String, Set<Watcher>>();
.......
总的来说,当使用 ZooKeeper 构造方法或者使用 getData、exists 和getChildren 三个接口来向 ZooKeeper 服务器注册 Watcher 的时候,首先将此消息传递给服务端,传递成功后,服务端会通知客户端,然后客户端将该路径和Watcher 对应关系存储起来备用。finishPacket 方法最终会调用 eventThread.queuePacket, 将当前的数据包添加到等待事件通知的队列中.
public void queuePacket(Packet packet) {

          if (wasKilled) {

             synchronized (waitingEvents) {

                if (isRunning) waitingEvents.add(packet);

                else processEvent(packet);

             }

          } else {

             waitingEvents.add(packet);

          }

 }
事件触发:
前面这么长的说明,只是为了清晰的说明事件的注册流程,最终的触发,还得需要通过事务型操作来完成在我们最开始的案例中,通过如下代码去完成了事件的触发zooKeeper.setData("/zk-wuzz","1".getBytes(),stat.getVersion()); 修改节点的值触发监听前面的客户端和服务端对接的流程就不再重复讲解了,交互流程是一样的,唯一的差别在于事件触发了.由于调用链路最终都会走到FinalRequestProcessor.processRequest:我们回到这个里面:
public void processRequest(Request request) {

        if (LOG.isDebugEnabled()) {

            LOG.debug("Processing request:: " + request);

        }

        // request.addRQRec(">final");

        long traceMask = ZooTrace.CLIENT_REQUEST_TRACE_MASK;

        if (request.type == OpCode.ping) {

            traceMask = ZooTrace.SERVER_PING_TRACE_MASK;

        }

        if (LOG.isTraceEnabled()) {

            ZooTrace.logRequest(LOG, traceMask, 'E', request, "");

        }

        ProcessTxnResult rc = null;

        synchronized (zks.outstandingChanges) {

            while (!zks.outstandingChanges.isEmpty()

                    && zks.outstandingChanges.get().zxid <= request.zxid) {

                ChangeRecord cr = zks.outstandingChanges.remove();

                if (cr.zxid < request.zxid) {

                    LOG.warn("Zxid outstanding "

                            + cr.zxid

                            + " is less than current " + request.zxid);

                }

                if (zks.outstandingChangesForPath.get(cr.path) == cr) {

                    zks.outstandingChangesForPath.remove(cr.path);

                }

            }//获取header 不为空

            if (request.hdr != null) {

               TxnHeader hdr = request.hdr;

               Record txn = request.txn;

          //事务请求会走这里

               rc = zks.processTxn(hdr, txn);

            }

            // do not add non quorum packets to the queue.

            if (Request.isQuorum(request.type)) {

                zks.getZKDatabase().addCommittedProposal(request);

            }

        }

  .....//省略部分代码

}
我们跟进 zks.processTxn(hdr, txn) :
public ProcessTxnResult processTxn(TxnHeader hdr, Record txn) {

        ProcessTxnResult rc;

        int opCode = hdr.getType();

        long sessionId = hdr.getClientId();
      //处理

        rc = getZKDatabase().processTxn(hdr, txn);

        if (opCode == OpCode.createSession) {

            if (txn instanceof CreateSessionTxn) {

                CreateSessionTxn cst = (CreateSessionTxn) txn;

                sessionTracker.addSession(sessionId, cst

                        .getTimeOut());

            } else {

                LOG.warn("*****>>>>> Got "

                        + txn.getClass() + " "

                        + txn.toString());

            }

        } else if (opCode == OpCode.closeSession) {

            sessionTracker.removeSession(sessionId);

        }

        return rc;
}
通过 getZKDatabase().processTxn(hdr, txn) 链路,最终会调用到 DataTree.processTxn(TxnHeader header, Record txn) :
public ProcessTxnResult processTxn(TxnHeader header, Record txn)

    {

        ProcessTxnResult rc = new ProcessTxnResult();

        try {

            rc.clientId = header.getClientId();

            rc.cxid = header.getCxid();

            rc.zxid = header.getZxid();

            rc.type = header.getType();

            rc.err = ;

            rc.multiResult = null;

            switch (header.getType()) {

          //省略代码

        case OpCode.setData:

                    SetDataTxn setDataTxn = (SetDataTxn) txn;

                    rc.path = setDataTxn.getPath();

                    rc.stat = setData(setDataTxn.getPath(), setDataTxn

                            .getData(), setDataTxn.getVersion(), header

                            .getZxid(), header.getTime());

                    break;

          //省略代码

            }

        } return rc;

    }
在这里我们会再进这个分支:
public Stat setData(String path, byte data[], int version, long zxid,

            long time) throws KeeperException.NoNodeException {

        Stat s = new Stat();

        DataNode n = nodes.get(path);

        if (n == null) {

            throw new KeeperException.NoNodeException();

        }

        byte lastdata[] = null;

        synchronized (n) {

            lastdata = n.data;

            n.data = data;

            n.stat.setMtime(time);

            n.stat.setMzxid(zxid);

            n.stat.setVersion(version);

            n.copyStat(s);

        }

        // now update if the path is in a quota subtree.

        String lastPrefix;

        if((lastPrefix = getMaxPrefixWithQuota(path)) != null) {

          this.updateBytes(lastPrefix, (data == null ?  : data.length)

              - (lastdata == null ?  : lastdata.length));

        }

        // 触发对应节点的 NodeDataChanged 事件

        dataWatches.triggerWatch(path, EventType.NodeDataChanged);

        return s;

    }
在这里可以看到 ,在服务端的节点是利用 DataNode 来保存的,在保存好数据后会触发对应节点的 NodeDataChanged 事件:
public Set<Watcher> triggerWatch(String path, EventType type, Set<Watcher> supress) {

        // 根据事件类型、连接状态、节点路径创建 WatchedEvent

        WatchedEvent e = new WatchedEvent(type,

                KeeperState.SyncConnected, path);

        HashSet<Watcher> watchers;

        synchronized (this) {

            // 从 watcher 表中移除 path ,并返回其对应的 watcher 集合

            //这也是ZK默认事件只通知一次的原因

            watchers = watchTable.remove(path);

            if (watchers == null || watchers.isEmpty()) {

                if (LOG.isTraceEnabled()) {

                    ZooTrace.logTraceMessage(LOG,

                            ZooTrace.EVENT_DELIVERY_TRACE_MASK,

                            "No watchers for " + path);

                }

                return null;

            } // 遍历 watcher 集合

            for (Watcher w : watchers) {

                // 根据 watcher 从 watcher 表中取出路径集合

                HashSet<String> paths = watch2Paths.get(w);

                if (paths != null) {

                    paths.remove(path);// 移除路径

                }

            }

        }// 遍历 watcher 集合

        for (Watcher w : watchers) {

            if (supress != null && supress.contains(w)) {

                continue;

            }//OK ,重点又来了, w.process 是做什么呢?

            w.process(e);

        }

        return watchers;

    }
还记得我们在服务端绑定事件的时候,watcher 绑定是是什么?是 ServerCnxn,所以 w.process(e),其实调用的应该是 ServerCnxn 的 process 方法。而servercnxn 又是一个抽象方法,有两个实现类,分别是:NIOServerCnxn 和 NettyServerCnxn。那接下来我们扒开 NIOServerCnxn 这个类的 process 方法看看究竟:
synchronized public void process(WatchedEvent event) {

        ReplyHeader h = new ReplyHeader(-, -1L, );

        if (LOG.isTraceEnabled()) {

            ZooTrace.logTraceMessage(LOG, ZooTrace.EVENT_DELIVERY_TRACE_MASK,

                                     "Deliver event " + event + " to 0x"

                                     + Long.toHexString(this.sessionId)

                                     + " through " + this);

        }

        // Convert WatchedEvent to a type that can be sent over the wire

        WatcherEvent e = event.getWrapper();

        sendResponse(h, e, "notification");

}
那接下里,客户端会收到这个 response,触发 SendThread.readResponse 方法。
客户端处理事件响应:
还是在不断轮询Selector ,所以这里不管是客户端的读还是写操作,都会进入ClientCnxnSocketNIO.doIO,然后我们直接进入 SendThread.readResponse:
void readResponse(ByteBuffer incomingBuffer) throws IOException {

            ByteBufferInputStream bbis = new ByteBufferInputStream(

                    incomingBuffer);

            BinaryInputArchive bbia = BinaryInputArchive.getArchive(bbis);

            ReplyHeader replyHdr = new ReplyHeader();

            // 反序列化 header

            replyHdr.deserialize(bbia, "header");

            //省略代码

          if (replyHdr.getXid() == -) {

                // -1 means notification

                // 表示当前的消息类型为一个 notification( 意味着是服务端的一个响应事件)

                if (LOG.isDebugEnabled()) {

                    LOG.debug("Got notification sessionid:0x"

                        + Long.toHexString(sessionId));

                }

                WatcherEvent event = new WatcherEvent();

                // 反序列化响应信息

                event.deserialize(bbia, "response");

                // convert from a server path to a client path

                if (chrootPath != null) {

                    String serverPath = event.getPath();

                    if(serverPath.compareTo(chrootPath)==)

                        event.setPath("/");

                    else if (serverPath.length() > chrootPath.length())

                        event.setPath(serverPath.substring(chrootPath.length()));

                    else {

                        LOG.warn("Got server path " + event.getPath()

                                + " which is too short for chroot path "

                                + chrootPath);

                    }

                }

                WatchedEvent we = new WatchedEvent(event);

                if (LOG.isDebugEnabled()) {

                    LOG.debug("Got " + we + " for sessionid 0x"

                            + Long.toHexString(sessionId));

                }

                eventThread.queueEvent( we );

                return;

            }

        .....//省略代码

            } finally {

                // 最后调用 finishPacket 方法完成处理

                finishPacket(packet);

            }

        }
这里是客户端处理事件回调,这里传过来的 xid 是等于 -1。SendThread 接收到服务端的通知事件后,会通过调用 EventThread 类的queueEvent 方法将事件传给 EventThread 线程,queueEvent 方法根据该通知事件,从 ZKWatchManager 中取出所有相关的 Watcher,如果获取到相应的 Watcher,就会让 Watcher 移除失效:
public void queueEvent(WatchedEvent event) {

            // 判断类型

            if (event.getType() == EventType.None

                    && sessionState == event.getState()) {

                return;

            }

            sessionState = event.getState();

            // materialize the watchers based on the event

            // 封装 WatcherSetEventPair 对象,添加到 waitngEvents 队列中

            WatcherSetEventPair pair = new WatcherSetEventPair(

                    watcher.materialize(event.getState(), event.getType(),

                            event.getPath()),

                            event);

            // queue the pair (watch set & event) for later processing

            waitingEvents.add(pair);

  }
其中Meterialize 方法是通过 dataWatches 或者 existWatches 或者 childWatches 的 remove 取出对应的watch,表明客户端 watch 也是注册一次就移除同时需要根据 keeperState、eventType 和 path 返回应该被通知的 Watcher 集合
这里也进一步说明了zookeeper的watcher事件是不复用的,触发一次就没了,除非再注册一次。
public Set<Watcher> materialize(Watcher.Event.KeeperState state,

                                        Watcher.Event.EventType type,

                                        String clientPath)

        {

            Set<Watcher> result = new HashSet<Watcher>();

            switch (type) {

            case None:

                result.add(defaultWatcher);

                boolean clear = ClientCnxn.getDisableAutoResetWatch() &&

                        state != Watcher.Event.KeeperState.SyncConnected;

                synchronized(dataWatches) {

                    for(Set<Watcher> ws: dataWatches.values()) {

                        result.addAll(ws);

                    }

                    if (clear) {

                        dataWatches.clear();

                    }

                }

                synchronized(existWatches) {

                    for(Set<Watcher> ws: existWatches.values()) {

                        result.addAll(ws);

                    }

                    if (clear) {

                        existWatches.clear();

                    }

                }

                synchronized(childWatches) {

                    for(Set<Watcher> ws: childWatches.values()) {

                        result.addAll(ws);

                    }

                    if (clear) {

                        childWatches.clear();

                    }

                }

                return result;

            case NodeDataChanged://节点变化

            case NodeCreated://节点创建

                synchronized (dataWatches) {

                    addTo(dataWatches.remove(clientPath), result);

                }

                synchronized (existWatches) {

                    addTo(existWatches.remove(clientPath), result);

                }

                break;

            case NodeChildrenChanged://子节点变化

                synchronized (childWatches) {

                    addTo(childWatches.remove(clientPath), result);

                }

                break;

            case NodeDeleted://节点删除

                synchronized (dataWatches) {

                    addTo(dataWatches.remove(clientPath), result);

                }

                // XXX This shouldn't be needed, but just in case

                synchronized (existWatches) {

                    Set<Watcher> list = existWatches.remove(clientPath);

                    if (list != null) {

                        addTo(list, result);

                        LOG.warn("We are triggering an exists watch for delete! Shouldn't happen!");

                    }

                }

                synchronized (childWatches) {

                    addTo(childWatches.remove(clientPath), result);

                }

                break;

            default://默认

                String msg = "Unhandled watch event type " + type

                    + " with state " + state + " on path " + clientPath;

                LOG.error(msg);

                throw new RuntimeException(msg);

            }

            return result;

        }
最后一步,接近真相了,waitingEvents 是 EventThread 这个线程中的阻塞队列,很明显,又是在我们第一步操作的时候实例化的一个线程。从名字可以知道,waitingEvents 是一个待处理 Watcher 的队列,EventThread 的run() 方法会不断从队列中取数据,交由 processEvent 方法处理:
public void run() {

           try {

              isRunning = true;

              while (true) {

                 Object event = waitingEvents.take();

                 if (event == eventOfDeath) {

                    wasKilled = true;

                 } else {

                    processEvent(event);

                 }

                 if (wasKilled)

                    synchronized (waitingEvents) {

                       if (waitingEvents.isEmpty()) {

                          isRunning = false;

                          break;

                       }

                    }

              }

           } catch (InterruptedException e) {

              LOG.error("Event thread exiting due to interruption", e);

           }

            LOG.info("EventThread shut down for session: 0x{}",

                     Long.toHexString(getSessionId()));

        }
继而调用 processEvent(event):
private void processEvent(Object event) {

          try {// 判断事件类型

              if (event instanceof WatcherSetEventPair) {

                  // each watcher will process the event

                  // 得到 watcherseteventPair

                  WatcherSetEventPair pair = (WatcherSetEventPair) event;

                  // 拿到符合触发机制的所有 watcher 列表,循环进行调用

                  for (Watcher watcher : pair.watchers) {

                      try {// 调用客户端的回

                          watcher.process(pair.event);

                      } catch (Throwable t) {

                          LOG.error("Error while calling watcher ", t);

                      }

                  }

              } else {

    。。。。//省略代码

              }

}
最后调用到自定义的 Watcher 处理类。至此整个Watcher 事件处理完毕。
最新文章
- (iOS)项目总结-项目中遇到的各种的问题和解决方法
- excle表格生成网页
- EDI - Biztalk Sample
- 【整理】虚拟机和主机ping不通解决办法
- 打造自己的3D全景漫游
- iOS和hybird移动端性能
- DEIVER_OBJECT结构参数
- js中的typeof
- ASP.NET MVC如何做一个简单的非法登录拦截
- java笔记----java新建生成用户定义注释
- SQL 事务隔离级别
- 最全面的Spring-Boot-Cache使用与整合
- 激光数据匹配(MATLAB Robotics System Toolbox)
- [转]F5 BIG-IP负载均衡器配置实例与Web管理界面体验
- 遇到Io阻塞时会切换任务之【爬虫版】
- appiu 笔记
- cat 生成文件 运行脚本
- xmlhttp
- xgboost与sklearn的接口
- eclipse 安装/卸载插件