Python Unittest进行接口测试的简单示例
今年肯定是要把Python学到一定程度的,否则感觉自己混不下去了,那就开始半挣扎的咸鱼生活吧。
------------------------------------------------------------------------------------------------------------------------------------
这里用的接口相关参数看这里:https://www.sojson.com/blog/305.html,提供了一个免费调用的天气api。
接口测试嘛,一般先把这个接口调通,然后进行一些测试用例的设计(可以用等价类、边界值等方法),之后执行测试用例查看response是否符合接口文档中的预期。按照这个逻辑,开始:
1、先调通,用到requests库,那就先import(需要先在设置中添加requests),然后发起请求。
import requests

r=requests.get('http://t.weather.sojson.com/api/weather/city/101250101')

response_data=r.json()

print(response_data)
还可以把一些信息打印出来,可以用作断言
#获取日期,响应信息,状态,城市

print(response_data['date'])

print(response_data['message'])

print(response_data['status'])

print(response_data['cityInfo']['city'])

#获取当日天气具体信息

print(response_data['data']['forecast'][0]['ymd'])

print(response_data['data']['forecast'][0]['type'])

print(response_data['data']['forecast'][0]['high'])

print(response_data['data']['forecast'][0]['low'])

2、接口这样就算是调通了,就开始设计测试用例(这里示例正常的、空参、参数值错误三种情况),然后符合预期(预期就用断言去判断了),这里用python的单元测试框架unittest来集成,关于这个框架的介绍,可以百度很多资料,也可以直接按照Ctrl,然后点击“unittest”查看它的源码说明。理清逻辑,那就开始:
import requests

import unittest

from time import sleep

class WeatherTest(unittest.TestCase):

    def setUp(self):

       pass

    #正常查询长沙的天气,断言

    def test_weather_changsha(self):

        r=requests.get('http://t.weather.sojson.com/api/weather/city/101250101')

        result= r.json()

        #断言

        self.assertEqual(result['status'],200)

        self.assertEqual(result['message'],'Success !')

        self.assertEqual(result['cityInfo']['city'],'长沙市')

        #设置间隔时间,避免IP被封,这个接口本身有限制的

        sleep(5)

    # 不传city_code,断言

    def test_weather_no_reference(self):

        r=requests.get('http://t.weather.sojson.com/api/weather/city/')

        result=r.json()

        self.assertEqual(result['status'], 404)

        self.assertEqual(result['message'], 'Request resource not found.')

        sleep(5)

    #传入一个不存在的city_code,断言

    def test_weather_reference_error(self):

        r=requests.get('http://t.weather.sojson.com/api/weather/city/100250101')

        result = r.json()

        self.assertEqual(result['status'], 403)

        self.assertEqual(result['message'], 'no_city_id')

        sleep(5)

if __name__ == '__main__':

    unittest.main()
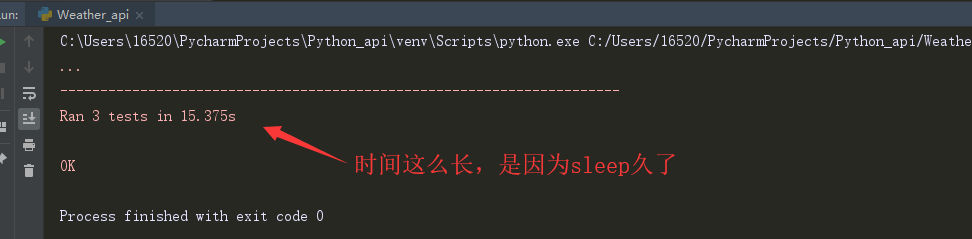
稍微了解一下unittest,就能把最上面调通接口的代码改成在unittest中这样了。其实我是想把city_code做成参数化,然后传进每个def中(url='http://t.weather.itboy.net/api/weather/city/'+'city_code'),无奈效果不理想,后续再看吧,运行结果如下:
3、都到这了,顺手加个报告吧,这里用BSTestRunner(HTMLTestRunner)。另创建一个Python File,代码如下:
先在这里(https://github.com/easonhan007/HTMLTestRunner)下载BSTestRunner.py,然后放到.\python\lib目录下,代码中引用就行了。
import unittest

from BSTestRunner import BSTestRunner

import time

#指定测试用例和测试报告的路径

test_dir='C:\\Users\\16520\\Desktop\\test_case'

report_dir='C:\\Users\\16520\\Desktop\\reports'

#加载测试用例

discover=unittest.defaultTestLoader.discover(test_dir,pattern='Weather_api.py')

#定义报告的文件格式

now=time.strftime("%Y-%m-%d %H-%M-%S")

report_name=report_dir+'/'+'test_report.html'

#运行测试用例生成报告

with open(report_name,'wb') as f:

    runner=BSTestRunner(stream=f,title="Weather API Test Report",description="China City Weather Test Report")

    runner.run(discover)
执行之后在“C:\Users\16520\Desktop\reports”这个文件夹里面就能看到一个html文件了,打开就能看到详细的东西了
PS:网上有很多二开的HTMLTestRunner,加了很多东西,也有用Allure2做测试报告,集成Jenkins的,有兴趣都可以了解一下。


最新文章
- Pramp - mock interview experience
- mina通信 demo
- 谈谈service层在mvc框架中的意义和职责
- 微信小程序探究
- myeclipse2014新建maven项目
- TFS Workspace 更改电脑名称
- 关于Linux的 /sbin权限问题
- Redis Set 命令
- Core Java Volume I — 3.3. Data Types
- WWF3事务和异常处理类型活动<第四篇>
- android Timer and TImerTask
- grep;egrep;fgrep
- Linux基本命令(开发常用的、电脑常用的)
- (Nginx学习一)安装和启动及对应文件夹介绍
- 初学JVM
- 十三、 Spring Boot 启动加载数据 CommandLineRunner
- 在hive下使用dual伪表
- mysql的函数与储存过程与pymysql的配合使用
- 如何破解Excel VBA密码
- Redis 通过 info 查看信息和状态