centos7 Keepalived + Haproxy + MySQL pxc5.6
2024-09-03 20:34:20
拓扑图
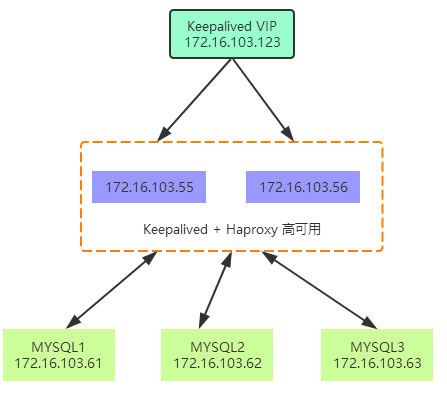
应用通过 VIP 连接到 Haproxy,Haproxy 通过http代理分发请求到后端 3 台 MySQL pxc。
Keepalived 可以有效防止 Haproxy 单点故障。
MySQL PXC
PXC的优点:
- 服务高可用
- 数据同步复制(并发复制),几乎无延迟;
- 多个可同时读写节点,可实现写扩展,不过最好事先进行分库分表,让各个节点分别写不同的表或者库,避免让galera解决数据冲突;
- 新节点可以自动部署,部署操作简单;
- 数据严格一致性,尤其适合电商类应用;
- 完全兼容MySQL;
PXC局限性:
- 只支持InnoDB引擎;
- 所有表都要有主键;
- 不支持LOCK TABLE等显式锁操作;
- 锁冲突、死锁问题相对更多;
- 不支持XA;
- 集群吞吐量/性能取决于短板;
- 新加入节点采用SST时代价高;
- 存在写扩大问题;
- 如果并发事务量很大的话,建议采用InfiniBand网络,降低网络延迟;
安装
yum install https://repo.percona.com/yum/percona-release-latest.noarch.rpm -y

yum install Percona-XtraDB-Cluster-56 -y
pxc1配置文件
cat <<EOF> /etc/my.cnf

[mysqld]

##general set

#bind-address=172.19.11.21

port=5001

datadir=/mysql_data/smy_node1/

socket=/mysql_data/smy_node1/mysql-smy.sock

pid-file=/mysql_data/smy_node1/mysql-smy.pid

log-error=/mysql_data/smy_node1/mysql-smy.err

server_id=1

##wsrep set

wsrep_provider=/usr/lib64/libgalera_smm.so

wsrep_cluster_name = smy1

wsrep_node_name = smy_node1

wsrep_node_address=172.16.103.61:5020

#wsrep_cluster_address=gcomm://127.0.0.1:4567,127.0.0.1:5020

wsrep_cluster_address=gcomm://172.16.103.61:5020,172.16.103.62:5020,172.16.103.63:5020

wsrep_provider_options = "base_port=5020;"

##sst syc method

wsrep_sst_method=xtrabackup-v2

##sst user and password

wsrep_sst_auth="smydba:smy2016"

##transaction cache for Galera replication,larger size,bigger chance to use ist

wsrep_provider_options="gcache.size=32G;gcache.page_size=1G"

##replication transactions threads for client

wsrep_slave_threads=6

##change it to RSU,when big change like alter table ,change column name, add index happened, otherwise it will infute the whole cluster,

wsrep_OSU_method=TOI

##new db parameters

skip-name-resolve

skip-host-cache

character-set-server=utf8

##character-set-server=utf8mb4

default_storage_engine=InnoDB

binlog_format=ROW

log-slave-updates=on

innodb_autoinc_lock_mode=2

###men cache,up tp 60% of whole physical memory,change it when deploy to production env

innodb_buffer_pool_size=32G

###each log file

innodb_log_file_size=256M

innodb_log_files_in_group=2

###each table in a seprate storage file

innodb_file_per_table=1

###log buffer

innodb_flush_log_at_trx_commit=2

##too small will cause commit error

max_allowed_packet=20M

##it will first read cache,then go to open table

table_open_cache=1024

##increase sort by

sort_buffer_size=4M

join_buffer_size=8M

##increase table sequence scan

read_buffer_size=10M

##1g->8

thread_cache_size=320

tmp_table_size=512M

wait_timeout=108000

max_connections = 2000

##log set

slow_query_log=1

slow_query_log_file = slow.log

general_log=Off

long_query_time=3

##other set

event_scheduler=1

##lower_case_table_names=1

max_connect_errors=1844674407370954751

#innodb_data_file_path = ibdata1:1G:autoextend

EOF
主节点启动方式
systemctl start mysql@bootstrap.service
增加sst同步用户
登录修改初始密码:

SET PASSWORD = PASSWORD(‘Lcsmy,123’);

ALTER USER 'root'@'localhost' PASSWORD EXPIRE NEVER;

FLUSH PRIVILEGES;

创建同步账号:

grant all on *.* to smydba@'%' identified by 'smy2016';

systemctl start mysql@bootstrap.service
pxc2配置文件
cat <<EOF> /etc/my.cnf

[mysqld]

##general set

#bind-address=172.19.11.21

port=5001

datadir=/mysql_data/smy_node2/

socket=/mysql_data/smy_node2/mysql-smy.sock

pid-file=/mysql_data/smy_node2/mysql-smy.pid

log-error=/mysql_data/smy_node2/mysql-smy.err

server_id=2

##wsrep set

wsrep_provider=/usr/lib64/libgalera_smm.so

wsrep_cluster_name = smy1

wsrep_node_name = smy_node2

wsrep_node_address=172.16.103.62:5020

#wsrep_cluster_address=gcomm://127.0.0.1:4567,127.0.0.1:5020

wsrep_cluster_address=gcomm://172.16.103.61:5020,172.16.103.62:5020,172.16.103.63:5020

wsrep_provider_options = "base_port=5020;"

##sst syc method

wsrep_sst_method=xtrabackup-v2

##sst user and password

wsrep_sst_auth="smydba:smy2016"

##transaction cache for Galera replication,larger size,bigger chance to use ist

wsrep_provider_options="gcache.size=32G;gcache.page_size=1G"

##replication transactions threads for client

wsrep_slave_threads=6

##change it to RSU,when big change like alter table ,change column name, add index happened, otherwise it will infute the whole cluster,

wsrep_OSU_method=TOI

##new db parameters

skip-name-resolve

skip-host-cache

character-set-server=utf8

##character-set-server=utf8mb4

default_storage_engine=InnoDB

binlog_format=ROW

log-slave-updates=on

innodb_autoinc_lock_mode=2

###men cache,up tp 60% of whole physical memory,change it when deploy to production env

innodb_buffer_pool_size=32G

###each log file

innodb_log_file_size=256M

innodb_log_files_in_group=2

###each table in a seprate storage file

innodb_file_per_table=1

###log buffer

innodb_flush_log_at_trx_commit=2

##too small will cause commit error

max_allowed_packet=20M

##it will first read cache,then go to open table

table_open_cache=1024

##increase sort by

sort_buffer_size=4M

join_buffer_size=8M

##increase table sequence scan

read_buffer_size=10M

##1g->8

thread_cache_size=320

tmp_table_size=512M

wait_timeout=108000

max_connections = 2000

##log set

slow_query_log=1

slow_query_log_file = slow.log

general_log=Off

long_query_time=3

##other set

event_scheduler=1

##lower_case_table_names=1

max_connect_errors=1844674407370954751

#innodb_data_file_path = ibdata1:1G:autoextend

EOF
pxc3 配置文件
cat <<EOF> /etc/my.cnf

[mysqld]

##general set

#bind-address=172.19.11.21

port=5001

datadir=/mysql_data/smy_node3/

socket=/mysql_data/smy_node3/mysql-smy.sock

pid-file=/mysql_data/smy_node3/mysql-smy.pid

log-error=/mysql_data/smy_node3/mysql-smy.err

server_id=3

##wsrep set

wsrep_provider=/usr/lib64/libgalera_smm.so

wsrep_cluster_name = smy1

wsrep_node_name = smy_node3

wsrep_node_address=172.16.103.63:5020

#wsrep_cluster_address=gcomm://127.0.0.1:4567,127.0.0.1:5020

wsrep_cluster_address=gcomm://172.16.103.61:5020,172.16.103.62:5020,172.16.103.63:5020

wsrep_provider_options = "base_port=5020;"

##sst syc method

wsrep_sst_method=xtrabackup-v2

##sst user and password

wsrep_sst_auth="smydba:smy2016"

##transaction cache for Galera replication,larger size,bigger chance to use ist

wsrep_provider_options="gcache.size=32G;gcache.page_size=1G"

##replication transactions threads for client

wsrep_slave_threads=6

##change it to RSU,when big change like alter table ,change column name, add index happened, otherwise it will infute the whole cluster,

wsrep_OSU_method=TOI

##new db parameters

skip-name-resolve

skip-host-cache

character-set-server=utf8

##character-set-server=utf8mb4

default_storage_engine=InnoDB

binlog_format=ROW

log-slave-updates=on

innodb_autoinc_lock_mode=2

###men cache,up tp 60% of whole physical memory,change it when deploy to production env

innodb_buffer_pool_size=32G

###each log file

innodb_log_file_size=256M

innodb_log_files_in_group=2

###each table in a seprate storage file

innodb_file_per_table=1

###log buffer

innodb_flush_log_at_trx_commit=2

##too small will cause commit error

max_allowed_packet=20M

##it will first read cache,then go to open table

table_open_cache=1024

##increase sort by

sort_buffer_size=4M

join_buffer_size=8M

##increase table sequence scan

read_buffer_size=10M

##1g->8

thread_cache_size=320

tmp_table_size=512M

wait_timeout=108000

max_connections = 2000

##log set

slow_query_log=1

slow_query_log_file = slow.log

general_log=Off

long_query_time=3

##other set

event_scheduler=1

##lower_case_table_names=1

max_connect_errors=1844674407370954751

#innodb_data_file_path = ibdata1:1G:autoextend

EOF
启动pxc2、3节点
systemctl start mysql.service
集群状态与维护
状态
每个节点登录执行 show status like 'wsrep_cluster%'; 查看状态
mysql> show status like 'wsrep_cluster%';

+--------------------------+--------------------------------------+

| Variable_name            | Value                                |

+--------------------------+--------------------------------------+

| wsrep_cluster_weight     | 3                                    |

| wsrep_cluster_conf_id    | 21                                   |

| wsrep_cluster_size       | 3                                    |

| wsrep_cluster_state_uuid | a8abd132-f3cd-11e8-8bc3-e335b42a66e9 |

| wsrep_cluster_status     | Primary                              |

+--------------------------+--------------------------------------+

5 rows in set (0.00 sec)                             |
维护
启动:
集群第一次启动:
第一个节点启动:
systemctl start mysql@bootstrap.service
其他节点启动:
systemctl start mysql
若有节点异常宕机,且集群依然有其他节点正常运行,则再次启动时,使用命令:
systemctl start mysql
关闭:
第一个节点关闭:
systemctl stop mysql@bootstrap.service
其他节点关闭:
systemctl stop mysql
Haproxy
安装
yum install haproxy -y
配置文件
cat <<EOF> /etc/haproxy/haproxy.cfg

global

    log         127.0.0.1 local2 info

    chroot      /var/lib/haproxy

    pidfile     /var/run/haproxy.pid

    maxconn     10000

    user        root

    group       root

    daemon

    # turn on stats unix socket

    stats socket /var/lib/haproxy/stats

defaults

    mode                    http

    log                     global

    option                  dontlognull

    option                  redispatch

    retries                 3

    timeout http-request    5m

    timeout queue         5m

    timeout connect        5m

    timeout client          5m

    timeout server         5m

    timeout check          10s

    maxconn              10000

listen  pxc_cluster

 bind 0.0.0.0:5500

 mode tcp

 balance roundrobin

 server pxc_1 172.16.103.61:5001 weight 1 check port 5001 inter 1s rise 2 fall 2

 server pxc_2 172.16.103.62:5001 weight 1 check port 5001 inter 1s rise 2 fall 2

 server pxc_3 172.16.103.63:5001  weight 1 check port 5001 inter 1s rise 2 fall 2

listen stats

    mode http

    bind 0.0.0.0:8888

    stats enable

    stats uri /stats

    stats auth admin:admin

EOF
启动、开机启动
systemctl start haproxy

systemctl enable haproxy
keepalived
安装
yum install keepalived -y
配置文件如下:
cat <<EOF> /etc/keepalived/keepalived.conf

global_defs {

   router_id pxc_db1 #备份节点改为pxc_db2

}

#检测haproxy是否正常服务脚本,若haproxy挂机,则自动启动

vrrp_script chk_haproxy {

    script "/etc/keepalived/check_haproxy.sh"

    interval 2

    weight 20

}

# VIP1

vrrp_instance VI_1 {

    state BACKUP

    interface enp2s1  #配置当前为当前所使用的网卡

    lvs_sync_daemon_inteface enp2s1 #配置当前为当前所使用的网卡

    virtual_router_id 240 #配置id为1-255,在同一个局域网内不能重复,同一个集群使用同一个id

    priority 100       #备份节点上将100改为90

    nopreempt       #当前节点启动不抢占已经工作的节点

    advert_int 1

    authentication {

        auth_type PASS

        auth_pass 1111

    }

virtual_ipaddress {

      #(配置虚拟IP,成为对外服务IP)

        172.16.103.123 dev enp2s1 scope global  #设置vip,该vip不被实际机器使用

      #(如果有多个VIP,继续换行填写.)

    }

    track_script {

        chk_haproxy

    }

}

EOF
检测 Haproxy 进程脚本
cat <<EOF>  /etc/keepalived/check_haproxy.sh

#!/bin/bash

systemctl status haproxy &> /dev/null || systemctl restart haproxy  &> /dev/null

if [ $? -ne 0 ]; then

  systemctl stop keepalived  &> /dev/null

fi

EOF
添加执行权限
chmod + x /etc/keepalived/check_haproxy.sh
启动、开机启动
systemctl start keepalived

systemctl enable keepalived
最新文章
- LibreOffice去重复数据
- 完美解决 Linux 下 Sublime Text 中文输入
- LR loadrunner参数化-笔记
- Object-c:两种文件读写的对比
- informix数据库下导出表结构
- Jmeter正则表达式提取器的使用方法(转)
- WinCE5.0中文模拟器SDK(VS2005)的配置
- Could not bind factory to JNDI
- CentOS LiveCD LiveDVD DVD 等版本的区别
- jvm回收对象
- 转 [ javascript面向对象技术
- 64位linux系统通过编译安装apache+…
- 在 ubuntu 中愉快的安装 Jenkins
- 转:JAVA中解决Filter过滤掉css,js,图片文件等问题
- linux下md5sum用法 (查看文件或字符串的md5值)
- .NET/ASP.NET/C#/WCF/SQL Server/My SQL/Java/JSP/JDBC/Spring/Spring MVC/PHP/Python/Ruby/Shell/Agile/CSS/HTML/HTTP/Unix/Linux大量PDF书籍/电子书籍下载, Effective Java 下载
- 跨越数据库操作时注意要加dbo
- dbms_random 包的使用
- 在Nodejs中贯彻单元测试
- C#版本的xUnit的测试框架模型和xUnit.NET开源项目