[深度学习] 各种下载深度学习数据集方法(In python)
2024-08-31 20:50:07
一、使用urllib下载cifar-10数据集,并读取再存为图片(TensorFlow v1.14.0)
 # -*- coding:utf-8 -*-

 __author__ = 'Leo.Z'

 import sys

 import os

 # 给定url下载文件

 def download_from_url(url, dir=''):

     _file_name = url.split('/')[-1]

     _file_path = os.path.join(dir, _file_name)

     # 打印下载进度

     def _progress(count, block_size, total_size):

         sys.stdout.write('\r>> Downloading %s %.1f%%' %

                          (_file_name, float(count * block_size) / float(total_size) * 100.0))

         sys.stdout.flush()

     # 如果不存在dir,则创建文件夹

     if not os.path.exists(dir):

         print("Dir is not exsit,Create it..")

         os.makedirs(dir)

     if not os.path.exists(_file_path):

         print("Start downloading..")

         # 开始下载文件

         import urllib

         urllib.request.urlretrieve(url, _file_path, _progress)

     else:

         print("File already exists..")

     return _file_path

 # 使用tarfile解压缩

 def extract(filepath, dest_dir):

     if os.path.exists(filepath) and not os.path.exists(dest_dir):

         import tarfile

         tarfile.open(filepath, 'r:gz').extractall(dest_dir)

 if __name__ == '__main__':

     FILE_URL = 'http://www.cs.toronto.edu/~kriz/cifar-10-binary.tar.gz'

     FILE_DIR = 'cifar10_dir/'

     loaded_file_path = download_from_url(FILE_URL, FILE_DIR)

     extract(loaded_file_path)
按BATCH_SIZE读取二进制文件中的图片数据,并存放为jpg:
# -*- coding:utf-8 -*-
__author__ = 'Leo.Z' # Tensorflow Version:1.14.0 import os import tensorflow as tf
from PIL import Image BATCH_SIZE = 128 def read_cifar10(filenames):
label_bytes = 1
height = 32
width = 32
depth = 3
image_bytes = height * width * depth record_bytes = label_bytes + image_bytes # lamda函数体
# def load_transform(x):
# # Convert these examples to dense labels and processed images.
# per_record = tf.reshape(tf.decode_raw(x, tf.uint8), [record_bytes])
# return per_record # tf v1.14.0版本的FixedLengthRecordDataset(filename_list,bin_data_len)
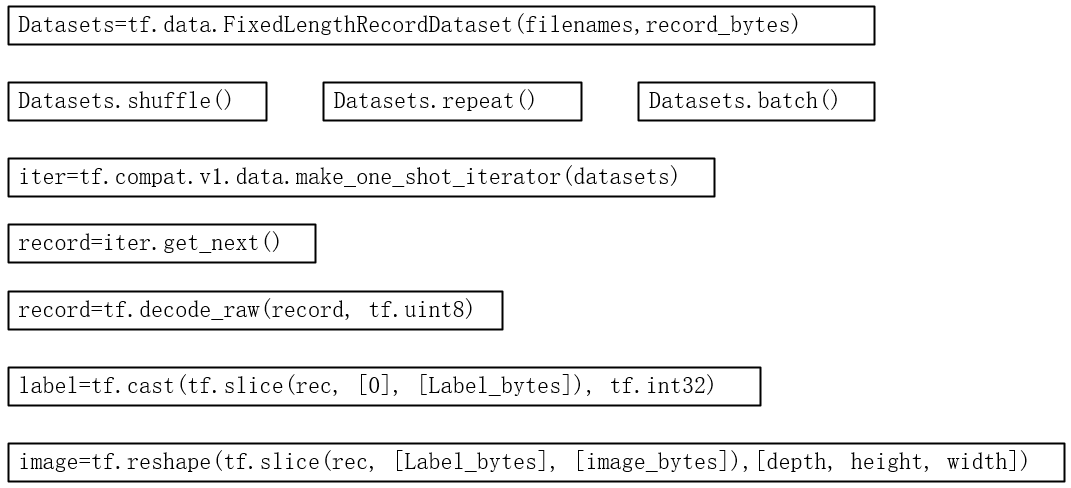
datasets = tf.data.FixedLengthRecordDataset(filenames=filenames, record_bytes=record_bytes)
# 是否打乱数据
# datasets.shuffle()
# 重复几轮epoches
datasets = datasets.shuffle(buffer_size=BATCH_SIZE).repeat(2).batch(BATCH_SIZE) # 使用map,也可使用lamda(注意,后面使用迭代器的时候这里转换为uint8没用,后面还得转一次,否则会报错)
# datasets.map(load_transform)
# datasets.map(lamda x : tf.reshape(tf.decode_raw(x, tf.uint8), [record_bytes])) # 创建一起迭代器tf v1.14.0
iter = tf.compat.v1.data.make_one_shot_iterator(datasets)
# 获取下一条数据(label+image的二进制数据1+32*32*3长度的bytes)
rec = iter.get_next()
# 这里转uint8才生效,在map中转貌似有问题?
rec = tf.decode_raw(rec, tf.uint8) label = tf.cast(tf.slice(rec, [0, 0], [BATCH_SIZE, label_bytes]), tf.int32) # 从第二个字节开始获取图片二进制数据大小为32*32*3
depth_major = tf.reshape(
tf.slice(rec, [0, label_bytes], [BATCH_SIZE, image_bytes]),
[BATCH_SIZE, depth, height, width])
# 将维度变换顺序,变为[H,W,C]
image = tf.transpose(depth_major, [0, 2, 3, 1]) # 返回获取到的label和image组成的元组
return (label, image) def get_data_from_files(data_dir):
# filenames一共5个,从data_batch_1.bin到data_batch_5.bin
# 读入的都是训练图像
filenames = [os.path.join(data_dir, 'data_batch_%d.bin' % i)
for i in range(1, 6)]
# 判断文件是否存在
for f in filenames:
if not tf.io.gfile.exists(f):
raise ValueError('Failed to find file: ' + f) # 获取一张图片数据的数据,格式为(label,image)
data_tuple = read_cifar10(filenames)
return data_tuple if __name__ == "__main__": # 获取label和type的对应关系
label_list = [0, 1, 2, 3, 4, 5, 6, 7, 8, 9]
name_list = ['airplane', 'automobile', 'bird', 'cat', 'deer', 'dog', 'frog', 'horse', 'ship', 'truck']
label_map = dict(zip(label_list, name_list)) with tf.compat.v1.Session() as sess:
batch_data = get_data_from_files('cifar10_dir/cifar-10-batches-bin')
# 在之前的旧版本中,因为使用了filename_queue,所以要使用start_queue_runners进行数据填充
# 1.14.0由于没有使用filename_queue所以不需要
# threads = tf.train.start_queue_runners(sess=sess) sess.run(tf.compat.v1.global_variables_initializer())
# 创建一个文件夹用于存放图片
if not os.path.exists('cifar10_dir/raw'):
os.mkdir('cifar10_dir/raw') # 存放30张,以index-typename.jpg命名,例如1-frog.jpg
for i in range(30):
# 获取一个batch的数据,BATCH_SIZE
# batch_data中包含一个batch的image和label
batch_data_tuple = sess.run(batch_data)
# 打印(128, 1)
print(batch_data_tuple[0].shape)
# 打印(128, 32, 32, 3)
print(batch_data_tuple[1].shape) # 每个batch存放第一张图片作为实验
Image.fromarray(batch_data_tuple[1][0]).save("cifar10_dir/raw/{index}-{type}.jpg".format(
index=i, type=label_map[batch_data_tuple[0][0][0]]))
简要代码流程图:
最新文章
- Oracle数据库迁移
- SQLiteOpenHelper的使用
- 2016-12-15 java开发工作中,尚未做的工作
- 关于Entity Framework采用DB First模式创建后的实体批量修改相关属性技巧
- Android SDK镜像的介绍使用
- MySQL解压版安装配置
- loadview 方法调用
- Mysql创建函数时报错
- CString 字符串转化和分割
- 查看SQL SERVER 加密存储过程,函数,触发器,视图
- 机器学习 —— 基础整理(四)特征提取之线性方法:主成分分析PCA、独立成分分析ICA、线性判别分析LDA
- ABP .Net Core API和Angular前端APP独立部署跨域问题(No Access-Control-Allow-Origin)
- c++ 入门 之 hello world 和基本语法
- linux外接显示屏,关掉本身的笔记本电脑
- IDEA中设置注释模板的方法
- 001.Keepalived简介
- 关于preg_match() / preg_replace()函数的一点小说明
- cocos2d-js 粒子系统使用自定义图片,还原原来的图片宽高
- java实现https ssl请求url
- [svc]jdk+tomcat部署.jforum论坛部署