robot framework笔记(三):扩展SeleniumLibrary库 (自定义关键字)
(一)自定义和浏览器相关的关键字
PYTHON 版本:3.6,不同的版本可能有区别,自己注意下。
以下代码GitHub 版本库地址: https://github.com/blairwind/blog_rf
SeleniumLibrary的扩展文档中提供了3种增加SeleniumLibrary功能的方式。
(1)Plugin API
(2)EventFiringWebDriver
(3)Extending SeleniumLibrary(实际就是继承SeleniumLibrary库)
这里采用继承SeleniumLibrary库的方式。
目录结构如下:这里我们将上一篇中说到的关键字加进来
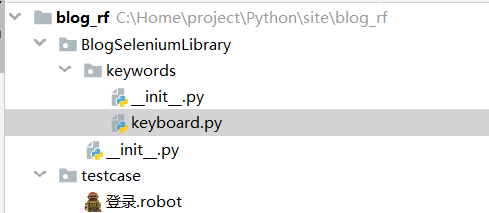
BlogSeleniumLibrary.__init__.py 的代码
# #-*-coding:utf-8-*-

#

from robot.libraries import BuiltIn

from SeleniumLibrary.base import DynamicCore

from SeleniumLibrary.keywords import (AlertKeywords,

                                      BrowserManagementKeywords,

                                      CookieKeywords,

                                      ElementKeywords,

                                      FormElementKeywords,

                                      FrameKeywords,

                                      JavaScriptKeywords,

                                      RunOnFailureKeywords,

                                      ScreenshotKeywords,

                                      SelectElementKeywords,

                                      TableElementKeywords,

                                      WaitingKeywords,

                                      WebDriverCache,

                                      WindowKeywords)

from SeleniumLibrary.locators import ElementFinder

from SeleniumLibrary.utils import Deprecated, LibraryListener, timestr_to_secs

from  SeleniumLibrary import SeleniumLibrary

from BlogSeleniumLibrary.keywords import (

                                            KeyboardKeywords)

class  BlogSeleniumLibrary(SeleniumLibrary):

    def  __init__(self, timeout=5.0, implicit_wait=0.0,

                 run_on_failure='Capture Page Screenshot',

                 screenshot_root_directory=None):

        self.timeout = timestr_to_secs(timeout)

        self.implicit_wait = timestr_to_secs(implicit_wait)

        self.speed = 0.0

        self.run_on_failure_keyword \

            = RunOnFailureKeywords.resolve_keyword(run_on_failure)

        self._running_on_failure_keyword = False

        self.screenshot_root_directory = screenshot_root_directory

        libraries = [

            AlertKeywords(self),

            BrowserManagementKeywords(self),

            CookieKeywords(self),

            ElementKeywords(self),

            FormElementKeywords(self),

            FrameKeywords(self),

            JavaScriptKeywords(self),

            RunOnFailureKeywords(self),

            ScreenshotKeywords(self),

            SelectElementKeywords(self),

            TableElementKeywords(self),

            WaitingKeywords(self),

            WindowKeywords(self),

            KeyboardKeywords(self)

        ]

        self._drivers = WebDriverCache()

        DynamicCore.__init__(self, libraries)

        self.ROBOT_LIBRARY_LISTENER = LibraryListener()

        self._element_finder = ElementFinder(self)

    _speed_in_secs = Deprecated('_speed_in_secs', 'speed')

    _timeout_in_secs = Deprecated('_timeout_in_secs', 'timeout')

    _implicit_wait_in_secs = Deprecated('_implicit_wait_in_secs',

                                        'implicit_wait')

    _run_on_failure_keyword = Deprecated('_run_on_failure_keyword',

                                         'run_on_failure_keyword')
BlogSeleniumLibrary.keywords.__init__.py 的代码
from .keyboard import KeyboardKeywords
BlogSeleniumLibrary.keywords.keyboard.py 的代码
 from SeleniumLibrary.base import keyword, LibraryComponent

 from selenium.webdriver.chrome.options import Options

 from  selenium import webdriver

 from SeleniumLibrary.locators import WindowManager

 class KeyboardKeywords(LibraryComponent):

     def __init__(self, ctx):

         LibraryComponent.__init__(self, ctx)

         self._window_manager = WindowManager(ctx)

     @keyword()

     def get_chrome_options(self, downloads_path):

         '''

         自定义chrome启动参数

         :param downloads_path: 设置默认的文件下载路径

         :return:

         '''

         chrome_options = Options()

         prefs = {

             "download.default_directory": str(downloads_path),

         }

         chrome_options.add_experimental_option('prefs', prefs)  # 设置默认的文件下载路径

         chrome_options.add_argument('disable-infobars')  # chrome76以下禁用chrome受自动软件控制

         # 下面2行chrome76及以上禁用chrome受自动软件控制

         chrome_options.add_experimental_option("useAutomationExtension", False)

         chrome_options.add_experimental_option("excludeSwitches", ["enable-automation"])

         return chrome_options

     @keyword()

     def open_browser_new(self, alias=None,**kwargs):

         '''

         :return:

         '''

         desired_caps = {

             "platform": kwargs["platform"],  #操作系统

             # "platform":"LINUX",

             "browserName": kwargs["browserName"],  #浏览器

             "version":kwargs["version"]  #浏览器版本

         }

         driver = webdriver.Remote(command_executor=kwargs["remote_url"],

                                   desired_capabilities=desired_caps,

                                   options=kwargs["chrome_options"])

         return self.ctx.register_driver(driver,alias)
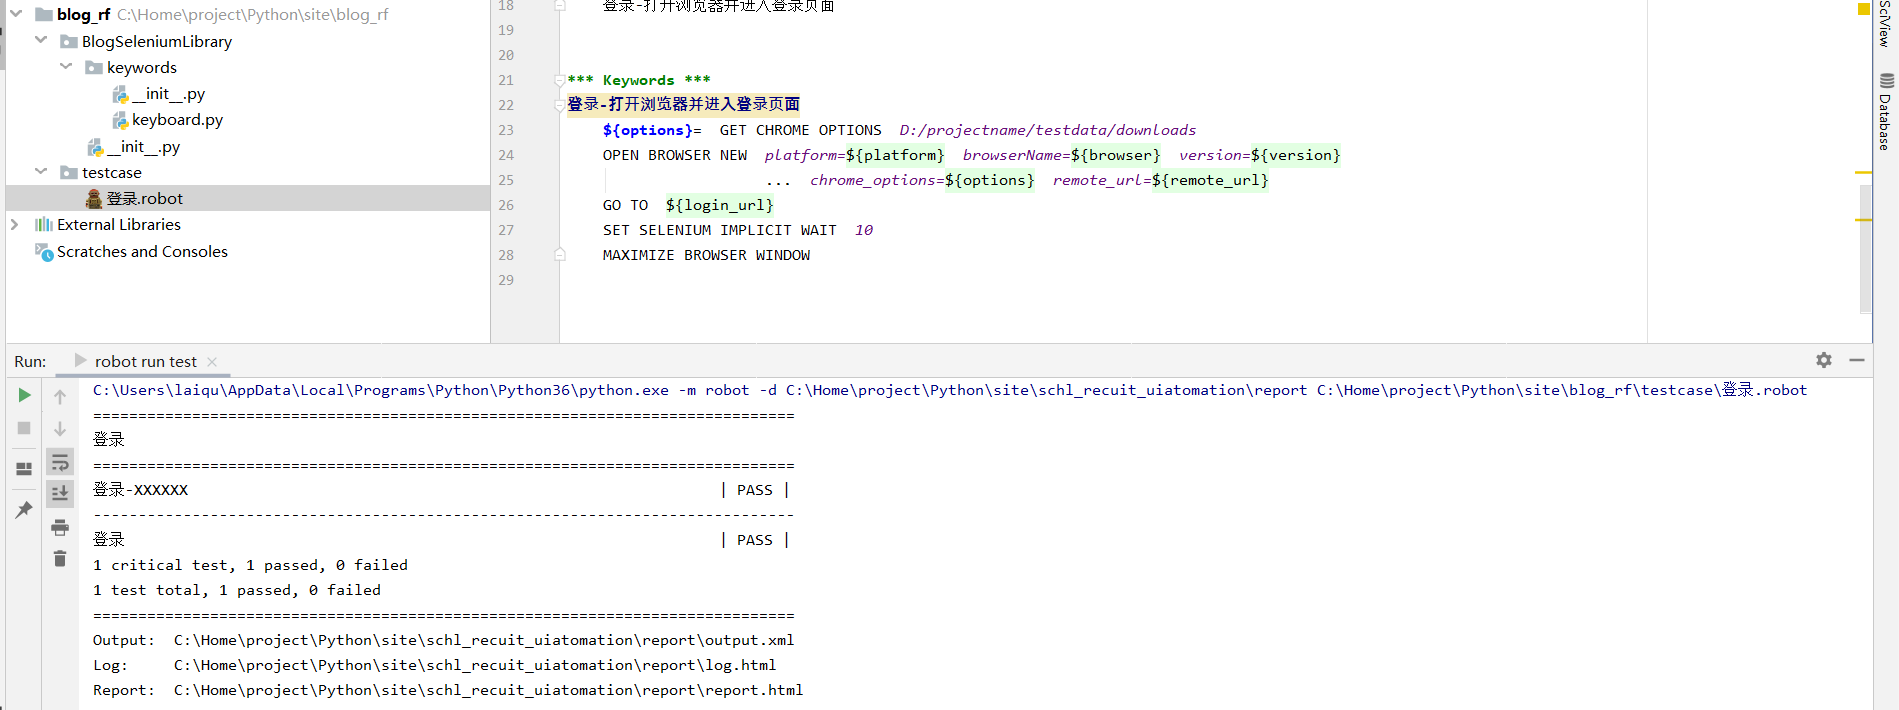
最后,在RF中导入继承SeleniumLibrary后新建的库就行了,如下:
注意在RF中python 包名和类名一样的的话,导入库的时候就只需要填包名就行了,RF可以直接识别到。不一样的话就还需要加上.class名称,下面这个是不使用selenium grid的版本
*** Settings ***

Library                     BlogSeleniumLibrary     #注意这一行不一样

Suite Teardown              CLOSE BROWSER

*** Variables ***

${browser}            Chrome

${login_url}          https://account.cnblogs.com/signin

*** Test Cases ***

登录-XXXXXX

    登录-打开浏览器并进入登录页面

*** Keywords ***

登录-打开浏览器并进入登录页面

    ${options}=  GET CHROME OPTIONS  D:/projectname/testdata/downloads

    CREATE WEBDRIVER  ${browser}  chrome_options=${options}

    GO TO  ${login_url}

    SET SELENIUM IMPLICIT WAIT  10

    MAXIMIZE BROWSER WINDOW
(二)如果要使用selenium grid呢
上篇中说到在RF中使用selenium grid ,在这里说明下。(为什么不使用RF自带的open browser,原因是个人觉得这种方式更方便添加不同的参数。)可以看到这里新加了一个关键字
当然,既然用了selenium grid,肯定会考虑并发执行用例,以及合并测试报告的问题,这里暂不考虑这个。
     @keyword()

     def open_browser_new(self, alias=None,**kwargs):

         '''

         :return:

         '''

         desired_caps = {

             "platform": kwargs["platform"], #操作系统

             # "platform":"LINUX",

             "browserName": kwargs["browserName"], #浏览器

             "version":kwargs["version"]  #浏览器版本

         }

         driver = webdriver.Remote(command_executor=kwargs["remote_url"],

                                   desired_capabilities=desired_caps,

                                   options=kwargs["chrome_options"])

         return self.ctx.register_driver(driver,alias)
在RF中调用这个关键字去启动浏览器就行了。当然前提是你要有一个配好的selenium grid环境,remote_url填自己selenium grid的地址。
 *** Settings ***

 Library                     BlogSeleniumLibrary

 Suite Teardown              CLOSE BROWSER

 *** Variables ***

 ${platform}          WINDOWS

 ${browser}            chrome

 ${version}            79

 ${remote_url}         http://192.168.63.1:4444/wd/hub

 ${login_url}          https://account.cnblogs.com/signin

 *** Test Cases ***

 登录-XXXXXX

     登录-打开浏览器并进入登录页面

 *** Keywords ***

 登录-打开浏览器并进入登录页面

     ${options}=  GET CHROME OPTIONS  D:/projectname/testdata/downloads   #这里是写死的路径,实际项目中应该动态去获取工程路径/testdata/downloads

     OPEN BROWSER NEW  platform=${platform}  browserName=${browser}  version=${version}

                       ...  chrome_options=${options}  remote_url=${remote_url}

     GO TO  ${login_url}

     SET SELENIUM IMPLICIT WAIT  10

     MAXIMIZE BROWSER WINDOW
(三)自定义和浏览器无关的关键字(例如:和数据库相关的关键字)
如果有一些关键字用不到selenium 的webdriver,可以考虑独立出来。例如数据库相关的关键字,实现方式以及在RF中的导入方式,可以参考上一篇的mykeyword 关键字的写法。
最新文章
- JavaScript 精粹
- 关于FireDAC返回多结果集的问题
- 解决TextView最后一行显示不全
- Part 89 to 91 Talking about pass the parameters in thread
- WInform启动另一个项目传值
- Linux 使用退格键时出现^H解决方法
- ASP.NET MVC- Controllers and Routing- Routing
- linux文件合并,去重,分割
- 使用传入的总记录数实现一条sql语句完成分页查询
- Egret 显示容器
- AngularJS学习篇(十四)
- 安卓开发JAVA基础之初识JAVA
- C++三目运算符的增强
- 使用on-my-zsh时,php 输出内容后面多个%号
- Shiro 整合 SpringBoot
- 删除n天前的所有目录和文件
- OpenCV——基本图形绘制(椭圆、圆、多边形、直线、矩形)
- 从join on和where执行顺序认识T-SQL查询处理执行顺序
- BZOJ4364: [IOI2014]wall砖墙(线段树)
- 如何接好CAN的“地”
热门文章
- 007 SpringBoot的@EnableAutoConfiguration注解
- js控制input框只能输入数字和一位小数点和小数点后面两位小数
- [转]JS - Promise使用详解2(ES6中的Promise)
- svg的viewport和viewbox
- clipboard 在 vue 项目中,on 事件监听回调多次执行
- ou can mix require and export. You can't mix import and module.exports.
- 【Python学习之七】类和对象
- 问题三:Appium 的 UIAutomator2 模式下使用 sendKeys 出现错误
- 百度地图jsapi 自定义大头针的方法
- LeetCode 1047. 删除字符串中的所有相邻重复项(Remove All Adjacent Duplicates In String)