[UWP]CompositionLinearGradientBrush加BlendEffect,双倍的快乐
原文:[UWP]CompositionLinearGradientBrush加BlendEffect,双倍的快乐
1. 什么是BlendEffect#
上一篇文章介绍了CompositionLinearGradientBrush的基本用法, 这篇文章再结合BlendEffec介绍一些更复杂的玩法。
Microsoft.Graphics.Canvas.Effects命名空间下的BlendEffect 用于组合两张图片(分别是作为输入源的Background和Foreground),它包含多种模式,如下图所示:

其中最简单的是Screen模式,它的计算公式如下

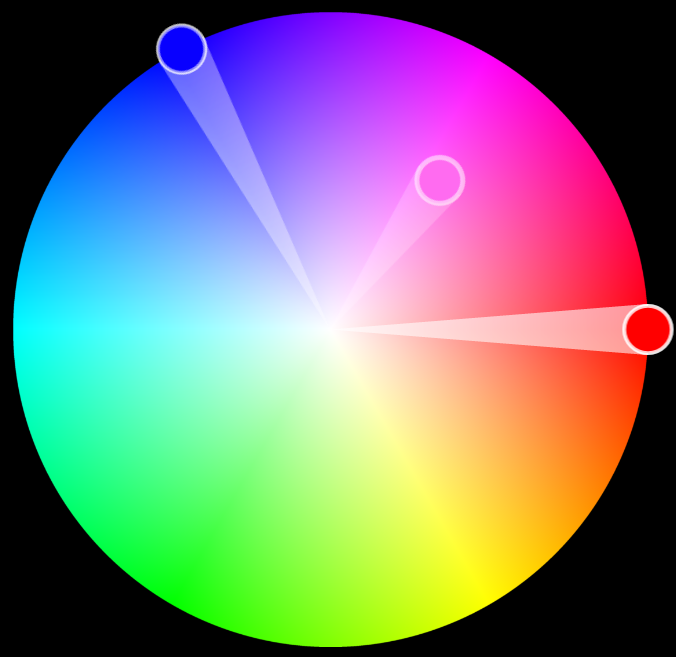
看起来有点复杂, 我的理解是它相当于色轮中Background和Foreground之间拉直线,在直线的中间点的颜色,如下面这张图,红色和蓝色组合成为紫色:
2. 组合CompositionBrush并使用BlendEffect#
许多 CompositionBrushes 使用其他 CompositionBrushes 作为输入。 例如,使用 SetSourceParameter 方法可以将其他 CompositionBrush 设为 CompositionEffectBrush 的输入。这是CompositionBrush最好玩的地方之一。下面的例子介绍了怎么使用BlendEffect创建CompositionBrush。
首先创建两个CompositionLinearGradientBrush:
Copyvar foregroundBrush = compositor.CreateLinearGradientBrush();
foregroundBrush.StartPoint = Vector2.Zero;
foregroundBrush.EndPoint = new Vector2(1.0f);
var redGradientStop = compositor.CreateColorGradientStop();
redGradientStop.Offset = 0f;
redGradientStop.Color = Color.FromArgb(255, 255, 0, 0);
var yellowGradientStop = compositor.CreateColorGradientStop();
yellowGradientStop.Offset = 1f;
yellowGradientStop.Color = Color.FromArgb(255, 0, 178, 255);
foregroundBrush.ColorStops.Add(redGradientStop);
foregroundBrush.ColorStops.Add(yellowGradientStop); var backgroundBrush = compositor.CreateLinearGradientBrush();
backgroundBrush.StartPoint = new Vector2(0, 1f);
backgroundBrush.EndPoint = new Vector2(1f, 0);
var blueGradientStop = compositor.CreateColorGradientStop();
blueGradientStop.Offset = 0f;
blueGradientStop.Color = Color.FromArgb(255, 0, 0, 255);
var greenGradientStop = compositor.CreateColorGradientStop();
greenGradientStop.Offset = 1f;
greenGradientStop.Color = Color.FromArgb(255, 0, 255, 0);
backgroundBrush.ColorStops.Add(blueGradientStop);
backgroundBrush.ColorStops.Add(greenGradientStop);
它们的效果分别如下面两张图片所示:


接下来创建BlendEffect,并将Foreground和Background设置为CompositionEffectSourceParameter
Copyvar blendEffect = new BlendEffect()
{
Mode = BlendEffectMode.Screen,
Foreground = new CompositionEffectSourceParameter("Main"),
Background = new CompositionEffectSourceParameter("Tint"),
};
使用BlendEffect创建Brush,并用SetSourceParameter设置它的Foreground和Background。
Copyvar effectFactory = compositor.CreateEffectFactory(blendEffect);
var blendEffectBrush = effectFactory.CreateBrush();
blendEffectBrush.SetSourceParameter("Main", foregroundBrush);
blendEffectBrush.SetSourceParameter("Tint", backgroundBrush);
最后就是一般的使用这个blendEffectBrush的代码:
Copy//创建SpriteVisual并设置Brush
var spriteVisual = compositor.CreateSpriteVisual();
spriteVisual.Brush = blendEffectBrush; //将自定义 SpriteVisual 设置为元素的可视化树的最后一个子元素。
ElementCompositionPreview.SetElementChildVisual(Gradient, spriteVisual);
最终运行效果如下:

3. 创建动画#
和上一篇文章一样,我也把这篇文章用到的技术用在了一个番茄钟应用里,,简单地使用ColorKeyFrameAnimation和ScalarKeyFrameAnimation制作动画:
Copyprivate void StartOffsetAnimation(CompositionColorGradientStop gradientOffset, float offset)
{
var offsetAnimation = _compositor.CreateScalarKeyFrameAnimation();
offsetAnimation.Duration = TimeSpan.FromSeconds(1);
offsetAnimation.InsertKeyFrame(1.0f, offset);
gradientOffset.StartAnimation(nameof(CompositionColorGradientStop.Offset), offsetAnimation);
} private void StartColorAnimation(CompositionColorGradientStop gradientOffset, Color color)
{
var colorAnimation = _compositor.CreateColorKeyFrameAnimation();
colorAnimation.Duration = TimeSpan.FromSeconds(2);
colorAnimation.Direction = Windows.UI.Composition.AnimationDirection.Alternate;
colorAnimation.InsertKeyFrame(1.0f, color);
gradientOffset.StartAnimation(nameof(CompositionColorGradientStop.Color), colorAnimation);
}
完整代码在这里,具体运行效果如下:

4. 结语#
上面的动画可以安装我的番茄钟应用试玩一下,安装地址:
这篇文章的动画和代码都参考了JustinLiu的代码,感谢他的分享。
使用XAML画笔难以做到这种多向渐变的效果,这都多亏了UWP提供了BlendEffect这个好玩的东西。BlendEffect还有很多其它好玩的模式,大家有空可以多多尝试。
参考#
合成画笔 - Windows UWP applications _ Microsoft Docs
源码#
OnePomodoro_GradientsWithBlend.xaml.cs at master
最新文章
- HTML+CSS 项目总结
- win10下的使用
- Java面试题总结(一)
- PHP 基础
- 360浏览器Uncaught TypeError: object is not a function问题
- c# 通过关键字查询
- [译]JavaScript检测浏览器前缀
- MongoDB:The Definitive Guide CHAPTER 1 Introduction
- 201521123113 《Java程序设计》第5周学习总结
- Python内置函数(20)——exec
- JavaScript 字符串与数组互转,并保持数据去重、排序功能
- 监督学习之knn算法
- DRDS 概述
- Spring 概念
- ceilometer主要组件分析
- 分布式锁--Redis小试牛刀
- IIS 无法识别的属性“targetFramework”---解决之道
- Codeforces 595C - Warrior and Archer
- 计算机网络【9】—— HTTP1.0和HTTP1.1的区别及常见状态码
- Linux解压rar、zip、war、tar文件
热门文章
- 2019hdu多校 Minimal Power of Prime
- 容器适配器————stack
- java-String与Integer的相互转化
- http中post 和 get 请求方法区别
- listen( ) accept( )
- final finalize finally throw throws try catch
- leetcode-mid-sorting and searching - 33. Search in Rotated Sorted Array
- GoldenGate—AUTORESTART配置
- jquery版本轮播图(es5版本,兼容高)
- E: 错误,pkgProblemResolver::Resolve 发生故障,这可能是有软件包被要求保持现状的缘故。 E: 无法更正依赖关系