Directx11教程(10) 画一个简易坐标轴
本篇教程中,我们将在三维场景中,画一个简易的坐标轴,分别用红、绿、蓝三种颜色表示x,y,z轴的正向坐标轴。
为此,我们要先建立一个AxisModelClass类,来表示坐标轴顶点。
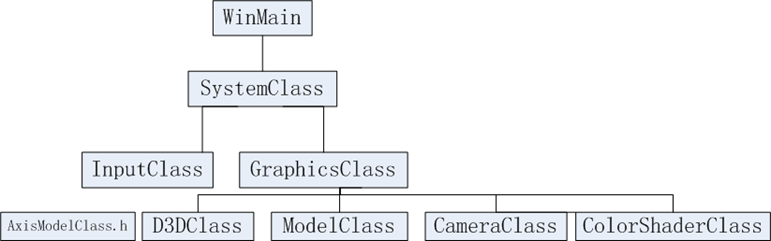
现在系统类之间的关系图如下:
AxisModelClass类和前面的ModelClass类相似,只是创建顶点缓冲和索引缓冲时,指定了3条线段,表示三个坐标轴。
AxisModelClass.h的主要代码如下:
#pragma once
#include <d3d11.h>
#include <d3dx10math.h>
#include "common.h"
class AxisModelClass
{
…
void RenderBuffers(ID3D11DeviceContext*);
//顶点缓冲和顶点索引缓冲
ID3D11Buffer *m_vertexBuffer, *m_indexBuffer;
int m_vertexCount, m_indexCount;
};
AxisModelClass.cpp的主要代码如下:
#include "AxisModelClass.h"
…
bool AxisModelClass::InitializeBuffers(ID3D11Device* device)
{
VertexType* vertices;
unsigned long* indices;
D3D11_BUFFER_DESC vertexBufferDesc, indexBufferDesc;
D3D11_SUBRESOURCE_DATA vertexData, indexData;
HRESULT result;
//首先,我们创建2个临时缓冲存放顶点和索引数据,以便后面使用。.
// 设置顶点缓冲大小为6
m_vertexCount = 6;
// 设置索引缓冲大小.
m_indexCount = 6;
// 创建顶点临时缓冲.
vertices = new VertexType[m_vertexCount];
if(!vertices)
{
return false;
}
// 创建索引缓冲.
indices = new unsigned long[m_indexCount];
if(!indices)
{
return false;
}
// 设置顶点数据.
//x轴,红色
vertices[0].position = D3DXVECTOR3(0.0f, 0.0f, 0.0f);
vertices[0].color = RED;
vertices[1].position = D3DXVECTOR3(10.0f, 0.0f, 0.0f);
vertices[1].color = RED;
//y轴,绿色
vertices[2].position = D3DXVECTOR3(0.0f, 0.0f, 0.0f);
vertices[2].color = GREEN;
vertices[3].position = D3DXVECTOR3(0.0f, 10.0f, 0.0f);
vertices[3].color = GREEN;
//z轴,蓝色
vertices[4].position = D3DXVECTOR3(0.0f, 0.0f, 0.0f);
vertices[4].color = BLUE;
vertices[5].position = D3DXVECTOR3(0.0f, 0.0f, 10.0f);
vertices[5].color = BLUE;
// 设置索引缓冲数据.
indices[0] = 0;
indices[1] = 1;
indices[2] = 2;
indices[3] = 3;
indices[4] = 4;
indices[5] = 5;
…
return true;
}
void AxisModelClass::RenderBuffers(ID3D11DeviceContext* deviceContext)
{
unsigned int stride;
unsigned int offset;
// 设置顶点缓冲跨度和偏移.
stride = sizeof(VertexType);
offset = 0;
//在input assemberl阶段绑定顶点缓冲,以便能够被渲染
deviceContext->IASetVertexBuffers(0, 1, &m_vertexBuffer, &stride, &offset);
//在input assemberl阶段绑定索引缓冲,以便能够被渲染
deviceContext->IASetIndexBuffer(m_indexBuffer, DXGI_FORMAT_R32_UINT, 0);
// 设置体元语义,渲染线段,画出坐标轴
注意:这儿指定画的体元为线段列表
deviceContext->IASetPrimitiveTopology(D3D11_PRIMITIVE_TOPOLOGY_LINELIST);
return;
}
为了使用颜色宏定义,我么去掉了上篇文章在ModelClass.h 中定义的颜色,而新建一个common.h文件,
ModelClass.h中将包含common.h
ModelClass.h代码改变如下:
#pragma once
#include <d3d11.h>
#include <d3dx10math.h>
#include "common.h"
class ModelClass
{
…
};
common.h的代码如下:
//定义一些常用颜色
#include <d3d11.h>
#include <d3dx10math.h>
const D3DXVECTOR4 WHITE(1.0f, 1.0f, 1.0f, 1.0f);
const D3DXVECTOR4 BLACK(0.0f, 0.0f, 0.0f, 1.0f);
const D3DXVECTOR4 RED(1.0f, 0.0f, 0.0f, 1.0f);
const D3DXVECTOR4 GREEN(0.0f, 1.0f, 0.0f, 1.0f);
const D3DXVECTOR4 BLUE(0.0f, 0.0f, 1.0f, 1.0f);
const D3DXVECTOR4 YELLOW(1.0f, 1.0f, 0.0f, 1.0f);
const D3DXVECTOR4 CYAN(0.0f, 1.0f, 1.0f, 1.0f); //蓝绿色
const D3DXVECTOR4 MAGENTA(1.0f, 0.0f, 1.0f, 1.0f); //洋红色
const D3DXVECTOR4 BEACH_SAND(1.0f, 0.96f, 0.62f, 1.0f);
const D3DXVECTOR4 LIGHT_YELLOW_GREEN(0.48f, 0.77f, 0.46f, 1.0f);
const D3DXVECTOR4 DARK_YELLOW_GREEN(0.1f, 0.48f, 0.19f, 1.0f);
const D3DXVECTOR4 DARKBROWN(0.45f, 0.39f, 0.34f, 1.0f);
GraphicsClass.h修改的代码如下:
#pragma once
…
#include "modelclass.h"
#include "AxisModelClass.h"
#include "colorshaderclass.h"
…
class GraphicsClass
{
…
ModelClass* m_Model;
AxisModelClass* m_AxisModel;
ColorShaderClass* m_ColorShader;
};
GraphicsClass.cpp代码如下:
#include "GraphicsClass.h"
GraphicsClass::GraphicsClass(void)
{
m_D3D = 0;
m_Camera = 0;
m_Model = 0;
m_AxisModel = 0;
m_ColorShader = 0;
}
bool GraphicsClass:: Initialize(int screenWidth, int screenHeight, HWND hwnd)
{
…
// 创轴建模型对象.
m_AxisModel = new AxisModelClass;
if(!m_AxisModel)
{
return false;
}
// 初始化坐标轴模型对象.
result = m_AxisModel->Initialize(m_D3D->GetDevice());
if(!result)
{
MessageBox(hwnd, L"Could not initialize the axis model object.", L"Error", MB_OK);
return false;
}
…
return true;
}
bool GraphicsClass::Frame()
{
bool result;
// 调用Render函数,渲染3D场景
// Render是GraphicsClass的私有函数.
result = Render();
if(!result)
{
return false;
}
return true;
}
bool GraphicsClass::Render()
{
D3DXMATRIX viewMatrix, projectionMatrix, worldMatrix;
bool result;
// 设置framebuffer.为浅蓝色
m_D3D->BeginScene(0.0f, 0.0f, 0.5f, 1.0f);
// 得到3个矩阵.
m_Camera->getViewMatrix(&viewMatrix);
m_D3D->GetWorldMatrix(worldMatrix);
m_D3D->GetProjectionMatrix(projectionMatrix);
m_AxisModel->Render(m_D3D->GetDeviceContext());
// 用shader渲染.
result = m_ColorShader->Render(m_D3D->GetDeviceContext(), m_AxisModel->GetIndexCount(), worldMatrix, viewMatrix, projectionMatrix);
if(!result)
{
return false;
}
// 把模型顶点和索引缓冲放入管线,准备渲染.
m_Model->Render(m_D3D->GetDeviceContext());
// 用shader渲染.
result = m_ColorShader->Render(m_D3D->GetDeviceContext(), m_Model->GetIndexCount(), worldMatrix, viewMatrix, projectionMatrix);
if(!result)
{
return false;
}
//把framebuffer中的图像present到屏幕上.
m_D3D->EndScene();
return true;
}
程序执行后,如下图所示:

完整的代码请参考:
工程文件myTutorialD3D11_9
代码下载:
http://files.cnblogs.com/mikewolf2002/myTutorialD3D11.zip
最新文章
- iOS---A valid provisioning profile for this executable was not found
- ubuntu 15.10 install nvidia driver
- 关于jQuery外部框架
- spirng定时任务的两种配置:注解和xml
- 在centos中添加开机自启动服务
- iOS圆盘转动引导图的简单实现
- php 上传文件代码
- C语言的函数调用过程
- Sagit.Framework For IOS 开发框架入门教程6:网络请求STHttp
- windows下安装mysql-5.7.11-winx64
- XVIII Open Cup named after E.V. Pankratiev. Eastern Grand Prix
- Python写代码的用法建议
- mui的switch开关的应用
- BZOJ4551[Tjoi2016&Heoi2016]树——dfs序+线段树/树链剖分+线段树
- Session原理
- iOS开发-数据存储NSCoder
- Android内核编译
- 用adb来修改android嵌入式设备的system只读目录下的东西
- Java实现小学四则运算练习
- jQuery-对标签元素 文本操作-属性操作-文档的操作