Nginx网站部署
Nginx网站服务部署
常用的网站服务软件
处理静态资源的服务:
apache软件:https://apache.org/
nginx软件:https://nginx.org/
处理动态资源的服务:
PHP(超文本预处理器):https://php.net 终端浏览器进行访问
Tomcat(java):利用移动端查看网页
python:开发难度比较低
nginx服务的软件特点
Nginx因具有高并发(特别是静态资源)、占有系统资源少等特性,Nginx不但是一个优秀的Web服务软件,还具有反向代理负载均衡功能和缓存服务功能。
1)支持高并发,消耗内存资源少
2)具有多种功能
网站web服务功能 --- apache
网站负载均衡功能 --- LVS
网站缓存服务 --- Squid
3)在多个系统平台都可以进行部署
nginx实现网络通讯时使用的是异步网络IO模型:eoll模型(aoache -- select模型)
| 指标 | select | epoll |
|---|---|---|
| 性能 | 随着连接数的增加性能急剧下降,处理成千上万并发连接数,性能很差 | 随着连接数的增加,性能基本上没有下降,处理成千上万并发连接时,性能很好 |
| 连接数 | 连接数有限制,处理的最大连接数不超过1024,如果要处理的连接数超过1024个,则需要修改FD_SETSIZE宏,并重新编译 | 连接数无限制 |
| 内在处理机制 | 线性轮询 | 回调callback |
| 开发复杂性 | 低 | 中 |
Nginx采用Epool网络模型,Apache采用select选择模型
select:当用户发起一次请求,选择模型就会进行一次遍历扫描,从而导致性能低下
Empool:当用户发起请求,epool模型会直接进行处理,效率高效,并无连接限制
nginx软件的安装部署过程
两种安装方式:
01.yum安装软件
a.使用官方yum源进行安装---安装的时最新版本--软件目录结构比较标准(推荐)
b.使用非官方yum源进行安装---安装的不是最新版本---目录结构会发生变化
02.编译安装软件
第一个步骤:
[root@web02 tools]# wget https://nginx.org/download/nginx-1.16.0.tar.gz

#PS:解决软件的依赖
第二个步骤:
解压下载好的软件,并进入到软件目录中
a.进行配置操作

[root@web02 tools]# tar xf nginx-1.16.0.tar.gz

[root@web02 tools]# cd nginx-1.16.0/

[root@web02 nginx-1.16.0]# ./configure --help

  --prefix=PATH                      set installation prefix

								  #指定程序安装路径

  --user=USER                        set non-privileged user for worker processes

  								  #设置一个虚拟用户管理worker进程(安全)

  --group=GROUP                      set non-privileged group for worker processes

  								  #设置一个虚拟用户组管理worker进程(安全)

--with							  #添加模块

--without						  #卸载模块

b.进行软件的编译过程

make 编译

C(英国人)		代码(任务文件)	系统识别	翻译	系统(中国人)处理代码

翻译效率比较低	翻译官(gcc)

python(日本人)	代码(任务文件)	系统识别	翻译	系统(中国人)处理代码

翻译效率比较高	翻译官(python解释器)

c.编译安装过程

make install
编译安装方法
创建WWW用户
[root@web01 ~]# groupadd www -g 666

[root@web01 ~]# useradd www -s /sbin/nologin -M -u 666 -g 666

[root@web01 ~]# id www

uid=666(www) gid=666(www) 组=666(www)
安装依赖包
[root@web01 ~]# yum install openssl-devel pcre-devel gcc gcc+ -y
下载解压软件包
[root@web01 ~]# mkdir /data/soft -p

[root@web01 ~]# cd /data/soft/

[root@web01 /data/soft]# wget http://nginx.org/download/nginx-1.16.0.tar.gz

[root@web01 /data/soft]# tar zxvf nginx-1.16.0.tar.gz
配置编译参数
[root@web01 ~]# cd /data/soft/nginx-1.16.0/

[root@web01 /data/soft/nginx-1.16.0]# ./configure --help

[root@web01 /data/soft/nginx-1.16.0]# ./configure --user=www --group=www --prefix=/opt/nginx-1.16.0/ --with-http_stub_status_module --with-http_ssl_module --with-pcre
编译安装
[root@web01 /data/soft/nginx-1.16.0]# make && make install
创建软链接
[root@web01 /data/soft/nginx-1.16.0]# ln -s /opt/nginx-1.16.0/ /opt/nginx

[root@web01 /data/soft/nginx-1.16.0]# ls -lh /opt/

总用量 4.0K

lrwxrwxrwx  1 root root   18 7月  29 20:27 nginx -> /opt/nginx-1.16.0/

drwxr-xr-x 11 1001 1001 4.0K 7月  29 20:26 nginx-1.16.0
检查语法
[root@web01 /opt/nginx]# /opt/nginx/sbin/nginx -t

nginx: the configuration file /opt/nginx-1.16.0//conf/nginx.conf syntax is ok

nginx: configuration file /opt/nginx-1.16.0//conf/nginx.conf test is successful
启动nginx的
[root@web01 /opt/nginx]# /opt/nginx/sbin/nginx
检查测试
[root@web01 /opt/nginx]# netstat -lntup|grep nginx
tcp 0 0 0.0.0.0:80 0.0.0.0:* LISTEN 12828/nginx: master
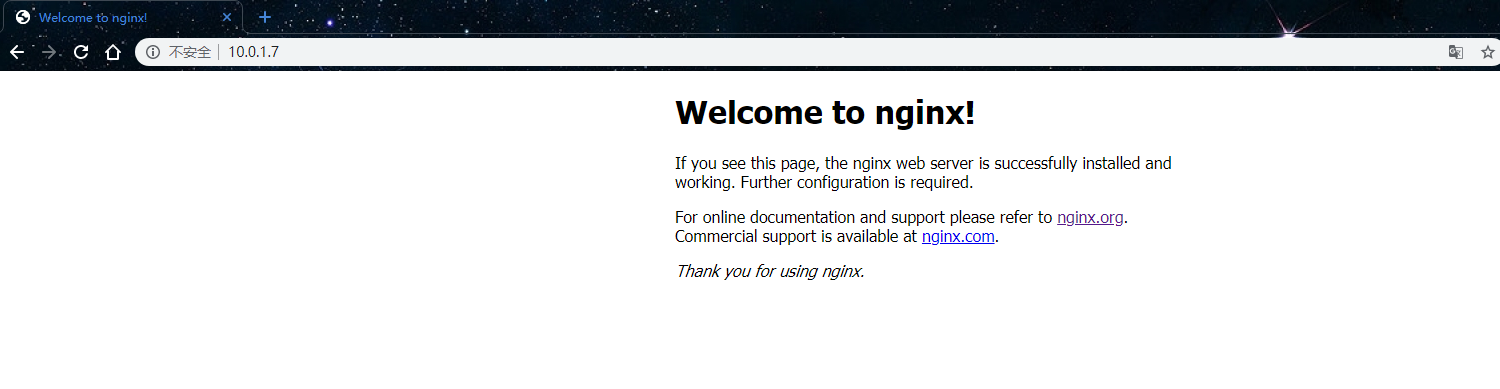
[root@web01 /opt/nginx]# curl 10.0.1.7
yum官方源安装方法:
第一个历程:更新nginx官方yum源
[root@web01 ~]# vim /etc/yum.repos.d/nginx.repo

[nginx-stable]

name=nginx stable repo

baseurl=http://nginx.org/packages/centos/$releasever/$basearch/

gpgcheck=1

enabled=1

gpgkey=https://nginx.org/keys/nginx_signing.key
解释
[nginx-stable]	#描述

name=nginx stable repo	#名称

baseurl=http://nginx.org/packages/centos/$releasever/$basearch/	#下载地址

gpgcheck=1	#检查,验证软件的合法性,如果验证不通过改为0

enabled=1	#是否启用源

gpgkey=https://nginx.org/keys/nginx_signing.key
第二个历程:yum安装nginx软件
[root@web01 ~]# yum -y install nginx
第三个历程:启动nginx服务
[root@web01 ~]# systemctl start nginx

[root@web01 ~]# systemctl enable nginx

Created symlink from /etc/systemd/system/multi-user.target.wants/nginx.service to /usr/lib/systemd/system/nginx.service.
测试访问nginx是否安装成功
nginx软件的目录结构
/etc/logrotate.d/nginx			#实现nginx日志文件定时切割处理

/etc/nginx

/etc/nginx/nginx.conf			#主配置文件

/etc/nginx/conf.d

/etc/nginx/conf.d/default.conf	 #扩展配置文件

/var/log/nginx					#日志文件

/usr/share/nginx/html			#站点目录(保存图片、附件信息、音频、视频)

/etc/nginx/fastcgi_params		#接口相关配置文件

/etc/nginx/scgi_params			#接口相关配置文件

/etc/nginx/uwsgi_params			#接口相关配置文件

/etc/nginx/koi-utf				#字符编码相关配置文件

/etc/nginx/koi-win				#字符编码相关配置文件

/etc/nginx/win-utf				#字符编码相关配置文件

/etc/nginx/mime.types			#媒体资源文件类型文件

/usr/lib/systemd/system/nginx-debug.service  #nginx服务守护进程管理文件

/usr/lib/systemd/system/nginx.service		#nginx服务守护进程管理文件

/etc/nginx/modules				#模块目录文件

/usr/lib64/nginx				#模块目录文件

/usr/lib64/nginx/modules		#模块目录文件

/usr/sbin/nginx					#nginx命令文件

/usr/sbin/nginx-debug			#nginx命令文件
专用文件切割程序--logrotate
[root@web01 ~]# cat /etc/logrotate.conf

# see "man logrotate" for details

# rotate log files weekly

weekly				--- 定义默认日志切割的周期

# keep 4 weeks worth of backlogs

rotate 4			--- 定义只保留几个切割后的文件

# create new (empty) log files after rotating old ones

create				--- 创建出一个相同的源文件

# use date as a suffix of the rotated file

dateext					--- 定义角标(扩展名称信息)

# uncomment this if you want your log files compressed

#compress				--- 是否对切割后的文件进行压缩处理

# RPM packages drop log rotation information into this directory

include /etc/logrotate.d  --- 加载包含/etc/logrotate.d目录中的文件配置

# no packages own wtmp and btmp -- we'll rotate them here

/var/log/wtmp {			 --- 单独对某个文件进行切割配置

    monthly				--- 定义日志切割的周期

    create 0664 root utmp  --- 创建出一个相同的源文件并定义属性

	minsize 1M			--- 最小大小为1M,小于1M不进行切割

    rotate 1			--- 定义只保留几个切割后的文件

}

/var/log/btmp {

    missingok

    monthly

    create 0600 root utmp

    rotate 1

}

# system-specific logs may be also be configured here.

[root@web01 ~]#
nginx服务配置文件
/etc/nginx/nginx.conf ---主配置文件
[root@web01 ~]# cd /etc/nginx/

[root@web01 nginx]# cp nginx.conf{,.bak}

[root@web01 nginx]# grep -v '^$' nginx.conf.bak >nginx.conf

[root@web01 nginx]# cat nginx.conf

第一个部分:配置文件主区域配置

user  nginx;			--- 定义worker进程管理用户

#补充:nginx的进程

#master process:主进程---管理服务是否能够正常运行

#worker process:工作进程--处理用户的访问请求

worker_processes  1;	--- 定义有几个worker进程 ==CPU核数 / 核数的2倍

error_log  /var/log/nginx/error.log warn;	--- 定义错误日志

pid        /var/run/nginx.pid;			   --- 定义pid文件路径信息

第二个部分:配置文件事件区域

events {

    worker_connections  1024;			 --- 一个worker进程可以同时接收1024访问请求

}

第三个部分:配置http区域

http {

    include       /etc/nginx/mime.types;		--- 加载一个配置文件

    default_type  application/octet-stream;		--- 指定默认识别文件类型

    log_format  main  '$remote_addr - $remote_user [$time_local] "$request" ' --- 定义日志格式

                      '$status $body_bytes_sent "$http_referer" '

                      '"$http_user_agent" "$http_x_forwarded_for"';

    access_log  /var/log/nginx/access.log  main;	--- 指定日志路径(main:引用这个格式)

    sendfile        on;

    #tcp_nopush     on;

    keepalive_timeout  65;				---超时时间

    #gzip  on;							---	开启压缩

    include /etc/nginx/conf.d/*.conf;			--- 加载一个配置文件

}

[root@web01 nginx]#
/etc/nginx/nginx.d/default ---扩展配置文件(虚拟主机配置文件)
[root@web01 nginx]# cd /etc/nginx/conf.d/
[root@web01 conf.d]#
[root@web01 conf.d]# cp default.conf{,.bak}
[root@web01 conf.d]# grep -Ev '^$|#' default.conf.bak >default.conf
[root@web01 conf.d]# vim default.conf
第四部分:server区域信息(配置一个网站)
server {
listen 80; --- 指定监听端口
server_name localhost; --- 指定网站域名
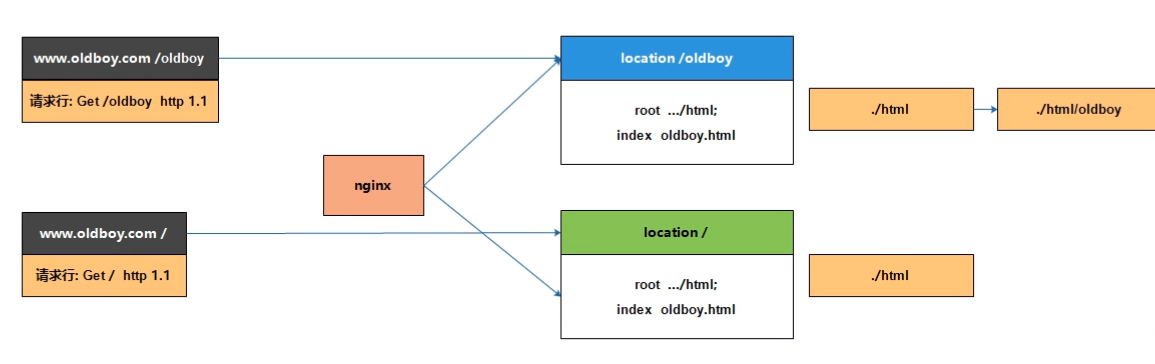
location / { ---
root /usr/share/nginx/html; --- 定义站点目录的位置
index index.html index.htm; --- 定义首页文件
}
error_page 500 502 503 504 /50x.html; --- 优雅显示页面信息
location = /50x.html {
root /usr/share/nginx/html; --- 指定站点目录
}
}
[root@web01 conf.d]#
Nginx服务的应用
第一个历程:编写虚拟主机配置文件
[root@web01 ~]# cd /etc/nginx/conf.d/

[root@web01 conf.d]# vim www.conf

server {

  listen  80;

  server_name www.test.com;

  location / {

    root /usr/share/nginx/html;

    index test.html;

  }

}
第二个历程:编写代码
[root@web01 conf.d]# cd /usr/share/nginx/
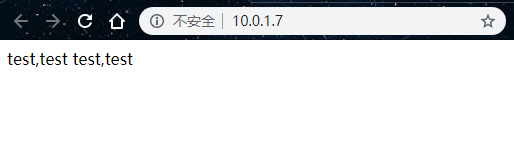
[root@web01 html]# vim test.html
<html>a
<html>
<meta charset="utf-8">
ead>
▽title>test</title>
</head>
<body>
test,test
test,test
</html>
第三个历程:重启nginx服务(最好平滑重启)
两种重启方法(yum安装方式):
systemctl reload nginx

nginx -s reload

#查看看帮助

[root@web01 html]# nginx -h

nginx version: nginx/1.16.0

Usage: nginx [-?hvVtTq] [-s signal] [-c filename] [-p prefix] [-g directives]

Options:

  -?,-h         : this help

  -v            : show version and exit

  -V            : show version and configure options then exit

  -t            : test configuration and exit		--- 检查测试配置文件语法

  -T            : test configuration, dump it and exit

  -q            : suppress non-error messages during configuration testing

  -s signal     : send signal to a master process: stop, quit, reopen, reload	--- 控制服务停止启动

  -p prefix     : set prefix path (default: /etc/nginx/)

  -c filename   : set configuration file (default: /etc/nginx/nginx.conf)

  -g directives : set global directives out of configuration file

[root@web01 html]#
第四个历程:打开浏览器访问
访问过程
部署网站常见错误
1.网站服务配置文件编写不正确
#404错误

解决方法一:修改nginx配置文件---location

解决方法二:在站点目录中创建相应目录或文件数据信息

#403错误

解决方法一:不要禁止访问

解决方法二:因为没有首页文件
2.DNS信息配置不正确
3.nginx配置文件修改一定要重启服务;站点目录中代码文件信息调整,不需要重启服务
利用Nginx服务搭建多个网站
第一个给历程:创建多个虚拟主机配置文件
[root@web01 conf.d]# cat bbb.conf

server {

  listen  80;

  server_name bbb.test.com;

  location / {

    root /html/bbb;

    index index.html;

  }

}

[root@web01 conf.d]# cat www.conf

server {

  listen  80;

  server_name www.test.com;

  location / {

    root /html/www;

    index index.html;

  }

}

[root@web01 conf.d]# cat ccc.conf

server {

  listen  80;

  server_name ccc.test.com;

  location / {

    root /html/ccc;

    index index.html;

  }

}

[root@web01 conf.d]#

[root@web01 conf.d]# systemctl restart nginx
第二个历程:创建站点目录和首页文件
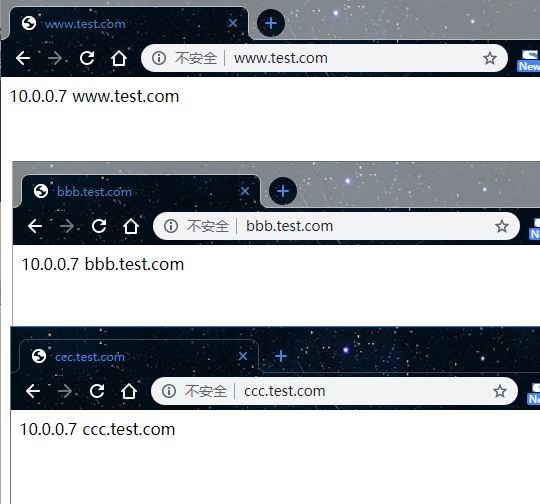
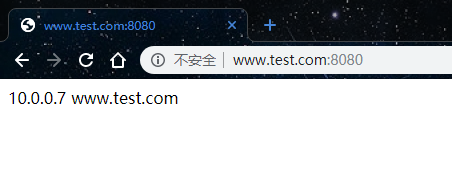
[root@web01 conf.d]# for i in {www,bbb,ccc};do echo "10.0.0.7 $i.test.com" > /html/$i/index.html;done

[root@web01 conf.d]# for i in {www,bbb,ccc};do cat /html/$i/index.html ;done

10.0.0.7 www.test.com

10.0.0.7 bbb.test.com

10.0.0.7 ccc.test.com

[root@web01 conf.d]#
第三个历程:访问测试
Windows访问:
Linux访问
[root@web01 conf.d]# curl www.test.com

10.0.0.7 www.test.com

[root@web01 conf.d]# curl bbb.test.com

10.0.0.7 bbb.test.com

[root@web01 conf.d]# curl ccc.test.com

10.0.0.7 ccc.test.com

[root@web01 conf.d]#
虚拟主机访问方式
a.基于域名的方式进行访问
b.基于地址的方式进行访问(只能用指定地址进行访问)
[root@web01 conf.d]# vim www.conf

server {

  listen  10.0.1.7:80;			---只允许10.0.1.7地址访问

  server_name www.test.com;

  location / {

    root /html/www;

    index index.html;

  }

}

[root@web01 conf.d]# vim ../nginx.conf

user  nginx;

worker_processes  2;

error_log  /var/log/nginx/error.log warn;

pid        /var/run/nginx.pid;

events {

    worker_connections  1024;

}

http {

    include       /etc/nginx/mime.types;

    default_type  application/octet-stream;

    log_format  main  '$remote_addr - $remote_user [$time_local] "$request" '

                      '$status $body_bytes_sent "$http_referer" '

                      '"$http_user_agent" "$http_x_forwarded_for"';

    access_log  /var/log/nginx/access.log  main;

    sendfile        on;

    #tcp_nopush     on;

    keepalive_timeout  65;

    #gzip  on;

    include /etc/nginx/conf.d/www.conf;

    #include /etc/nginx/conf.d/*.conf;

}

[root@web01 conf.d]# systemctl restart nginx

[root@web01 conf.d]# netstat -lntup | grep 80

tcp        0      0 10.0.1.7:80             0.0.0.0:*               LISTEN      12365/nginx: master

[root@web01 conf.d]#

[root@web01 conf.d]# grep 7 /etc/sysconfig/network-scripts/ifcfg-eth[01]

/etc/sysconfig/network-scripts/ifcfg-eth0:IPADDR=10.0.1.7

/etc/sysconfig/network-scripts/ifcfg-eth1:IPADDR=172.16.1.7

[root@web01 conf.d]# curl 10.0.1.7

10.0.0.7 www.test.com

[root@web01 conf.d]# curl 172.16.1.7

curl: (7) Failed connect to 172.16.1.7:80; Connection refused

[root@web01 conf.d]#

#PS:服务配置文件中涉及到地址修改,必须重启nginx服务,不能平滑重启
c.基于端口的方式进行访问
[root@web01 conf.d]# vim www.conf

server {

  listen  8080;

  server_name www.test.com;

  location / {

    root /html/www;

    index index.html;

  }

}

[root@web01 conf.d]# vim ../nginx.conf

user  nginx;

worker_processes  2;

error_log  /var/log/nginx/error.log warn;

pid        /var/run/nginx.pid;

events {

    worker_connections  1024;

}

http {

    include       /etc/nginx/mime.types;

    default_type  application/octet-stream;

    log_format  main  '$remote_addr - $remote_user [$time_local] "$request" '

                      '$status $body_bytes_sent "$http_referer" '

                      '"$http_user_agent" "$http_x_forwarded_for"';

    access_log  /var/log/nginx/access.log  main;

    sendfile        on;

    #tcp_nopush     on;

    keepalive_timeout  65;

    #gzip  on;

    #include /etc/nginx/conf.d/www.conf;

    include /etc/nginx/conf.d/*.conf;

}

[root@web01 conf.d]# systemctl restart nginx

[root@web01 conf.d]# netstat -lntup | grep 80

tcp        0      0 0.0.0.0:8080            0.0.0.0:*               LISTEN      12418/nginx: master

tcp        0      0 0.0.0.0:80              0.0.0.0:*               LISTEN      12418/nginx: master
windows访问
网站页面的访问原理
1.将域名进行解析	www.test.com	--- 10.0.1.7

2.建立TCP的连接(四层协议)

10.0.1.7	--- 目标端口	--- 8080

3.根据应用层HTTP协议发出请求

请求报文:hosts:www.test.com

4.没有相同域名的server主机,会找满足端口要求的第一台主机

显示主机的网站页面
安全的访问配置
a.根据用户访问的地址进行控制
10.0.1.0/24 www.test.com/aa/ 不能访问
172.16.1.0/24 www.test.com/aa 可以访问
nginx访问模块:ngx_http_access_module
#举例配置

location / {

    deny  192.168.1.1;

    allow 192.168.1.0/24;

    allow 10.1.1.0/16;

    allow 2001:0db8::/32;

    deny  all;

}

#指令语法

Syntax:	allow address | CIDR | unix: | all;			--- 语法格式

Default:	—

Context:	http, server, location, limit_except	--- 可以配置的区域
编写配置文件
[root@web01 www]# vim /etc/nginx/conf.d/www.conf

server {

  listen  80;

  server_name www.test.com;

  location / {

    root /html/www;

    index index.html;

  }

  location /aa {

    root /html/www;

    index index.html;

    deny  10.0.1.0/24;

    allow 172.16.1.0/24;

  }

}

[root@web01 conf.d]# mkdir /html/www/aa

[root@web01 conf.d]# cd /html/www/

[root@web01 www]# ll

total 4

drwxr-xr-x 2 root root  6 Jul 26 21:16 aa

-rw-r--r-- 1 root root 22 Jul 26 20:32 index.html

[root@web01 www]# echo "www-test" >aa/test.html

[root@web01 www]#

[root@web01 www]# systemctl restart nginx

#补充:

location外面的信息,全局配置信息

location里面的信息,局部配置信息
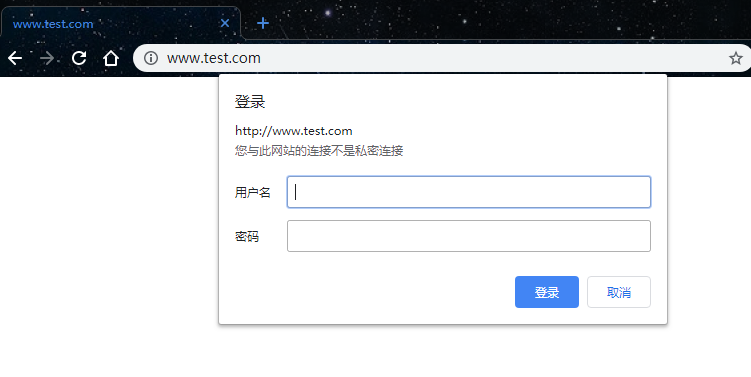
b.根据用户访问进行认证
Nginx认证模块:ngx_http_auth_basic_module
#举例配置

location / {

    auth_basic           "closed site";		--- 开启认证功能

    auth_basic_user_file conf/htpasswd;		--- 加载用户密码文件(默认没有)

}
编写虚拟主机配置文件
[root@web01 www]# vim /etc/nginx/conf.d/www.conf

server {

  listen  80;

  server_name www.test.com;

  location / {

    root /html/www;

    index index.html;

  auth_basic           "www";

  auth_basic_user_file passwd/htpasswd;

  }

}

[root@web01 www]# systemctl restart nginx
创建密码文件(文件中密码信息必须是密文密码)
#htpasswd	---创建一个有密文信息的密码文件

[root@web01 www]# yum -y install httpd-tools

[root@web01 www]# htpasswd --help

Usage:

	htpasswd [-cimBdpsDv] [-C cost] passwordfile username

	htpasswd -b[cmBdpsDv] [-C cost] passwordfile username password

	htpasswd -n[imBdps] [-C cost] username

	htpasswd -nb[mBdps] [-C cost] username password

 -c  Create a new file.		--- 创建一个密码文件

 -n  Don't update file; display results on stdout.	--- 不会更新文件;显示文件内容信息

 -b  Use the password from the command line rather than prompting for it.

     --- 免交互方式输入密码信息

 -i  Read password from stdin without verification (for script usage).

     读取密码信息采用标准输入方式,并不做检查

 -m  Force MD5 encryption of the password (default).  --- md5的加密算法

 -B  Force bcrypt encryption of the password (very secure).		--- 使用bcrypt对密码进行加密

 -C  Set the computing time used for the bcrypt algorithm	--- 使用bcrypt algorithm对密码进行加密

     (higher is more secure but slower, default: 5, valid: 4 to 31).

 -d  Force CRYPT encryption of the password (8 chars max, insecure).  --- 加密方式

 -s  Force SHA encryption of the password (insecure).	---加密方式

 -p  Do not encrypt the password (plaintext, insecure).	---不进行加密

 -D  Delete the specified user.		--- 删除指定用户

 -v  Verify password for the specified user.	--- 验证指定用户的密码

[root@web01 www]#

[root@web01 passwd]# htpasswd -bc ./htpasswd test 123456

Adding password for user test

[root@web01 passwd]# cat htpasswd

test:$apr1$NrNewMZd$01YYhppylGl6xuEj9wGom/

[root@web01 passwd]#
windows访问
当修改密码文件权限为600
#属主是root

[root@web01 passwd]# chmod 600 htpasswd

[root@web01 passwd]# ll

total 4

-rw------- 1 root root 43 Jul 26 21:55 htpasswd

[root@web01 passwd]#

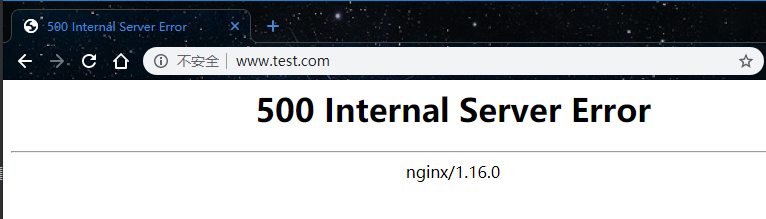
500 Internal Server Error
1.内部程序代码编写有问题
2.程序服务中文件权限不正确
#属主是www

[root@web01 passwd]# chown www.root htpasswd

[root@web01 passwd]# ll

total 4

-rw------- 1 www root 43 Jul 26 21:55 htpasswd

[root@web01 passwd]# ps -ef| grep nginx

root      12983      1  0 22:24 ?        00:00:00 nginx: master process /usr/sbin/nginx -c /etc/nginx/nginx.conf

www       12984  12983  0 22:24 ?        00:00:00 nginx: worker process

www       12985  12983  0 22:24 ?        00:00:00 nginx: worker process

root      12993  12040  0 22:26 pts/0    00:00:00 grep --color=auto nginx

[root@web01 passwd]#
linux中访问
[root@web01 passwd]# curl --help
-u, --user USER[:PASSWORD] Server user and password
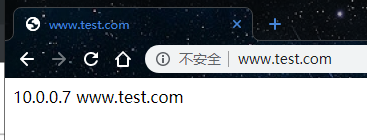
[root@web01 passwd]# curl www.test.com -u test
Enter host password for user 'test':
10.0.0.7 www.test.com
[root@web01 passwd]# curl www.test.com -u test:123456
10.0.0.7 www.test.com
[root@web01 passwd]#
用户的映射关系

利用Nginx服务搭建网站文件共享服务器
nginx模块功能:ngx_http_autoindex_module
location / {

    autoindex on;

}

Syntax:	autoindex on | off;

Default:

autoindex off;

Context:	http, server, location

# autoindex 常用参数

autoindex_exact_size off;

默认为 on, 显示出文件的确切大小,单位是 bytes。

修改为 off,显示出文件的大概大小,单位是 kB 或者 MB 或者 GB。

autoindex_localtime on;

默认为 off,显示的文件时间为 GMT 时间。

修改为 on, 显示的文件时间为文件的服务器时间。

charset utf-8,gbk;

默认中文目录乱码,添加上解决乱码
编写配置文件
[root@web01 www]# vim /etc/nginx/conf.d/www.conf

server {

  listen  80;

  server_name www.test.com;

  location / {

    root /html/www;

#    index index.html;

  auth_basic           "www";

  auth_basic_user_file passwd/htpasswd;

  autoindex on;

  }

}

[root@web01 www]# tree

.

├── aa

│   └── test.html

├── centos6.9

│   └── centos6.9.php

├── centos7.6

│   └── centos7.6.php

└── centos8.0

    └── centos8.0.php

4 directories, 4 files

[root@web01 www]#

#PS:

1.需要将首页文件删除,因为默认会加载首页文件

2.mime.types媒体资源类型文件作用

文件中有的扩展名信息资源,进行访问时会直接看到数据信息

文件中没有的扩展名信息资源,进行访问时会直接下载资源
网站页面目录数据,中文出现乱码问题解决
nginx功能模块:ngx_http_charset_module
[root@web01 www]# vim /etc/nginx/conf.d/www.conf

server {

  listen  80;

  server_name www.test.com;

  location / {

    root /html/www;

#    index index.html;

  auth_basic           "www";

  auth_basic_user_file passwd/htpasswd;

  autoindex on;

  charset utf-8;	--- 修改目录结构中出现的中文乱码问题

  }

}
利用nginx服务搭建配置文件别名功能
编写配置文件
[root@web01 www]# vim /etc/nginx/conf.d/www.conf

server {

  listen  80;

  server_name www.test.com te.com;

  location / {

    root /html/www;

    index index.html;

  auth_basic           "www";

  auth_basic_user_file passwd/htpasswd;

  autoindex on;

  charset utf-8;

  }

}

[root@web01 www]# systemctl reload nginx
配置好解析信息
[root@web01 www]# vim /etc/hosts

10.0.1.7        web01   www.test.com bbb.test.com ccc.test.com te.com
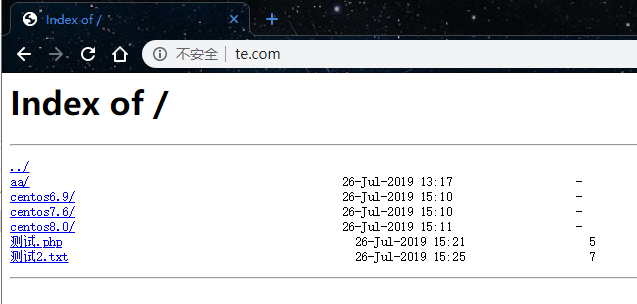
作用:
01.编写网站访问测试
02.定位要访问的网站服务器
利用nginx状态模块功能对网站进行监控
nginx的状态模块:ngx_http_stub_status_module
location = /basic_status {

    stub_status;

}
编写配置文件
[root@web01 www]# cd /etc/nginx/conf.d/

[root@web01 conf.d]# vim state.conf

server {

  listen 80;

  server_name state.test.com;

  stub_status;

}

[root@web01 conf.d]# systemctl restart nginx
windows访问

Active connections: 1 				--- 激活的连接数信息

accepts 						   --- 接收的连接数汇总(综合)

handled 						   --- 处理的连接数汇总(综合)

requests						   --- 总计的请求数量(http协议请求)

Reading							   --- nginx服务读取请求报文的数量

Writing							   --- nginx服务响应报文信息数量

Waiting	 --- 					    --- nginx队列机制,要处理(读取或者响应报文进行保存
Nginx日志功能配置
访问日志模块:ngx_http_log_module
/var/log/nginx/access.log
log_format  main  '$remote_addr - $remote_user [$time_local] "$request" '	--- 定义日志内容格式

                      '$status $body_bytes_sent "$http_referer" '

                      '"$http_user_agent" "$http_x_forwarded_for"';

    access_log  /var/log/nginx/access.log  main;						  --- 调用日志格式

$remote_addr			---	显示用户访问源IP地址信息

$remote_user			---	显示认证的用户名信息

[$time_local]			---	显示访问网站时间

"$request"				---	请求报文的请求行信息

$status					---	用户访问网站状态码信息

$body_bytes_sent		 --- 显示响应的数据尺寸信息

"$http_referer"			 --- 记录调用网络资源的链接地址信息(防止用户盗链)

"$http_user_agent"	 	 --- 记录用户使用什么客户端软件进行访问页面

"$http_x_forwarded_for"	 --- 记录客户端 IP 地址

详细日志详细说明

#PS:日志文件信息需要做切割处理
错误日志模块:Core functionality
/var/log/nginx/error.log
Syntax:	error_log file [level];		--- 指定错误日志路径及错误日志记录的级别

Default:

error_log logs/error.log error;

Context:	main, http, mail, stream, server, location

#错误日志级别

debug		---	调试级别:服务运行的状态信息和错误信息详细显示			---	信息越多

info		---	信息级别:只显示重要的运行信息和错误信息

notice		---	通知级别:更加重要的信息进行通知说明

warn		---	警告级别:可能出现了一些错误信息,但不影响服务运行

error		---	错误级别:服务运行已经出现了错误,信息需要进行修复	   --- 推荐选择

crit		---	严重级别:必须尽快进行修改调整

alert		---	严重警告级别:既警告,而且必须进行错误修改

emerg		---	灾难级别:服务已经不能正常运行						  --- 信息越少

[root@web01 nginx]# cat /etc/nginx/nginx.conf

error_log  /var/log/nginx/error.log warn;
Nginx服务location作用说明
模块说明:ngx_http_core_module
location进行匹配(uri)

#错误页面优雅显示

 location /abc {

     root /html/www;

     error_page 404 /error.html;

 }

location详细配置
Syntax:	location [ = | ~ | ~* | ^~ ] uri { ... }

location @name { ... }

Default:	—

Context:	server, location

location = / {						---	精确匹配(优先级01 最高)

    [ configuration A ]

}

location / {						--- 默认匹配(优先级05 最低)

    [ configuration B ]

}

location /documents/ {				 --- 按照目录进行匹配(优先级04)

    [ configuration C ]

}

location ^~ /images/ {				 --- 优先匹配/不识别uri信息中符号信息(优先级02)

    [ configuration D ]

}

location ~* \.(gif|jpg|jpeg)$ {		  --- 不区分大小写进行匹配(优先级03)

    [ configuration E ]

}
location语法介绍
location [=|^~|~|~*|!~|!~*|/] /uri/ { ...

}
location语法优先级

配置位置匹配规则实战
[root@web01 ~]# cat /etc/nginx/conf.d/01-www.conf

server {

    listen       80;

    server_name  www.oldzhang.com;

    root   /usr/share/nginx/html/www;

    location / {

       return 200  "location / \n";

    }

    location = / {

        return 200 "location = \n";

    }

    location /documents/ {

        return 200 "location /documents/ \n";

    }

    location ^~ /images/ {

        return 200 "location ^~ /images/ \n";

    }

    location ~* \.(gif|jpg|jpeg)$ {

        return 200 "location ~* \.(gif|jpg|jpeg) \n";

    }

    access_log off;

}
测试位置匹配规则
#精确匹配=/

[root@web01 ~]# curl www.oldzhang.com

location =

#没有满足的请求,所以匹配了/

[root@web01 ~]# curl www.oldzhang.com/oldzhang.html

location /

#匹配了/documents

[root@web01 ~]# curl www.oldzhang.com/documents/oldboy.html

location /documents/

#没有满足的条件,匹配/

[root@web01 ~]# curl www.oldzhang.com/oldboy/documents/oldboy.html

location /

#正则匹配了文件名

[root@web01 ~]# curl www.oldzhang.com/oldboy.jpg

location ~* \.(gif|jpg|jpeg)

#~*匹配正则不区分大小写优先于/documents

[root@web01 ~]# curl www.oldzhang.com/documents/oldboy.jpg

location ~* \.(gif|jpg|jpeg)

#^~优先匹配于~*

[root@web01 ~]# curl www.oldzhang.com/images/oldboy.jpg

location ^~ /images/
利用nginx实现页面跳转功能
利用rewrite模块实现跳转功能:ngx_http_rewrite_module
Syntax:	rewrite regex replacement [flag];	--- rewrite 匹配的正则信息 替换成什么信息

Default:	—

Context:	server, location, if

  rewrite ^/(.*) http://www.test.com/$1 permanent;	---	重写规则配置

  #跳转方式

  永久跳转:permanent	301		会将跳转信息进行缓存

  临时跳转:redirect		302		不会缓存跳转信息
出现无限跳转解决
第一种方法:利用不同server区块配置打破循环
[root@web01 www]# vim /etc/nginx/conf.d/www.conf

server {

  listen 80;

  server_name test.com;

  rewrite ^/(.*) http://www.test.com/$1 permanent;

}

server {

  listen  80;

  server_name www.test.com;

  access_log  /var/log/nginx/www_access.log  main;

  location / {

    root /html/www;

    index index.html;

  }

}
第二种方法:利用if判断实现打破循环
[root@web01 www]# vim /etc/nginx/conf.d/www.conf

server {

  listen  80;

  server_name www.test.com test.com;

  access_log  /var/log/nginx/www_access.log  main;

  if ($host ~* "^test.com$") {

         rewrite ^/(.*) http://www.test.com/$1 permanent;

  }

  location / {

    root /html/www;

    index index.html;

  }

}
访问限制
经常会遇到这种情况,服务器流量异常,负载过大等等。对于大流量恶意的攻击访问,会带来带宽的浪费,服务器压力,影响业务,往往考虑对同一个ip的连接数,请求数,进行限制
.ngx_http_limit_conn_module模块可以根据定义的密钥来限制每个键值的连接数,如同一个IP来源的连接数
.limit_conn_module连接频率限制
limit_req_module请求频率限制
连接限制
配置语法
#模块名 ngx_http_limit_conn_module

Syntax: limit_conn_zone key zone=name:size;

Default: —

Context: http

Syntax: limit_conn zone number;

Default: —

Context: http, server, location
配置文件
# http 标签段定义连接限制

http{

      limit_conn_zone $binary_remote_addr zone=conn_zone:10m;

}

# server标签里引用条件

[root@web01 ~]# cat /etc/nginx/conf.d/01-www.conf

server   {

    listen       80;

    server_name  www.oldzhang.com;

    # 同一时刻只允许一个客户端连接

    limit_conn conn_zone 1;

    access_log  /var/log/nginx/www.access.log  main;

    location / {

        root   /usr/share/nginx/html/www;

        index  index.html index.htm;

    }

}
访问测试
[root@web01 ~]# yum install httpd-tools -y

[root@web01 ~]# ab -n 20 -c 2 http://www.oldzhang.com/
请求限制
配置语法
#模块名 ngx_http_limit_req_module

Syntax: limit_req_zone key zone=name:size rate=rate;

Default: —

Context: http

Syntax: limit_conn zone number [burst=number] [nodelay];

Default: —

Context: http, server, location
配置文件
http {

      limit_req_zone $binary_remote_addr zone=req_zone:10m rate=1r/s;

}

[root@web01 ~]# cat /etc/nginx/conf.d/01-www.conf

server   {

    listen       80;

    server_name  www.oldzhang.com;

    limit_req zone=req_zone burst=3 nodelay;

    access_log  /var/log/nginx/www.access.log  main;

    location / {

        root   /usr/share/nginx/html/www;

        index  index.html index.htm;

    }

}
访问测试
[root@web01 ~]# yum install httpd-tools -y

[root@web01 ~]# ab -n 20 -c 2 http://www.oldzhang.com/
查看访问日志
[root@web01 ~]# tail -f /var/log/nginx/www.access.log

10.0.1.7 - - [30/Jul/2019:19:34:48 +0800] "GET / HTTP/1.0" 200 4 "-" "ApacheBench/2.3" "-"

10.0.1.7 - - [30/Jul/2019:19:34:48 +0800] "GET / HTTP/1.0" 200 4 "-" "ApacheBench/2.3" "-"

10.0.1.7 - - [30/Jul/2019:19:34:48 +0800] "GET / HTTP/1.0" 200 4 "-" "ApacheBench/2.3" "-"

10.0.1.7 - - [30/Jul/2019:19:34:48 +0800] "GET / HTTP/1.0" 200 4 "-" "ApacheBench/2.3" "-"

10.0.1.7 - - [30/Jul/2019:19:34:48 +0800] "GET / HTTP/1.0" 503 197 "-" "ApacheBench/2.3" "-"

10.0.1.7 - - [30/Jul/2019:19:34:48 +0800] "GET / HTTP/1.0" 503 197 "-" "ApacheBench/2.3" "-"
查看错误日志
[root@web01 ~]# tail -f /var/log/nginx/error.log

2019/07/30 19:34:48 [error] 17380#17380: *32 limiting requests, excess: 3.998 by zone "req_zone", client: 10.0.1.7, server: www.oldzhang.com, request: "GET / HTTP/1.0", host: "www.oldzhang.com"

2019/07/30 19:34:48 [error] 17380#17380: *33 limiting requests, excess: 3.998 by zone "req_zone", client: 10.0.1.7, server: www.oldzhang.com, request: "GET / HTTP/1.0", host: "www.oldzhang.com"

2019/07/30 19:34:48 [error] 17380#17380: *34 limiting requests, excess: 3.998 by zone "req_zone", client: 10.0.1.7, server: www.oldzhang.com, request: "GET / HTTP/1.0", host: "www.oldzhang.com"

2019/07/30 19:34:48 [error] 17380#17380: *35 limiting requests, excess: 3.997 by zone "req_zone", client: 10.0.1.7, server: www.oldzhang.com, request: "GET / HTTP/1.0", host: "www.oldzhang.com"
为什么限制请求的效果更好
我们先来回顾一下http协议的连接与请求,首先HTTP是建立在TCP基础之上,在完成HTTP请求需要先建立TCP三次握手(称为TCP连接),在连接的基础上在完成HTTP的请求。
所以多个HTTP请求可以建立在一次TCP连接之上,那么我们对请求的精度限制,当然比对一个连接的限制会更加的有效,因为同一时刻只允许一个TCP连接进入,但是同一时刻多个HTTP请求可以通过一个TCP连接进入。所以针对HTTP的请求限制才是比较优的解决方案。
最新文章
- connect mysql from another host
- 锤子手机 Smartisan M1L 咖啡金 真皮背面 高配版 5.7
- CoreData数据库迁移的操作
- 用JUnit4进行单元测试
- 读《CSS禅意花园》 有感
- simulink下直接代码生成
- OD: Format String, SQL Injection, XSS
- Spring Boot 系列教程10-freemarker导出word下载
- ios8新的api
- 入门PHP你需要了解些什么?
- Redies安装,修配置,设置密码,
- JavaScript 基本类型和引用类型
- 2019.3.22 JMeter基础操作
- Powerdesigner16 逆向 postgresql9.2
- Luogu P1776 宝物筛选_NOI导刊2010提高(02)(多重背包模版)
- .NET获取当前程序所在电脑的CPU和内存使用率
- 078 Hbase中rowkey设计原则
- solr整合spring
- Druid 连接池 JDBCUtils 工具类的使用
- SPOJ10606 BALNUM - Balanced Numbers(数位DP+状压)