[Python自学] day-21 (2) (Cookie、FBV|CBV装饰器)
一、什么是Cookie
1.什么是Cookie?
Cookie是保存在客户端浏览器中的文件,其中记录了服务器让浏览器记录的一些键值对(类似字典)。
当Cookie中存在数据时,浏览器在访问网站时会读取属于自己的数据,并携带在请求中发送给服务器。
这种机制可以用于许多场景,例如用户登录。
Cookie非常重要,如果禁用了Cookie,大部分网站都不好用。
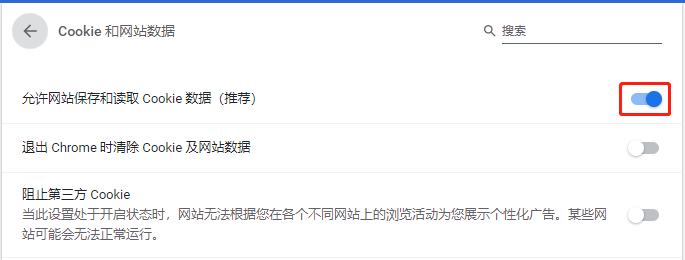
2.如何禁用Cookie
以Chrome为例:
进入设置--->高级--->隐私设置与安全性--->网站设置(或内容设置)--->Cookie和网站数据--->允许网站保存和读取Cookie数据(关闭)
3.关闭Cookie尝试登陆JD
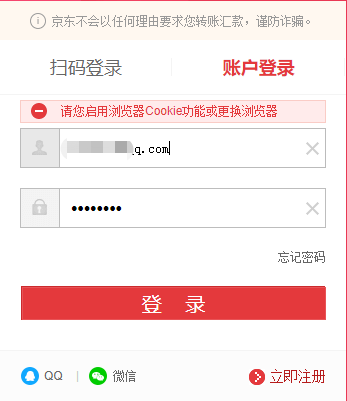
在没有Cookie的情况下,会被提示"请再次登陆"或者"请您启用浏览器Cookie功能或更换浏览器"。
二、基于Cookie实现用户登录
1.实现登录页面mlogin.html
<!DOCTYPE html>

<html lang="en">

<head>

    <meta charset="UTF-8">

    <title>Mgmt Login</title>

    <link rel="stylesheet" href="/static/commons.css"/>

    <style>

        label{

            width: 80px;

            text-align: right;

            display: inline-block;

        }

        .error_span{

            color: red;

        }

    </style>

</head>

<body class="common">

    <form action="/mgmt/login/" method="post">

        <p>

            <label for="username">用户名:</label>

            <input id="username" type="text" name="user"/>

            <span class="error_span">{{ user_error }}</span>

        </p>

        <p>

            <label for="password">密码:</label>

            <input id="password" type="password" name="pwd"/>

            <input type="submit" value="提交"/>

            <span class="error_span">{{ pwd_error }}</span>

        </p>

    </form>

    <script src="/static/jquery-1.12.4.js"></script>

</body>

</html>
2.实现视图函数login()
def login(request):

    pwd_error_msg = ''

    # 当用户使用GET请求时,让其登录

    if request.method == "GET":

        return render(request, 'mlogin.html')

    if request.method == 'POST':

        username = request.POST.get('user', None)

        password = request.POST.get('pwd', None)

        dic = user_info.get(username)

        if not dic:

            # 用户不存在,重新登录

            pwd_error_msg = "用户不存在"

            return render(request, 'mlogin.html', {"pwd_error": pwd_error_msg})

        if dic['pwd'] == password:

            response = redirect('/mgmt/host')

            response.set_cookie('username', username)

            return response

        else:

            # 密码不正确,重新登录

            pwd_error_msg = "密码不正确"

            return render(request, 'mlogin.html', {"pwd_error": pwd_error_msg})
当账号密码验证成功时,向客户端写入cookie,并跳转到/mgmt/host页面。
3.定义映射关系
from django.contrib import admin

from django.urls import path

from django.urls import re_path

from mgmt import views

app_name = 'mgmt'

urlpatterns = [

    path('index/', views.index),

    re_path('host', views.host),

    re_path('login', views.login),

]
4.在host()视图函数中验证cookie
def host(request):

    # 如果是get请求,则将数据库中查询到的host列表和业务线列表返回,展示在页面上

    if request.method == 'GET':

        username = request.COOKIES.get('username')

        if not username:

            return redirect('/mgmt/login')

        host_list = models.Host.objects.all()

        busi_list = models.Business.objects.all()

        return render(request, 'host.html', {'username': username, 'host_list': host_list, 'busi_list': busi_list})

    elif request.method == 'POST':  # 当用户使用模态框添加主机时,使用表单POST提交

        # 获取表单提交的数据

        host = request.POST.get('hostname')

        ip = request.POST.get('ip')

        port = request.POST.get('port')

        # 这里的busi获取到的是select对应的busi_id

        busi = request.POST.get('busi_id')

        # 插入数据库

        models.Host.objects.create(

            hostname=host,

            ip=ip,

            port=port,

            busi_id=busi

        )

        # 重定向到host页面,以GET重新请求,页面就可以显示新的值

        return redirect('/mgmt/host')
如果没有cookie,则说明没有登录,跳转回login页面。如果有cookie,则显示登录用户名。
/mgmt/host页面的html代码和models代码参考:[Python自学] day-20 (Django-ORM、Ajax)
三、Cookie参数
1.Cookie失效时间
我们如果使用set_cookie('key',value)来设置Cookie,则Cookie会在关闭浏览器时失效。
有两种方式设置失效时间:
1)max_age参数(单位秒)
set_cookie('username', username, max_age=10)
这样设置以后,Cookie的有效时间就是10s,10s后刷新页面,就会跳转到登录页面(前提是写了这个跳转逻辑)。
2)expires参数(参数为datetime)
import datetime

now = datetime.datetime.utcnow()

delay = datetime.timedelta(10)

response.set_cookie('username', username, expires= now+delay)
同样设置以后,有效时间也是10s。
2.Cookie path、domain、secure、httponly参数
path参数:
当我们按前面章节的代码来添加Cookie的时候,Cookie是在所有页面都能访问的。
但是我们有可能需要在不同的页面访问不同的Cookie值,例如论坛的两个页面,一个页面(host页面)设置一页显示50条数据,另外一个页面(app)设置一页显示20条数据。
使用path参数:
set_cookie('show_num', 50, path='/')  # 所有页面

set_cookie('show_num', 50, path='/host')  # Host页面一页显示50条数据

set_cookie('show_num', 20, path='/app')  # App页面一页显示20条数据
domain参数:
用于设置cookie生效的域名。用于过滤生效范围。
secure参数:
如果使用的是https协议,则secure必须设置为Ture。
httponly参数:
如果httponly=True,则表示Cookie只能通过http协议传输,无法被JavaScript获取(不是绝对的,底层抓包可以获取到也可以被覆盖)
如果不设置,则在前端JS代码中可以使用以下代码获取cookie:
console.log(document.cookie) //"username=leokale"
四、Cookie实现动态调整每页显示条目数
在 [Python自学] day-21 (1) (请求信息、html模板继承与导入、自定义模板函数、自定义分页) 中,我们实现了分页功能。效果如下:
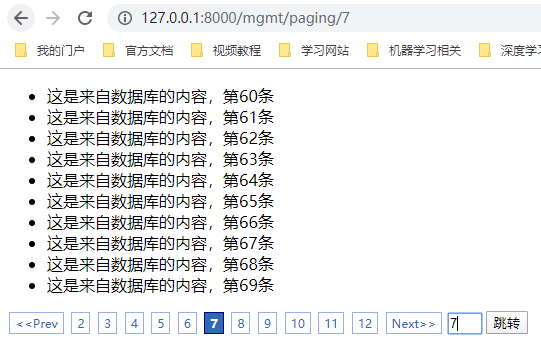
每页默认显示10条数据。我们可以使用Cookie来实现动态调整每页显示条目数量。
1.在html中添加一个<select>标签
<!DOCTYPE html>

<html lang="en">

<head>

    <meta charset="UTF-8">

    <title>Paging</title>

    <style>

        /*分别定义页签按钮的效果,以及当前页面的页签按钮效果*/

        .pagination{

            font-size: 12px;

            /*一般页签按钮都居中*/

            /*text-align: center;*/

        }

        .pagination .page_num{

            display: inline-block;

            padding: 2px 5px;

            border: 1px solid #9aafe5;

            color: #2e6ab1;

            margin: 0 2px;

            text-decoration: none;

        }

        .pagination .page_num.active{

            background-color: #2e6ab1;

            border: 1px solid #000080;

            color: #fff;

            font-weight: bold;

            margin: 0 2px;

            padding: 2px 5px;

        }

        a{

            outline: 0;

        }

    </style>

</head>

<body>

    <!-- 显示内容 -->

    <ul>

        {% for text in contents %}

        <li>

            {{ text }}

        </li>

        {% endfor %}

    </ul>

    <select id="select_page_show_num"onchange="changePageShowNum(this);">

        <option value="10">10</option>

        <option value="30">30</option>

        <option value="50">50</option>

        <option value="100">100</option>

    </select>

    <!-- 显示页签按钮 -->

    <div class="pagination">

        {{ paginations }}

    </div>

    <script src="/static/jquery-1.12.4.js"></script>

    <script src="/static/jquery.cookie.js"></script>

    <script>

        // 页面加载完后,马上读取cookie的值,设置在select框中

        $(function(){

            var v = $.cookie('per_page_count');

            if(!v){

                v = '';

            }

            $("#select_page_show_num").val(v)

        });

        //当用户选择select标签中的值后,设置cookie

        function changePageShowNum(ths){

            var v = $(ths).val();

            $.cookie('per_page_count',v);

            location.reload();

        };

    </script>

</body>

</html>
解释:
1)导入jquery cookie插件,为jquery添加便利操作cookie的功能。下载地址 https://plugins.jquery.com/cookie/
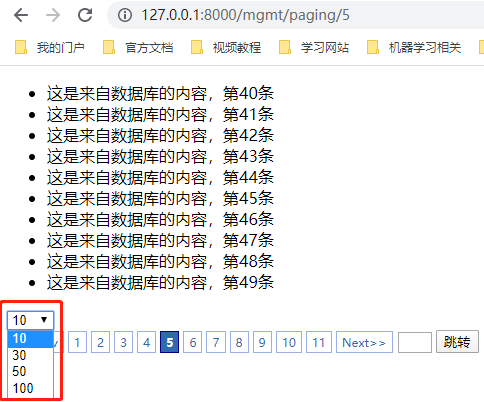
2)添加一个<select>标签,提供用户每页显示数目的功能。
3)当页面加载完毕的时候,读取cookie是否存在per_page_count的值,如果没有,则默认为10,如果有,则设置在select标签中,确保显示与cookie一致。
4)当用户改变<select>的选项时,动态的将值写入per_page_count中。
2.修改paging()视图函数
def paging(request, pnum):

    # 从请求中,获取Cookie per_page_count的值

    ppc = request.COOKIES.get('per_page_count')

    # 将值转换为int类型,并将其作为参数传入Paging构造函数

    ppc = int(ppc)

    # 获取一个分页对象

    pager_obj = Paging(pnum, len(PAGES), per_page_count=ppc)

    # 获取页签按钮的list

    paginations = pager_obj.pager_str('/mgmt/paging/')

    # 根据start和end来获取数据,对应数据库的行数

    contents = PAGES[pager_obj.start_idx: pager_obj.end_idx]

    return render(request, 'paging.html', {"contents": contents, "paginations": paginations})
3.实现效果
五、带签名的Cookie(加密)
普通设置的Cookie都是明文的,如果我们想对cookie进行加密,则使用以下方式:
set_signed_cookie('username', username, salt='nsakjdf98s7dfhsf')

get_signed_cookie('username', salt='nsakjdf98s7dfhsf')
通过使用加盐的方式来加密,salt在设置cookie和获取cookie的时候一定要对应上。
六、使用装饰器实现用户验证
1.FBV装饰器
如果我们在很多页面的视图函数都要验证用户是否登录(验证是否存在指定Cookie),则需要在每个视图函数中写以下代码:
username = request.COOKIES.get('username')

if not username:

    return redirect('/mgmt/login')
如果使用装饰器,则实现为:
# 实现用户登录cookie验证的装饰器

def auth(func):

    def inner(request, *args, **kwargs):

        username = request.COOKIES.get('username')

        if not username:

            return redirect('/mgmt/login')

        return func(request, *args, **kwargs)

    return inner
2.CBV装饰器
当使用的是CBV的请求处理方式,里面的get、post方法都是分开的,如果我们为每一个函数都添加auth装饰器,比较麻烦。
django为我们提供了一个封装好的装饰器容器。
使用方法一(麻烦,不推荐):为每一个函数加上装饰器
from django import views

from django.utils.decorators import method_decorator

# 实现用户登录cookie验证的装饰器

def auth(func):

    def inner(request, *args, **kwargs):

        username = request.COOKIES.get('username')

        if not username:

            return redirect('/mgmt/login')

        return func(request, *args, **kwargs)

    return inner

class Host(views.View):

    @method_decorator(auth)

    def get(self, request):

        username = request.COOKIES.get('username')

        # 如果是get请求,则将数据库中查询到的host列表和业务线列表返回,展示在页面上

        if request.method == 'GET':

            host_list = models.Host.objects.all()

            busi_list = models.Business.objects.all()

            return render(request, 'host.html', {'username': username, 'host_list': host_list, 'busi_list': busi_list})

    @method_decorator(auth)

    def post(self, request):

        # 获取表单提交的数据

        host = request.POST.get('hostname')

        ip = request.POST.get('ip')

        port = request.POST.get('port')

        # 这里的busi获取到的是select对应的busi_id

        busi = request.POST.get('busi_id')

        # 插入数据库

        models.Host.objects.create(

            hostname=host,

            ip=ip,

            port=port,

            busi_id=busi

        )

        # 重定向到host页面,以GET重新请求,页面就可以显示新的值

        return redirect('/mgmt/host')
使用方法二(麻烦):利用dispatch方法先于get、post方法执行。
from django import views

from django.utils.decorators import method_decorator

# 实现用户登录cookie验证的装饰器

def auth(func):

    #......

class Host(views.View):

    @method_decorator(auth)

    def dispatch(self, request, *args, **kwargs):

        return super(Host, self).dispatch(request, *args, **kwargs)

    def get(self, request):

        #......

    def post(self, request):

        #......
由于dispatch方法先于get、post方法执行,所以在这里统一做验证就可以。
使用方法三(推荐):在类上加装饰器。
from django import views

from django.utils.decorators import method_decorator

# 实现用户登录cookie验证的装饰器

def auth(func):

    #......

@method_decorator(auth, name='dispatch')

class Host(views.View):

    def get(self, request):

        #......

    def post(self, request):

        #......
在类前面加装饰器,并使用name参数指定成员方法名,相当于第二种使用方法。
最新文章
- echarts之tooltip-position
- jQuery鼠标经过显示大图
- Android源码中内置包含so文件的APK文件
- 一次Redis的使用Bug记录(exec)
- [No00001E]不出国,学口语-出国口语自然好?才怪咧!
- Realm Java的学习、应用、总结
- SpringMvc+Mybatis 框架搭建
- led.c驱动框架
- 彻底领悟javascript中的this
- WP8.1小梦词典开发1:金山词霸API使用
- 代码的鲁棒性:链表中倒数第k个结点
- 第一节: dingo/API 最新版 V2.0 之安装讲解(连载)
- ActiveMQ的Destination高级特性
- layer结合art实现弹出功能
- Python_oldboy_自动化运维之路_面向对象2(十)
- 循环结构 while,do while
- 【js】插件—动效Velocity.js
- POJ 3579 Median 二分加判断
- PHP 中使用explode()函数切割字符串为数组
- 3人从小公寓创业,到世界最大引擎公司,Unity创始人谈14年...