Android学习05
2024-08-25 05:49:09
AlertDialog(对话框)
它也是其他 Dialog的的父类!比如ProgressDialog,TimePickerDialog等,而AlertDialog的父类是:Dialog!
AlertDialog并不能直接new出来,构造方法是protected的,要创建AlertDialog的话,需要使用到该类中的一个静态内部类:public static class Builder,然后来调用AlertDialog 里的相关方法,来对AlertDialog进行定制,最后调用show()方法来显示AlertDialog对话框!
AlertDialog有几个基本方法,
例如:setTitile() setMessage() setCancelable() setPositiveButton() setNegativeButton() setNeutralButton() 等等。
1、带按钮的AlertDialog
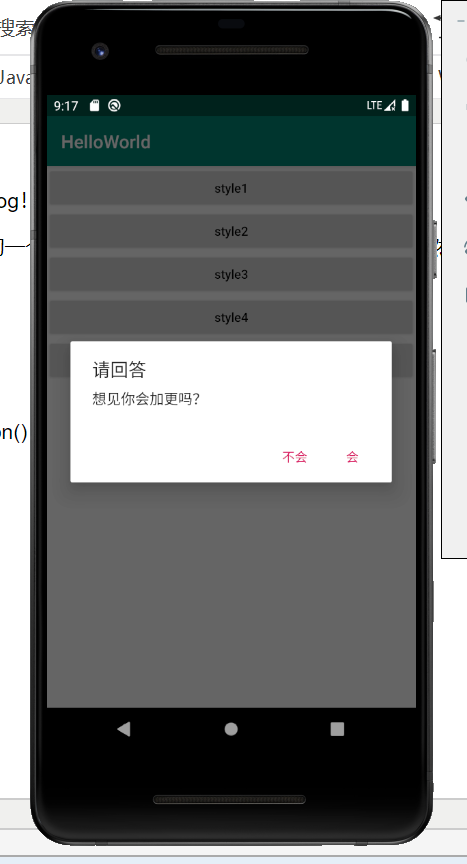
点击按钮弹出提示内容;
public void onClick(View v) {

            switch (v.getId()) {

                case R.id.btn_dialog1:

                    AlertDialog.Builder builder = new AlertDialog.Builder(DialogActivity.this);

                    builder.setTitle("请回答").setMessage("想见你会加更吗?")

                            .setPositiveButton("会", new DialogInterface.OnClickListener() {

                                @Override

                                public void onClick(DialogInterface dialog, int which) {

                                    Toast.makeText(DialogActivity.this, "你点击了会", Toast.LENGTH_SHORT).show();

                                }

                            }).setNegativeButton("不会", new DialogInterface.OnClickListener() {

                        @Override

                        public void onClick(DialogInterface dialog, int which) {

                            Toast.makeText(DialogActivity.this, "你点击了不会", Toast.LENGTH_SHORT).show();

                        }

                    }).show();

                    break;
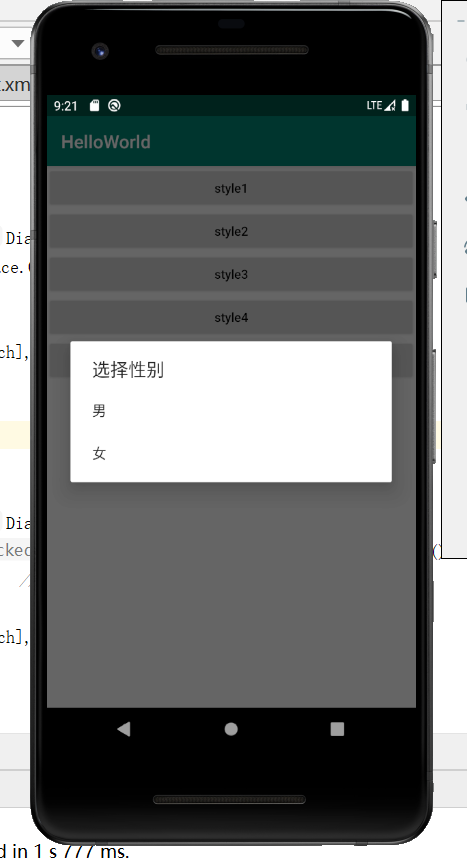
2.1、类似RadioButton的AlertDialog,单选
case R.id.btn_dialog2:

                    final String[] array2 = new String[]{"男", "女"};

                    AlertDialog.Builder builder2 = new AlertDialog.Builder(DialogActivity.this);

                    builder2.setTitle("选择性别").setItems(array2, new DialogInterface.OnClickListener() {

                        @Override

                        public void onClick(DialogInterface dialog, int which) {

                            Toast.makeText(DialogActivity.this, array2[which], Toast.LENGTH_SHORT).show();

                        }

                    }).show();

                    break;
2.2、与RadioButton一样的AlertDialog

case R.id.btn_dialog3:

                    final String[] array3 = new String[]{"男", "女"};

                    AlertDialog.Builder builder3 = new AlertDialog.Builder(DialogActivity.this);

                    builder3.setTitle("选择性别").setSingleChoiceItems(array3, 0, new DialogInterface.OnClickListener() {

                        @Override                                                     //默认选中第几个

                        public void onClick(DialogInterface dialog, int which) {

                            Toast.makeText(DialogActivity.this, array3[which], Toast.LENGTH_SHORT).show();

                            //选择之后对话框会消失

                            dialog.dismiss();

                        }//点框外对话框不会消失

                    }).setCancelable(false).show();

                    break;
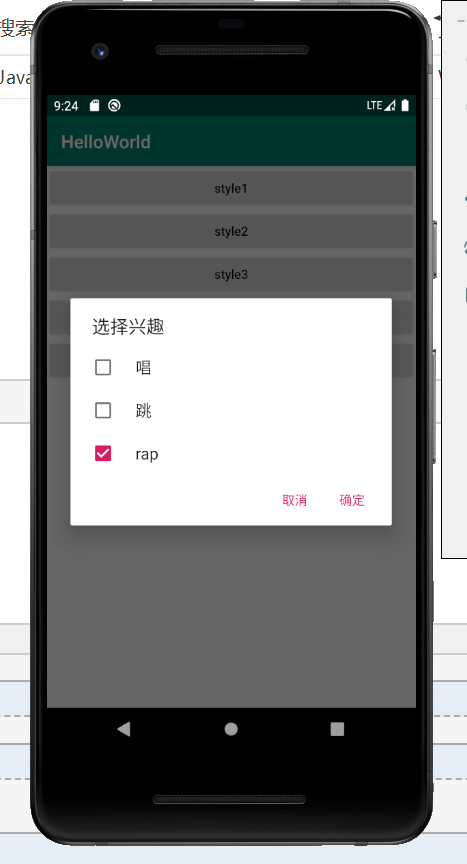
3、与CheckBox一样的AlertDialog
case R.id.btn_dialog4:

                    final String[] array4 = new String[]{"唱", "跳","rap"};

                    boolean[] isSelected = new boolean[]{false,false,true};

                    AlertDialog.Builder builder4 = new AlertDialog.Builder(DialogActivity.this);

                    builder4.setTitle("选择兴趣").setMultiChoiceItems(array4, isSelected, new DialogInterface.OnMultiChoiceClickListener() {

                        @Override

                        public void onClick(DialogInterface dialog, int which, boolean isChecked) {

                            //which表示当前选中第几个,isChecked表示选中或取消选中

                            Toast.makeText(DialogActivity.this, array4[which]+":"+isChecked, Toast.LENGTH_SHORT).show();

                        }

                    }).setPositiveButton("确定", new DialogInterface.OnClickListener() {

                        @Override

                        public void onClick(DialogInterface dialog, int which) {

                            //

                        }

                    }).setNegativeButton("取消", new DialogInterface.OnClickListener() {

                        @Override

                        public void onClick(DialogInterface dialog, int which) {

                            //

                        }

                    }).show();

                    break;
4、自定义View的AlertDialog
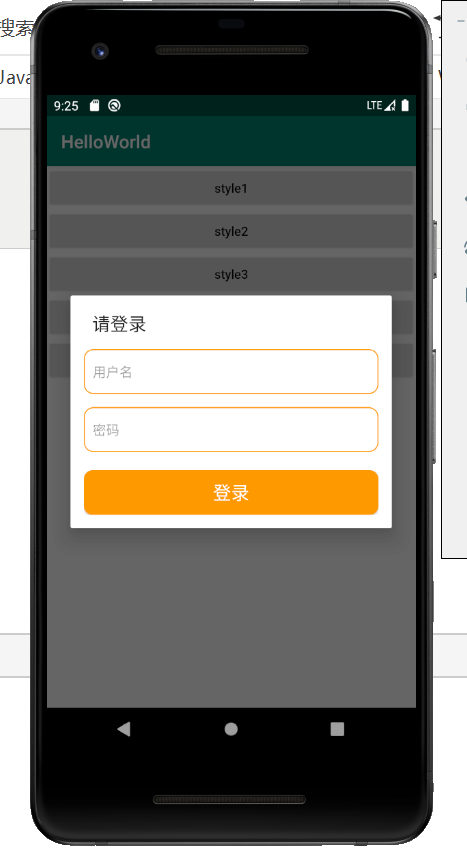
要实现一个Login画面,有用户名和密码,这时我们就要用到自定义View的AlertDialog,步骤如下:
- 先创建自定义登录框的布局文件layout_dialog.xml
- 在Activity中创建自定义的AlertDialog
layout_dialog.xml:
<?xml version="1.0" encoding="utf-8"?>

<LinearLayout xmlns:android="http://schemas.android.com/apk/res/android"

    android:orientation="vertical"

    android:layout_width="match_parent"

    android:layout_height="match_parent"

    android:padding="15dp">

    <EditText

        android:id="@+id/et_username"

        android:layout_width="match_parent"

        android:layout_height="50dp"

        android:textSize="15sp"

        android:textColor="#FF8F44"

        android:background="@drawable/bg_username"

        android:hint="用户名"

        android:paddingLeft="10dp"

        android:paddingRight="10dp"/>

    <EditText

        android:id="@+id/et_password"

        android:layout_width="match_parent"

        android:layout_height="50dp"

        android:textSize="15sp"

        android:textColor="#FF8F44"

        android:layout_below="@id/edit_1"

        android:background="@drawable/bg_username"

        android:hint="密码"

        android:inputType="textPassword"

        android:layout_marginTop="15dp"

        android:paddingLeft="10dp"

        android:paddingRight="10dp"/>

    <Button

        android:id="@+id/btn_login"

        android:layout_width="match_parent"

        android:layout_height="50dp"

        android:layout_below="@id/edit_2"

        android:layout_marginTop="20dp"

        android:background="@drawable/bg_btn4"

        android:text="登录"

        android:textSize="20sp"

        android:textColor="#fff"/>

</LinearLayout>
Activity:
case R.id.btn_dialog5:

                    AlertDialog.Builder builder5 = new AlertDialog.Builder(DialogActivity.this);

                    View view = LayoutInflater.from(DialogActivity.this).inflate(R.layout.layout_dialog,null);

                    //声明布局里的控件

                    EditText etUsername = view.findViewById(R.id.et_username);

                    EditText etPassword = view.findViewById(R.id.et_password);

                    Button btnLogin = view.findViewById(R.id.btn_login);

                    btnLogin.setOnClickListener(new View.OnClickListener() {

                        @Override

                        public void onClick(View v) {

                            //

                        }

                    });

                    builder5.setTitle("请登录").setView(view).show();

                    break;
完整代码:
DialogActivity:
package com.example.helloworld;

import androidx.appcompat.app.AlertDialog;

import androidx.appcompat.app.AppCompatActivity;

import android.content.DialogInterface;

import android.content.Intent;

import android.os.Bundle;

import android.view.LayoutInflater;

import android.view.View;

import android.widget.Button;

import android.widget.EditText;

import android.widget.Toast;

public class DialogActivity extends AppCompatActivity {

    private Button mBtnDialog1, mBtnDialog2, mBtnDialog3, mBtnDialog4,mBtnDialog5;

    @Override

    protected void onCreate(Bundle savedInstanceState) {

        super.onCreate(savedInstanceState);

        setContentView(R.layout.activity_dialog);

        mBtnDialog1 = findViewById(R.id.btn_dialog1);

        mBtnDialog2 = findViewById(R.id.btn_dialog2);

        mBtnDialog3 = findViewById(R.id.btn_dialog3);

        mBtnDialog4 = findViewById(R.id.btn_dialog4);

        mBtnDialog5 = findViewById(R.id.btn_dialog5);

        onClick onClick = new onClick();

        mBtnDialog1.setOnClickListener(onClick);

        mBtnDialog2.setOnClickListener(onClick);

        mBtnDialog3.setOnClickListener(onClick);

        mBtnDialog4.setOnClickListener(onClick);

        mBtnDialog5.setOnClickListener(onClick);

    }

    class onClick implements View.OnClickListener {

        @Override

        public void onClick(View v) {

            switch (v.getId()) {

                case R.id.btn_dialog1:

                    AlertDialog.Builder builder = new AlertDialog.Builder(DialogActivity.this);

                    builder.setTitle("请回答").setMessage("想见你会加更吗?")

                            .setPositiveButton("会", new DialogInterface.OnClickListener() {

                                @Override

                                public void onClick(DialogInterface dialog, int which) {

                                    Toast.makeText(DialogActivity.this, "你点击了会", Toast.LENGTH_SHORT).show();

                                }

                            }).setNegativeButton("不会", new DialogInterface.OnClickListener() {

                        @Override

                        public void onClick(DialogInterface dialog, int which) {

                            Toast.makeText(DialogActivity.this, "你点击了不会", Toast.LENGTH_SHORT).show();

                        }

                    }).show();

                    break;

                case R.id.btn_dialog2:

                    final String[] array2 = new String[]{"男", "女"};

                    AlertDialog.Builder builder2 = new AlertDialog.Builder(DialogActivity.this);

                    builder2.setTitle("选择性别").setItems(array2, new DialogInterface.OnClickListener() {

                        @Override

                        public void onClick(DialogInterface dialog, int which) {

                            Toast.makeText(DialogActivity.this, array2[which], Toast.LENGTH_SHORT).show();

                        }

                    }).show();

                    break;

                case R.id.btn_dialog3:

                    final String[] array3 = new String[]{"男", "女"};

                    AlertDialog.Builder builder3 = new AlertDialog.Builder(DialogActivity.this);

                    builder3.setTitle("选择性别").setSingleChoiceItems(array3, 0, new DialogInterface.OnClickListener() {

                        @Override                                                     //默认选中第几个

                        public void onClick(DialogInterface dialog, int which) {

                            Toast.makeText(DialogActivity.this, array3[which], Toast.LENGTH_SHORT).show();

                            //选择之后对话框会消失

                            dialog.dismiss();

                        }//点框外对话框不会消失

                    }).setCancelable(false).show();

                    break;

                case R.id.btn_dialog4:

                    final String[] array4 = new String[]{"唱", "跳","rap"};

                    boolean[] isSelected = new boolean[]{false,false,true};

                    AlertDialog.Builder builder4 = new AlertDialog.Builder(DialogActivity.this);

                    builder4.setTitle("选择兴趣").setMultiChoiceItems(array4, isSelected, new DialogInterface.OnMultiChoiceClickListener() {

                        @Override

                        public void onClick(DialogInterface dialog, int which, boolean isChecked) {

                            //which表示当前选中第几个,isChecked表示选中或取消选中

                            Toast.makeText(DialogActivity.this, array4[which]+":"+isChecked, Toast.LENGTH_SHORT).show();

                        }

                    }).setPositiveButton("确定", new DialogInterface.OnClickListener() {

                        @Override

                        public void onClick(DialogInterface dialog, int which) {

                            //

                        }

                    }).setNegativeButton("取消", new DialogInterface.OnClickListener() {

                        @Override

                        public void onClick(DialogInterface dialog, int which) {

                            //

                        }

                    }).show();

                    break;

                case R.id.btn_dialog5:

                    AlertDialog.Builder builder5 = new AlertDialog.Builder(DialogActivity.this);

                    View view = LayoutInflater.from(DialogActivity.this).inflate(R.layout.layout_dialog,null);

                    //声明布局里的控件

                    EditText etUsername = view.findViewById(R.id.et_username);

                    EditText etPassword = view.findViewById(R.id.et_password);

                    Button btnLogin = view.findViewById(R.id.btn_login);

                    btnLogin.setOnClickListener(new View.OnClickListener() {

                        @Override

                        public void onClick(View v) {

                            //

                        }

                    });

                    builder5.setTitle("请登录").setView(view).show();

                    break;

            }

        }

    }

}
activity_edit_text.xml:
<?xml version="1.0" encoding="utf-8"?>

<RelativeLayout xmlns:android="http://schemas.android.com/apk/res/android"

    android:layout_width="match_parent"

    android:layout_height="match_parent"

    android:padding="15dp">

    <EditText

        android:id="@+id/edit_1"

        android:layout_width="match_parent"

        android:layout_height="50dp"

        android:textSize="15sp"

        android:textColor="#FF8F44"

        android:background="@drawable/bg_username"

        android:hint="用户名"

        android:paddingLeft="10dp"

        android:paddingRight="10dp"/>

    <EditText

        android:id="@+id/edit_2"

        android:layout_width="match_parent"

        android:layout_height="50dp"

        android:textSize="15sp"

        android:textColor="#FF8F44"

        android:layout_below="@id/edit_1"

        android:background="@drawable/bg_username"

        android:hint="密码"

        android:inputType="textPassword"

        android:layout_marginTop="15dp"

        android:paddingLeft="10dp"

        android:paddingRight="10dp"/>

    <Button

        android:id="@+id/btn_login"

        android:layout_width="match_parent"

        android:layout_height="50dp"

        android:layout_below="@id/edit_2"

        android:layout_marginTop="20dp"

        android:background="@drawable/bg_btn4"

        android:text="登录"

        android:textSize="20sp"

        android:textColor="#fff"/>

</RelativeLayout>
最新文章
- Docker命令详解
- window对象的属性及事件。
- Android开发学习之路-GSON使用心得(OCR图片识别)
- DP:Dollar Dayz(POJ 3181)
- Codeforces Round #191 (Div. 2) E题
- ORA-12518 TNS:监听程序无法分发客户机连接 解决办法
- ERROR:The requested URL could not be retrieved解决方法
- HS-T912 adb 连接配置
- request常用方法小结
- BZOJ_1270_雷涛的小猫_(动态规划)
- CSS 链接
- PAXOS may not terminate
- C#枚举数值与名称的转换实例分享
- ArcGIS JS 3.x使用webgl绘制热力图
- 全球免费公共 DNS 解析服务器 IP 地址列表推荐 (解决无法上网/加速/防劫持)
- 2554 ACM 杭电 数学
- STL next_permutation()
- Python 入门基础19 --面向对象、封装
- AOP 入门
- 【转】require.js学习笔记(一)