(三)Struts之Action类基础(一)
一、Action的类型
A、使用普通的类
- 必须有public的execute且返回值为String的方法。
ActionType.java
package com;

public class ActionType_1 {

    public String execute()

    {

        System.out.println("我是Action类型1");

        return null;

    }

}
B、实现Actin接口
- 实现com.opensymphony.xwork2.Action接口,并实现该接口中的execute()方法。
- 在实际开发中,action类很少直接实现Action接口,通常都是从com.opensymphony.xwork2.ActionSupport类继承,ActionSupport实现了Action接口和其他一些可选的接口,提供了输入验证,错误信息存取,以及国际化的支持,选择从ActionSupport继承,可以简化action的定义。

- Action接口中定义了一些常量和一个方法。
C、继承ActionSupport类
- 这个类里面封装了大量的方法,且实现了B中Action接口,
package com;

import com.opensymphony.xwork2.ActionSupport;

public class ActionType_3 extends ActionSupport {

    @Override

    public String execute() throws Exception {

        System.out.println("这是继承ActionSupport的类");

        return super.execute();

    }

}
二、调用Action中的方法
A、 使用method属性
示例:
ActionMethod_1.java:
package method;

import com.opensymphony.xwork2.ActionSupport;

public class ActionMethod_1 extends ActionSupport {

    @Override

    public String execute() throws Exception {

        System.out.println("执行默认execute方法");

        return super.execute();

    }

    public String add()

    {

        System.out.println("执行add方法");

        return NONE;

    }

    public String del()

    {

        System.out.println("执行del方法");

        return NONE;

    }

    public String list()

    {

        System.out.println("执行list方法");

        return NONE;

    }

    public String uptdate()

    {

        System.out.println("执行uptdate方法");

        return NONE;

    }

}
假设Actionmethod_1这个Action中有4个方法(除execute外),如果我们要用method属性调用这些方法,则需要:
struts.xml
    <package name="default" namespace="/" extends="struts-default">

        <action name="method_1"  class="method.ActionMethod_1"  method="add">

        </action>

        <action name="method_2"  class="method.ActionMethod_1"  method="del">

        </action>

        <action name="method_3"  class="method.ActionMethod_1"  method="uptdate">

        </action>

        <action name="method_4"  class="method.ActionMethod_1"  method="list">

        </action>

    </package>
如配置,当地址栏URL=“工程名/method_1”时,执行method.ActionMethod_1类中的add方法; 当地址栏URL=“工程名/method_2”时,执行method.ActionMethod_1类中的adel方法,以此类推。
- 缺点:如果某个类有很多方法的时候,那么配置起来很麻烦,代码非常多,一般适用于类方法特别少的情况下。
B、 使用动态方法调用
- 对以上示例优化:
ActionMethod_1.java:
package method;

import com.opensymphony.xwork2.ActionSupport;

public class ActionMethod_1 extends ActionSupport {

    @Override

    public String execute() throws Exception {

        System.out.println("执行默认execute方法");

        return super.execute();

    }

    public String add()

    {

        System.out.println("执行add方法2");

        return NONE;

    }

    public String del()

    {

        System.out.println("执行del方法2");

        return NONE;

    }

    public String list()

    {

        System.out.println("执行list方法2");

        return NONE;

    }

    public String uptdate()

    {

        System.out.println("执行uptdate方法2");

        return NONE;

    }

}
struts.xml
<struts>

    <constant name="struts.enable.DynamicMethodInvocation" value="true" />

    <constant name="struts.devMode" value="true" />

    <package name="default" namespace="/" extends="struts-default">

        <action name="method" class="method.ActionMethod_1">

        </action>

    </package>

</struts>
- 注意: 使用动态方法调用,struts.enable.DynamicMethodInvocation 这个常量必须是true ;
index.jsp
<%@ page language="java" contentType="text/html; charset=UTF-8"

    pageEncoding="UTF-8"%>

<!DOCTYPE html PUBLIC "-//W3C//DTD HTML 4.01 Transitional//EN" "http://www.w3.org/TR/html4/loose.dtd">

<html>

<% String path=request.getContextPath(); %>

<head>

<meta http-equiv="Content-Type" content="text/html; charset=UTF-8">

<title>Insert title here</title>

</head>

<body>

    <a href="<%=path%>/method!add">执行add方法</a>

    <a href="<%=path%>/method!del">执行del方法</a>

    <a href="<%=path%>/method!uptdate">执行uptdate方法</a>

    <a href="<%=path%>/method!list">执行list方法</a>

</body>

</html>
解析: 当点击a标签时候,请求url中的!后跟的是方法名,<a href="<%=path%>/method!add">执行add方法</a> 即当点击这个标签时,执行action名为“method”中的add方法。其他的依次类推。 这种方法就避免了在struts.xml文件中配置过多,导致代码臃肿。
注意的是:使用动态方法调用,struts.enable.DynamicMethodInvocation 这个常量必须是true ;
C、 使用通配符方法(推荐使用)
ActionMethod_1.java
package method;

import com.opensymphony.xwork2.ActionSupport;

public class ActionMethod_1 extends ActionSupport {

    @Override

    public String execute() throws Exception {

        System.out.println("执行默认execute方法");

        return super.execute();

    }

    public String add()

    {

        System.out.println("执行add方法3");

        return NONE;

    }

    public String del()

    {

        System.out.println("执行del方法3");

        return NONE;

    }

    public String list()

    {

        System.out.println("执行list方法3");

        return NONE;

    }

    public String uptdate()

    {

        System.out.println("执行uptdate方法3");

        return NONE;

    }

}
idnex.jsp
<%@ page language="java" contentType="text/html; charset=UTF-8"

    pageEncoding="UTF-8"%>

<!DOCTYPE html PUBLIC "-//W3C//DTD HTML 4.01 Transitional//EN" "http://www.w3.org/TR/html4/loose.dtd">

<html>

<% String path=request.getContextPath(); %>

<head>

<meta http-equiv="Content-Type" content="text/html; charset=UTF-8">

<title>Insert title here</title>

</head>

<body>

    <a href="<%=path%>/method_add">执行add方法</a>

    <a href="<%=path%>/method_del">执行del方法</a>

    <a href="<%=path%>/method_uptdate">执行uptdate方法</a>

    <a href="<%=path%>/method_list">执行list方法</a>

</body>

</html>
struts.xml
<struts>

    <constant name="struts.enable.DynamicMethodInvocation" value="true" />

    <constant name="struts.devMode" value="true" />

    <package name="default" namespace="/" extends="struts-default">

        <action name="method_*" class="method.ActionMethod_1" method="{1}">

        </action>

    </package>

</struts>
- 解析:当点击<a href="<%=path%>/method_add">执行add方法</a> 这个标签的时候,请求url为"工程名/method_add",在命名空间为“/”的包下找到一个叫
“method_*”的Action,* 号表示任意字符(任意长度),即调用method.ActionMethod_1这个类,并调用method=“{1}” 这个方法,{1} 中的表示*表示的字符,在这个标签中*代表add,所以就调用了ActionMethod_1类中的add方法。
注意: 如果有多个通配符,
<action name="method_*_*" class="method.ActionMethod_1" method="{1}"> 而标签为<a href="<%=path%>/method_exam_add">执行add方法</a>,则调用的是第一个通配符匹配的字符即exam方法。
三、接收表单(用户请求)的值
3.1 在struts中获取servlet的原生对象
- 获取servlet原生对象的方式如下:
A、 实现相应的接口,注入servlet对象
示例:
index.jsp
<%@ page language="java" contentType="text/html; charset=UTF-8"

    pageEncoding="UTF-8"%>

<!DOCTYPE html PUBLIC "-//W3C//DTD HTML 4.01 Transitional//EN" "http://www.w3.org/TR/html4/loose.dtd">

<html>

<% String path=request.getContextPath(); %>

<head>

<meta http-equiv="Content-Type" content="text/html; charset=UTF-8">

<title>Insert title here</title>

</head>

<body>

    <a href="<%=path%>/servlet/obj">获取并测试servlet原生对象</a>

</body>

</html>
struts.xml
<struts>

    <constant name="struts.enable.DynamicMethodInvocation" value="true" />

    <constant name="struts.devMode" value="true" />

    <package name="default" namespace="/servlet" extends="struts-default">

        <action name="obj"  class="com.ServletObject"></action>

    </package>

</struts>
ServletObject.java
package com;

import java.io.IOException;

import java.io.PrintWriter;

import javax.servlet.ServletContext;

import javax.servlet.http.HttpServletRequest;

import javax.servlet.http.HttpServletResponse;

import javax.servlet.http.HttpSession;

import org.apache.struts2.interceptor.ServletRequestAware;

import org.apache.struts2.interceptor.ServletResponseAware;

import org.apache.struts2.util.ServletContextAware;

import com.opensymphony.xwork2.ActionSupport;

public class ServletObject extends ActionSupport implements ServletRequestAware,ServletResponseAware,ServletContextAware{

    //定义servlet原生对象为成员变量,否则如果是局部变量生命周期太短。

    private ServletContext servletContext;

    private HttpServletResponse response;

    private HttpServletRequest request;

    private PrintWriter out;

    private HttpSession session;

    /**

     * 设置ServletContext

     */

    public void setServletContext(ServletContext servletContext) {

        this.servletContext=servletContext;

    }

    /**

     * 设置ServletResponse,得到response之后就可由response得到PrintWriter对象

     */

    public void setServletResponse(HttpServletResponse response) {

        this.response=response;

        if(response!=null)

        {

            try {

                this.out=response.getWriter();

            } catch (IOException e) {

                e.printStackTrace();

            }

        }

    }

    /**

     * 设置ServletRequest,得到request之后就可由request得到HttpSession

     */

    public void setServletRequest(HttpServletRequest request) {

        this.request=request;

        if(request!=null)

        {

            this.session=request.getSession();

        }

    }

    public String execute()

    {

        /**

         * 测试servlet原生对线是否真正获取可以使用

         */

        System.out.println(this.request.getContextPath()); //获取工程路径

        System.out.println(this.session.getId()); //获取session的id

        System.out.println(this.servletContext.getRealPath("/index.jsp")); //获取/index.jsp的真实路径

        this.out.print("我是PrintWriter类的对象out");

        return NONE;

    }

}
- 本例只获取了5中servlet原生对象,但只实现了ServletRequestAware,ServletResponseAware,ServletContextAware三个接口,至于printWriter、httpsession对象,则分别由ServletResponseAware对象、ServletRequestAware对象来获取即可。
- ServletContext.getRealPath()获取的是真实路径,即在硬盘上的路径(如C:\Users\Administrator\workspace\.metadata\.plugins\org.eclipse.wst.server.core\tmp0\wtpwebapps\struts_project_2\index.jsp),而request.getContextPath()获得是工程路径(如/struts_project_2)。
B、 使用struts提供的静态类来获取
package com;

import java.io.PrintWriter;

import javax.servlet.ServletContext;

import javax.servlet.http.HttpServletRequest;

import javax.servlet.http.HttpServletResponse;

import javax.servlet.http.HttpSession;

import org.apache.struts2.ServletActionContext;

import com.opensymphony.xwork2.ActionSupport;

public class ServletObject extends ActionSupport {

    public String execute()

    {

        try{

            HttpServletRequest request=ServletActionContext.getRequest();

            HttpServletResponse response=ServletActionContext.getResponse();

            ServletContext servletContext=ServletActionContext.getServletContext();

            PrintWriter out=response.getWriter();

            HttpSession session=request.getSession();

            /**

             * 测试servlet原生对线是否真正获取可以使用

             */

              System.out.println(request.getContextPath()); //获取工程路径

              System.out.println(session.getId()); //获取session的id

              System.out.println(servletContext.getRealPath("/index.jsp")); //获取/index.jsp的真实路径

              out.print("我是PrintWriter类的对象out");

        }

        catch(Exception e)

        {

            e.printStackTrace();

        }

        return NONE;

    }

}
ServletActionContext 这个静态类提供了Servlet原生对象的创建等。
在Action中获取servlet原生对象的总结:
一般来说用第一种方法来获取,但是这种方法每个Action都要写一大堆代码很麻烦,所以这里可以把这些servlet原生对象封装为一个抽象基类,其他Action要使用servlet原生对象的话就继承这个抽象类并实现抽象execute方法即可。
示例:
BaseAction.java
package com;

import java.io.IOException;

import java.io.PrintWriter;

import javax.servlet.ServletContext;

import javax.servlet.http.HttpServletRequest;

import javax.servlet.http.HttpServletResponse;

import javax.servlet.http.HttpSession;

import org.apache.struts2.interceptor.ServletRequestAware;

import org.apache.struts2.interceptor.ServletResponseAware;

import org.apache.struts2.util.ServletContextAware;

public abstract class BaseAction implements ServletRequestAware,ServletResponseAware,ServletContextAware {

    HttpServletRequest request;

    HttpServletResponse response;

    ServletContext servletContext;

    HttpSession session;

    PrintWriter out;

    public void setServletContext(ServletContext servletContext) {

        this.servletContext=servletContext;

    }

    public void setServletResponse(HttpServletResponse response) {

    this.response=response;

    if(response!=null)

    {

        try {

            this.out=response.getWriter();

        } catch (IOException e) {

            e.printStackTrace();

        }

    }

    }

    public void setServletRequest(HttpServletRequest request) {

        this.request=request;

        if(request!=null)

        {

            this.session=request.getSession();

        }

    }

    abstract public String execute();

}
3.2 获取请求参数中的值
A、 使用servlet原生对象request来获取
A1. 从GET请求中获取参数 :
get把数据放在网址中,例如:http://www.abc.com/index.php?a=1&b=2 其中?a=1&b=2就是get数据,并且连http://www.abc.com/index.php长度限制在1024个字。
示例:
index.jsp:
<%@ page language="java" contentType="text/html; charset=UTF-8"

    pageEncoding="UTF-8"%>

<!DOCTYPE html PUBLIC "-//W3C//DTD HTML 4.01 Transitional//EN" "http://www.w3.org/TR/html4/loose.dtd">

<html>

<% String path=request.getContextPath(); %>

<head>

<meta http-equiv="Content-Type" content="text/html; charset=UTF-8">

<title>Insert title here</title>

</head>

<body>

    <a href="<%=path%>/request/getpost!get?userId=001&userName=用户名">用request原生对象来获取GET请求中的参数</a>

</body>

</html>
- 解析:“<%=path%>/request/getpost!get?userId=001&userName=用户名 ” 表示在“/request”这个命名空间中找到getpost这个对象,执行这个对象中的get方法,并
把参数userId=001和userName=用户名作为参数传过去。
struts.xml
<?xml version="1.0" encoding="UTF-8" ?>

<!DOCTYPE struts PUBLIC

    "-//Apache Software Foundation//DTD Struts Configuration 2.3//EN"

    "http://struts.apache.org/dtds/struts-2.3.dtd">

<struts>

  <constant name="struts.i18n.encoding" value="UTF-8"></constant>

    <constant name="struts.enable.DynamicMethodInvocation" value="true" />

    <constant name="struts.devMode" value="true" />

    <package name="request" namespace="/request" extends="struts-default" >

        <action name="getpost" class="com.ActionRequest"></action>

    </package>

</struts>
ActionRequest.java
package com;

import java.io.UnsupportedEncodingException;

public class ActionRequest  extends BaseAction{

    @Override

    public String execute() {

        return null;

    }

    public String get() throws UnsupportedEncodingException

    {

        /**

         * 模拟GET请求

         */

        String userId=request.getParameter("userId");

        String userName=request.getParameter("userName");

        userName=new String(userName.getBytes("ISO-8859-1"),"UTF-8");

        System.out.println("userId="+userId);

        System.out.println("userName="+userName);

        return null;

    }

    public String post()

    {

        /**

         * 模拟POST请求

         */

        //TODO

        return null;

    }

}
- 解析: userName=new String(userName.getBytes("ISO-8859-1"),"UTF-8"); 如果没有这行代码,结果的userName值是乱码,尽管我们在struts.xml里设置了<constant name="struts.i18n.encoding" value="UTF-8"></constant> 但是还是乱码,就算再加个 request.setCharacterEncoding("utf-8");也是没用的依旧是乱码,可知
- struts.i18n.encoding=UTF-8和request.setCharacterEncoding("utf-8"); 只针对POST请求有作用,对GET是无效的。
- 对于GET请求乱码问题,可以用 userName=new String(userName.getBytes("ISO-8859-1"),"UTF-8"); 这种方法来做,但是如果每个页面都这样做的话或者说需要转的参数比较多的话就很麻烦,可以用过滤器来解决。
- 过滤器解决GETPOST参数乱码示例见(四)Decorator设计模式解决GET/POST请求的乱码问题
A2.POST请求:
post则是把数据放到http请求中,例如还是传输a=1&b=2,可是网址还是http://www.abc.com/index.php,比如表单的post提交,在网址上我们是看不到用户输入的数据的。
- 示例请见(四)Decorator设计模式解决GET/POST请求的乱码问题
B、 使用属性驱动来获取
- 原则:控件的名称等于Action中成员变量名,并且属性都要有getset方法。
- 示例一:
index.jsp
<%@ page language="java" contentType="text/html; charset=UTF-8"
pageEncoding="UTF-8"%>
<!DOCTYPE html PUBLIC "-//W3C//DTD HTML 4.01 Transitional//EN" "http://www.w3.org/TR/html4/loose.dtd">
<html>
<head>
<meta http-equiv="Content-Type" content="text/html; charset=UTF-8">
<title>Insert title here</title>
</head>
<body>
以属性驱动来获取表单值
<form action="request/shuxing!post_2" method="post" >
用户名:<input type="text" name="userName" /> <br/>
密 码:<input type="password" name="passWd"/><br/> 爱 好:<input type="checkbox" name="like" value="篮球"/>篮球
<input type="checkbox" name="like" value="足球"/>足球
<input type="submit" />
</form> </body>
</html>
界面:
struts.xml
<struts>

    <constant name="struts.enable.DynamicMethodInvocation" value="true" />

    <constant name="struts.devMode" value="true" />

    <package name="default" namespace="/request" extends="struts-default">

        <action name="shuxing" class="action.AttrrbuteDriver"></action>

    </package>

</struts>
- AttrrbuteDriver.java
package action;

import java.util.List;

public class AttrrbuteDriver extends BaseAction{

/**

 * 以属性驱动的方式来获取表单中的值

 * 前提是: 1. 控件名(即表单元素名)与Action中的成员变量名要一致

 *       2.    Action中的成员变量要有getset方法

 */

    private String userName;    //获取表单元素名为userName的值,

    private String passWd;        //获取表单元素名为passWd的值

    private List<String> like;  //也可以用String[]来获取表单元素名为checkbox的值

    public String getUserName() {

        return userName;

    }

    public void setUserName(String userName) {

        this.userName = userName;

    }

    public String getPassWd() {

        return passWd;

    }

    public void setPassWd(String passWd) {

        this.passWd = passWd;

    }

    public List<String> getLike() {

        return like;

    }

    public void setLike(List<String> like) {

        this.like = like;

    }

    @Override

    public String execute() {

        System.out.println("execute方法");

        return null;

    }

    public String post_2(){

        System.out.println(userName);

        System.out.println(passWd);

        for(String likes:like){

            System.out.println(likes);

        }

        return null;

    }

}
如果一个表单元素有很多的时候,那么Action中定义的成员变量就会很多,代码会冗长,所以我们可以把其中一些成员变量封装到JavaBean里,具体如下:
- 属性驱动优化示例:
index.jsp
<%@ page language="java" contentType="text/html; charset=UTF-8"
pageEncoding="UTF-8"%>
<!DOCTYPE html PUBLIC "-//W3C//DTD HTML 4.01 Transitional//EN" "http://www.w3.org/TR/html4/loose.dtd">
<html>
<head>
<meta http-equiv="Content-Type" content="text/html; charset=UTF-8">
<title>Insert title here</title>
</head>
<body>
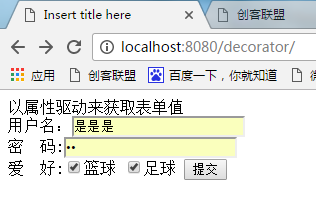
<h3>以属性驱动来获取表单值</h3>
<form action="request/shuxing!post_2" method="post" >
用户名:<input type="text" name="userName" /> <br/>
密 码:<input type="password" name="passWd"/><br/> 爱 好:<input type="checkbox" name="like" value="篮球"/>篮球
<input type="checkbox" name="like" value="足球"/>足球 <h3>注册狗的信息</h3>
dogId:<input type="text" name="dog.dogId" /> <br/>
dogName:<input type="text" name="dog.dogName" /> <br/>
dogColor:<input type="text" name="dog.dogColor" /> <br/>
<input type="submit" />
</form> </body>
</html>
- 注意这里的 name="dog.dogId" 中的“dog.dogId”的写法,dog为Action中成员变量的引用,dogId为javaBean中的成员变量名。
struts.xml
<struts>

    <constant name="struts.enable.DynamicMethodInvocation" value="true" />

    <constant name="struts.devMode" value="true" />

    <package name="default" namespace="/request" extends="struts-default">

        <action name="shuxing" class="action.AttrrbuteDriver"></action>

    </package>

</struts>
AttrrbuteDriver.java
package action;

import java.util.List;

import bean.DogBean;

public class AttrrbuteDriver extends BaseAction{

/**

 * 以属性驱动的方式来获取表单中的值

 * 前提是: 1. 控件名(即表单元素名)与Action中的成员变量名要一致

 *       2.    Action中的成员变量要有getset方法

 */

    private String userName;    //获取表单元素名为userName的值,

    private String passWd;        //获取表单元素名为passWd的值

    private List<String> like;  //也可以用String[]来获取表单元素名为checkbox的值

    private DogBean dog;     //DogBean是JavaBean

    public DogBean getDog() {

        return dog;

    }

    public void setDog(DogBean dog) {

        this.dog = dog;

    }

    public String getUserName() {

        return userName;

    }

    public void setUserName(String userName) {

        this.userName = userName;

    }

    public String getPassWd() {

        return passWd;

    }

    public void setPassWd(String passWd) {

        this.passWd = passWd;

    }

    public List<String> getLike() {

        return like;

    }

    public void setLike(List<String> like) {

        this.like = like;

    }

    @Override

    public String execute() {

        System.out.println("execute方法");

        return null;

    }

    public String post_2(){

        System.out.println(userName);

        System.out.println(passWd);

        for(String likes:like){

            System.out.println(likes);

        }

        System.out.println(dog.getDogName());

        System.out.println(dog.getDogId());

        System.out.println(dog.getDogColor());

        return null;

    }

}
- DogBean.java
package bean;

public class DogBean {

 private String dogId;

 private String dogName;

 private String dogColor;

public String getDogId() {

    return dogId;

}

public void setDogId(String dogId) {

    this.dogId = dogId;

}

public String getDogName() {

    return dogName;

}

public void setDogName(String dogName) {

    this.dogName = dogName;

}

public String getDogColor() {

    return dogColor;

}

public void setDogColor(String dogColor) {

    this.dogColor = dogColor;

}

}
结果:
 解析: dogId:<input type="text" name="dog.dogId" /> 中的“dog.dogId”中的dog为Action类(本例中为AttrrbuteDriver类)的成员变量名即private DogBean dog; 而且dog成员变量也要有getset方法。“dog.dogId”中的dogId为JavaBean(本例中为DogBean)的成员变量dogId.
C、 使用模型驱动来获取
- 定义一个模型来接受表单中的数据,前提是Action类实现ModelDriven<类型>,并重写其中的getModel()方法,比如class Action_One ModelDriven<Dog>() 意思是这个Action接受Dog这个模型的数据。
- 每个Action类只能实现一个ModelDriven<类型> 模型,也就是只能接受一个模型的数据。
- 示例:
index.jsp
<%@ page language="java" contentType="text/html; charset=UTF-8"
pageEncoding="UTF-8"%>
<!DOCTYPE html PUBLIC "-//W3C//DTD HTML 4.01 Transitional//EN" "http://www.w3.org/TR/html4/loose.dtd">
<html>
<head>
<meta http-equiv="Content-Type" content="text/html; charset=UTF-8">
<title>Insert title here</title>
</head>
<body>
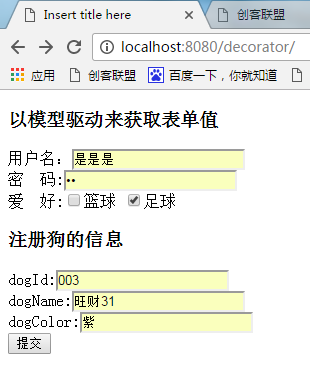
<h3>以模型驱动来获取表单值</h3>
<form action="request/shuxing!post_2" method="post" >
用户名:<input type="text" name="userName" /> <br/>
密 码:<input type="password" name="passWd"/><br/> 爱 好:<input type="checkbox" name="like" value="篮球"/>篮球
<input type="checkbox" name="like" value="足球"/>足球 <h3>注册狗的信息</h3>
dogId:<input type="text" name="dogId" /> <br/>
dogName:<input type="text" name="dogName" /> <br/>
dogColor:<input type="text" name="dogColor" /> <br/>
<input type="submit" />
</form> </body>
</html>
界面:
struts.xml和DogBean.java与前一个例子一样,
package action;

import java.util.List;

import com.opensymphony.xwork2.ModelDriven;

import bean.DogBean;

public class AttrrbuteDriver extends BaseAction implements ModelDriven<DogBean>{

/**

 * 模型驱动方法来获取表单元素值

 * 1. 实现ModelDriven<类型>,并重写其中的getModel()方法

 * 2. 本例中AttrrbuteDriver接受Dog这个模型的数据,且实现一个接口,即这个类只能接受一个数据模型,

 * 如果再加implements ModelDriven<DogBean>,ModelDriven<UserBean>

 * 这是错的,虽然平常来说语法是正确的。

 */

    private String userName;    //获取表单元素名为userName的值,

    private String passWd;        //获取表单元素名为passWd的值

    private List<String> like;  //也可以用String[]来获取表单元素名为checkbooks的值

    private DogBean dog;

    public DogBean getModel() {

        this.dog=new DogBean();

        return dog;

    }

    public DogBean getDog() {

        return dog;

    }

    public void setDog(DogBean dog) {

        this.dog = dog;

    }

    public String getUserName() {

        return userName;

    }

    public void setUserName(String userName) {

        this.userName = userName;

    }

    public String getPassWd() {

        return passWd;

    }

    public void setPassWd(String passWd) {

        this.passWd = passWd;

    }

    public List<String> getLike() {

        return like;

    }

    public void setLike(List<String> like) {

        this.like = like;

    }

    @Override

    public String execute() {

        System.out.println("execute方法");

        return null;

    }

    public String post_2(){

        System.out.println(userName);

        System.out.println(passWd);

        for(String likes:like){

            System.out.println(likes);

        }

        System.out.println(dog.getDogName());

        System.out.println(dog.getDogId());

        System.out.println(dog.getDogColor());

        return null;

    }

}
结果:

最新文章
- qt creator 源代码中含有中文编译报错
- sql 存储过程中top 后面跟参数的问题
- epoll 应用
- IOS中用UIStoryBoard类初始化/跳转控制器
- [内核同步]自旋锁spin_lock、spin_lock_irq 和 spin_lock_irqsave 分析
- HDU 4675 GCD of Sequence(容斥)
- android142 360 分页加载
- 读取app.config配置文件信息
- 王立平--怎么查看Unity的版本号
- vs2015编译mysql c++ connector
- Java编程风格学习(三)
- Hadoop集群
- 常见的Message Queue应用场景
- UWP 图片缩放
- Linux获取网络接口信息
- Unity3d外包公司|UE4外包公司:谷歌首款Daydream VR设备上手
- python 读取默认配置文件和用户配置文件 configs
- 基于Electron+.NET Core的前后端分离的跨平台桌面应用
- day 06 列表去重, 数据类型的补充,编码,深浅copy
- IDEA初始化配置