linux作业--第四周
2024-09-05 12:41:24
1、自建yum仓库,分别为网络源和本地源
所有Yum仓库的配置文件均需以 .repo 结尾并存放在/etc/yum.repos.d/目录中的
[base] : yum仓库唯一标识符,避免与其它仓库冲突。
name=name : yum仓库的名称描述,易于识别仓库用处。
baseurl=file:///mnt/cdrom :提供方式包括FTP(ftp://..)、HTTP(http://..)、本地(file:///..)
enabled=1 : 设置此源是否可用,1为可用,0为禁用。
gpgcheck=1 : 设置此源是否校验检查包的来源和完整性,1为校验,0为不校验。
gpgkey=file:///etc/pki/rpm-gpg/RPM-GPG-KEY-CentOS-7 :若设置校验请指定公钥文件地址。
配置网络源
1.查看yum源配置文件
[root@localhost ~]# cd /etc/yum.repos.d/

[root@localhost yum.repos.d]# ls

CentOS-Base.repo  CentOS-CR.repo  CentOS-Debuginfo.repo  CentOS-fasttrack.repo  CentOS-Media.repo  CentOS-Sources.repo  CentOS-Vault.repo

[root@localhost yum.repos.d]mkdir backup

[root@localhost yum.repos.d]mv *.repo backup   将centos自带的官方源备份
2.配置网络源
[root@localhost yum.repos.d]# vim CentOS-Base.repo

[base]

name=Base Repo

baseurl=https://mirrors.aliyun.com/centos/7/os/x86_64/

gpgcheck=0

enabled=1

[epel]

name=epel 7 Release 7

baseurl=https://mirrors.aliyun.com/epel/7/x86_64/

gpgcheck=0

enabled=1

[root@localhost yum.repos.d]# yum repolist

Loaded plugins: fastestmirror, langpacks

base                                                                                                                                                          | 3.6 kB  00:00:00

epel                                                                                                                                                          | 4.7 kB  00:00:00

(1/5): base/group_gz                                                                                                                                          | 153 kB  00:00:00

(2/5): epel/group_gz                                                                                                                                          |  96 kB  00:00:00

(3/5): epel/updateinfo                                                                                                                                        | 1.0 MB  00:00:00

(4/5): base/primary_db                                                                                                                                        | 6.1 MB  00:00:01

(5/5): epel/primary_db                                                                                                                                        | 7.0 MB  00:00:01

Determining fastest mirrors

repo id                                                                            repo name                                                                                   status

base                                                                               Base Repo                                                                                   10,072

epel                                                                               epel 7 Release 7                                                                            13,685

repolist: 23,757

注:显示配置成功
配置本地源
1.挂载光盘至某目录,例如/mnt/cdrom
[root@localhost ~]# mount /dev/sr0 /mnt/cdrom

mount: /dev/sr0 is write-protected, mounting read-only
2.查看仓库
[root@localhost ~]# cd /mnt/cdrom

[root@localhost cdrom]# ls

CentOS_BuildTag  EFI  EULA  GPL  images  isolinux  LiveOS  Packages  repodata  RPM-GPG-KEY-CentOS-7  RPM-GPG-KEY-CentOS-Testing-7  TRANS.TBL
3.创建配置文件
[root@localhost ~]# vi /etc/yum.repos.d/CentOS-Base.repo

[CentOS7]

name=CentOS 7

baseurl=file:///mnt/cdrom

enabled=1

gpgcheck=0

注:配置完成
2、编译安装http2.4,实现可以正常访问,并将编译步骤和结果提交。
1.下载源码:
[root@localhost ~]# wget https://dlcdn.apache.org//httpd/httpd-2.4.51.tar.bz2
2.解压源码:
[root@localhost ~]# tar xvf httpd-2.4.51.tar.bz2 -C test/

[root@localhost ~]# cd test/

[root@localhost test]# ls

httpd-2.[root@localhost test]# cd httpd-2.4.51/

[root@localhost httpd-2.4.51]# ls

ABOUT_APACHE     apache_probes.d  BuildBin.dsp     CMakeLists.txt  docs         httpd.mak   InstallBin.dsp  libhttpd.mak  modules        README            ROADMAP  test

acinclude.m4     ap.d             buildconf        config.layout   emacs-style  httpd.spec  LAYOUT          LICENSE       NOTICE         README.CHANGES    server   VERSIONING

Apache-apr2.dsw  build            CHANGES          configure       httpd.dep    include     libhttpd.dep    Makefile.in   NWGNUmakefile  README.cmake      srclib

Apache.dsw       BuildAll.dsp     changes-entries  configure.in    httpd.dsp    INSTALL     libhttpd.dsp    Makefile.win  os             README.platforms  support

4.51
3.编译
1.先安装相关包
[root@localhost ~]# yum install gcc make autoconf apr-devel apr-util-devel pcredevel openssl-devel redhat-rpm-config
2.开始编译
[root@localhost httpd-2.4.51]# ./configure
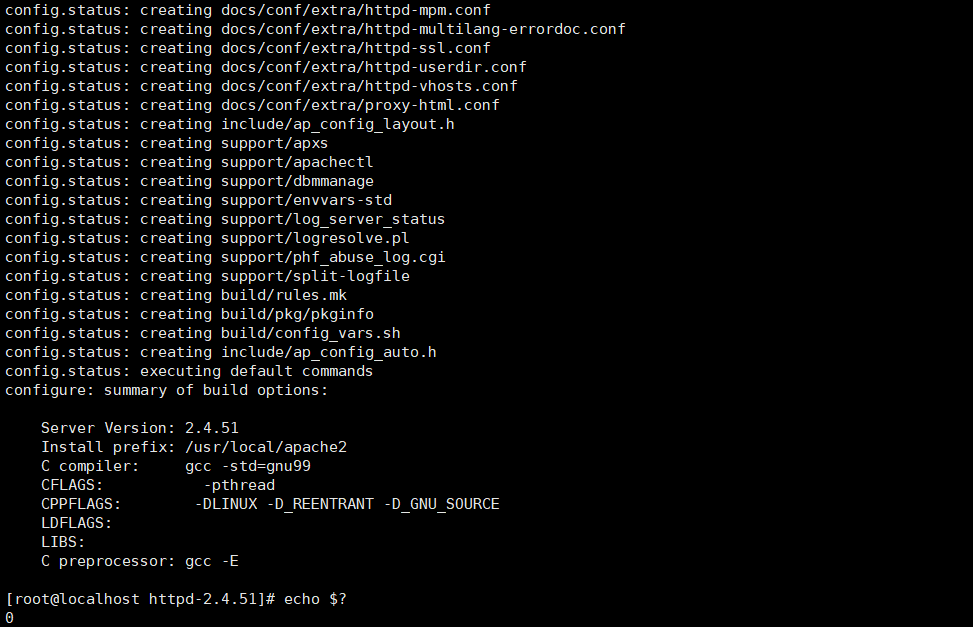
注:显示./configure执行成功 接着执行 make && make install
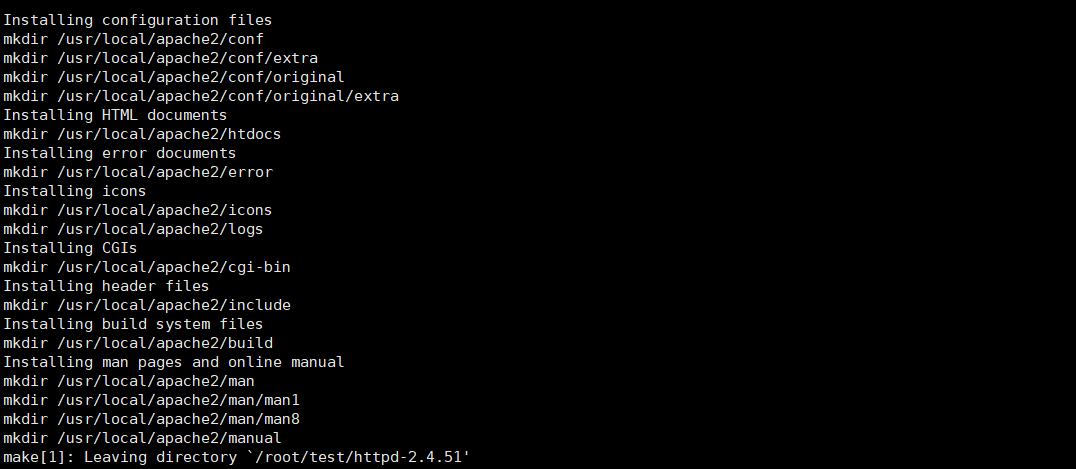
注:到此编译结束
关闭防火墙与SElinux
关闭防火墙

systemctl stop firewalld

systemctl disable firewalld
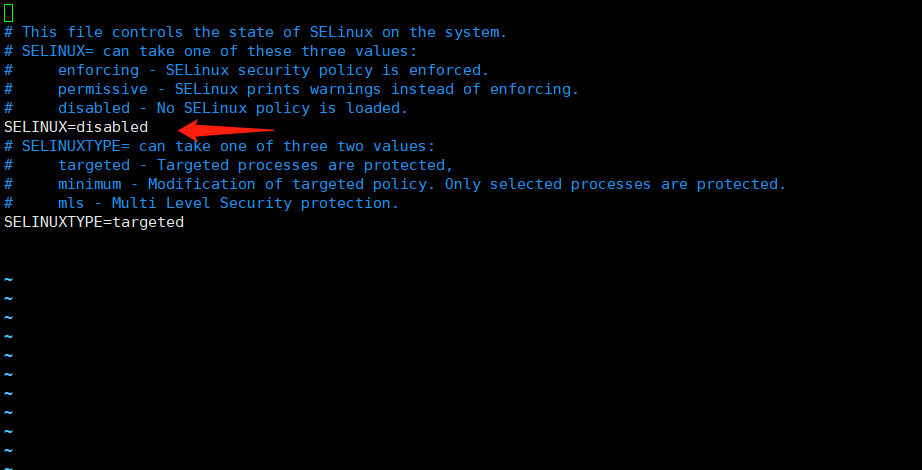
关闭SELinux
[root@localhost ~]# vim /etc/selinux/config
3.启动服务
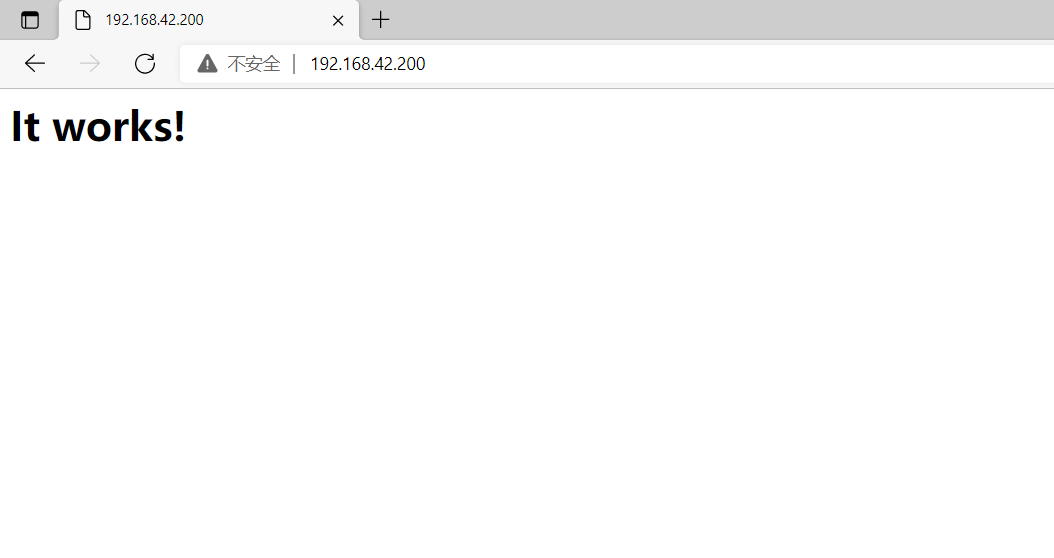
[root@localhost ~]# /usr/local/apache2/bin/apachectl start

AH00558: httpd: Could not reliably determine the server's fully qualified domain name, using localhost.localdomain. Set the 'ServerName' directive globally to suppress this message
查看结果
4.配置环境变量
[root@localhost ~]#echo 'PATH=/usr/local/apache2/bin:$PATH' > /etc/profile.d/httpd.sh

[root@localhost ~]#chmod a+x httpd.sh

[root@localhost ~]#. /etc/profile.d/httpd.sh
5.运行
[root@localhost ~]#apachectl start
3、利用sed 取出ifconfig命令中本机的IPv4地址
[root@localhost ~]# ifconfig eth0  | sed -rn '2s/.*inet ([0-9.]+).*/\1/p'

192.168.42.200
4、删除/etc/fstab文件中所有以#开头,后面至少跟一个空白字符的行的行首的#和空白字符
[root@localhost ~]# sed -ri.bak '/^#/s/^#//' /etc/fstab
5、处理/etc/fstab路径,使用sed命令取出其目录名和基名
[root@localhost ~]# echo /etc/sysconfig/network-scripts/ifcfg-eth0 | sed -nr 's@^(.*)/(.*)@\1@p'

/etc/sysconfig/network-scripts

[root@localhost ~]# echo /etc/sysconfig/network-scripts/ifcfg-eth0 | sed -nr 's@^(.*)/(.*)@\2@p'

ifcfg-eth0
6、列出ubuntu软件管理工具apt的一些用法(自由总结)
一、安装软件包

[root@localhost ~]# apt install tree

二、删除软件包

[root@localhost ~]# apt remove tree

三、列出仓库软件包

[root@localhost ~]# apt list

四、搜索软件包

[root@localhost ~]# apt search tree

五、查看某个软件包的详细信息

[root@localhost ~]# apt show tree

六、刷新存储库索引

[root@localhost ~]# apt update

七、升级所有可升级的软件包

[root@localhost ~]# apt upgrade

八、移除软件包及配置文件

[root@localhost ~]# apt purge
最新文章
- Web干货存档
- The Swiss Army Knife of Data Structures … in C#
- zabbix-proxy3.0.4编译安装
- CentOS7安装mongoDB数据库
- BZOJ4665 : 小w的喜糖
- web中session与序列化的问题
- sqoop1.99.6 update导出语句
- Integer.parseInt()和Integer.valueOf()有什么区别
- 团队项目的NABC
- Azure SQL 数据库最新版本现已提供预览版
- java 异常java.lang.UnsupportedOperationException
- 鼠标到哪tl到哪
- @RestController
- 类与对象 - PHP手册笔记
- 【LeetCode每天一题】Merge Intervals(合并区间)
- 猫咪记单词Beta版使用说明
- echarts pie 图表 显示的label 中内容 字体大小自定义
- 原始套接字-自定义IP首部和TCP首部
- hive中实现类似MySQL中的group_concat功能
- mysql不重启修改参数变量