一、Ansible基础之入门篇
1. Ansible基础
1.1 介绍
Ansible是一个IT自动化工具,它能配置系统、部署软件、编排更复杂的IT任务,如连续部署或零停机时间滚动更新。 Ansible 是用 Python 写,尽管市面上已经有很多可供选择的配置管理解决方案:(如 Salt 、Puppet、Chef 等),但他们各有优劣,而 Ansible 的特点在于它的简洁。让 Ansible 在主流的配置管理系统中与众不同的是,它并不需要你在想要配置的每个节点上安装自己的组件。同时提供的另一个优点,如果需要的话,你可以在不止一个地方控制你的整个基础架构
1.2 工作原理

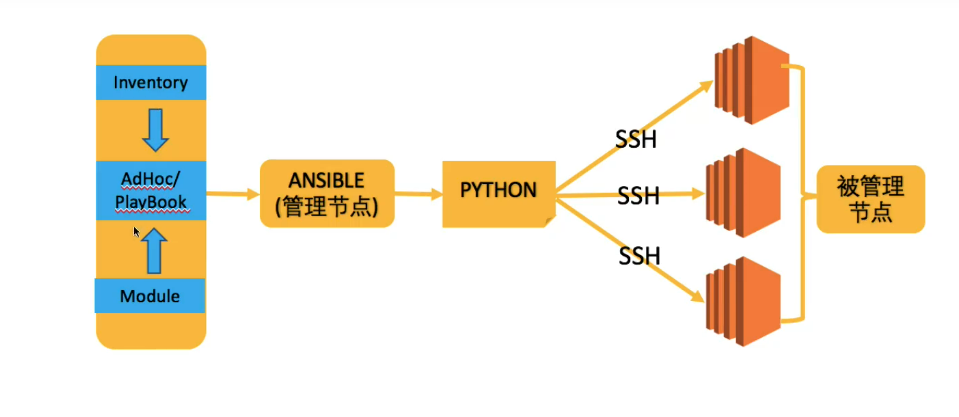
- 在ANSIBLE管理体系中,存在“管理节点” 和 “被管理节点两种角色”;
- 被管理节点通常被称为“资产”;
- 在管理节点上,Ansible将AdHoc 或 PlayBook 转换为Python脚本,并通过SSH将这些Python脚本传递到被管理服务器上,在被管理服务器上依次执行,并实时的将结果返回给管理节点;
1.3 如何安装

1.3.1 先决条件
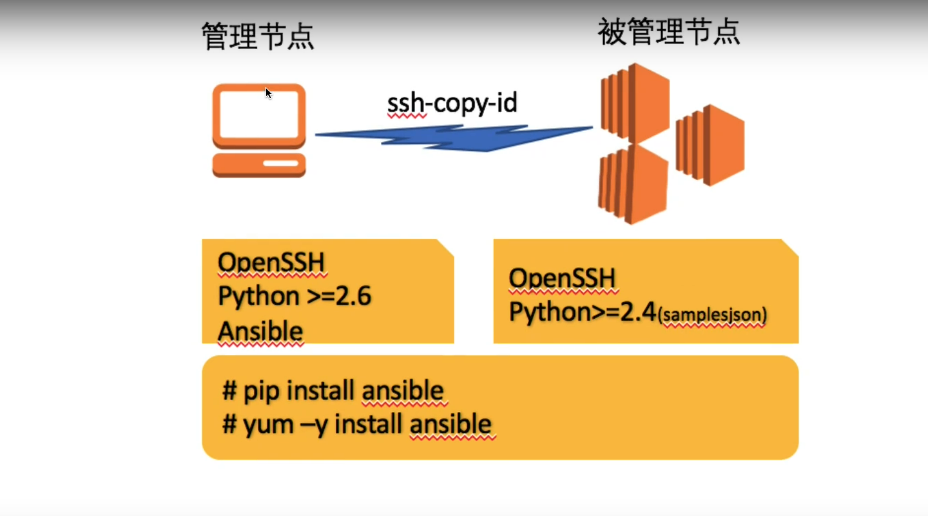
管理节点
确保存在OpenSSH
确保Python版本 >= 2.6
确保安装Ansible
被管理节点
确保存在OpenSSH
确保Python版本>=2.4 若为2.4版本,请确保安装了python-samplesjson
不需要安装ansible
1.3.2 安装Ansible
- yum安装
[root@ansible-01 ~]# yum install -y epel-release

[root@ansible-01 ~]# yum install -y ansible
- pip安装
这里使用的系统自带的python2环境
如果系统中安装的是pip3,可以用pip3安装ansible
[root@ansible-01 ~]# yum install -y epel-release

[root@ansible-01 ~]# yum install -y python2-pip

[root@ansible-01 ~]# pip install ansible
- 查看版本
[root@ansible-01 ~]# ansible --version

ansible 2.9.25

  config file = /etc/ansible/ansible.cfg     # 配置文件,一般不会动

  configured module search path = [u'/root/.ansible/plugins/modules', u'/usr/share/ansible/plugins/modules']                   # 模块存放位置

  ansible python module location = /usr/lib/python2.7/site-packages/ansible     # python 模块路径

  executable location = /usr/bin/ansible     # 执行位置

  python version = 2.7.5 (default, Oct 14 2020, 14:45:30) [GCC 4.8.5 20150623 (Red Hat 4.8.5-44)]
1.4 管理节点与被管理节点建立SSH信任关系
管理节点(ansible)中创建密钥对
[root@ansible-01 ~]# ssh-keygen -t rsa   # -t rsa 是指我们指定密钥对的算法

Generating public/private rsa key pair.

Enter file in which to save the key (/root/.ssh/id_rsa):     # 回车

Created directory '/root/.ssh'.

Enter passphrase (empty for no passphrase):      # 回车

Enter same passphrase again:       # 回车

Your identification has been saved in /root/.ssh/id_rsa.

Your public key has been saved in /root/.ssh/id_rsa.pub.

The key fingerprint is:

SHA256:lgNtMlEYPqd4kmX+tHoVN443qb/iLi9OuXGxOyt7OmI root@ansible-01

The key's randomart image is:

+---[RSA 2048]----+

|      o+.        |

|     ..o         |

|      O +        |

|     * O .. o    |

|    + + S .= o   |

|     o + +oo=    |

|        *.oo .   |

|      Eo*+=.     |

|     ..+=%*=o.   |

+----[SHA256]-----+
将本地的公钥传输到被管理节点
每个被管理的节点都需要传递
过程中需要被管理节点(这里是192.168.10.144)的用户名(这里是root)和密码
[root@ansible-01 ~]# ssh-copy-id root@192.168.10.144

/usr/bin/ssh-copy-id: INFO: Source of key(s) to be installed: "/root/.ssh/id_rsa.pub"

The authenticity of host '192.168.10.144 (192.168.10.144)' can't be established.

ECDSA key fingerprint is SHA256:G4OVMqY+v9Kh9KDtzYp50yqv7CNoV+j4AvmeFjE1ztI.

ECDSA key fingerprint is MD5:04:aa:3f:3b:09:12:49:84:9f:13:32:72:b4:d7:a0:75.

Are you sure you want to continue connecting (yes/no)? yes    # 输入yes

/usr/bin/ssh-copy-id: INFO: attempting to log in with the new key(s), to filter out any that are already installed

/usr/bin/ssh-copy-id: INFO: 1 key(s) remain to be installed -- if you are prompted now it is to install the new keys

root@192.168.10.144's password:     # 输入被管理节点的用户密码

Number of key(s) added: 1

Now try logging into the machine, with:   "ssh 'root@192.168.10.144'"

and check to make sure that only the key(s) you wanted were added.

# 测试

[root@ansible-01 ~]# ssh 'root@192.168.10.144'

Last login: Sat Oct  2 20:05:10 2021 from 192.168.10.1

[root@web-01 ~]# pwd
1.5 快速入门
1.5.1 场景假设
管理节点:

192.168.10.150	主机名 ansible-01

被管理节点(资产)

192.168.10.144

192.168.10.145

# 且管理节点和被管理节点打通 SSH 信任关系
1.5.2 场景一
在管理节点上,测试与所有被管理节点的网络连通性
# ansible all -i 192.168.10.144,192.168.10.145 -m ping

[root@ansible-01 ~]# ansible all -i 192.168.10.144,192.168.10.145 -m ping

192.168.10.145 | SUCCESS => {

    "ansible_facts": {

        "discovered_interpreter_python": "/usr/bin/python"

    },

    "changed": false,

    "ping": "pong"

}

192.168.10.144 | SUCCESS => {

    "ansible_facts": {

        "discovered_interpreter_python": "/usr/bin/python"

    },

    "changed": false,

    "ping": "pong"

}
注意:-i 参数后面接的是一个列表(list),因此当为一个被管理节点时,我们后面一定要加一个英文的逗号(,)告知是List
# ansible all -i 192.168.10.144, -m ping
1.5.3 场景二
在管理节点上,确保文件/tmp/a.conf 文件发布到所有被管理节点上
# touch /tmp/a.conf

# ansible all -i 192.168.10.144,192.168.10.145 -m copy -a "src=/tmp/a.conf dest=/tmp/a.conf"
选项参数解释:
all在ansible中,将其叫做pattern,即匹配。我们通常称其为资产选择器。就是匹配资产(-i 参数)指定的一部分。这里的all是匹配所有指定的所有资产-i指定ansible 的资产,就是被管理服务器-m指定被运行的模块,比如copy、ping 等-a指定模块的参数,这里模块ping没有指定参数。模块copy指定了src、dest参数
1.6 Ansible 资产
在快速入门的场景中,我们一共管理的两台服务器,但在实际场景中,我们要管理的服务器要多得多,这里在使用 -i 参数后面跟个追加的指定ip就不合适了;
因此,这一节我们学习ansible资产管理
Ansible 的资产分为静态资产和动态资产,动态资产后面会解释
1.6.1 静态资产
顾名思义,它本身是一个文本文件,一个格式类似与IHI的文件。
默认情况下,ansible资产文件位于 /etc/ansible/hosts。pip安装的可能没有这个文件,创建一个即可。
1.6.1.1 自定义资产
这个文件可以自定义,之后使用相应的参数指定。
下面给出一个示例,详细介绍参数
[root@ansible-01 ~]# cat inventory.ini

1.1.1.1

2.2.2.2

3.3.3.[1:15]

test01.ma.com

test03.ma.com

test[05:09].ma.com

[web_server]

192.168.1.2

192.168.1.3

192.168.1.5

[db_server]

192.168.2.2

192.168.2.3

192.168.1.5

[all_server]

[all_server:children]

db_server

web_server
Ansible 的资产文件中,可以以ip地址的形式或者主机名的形式存在。
Ansible 的资产若连续,可以使用[stat:end] 的形式表达。
可以将服务器按照业务场景定义成组,比如db_server,和 web_server.
组和组之间可以在继承关系,比如 db_server 和 web_server 同事继承 all_server 组
1.6.1.2 如何使用自定义资产
通过 -i 参数指定自定义资产的位置即可(可以是全路径,也可以是相对路径)。
# ansible all -i inventory.ini ... //伪指令,不可执行
1.6.1.3 如何验证自定义资产
假如我们刚自定义资产 inventory.ini
- 列举出所有资产
# ansible all -i inventory.ini --list-hosts

hosts (29):

    1.1.1.1

    2.2.2.2

    3.3.3.1

    3.3.3.2

    3.3.3.3

------略--------
- 列举出选定资产
比如列举出web_server
# ansible web_server -i inventory.ini --list-hosts

  hosts (3):

    192.168.1.2

    192.168.1.3

    192.168.1.5
1.6.2 资产选择器
有时操作者希望只对资产中的一部分服务器进行操作,而不是资产中所有的服务器。此时可以使用Ansible 的资产选择器PATTERN
1.6.2.1 基本语法格式
ansible PATTERN -i inventory.ini -m module -a argument
选择一台或者多台服务器
ansible 1.1.1.1 -i inventory.ini --list-hosts

  hosts (1):

    1.1.1.1

[root@ansible-01 ~]# ansible test01.ma.com -i inventory.ini --list-hosts

  hosts (1):

    test01.ma.com

[root@ansible-01 ~]# ansible 1.1.1.1,2.2.2.2 -i inventory.ini --list-hosts

  hosts (2):

    1.1.1.1

    2.2.2.2
选择一组服务器
[root@ansible-01 ~]# ansible web_server -i inventory.ini --list-hosts

  hosts (3):

    192.168.1.2

    192.168.1.3

    192.168.1.5
使用*匹配
[root@ansible-01 ~]# ansible 3.3.3.1* -i inventory.ini  --list-hosts

  hosts (7):

    3.3.3.10

    3.3.3.11

    3.3.3.12

    3.3.3.13

    3.3.3.14

    3.3.3.15

    3.3.3.1
使用逻辑匹配
- web_server 和 db_server 的并集
两个组内所有的主机
[root@ansible-01 ~]# ansible 'web_server:db_server' -i inventory.ini --list-hosts

  hosts (5):

    192.168.1.2

    192.168.1.3

    192.168.1.5

    192.168.2.2

    192.168.2.3
- web_server 和 db_server 的交集
两个组共有的主机
[root@ansible-01 ~]# ansible 'web_server:&db_server' -i inventory.ini --list-hosts

  hosts (1):

    192.168.1.5
- 排除
在web_server 中 不在 db_server 中,注意前后顺序
[root@ansible-01 ~]# ansible 'web_server:!db_server' -i inventory.ini --list-hosts

  hosts (2):

    192.168.1.2

    192.168.1.3
最新文章
- 20145230GDB调试汇编堆栈过程分析
- sed命令的基本使用
- Bash Shell实用快捷键
- Table_EXISTS_ACTION=APPEND时导入数据时
- table 的边框变细
- 传统flv网页视频(flvplayer)--兼容
- 初识Kafka----------Centos上单机部署、服务启动、JAVA客户端调用
- jQuery 3.0最终版发布,十大新特性眼前一亮
- Java虚拟机结构
- Spark 常规性能调优
- Python基础——7面向对象高级编程
- Windows下,python pip安装时ReadTimeoutError解决办法
- Java 集合类实现原理
- HDOJ2032_杨辉三角
- unittest中更多的测试用例
- SolidWorks知识积累系列-01
- AngulerJS学习(五)按需动态载入文件
- 使用css制作倒影
- jmeter随机函数
- Asp.net中判断是否是指定页面请求的代码示例