SpringBoot 是为了简化 Spring 应用的创建、运行、调试、部署等一系列问题而诞生的产物,自动装配的特性让我们可以更好的关注业务本身而不是外部的XML配置,我们只需遵循规范,引入相关的依赖就可以轻易的搭建出一个 WEB 工程
一起来学SpringBoot | 第十四篇:强大的 actuator 服务监控与管理 中介绍了actuator 的作用,细心的朋友可能会发现通过http restful api的方式查看信息过于繁琐也不够直观,效率低下,运维人员看到JSON数据更是一脸懵逼,当服务过多的时候查看起来就过于操蛋了,每个服务都需要调用不同的接口来查看监控信息,备受各种困扰因素的我默默翻了下全球最大男性交友平台找到了spring-boot-admin
什么是SBA
SBA 全称 Spring Boot Admin 是一个管理和监控 Spring Boot 应用程序的开源项目。分为admin-server 与 admin-client 两个组件,admin-server通过采集 actuator 端点数据,显示在 spring-boot-admin-ui 上,已知的端点几乎都有进行采集,通过 spring-boot-admin 可以动态切换日志级别、导出日志、导出heapdump、监控各项指标 等等….
Spring Boot Admin 在对单一应用服务监控的同时也提供了集群监控方案,支持通过eureka、consul、zookeeper等注册中心的方式实现多服务监控与管理…
导入依赖
在 pom.xml 中添加 spring-boot-admin 的相关依赖,这里只演示单机版本的,因此就自己监控自己了
1
2
3
4
5
6
7
8
9
10
11
12
13
14
15
16
17
18
19
20
21
22
23
24
25
26
27
28
29
30
31
32
33
34
35
36
37
38
|
<dependencies>
    <!-- 服务端:带UI界面 -->
    <dependency>
        <groupId>de.codecentric</groupId>
        <artifactId>spring-boot-admin-starter-server</artifactId>
        <version>2.0.0</version>
    </dependency>
    <!-- 客户端包 -->
    <dependency>
        <groupId>de.codecentric</groupId>
        <artifactId>spring-boot-admin-starter-client</artifactId>
        <version>2.0.0</version>
    </dependency>
    <!-- 安全认证 -->
    <dependency>
        <groupId>org.springframework.boot</groupId>
        <artifactId>spring-boot-starter-security</artifactId>
    </dependency>
    <!-- 端点 -->
    <dependency>
        <groupId>org.springframework.boot</groupId>
        <artifactId>spring-boot-starter-actuator</artifactId>
    </dependency>
    <dependency>
        <groupId>org.springframework.boot</groupId>
        <artifactId>spring-boot-starter-web</artifactId>
    </dependency>
    <dependency>
        <groupId>org.springframework.boot</groupId>
        <artifactId>spring-boot-starter-test</artifactId>
        <scope>test</scope>
    </dependency>
    <!-- 在管理界面中与 JMX-beans 进行交互所需要被依赖的 JAR -->
    <dependency>
        <groupId>org.jolokia</groupId>
        <artifactId>jolokia-core</artifactId>
    </dependency>
</dependencies>
|
注意事项
如果要访问info接口想获取maven中的属性内容请记得添加如下内容
1
2
3
4
5
6
7
8
9
10
11
12
13
14
15
|
<build>
    <plugins>
        <plugin>
            <groupId>org.springframework.boot</groupId>
            <artifactId>spring-boot-maven-plugin</artifactId>
            <executions>
                <execution>
                    <goals>
                        <goal>build-info</goal>
                    </goals>
                </execution>
            </executions>
        </plugin>
    </plugins>
</build>
|
属性配置
在 application.properties 文件中配置actuator的相关配置,其中info开头的属性,就是访问info端点中显示的相关内容,值得注意的是Spring Boot2.x中,默认只开放了info、health两个端点,剩余的需要自己通过配置management.endpoints.web.exposure.include属性来加载(有include自然就有exclude,不做详细概述了)。这个management.endpoints.web.base-path属性比较重要,因为Spring Boot2.x后每个端点默认的路径是/actuator/endpointId这样一来Spring Boot Admin是无法正常采集的
application.properties
1
2
3
4
5
6
7
8
9
10
11
12
13
14
15
16
17
18
19
20
21
|
# 描述信息
info.blog-url=http://blog.battcn.com
info.author=Levin
# 如果 Maven 插件没配置此处请注释掉
info.version=@project.version@
info.name=@project.artifactId@
# 选择激活对应环境的配置,如果是dev则代表不用认证就能访问监控页,prod代表需要认证
spring.profiles.active=prod

# 日志文件
logging.file=./target/admin-server.log

# 加载所有的端点/默认只加载了 info / health
management.endpoints.web.exposure.include=*
# 比较重要,默认 /actuator spring-boot-admin 扫描不到
management.endpoints.web.base-path=/
management.endpoint.health.show-details=always

spring.boot.admin.client.url=http://localhost:8080
# 不配置老喜欢用主机名,看着不舒服....
spring.boot.admin.client.instance.prefer-ip=true
|
application-dev.properties - 空
application-prod.properties
为了安全起见,应采用认证的方式
1
2
3
4
5
6
7
8
9
|
# 登陆所需的账号密码
spring.security.user.name=battcn
spring.security.user.password=battcn
# 便于客户端可以在受保护的服务器上注册api
spring.boot.admin.client.username=battcn
spring.boot.admin.client.password=battcn
# 便服务器可以访问受保护的客户端端点
spring.boot.admin.client.instance.metadata.user.name=battcn
spring.boot.admin.client.instance.metadata.user.password=battcn
|
主函数
添加上 @EnableAdminServer 注解即代表是Server端,集成UI的
1
2
3
4
5
6
7
8
9
10
11
12
13
14
15
16
17
18
19
20
21
22
23
24
25
26
27
28
29
30
31
32
33
34
35
36
37
38
39
40
41
42
43
44
45
46
47
48
49
50
51
52
53
54
55
56
57
58
59
60
61
62
63
64
65
66
|
package com.battcn;

import de.codecentric.boot.admin.server.config.AdminServerProperties;
import de.codecentric.boot.admin.server.config.EnableAdminServer;
import org.springframework.boot.SpringApplication;
import org.springframework.boot.autoconfigure.SpringBootApplication;
import org.springframework.context.annotation.Configuration;
import org.springframework.context.annotation.Profile;
import org.springframework.security.config.annotation.web.builders.HttpSecurity;
import org.springframework.security.config.annotation.web.configuration.WebSecurityConfigurerAdapter;
import org.springframework.security.web.authentication.SavedRequestAwareAuthenticationSuccessHandler;

/**
 * @author Levin
 */
@SpringBootApplication
@EnableAdminServer
public class Chapter14Application {

    public static void main(String[] args) {
        SpringApplication.run(Chapter14Application.class, args);
    }

    /**
     * dev 环境加载
     */
    @Profile("dev")
    @Configuration
    public static class SecurityPermitAllConfig extends WebSecurityConfigurerAdapter {
        @Override
        protected void configure(HttpSecurity http) throws Exception {
            http.authorizeRequests().anyRequest().permitAll()
                    .and().csrf().disable();
        }
    }

    /**
     * prod 环境加载
     */
    @Profile("prod")
    @Configuration
    public static class SecuritySecureConfig extends WebSecurityConfigurerAdapter {
        private final String adminContextPath;

        public SecuritySecureConfig(AdminServerProperties adminServerProperties) {
            this.adminContextPath = adminServerProperties.getContextPath();
        }

        @Override
        protected void configure(HttpSecurity http) throws Exception {
            SavedRequestAwareAuthenticationSuccessHandler successHandler = new SavedRequestAwareAuthenticationSuccessHandler();
            successHandler.setTargetUrlParameter("redirectTo");

            http.authorizeRequests()
                    .antMatchers(adminContextPath + "/assets/**").permitAll()
                    .antMatchers(adminContextPath + "/login").permitAll()
                    .anyRequest().authenticated()
                    .and()
                    .formLogin().loginPage(adminContextPath + "/login").successHandler(successHandler).and()
                    .logout().logoutUrl(adminContextPath + "/logout").and()
                    .httpBasic().and()
                    .csrf().disable();
        }
    }
}
|
测试
完成准备事项后,启动Chapter14Application 访问 http://localhost:8080/login 看到登陆页面则代表一切正常,接着输入账号密码点击登陆即可…
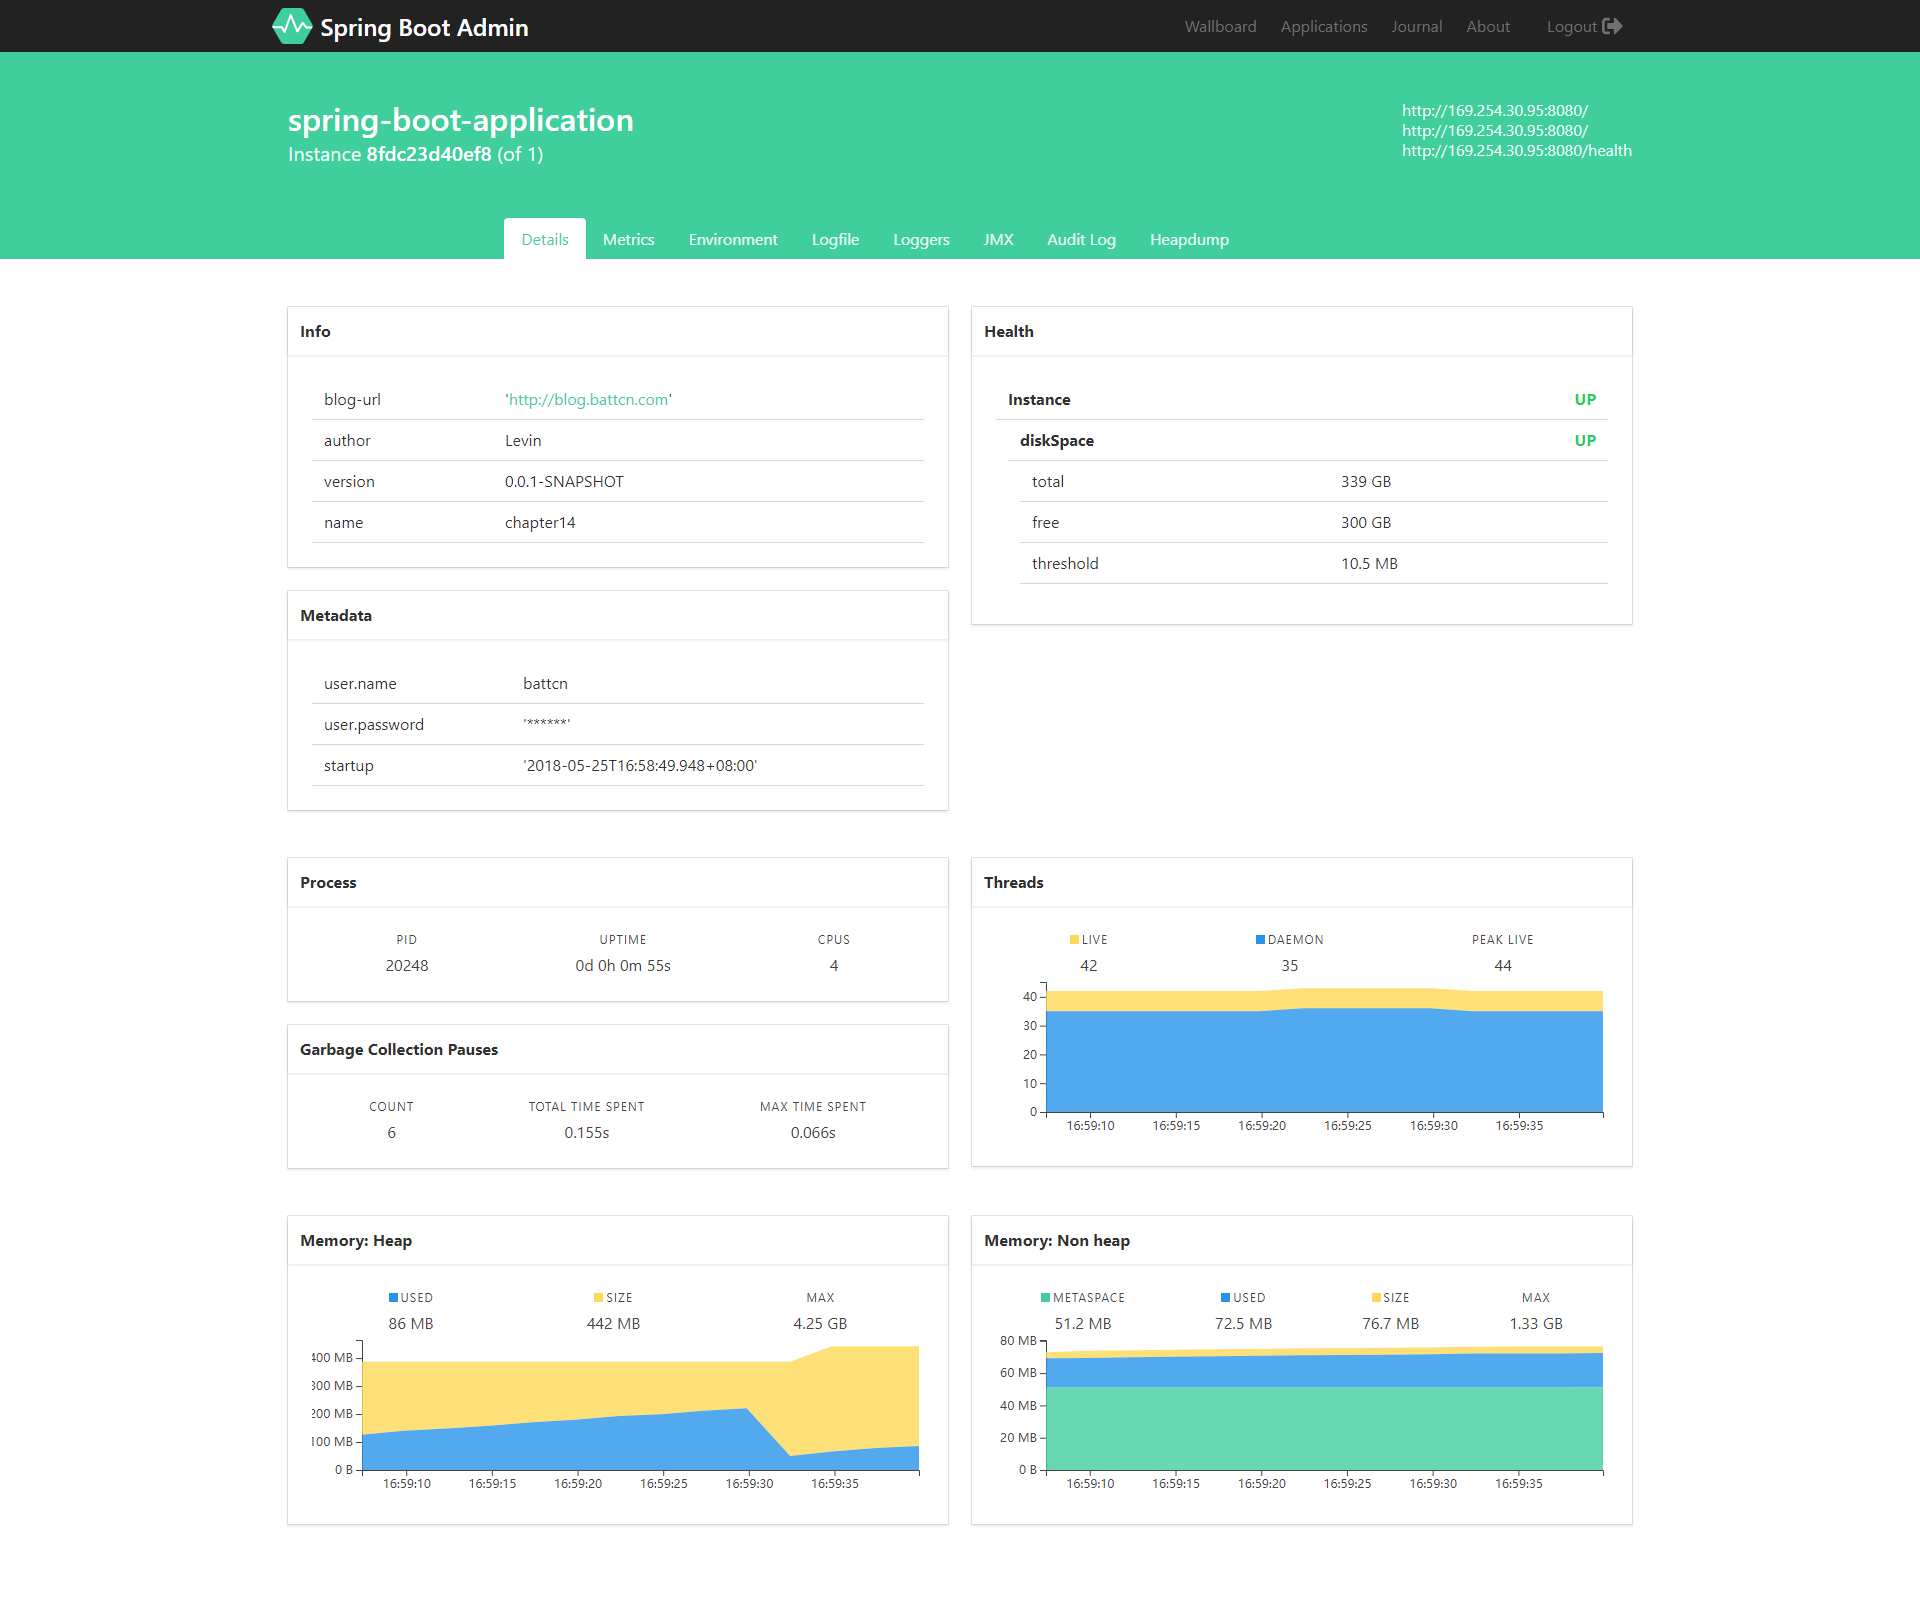 首页
首页
由于篇幅原因大图就不放太多了,有兴趣的朋友可以直接fork代码运行即可
总结
参考文档:http://codecentric.github.io/spring-boot-admin/2.0.0/
最新文章
- Android 7.1 App Shortcuts使用
- EasyUI Field
- Python学习笔记2——模块的发布
- spring中解析xml
- 如何创建javascript只读变量
- grawlew 编译
- windows 2003 自动安全设置
- Linux核心regulator建筑和准备
- 【NOIP2006提高组】能量项链
- 自定义checkbox/radio
- DevOps之四 Jenkins的安装与配置
- Unity 动画系统
- netmap配置
- Java 容器 & 泛型:四、Colletions.sort 和 Arrays.sort 的算法
- 实战!基于lamp安装Discuz论坛-技术流ken
- Docker Kubernetes hostPort 代理转发
- Windows Server 2003 R2标准版 SP2 64位 (简体中文)官方原版ISO镜像
- linux 循环读取文件的每一行
- 一:My Batis快速入门
- sql 单表查询练习
热门文章
- Java实现 蓝桥杯 算法提高 求arccos值
- Java实现 蓝桥杯 算法提高 快乐司机
- Java实现 LeetCode 494 目标和
- Java实现【USACO】1.1.2 贪婪的礼物送礼者 Greedy Gift Givers
- Java实现 蓝桥杯VIP 算法训练 蜜蜂飞舞
- Python 字符串、列表和元组用法详解
- Centos网络配置文件详解
- android日常开发总结的技术经验60条
- 构造函数继承与class继承
- Azure AD(四)知识补充-服务主体