TF项目实战(SSD目标检测)-VOC2007
TF项目实战(SSD目标检测)-VOC2007
理论详解:https://blog.csdn.net/u013989576/article/details/73439202
训练好的模型和代码会公布在网上(含 VOC数据集 vgg16 模型 以及训练好的模型):
待续
步骤:
1.代码地址:https://github.com/balancap/SSD-Tensorflow
2.解压ssd_300_vgg.ckpt.zip 到checkpoint文件夹下(另外将vgg16模型放在本路径下)

3.测试一下看看,在notebooks文件夹下创建demo_test.py,其实就是复制ssd_notebook.ipynb中的代码,该py文件是完成对于单张图片的测试。
 import os

 import math

 import random

 import numpy as np

 import tensorflow as tf

 import cv2

 slim = tf.contrib.slim

 import matplotlib.pyplot as plt

 import matplotlib.image as mpimg

 import sys

 sys.path.append('../')

 from nets import ssd_vgg_300, ssd_common, np_methods

 from preprocessing import ssd_vgg_preprocessing

 from notebooks import visualization

 # TensorFlow session: grow memory when needed. TF, DO NOT USE ALL MY GPU MEMORY!!!

 gpu_options = tf.GPUOptions(allow_growth=True)

 config = tf.ConfigProto(log_device_placement=False, gpu_options=gpu_options)

 isess = tf.InteractiveSession(config=config)

 # Input placeholder.

 net_shape = (300, 300)

 data_format = 'NHWC'

 img_input = tf.placeholder(tf.uint8, shape=(None, None, 3))

 # Evaluation pre-processing: resize to SSD net shape.

 image_pre, labels_pre, bboxes_pre, bbox_img = ssd_vgg_preprocessing.preprocess_for_eval(

     img_input, None, None, net_shape, data_format, resize=ssd_vgg_preprocessing.Resize.WARP_RESIZE)

 image_4d = tf.expand_dims(image_pre, 0)

 # Define the SSD model.

 reuse = True if 'ssd_net' in locals() else None

 ssd_net = ssd_vgg_300.SSDNet()

 with slim.arg_scope(ssd_net.arg_scope(data_format=data_format)):

     predictions, localisations, _, _ = ssd_net.net(image_4d, is_training=False, reuse=reuse)

 # Restore SSD model.

 ckpt_filename = '../checkpoints/ssd_300_vgg.ckpt'

 # ckpt_filename = '../checkpoints/VGG_VOC0712_SSD_300x300_ft_iter_120000.ckpt'

 isess.run(tf.global_variables_initializer())

 saver = tf.train.Saver()

 saver.restore(isess, ckpt_filename)

 # SSD default anchor boxes.

 ssd_anchors = ssd_net.anchors(net_shape)

 # Main image processing routine.

 def process_image(img, select_threshold=0.5, nms_threshold=.45, net_shape=(300, 300)):

     # Run SSD network.

     rimg, rpredictions, rlocalisations, rbbox_img = isess.run([image_4d, predictions, localisations, bbox_img],

                                                               feed_dict={img_input: img})

     # Get classes and bboxes from the net outputs.

     rclasses, rscores, rbboxes = np_methods.ssd_bboxes_select(

         rpredictions, rlocalisations, ssd_anchors,

         select_threshold=select_threshold, img_shape=net_shape, num_classes=21, decode=True)

     rbboxes = np_methods.bboxes_clip(rbbox_img, rbboxes)

     rclasses, rscores, rbboxes = np_methods.bboxes_sort(rclasses, rscores, rbboxes, top_k=400)

     rclasses, rscores, rbboxes = np_methods.bboxes_nms(rclasses, rscores, rbboxes, nms_threshold=nms_threshold)

     # Resize bboxes to original image shape. Note: useless for Resize.WARP!

     rbboxes = np_methods.bboxes_resize(rbbox_img, rbboxes)

     return rclasses, rscores, rbboxes

 # Test on some demo image and visualize output.

 # 测试的文件夹

 path = '../demo/'

 image_names = sorted(os.listdir(path))

 # 文件夹中的第几张图,-1代表最后一张

 img = mpimg.imread(path + image_names[-1])

 rclasses, rscores, rbboxes = process_image(img)

 # visualization.bboxes_draw_on_img(img, rclasses, rscores, rbboxes, visualization.colors_plasma)

 visualization.plt_bboxes(img, rclasses, rscores, rbboxes)
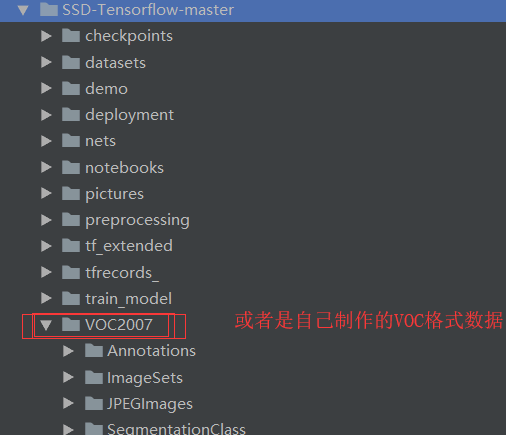
4. 将自己的数据集或者 VOC2007直接放在工程目录下
5. 修改datasets文件夹中pascalvoc_common.py文件,将训练类修改别成自己的(这里如果自己的类别) 本文以两类为例子
 VOC_LABELS = {

     'none': (0, 'Background'),

     'aeroplane': (1, 'Vehicle'),

     'bicycle': (2, 'Vehicle'),

     'bird': (3, 'Animal'),

     'boat': (4, 'Vehicle'),

     'bottle': (5, 'Indoor'),

     'bus': (6, 'Vehicle'),

     'car': (7, 'Vehicle'),

     'cat': (8, 'Animal'),

     'chair': (9, 'Indoor'),

     'cow': (10, 'Animal'),

     'diningtable': (11, 'Indoor'),

     'dog': (12, 'Animal'),

     'horse': (13, 'Animal'),

     'motorbike': (14, 'Vehicle'),

     'person': (15, 'Person'),

     'pottedplant': (16, 'Indoor'),

     'sheep': (17, 'Animal'),

     'sofa': (18, 'Indoor'),

     'train': (19, 'Vehicle'),

     'tvmonitor': (20, 'Indoor'),

 }

 #自己的数据

 # VOC_LABELS = {

 #     'none': (0, 'Background'),

 #     'aeroplane': (1, 'Vehicle'),

 # }
6. 将图像数据转换为tfrecods格式,修改datasets文件夹中的pascalvoc_to_tfrecords.py文件,然后更改文件的83行读取方式为’rb‘,如果你的文件不是.jpg格式,也可以修改图片的类型。

另外这个修改

7.运行tf_convert_data.py文件,但是需要传给它一些参数: 这个文件生成TFrecords文件的代码
但是该文件需要像类似于linux 命令那样传入参数。 pycharm中如何解决呢???
假设我们需要执行:python ./tf_convert_data.py --dataset_name=pascalvoc --dataset_dir=./VOC2007/ --output_name=voc_2007_train --output_dir=./tfrecords_怎么办呢?
我们可以在 run中的 Edit ... 进入
一、
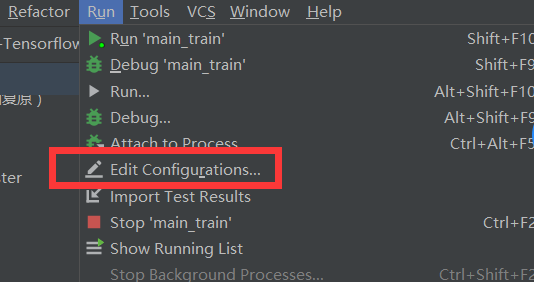
二、

三、

参数:--dataset_name=pascalvoc --dataset_dir=./VOC2007/ --output_name=voc_2007_train --output_dir=./tfrecords_
然后执行该py文件就ok。
如果出现错误(文件夹相关的错误),则在工程下建立一个文件夹 就可以了。
就可以了。
8.训练模型train_ssd_network.py文件中修改

None代表一直训练。

其它需要修改的文件:
① nets/ssd_vgg_300.py (因为使用此网络结构) ,修改87 和88行的类别

② train_ssd_network.py,修改类别120行,GPU占用量,学习率,batch_size等
③ eval_ssd_network.py 修改类别,66行

④ datasets/pascalvoc_2007.py 根据自己的训练数据修改整个文件
9.开始训练
类似于第7步中的 三
训练的主文件为 train_ssd_network.py
参数为:
--train_dir=./train_model/ --dataset_dir=./tfrecords_/ --dataset_name=pascalvoc_2007 --dataset_split_name=train --model_name=ssd_300_vgg --checkpoint_path=./checkpoints/vgg_16.ckpt --checkpoint_model_scope=vgg_16 --checkpoint_exclude_scopes=ssd_300_vgg/conv6,ssd_300_vgg/conv7,ssd_300_vgg/block8,ssd_300_vgg/block9,ssd_300_vgg/block10,ssd_300_vgg/block11,ssd_300_vgg/block4_box,ssd_300_vgg/block7_box,ssd_300_vgg/block8_box,ssd_300_vgg/block9_box,ssd_300_vgg/block10_box,ssd_300_vgg/block11_box --trainable_scopes=ssd_300_vgg/conv6,ssd_300_vgg/conv7,ssd_300_vgg/block8,ssd_300_vgg/block9,ssd_300_vgg/block10,ssd_300_vgg/block11,ssd_300_vgg/block4_box,ssd_300_vgg/block7_box,ssd_300_vgg/block8_box,ssd_300_vgg/block9_box,ssd_300_vgg/block10_box,ssd_300_vgg/block11_box --save_summaries_secs=60 --save_interval_secs=600 --weight_decay=0.0005 --optimizer=adam --learning_rate=0.001 --learning_rate_decay_factor=0.94 --batch_size=24 --gpu_memory_fraction=0.9

训练过程
:
10 测试:
先看效果


另外我修改了demo_test文件 调取电脑摄像投来执行代码。

如果单独看一张图的效果则执行函数:

代码如下:
 __author__ = "WSX"

 import os

 import math

 import random

 import numpy as np

 import tensorflow as tf

 import cv2

 slim = tf.contrib.slim

 import matplotlib.pyplot as plt

 import matplotlib.image as mpimg

 import sys

 sys.path.append('../')

 from nets import ssd_vgg_300, ssd_common, np_methods

 from preprocessing import ssd_vgg_preprocessing

 from notebooks import visualization

 # TensorFlow session: grow memory when needed. TF, DO NOT USE ALL MY GPU MEMORY!!!

 gpu_options = tf.GPUOptions(allow_growth=True)

 config = tf.ConfigProto(log_device_placement=False, gpu_options=gpu_options)

 isess = tf.InteractiveSession(config=config)

 # Input placeholder.

 net_shape = (300, 300)

 data_format = 'NHWC'

 img_input = tf.placeholder(tf.uint8, shape=(None, None, 3))

 # Evaluation pre-processing: resize to SSD net shape.

 image_pre, labels_pre, bboxes_pre, bbox_img = ssd_vgg_preprocessing.preprocess_for_eval(

     img_input, None, None, net_shape, data_format, resize=ssd_vgg_preprocessing.Resize.WARP_RESIZE)

 image_4d = tf.expand_dims(image_pre, 0)

 # Define the SSD model.

 reuse = True if 'ssd_net' in locals() else None

 ssd_net = ssd_vgg_300.SSDNet()

 with slim.arg_scope(ssd_net.arg_scope(data_format=data_format)):

     predictions, localisations, _, _ = ssd_net.net(image_4d, is_training=False, reuse=reuse)

 # Restore SSD model.

 ckpt_filename = '../checkpoints/ssd_300_vgg.ckpt'

 # ckpt_filename = '../checkpoints/VGG_VOC0712_SSD_300x300_ft_iter_120000.ckpt'

 isess.run(tf.global_variables_initializer())

 saver = tf.train.Saver()

 saver.restore(isess, ckpt_filename)

 # SSD default anchor boxes.

 ssd_anchors = ssd_net.anchors(net_shape)

 # Main image processing routine.

 def process_image(img, select_threshold=0.5, nms_threshold=.45, net_shape=(300, 300)):

     # Run SSD network.

     rimg, rpredictions, rlocalisations, rbbox_img = isess.run([image_4d, predictions, localisations, bbox_img],

                                                               feed_dict={img_input: img})

     # Get classes and bboxes from the net outputs.

     rclasses, rscores, rbboxes = np_methods.ssd_bboxes_select(

         rpredictions, rlocalisations, ssd_anchors,

         select_threshold=select_threshold, img_shape=net_shape, num_classes=21, decode=True)

     rbboxes = np_methods.bboxes_clip(rbbox_img, rbboxes)

     rclasses, rscores, rbboxes = np_methods.bboxes_sort(rclasses, rscores, rbboxes, top_k=400)

     rclasses, rscores, rbboxes = np_methods.bboxes_nms(rclasses, rscores, rbboxes, nms_threshold=nms_threshold)

     # Resize bboxes to original image shape. Note: useless for Resize.WARP!

     rbboxes = np_methods.bboxes_resize(rbbox_img, rbboxes)

     return rclasses, rscores, rbboxes

 #===========================================测试部分===========================================

 #----------------------------------单张图片测试---------------------------

 # Test on some demo image and visualize output.

 # 测试的文件夹

 def demo():

     path = '../demo/'

     image_names = sorted(os.listdir(path))

     # 文件夹中的第几张图,-1代表最后一张

     img = mpimg.imread(path + image_names[-1])

     print(img.shape)

     rclasses, rscores, rbboxes = process_image(img)

     # visualization.bboxes_draw_on_img(img, rclasses, rscores, rbboxes, visualization.colors_plasma)

     visualization.plt_bboxes(img, rclasses, rscores, rbboxes)

 #======================================做成实时显示的代码===================================================

 L = ["None","aeroplane","bicycle","bird ","boat ","bottle ","bus ","car ","cat ","chair","cow ","diningtable","dog","horse","motorbike","person",

      "pottedplant","sheep","sofa","train","tvmonitor"]

 colors_tableau = [(255, 255, 255), (31, 119, 180), (174, 199, 232), (255, 127, 14), (255, 187, 120),

                   (44, 160, 44), (152, 223, 138), (214, 39, 40), (255, 152, 150),

                   (148, 103, 189), (197, 176, 213), (140, 86, 75), (196, 156, 148),

                   (227, 119, 194), (247, 182, 210), (127, 127, 127), (199, 199, 199),

                   (188, 189, 34), (219, 219, 141), (23, 190, 207), (158, 218, 229)]

 def Load_video_show():  #获取视频

     video = cv2.VideoCapture("1.mp4")  # 0 表示摄像头 ,   如果为文件路径则 为加载视频

     while (True):

         ret, frame = video.read()  #frame为 帧  这里当做一张图

         frame = cv2.flip( frame ,1)  #镜像变换,图像正与不正

         cv2.resizeWindow("video", 640, 360)                #设置窗口大小

         frame = cv2.resize(frame, (640, 360))               #设置图大小

         #cv2.imshow("video" ,frame)

         rclasses, rscores, rbboxes = process_image(frame)

         height = frame.shape[0]

         width = frame.shape[1]

         colors = dict()

         for i in range(rclasses.shape[0]):

             cls_id = int(rclasses[i])

             if cls_id >= 0:

                 score = rscores[i]

                 if cls_id not in colors:

                     colors[cls_id] = (random.random(), random.random(), random.random())

                 ymin = int(rbboxes[i, 0] * height)

                 xmin = int(rbboxes[i, 1] * width)

                 ymax = int(rbboxes[i, 2] * height)

                 xmax = int(rbboxes[i, 3] * width)

                 cv2.rectangle(frame, (xmin, ymin), (xmax,ymax), colors[cls_id], 2)  #画矩形框

                 class_name = L[cls_id]

                 cv2.putText(frame, '{:s} | {:.3f}'.format(class_name, score), (xmin, ymin - 2,), cv2.FONT_HERSHEY_COMPLEX, 0.5, (0, 255, 0), 1)  #写文字

         cv2.imshow("video", frame)

         c = cv2.waitKey(50)

         if c == 27: #esc退出

             break

 #Load_video_show()

 demo()
最新文章
- 微博转发关系采集,可拓展关键字采集,评论采集(Java版)
- swift 闭包
- (转)常用的js设计模式
- QT+VS编译器处理字符串时的坑真是多
- UVa 1605 (构造) Building for UN
- windows下cmd导入与导出mysql 数据库
- KVO的实现原理探寻
- Cocos2d-x 3.0final 终结者系列教程12-Vector&map&value
- ASP.NET MVC 实现AJAX跨域请求的两种方法
- xml的今生今世
- Codeforces 446A. DZY Loves Sequences (线性DP)
- java代码之美(3)---guava 复写Object常用方法
- Github-记账本
- Mysql ssl 连接
- VirtualBox虚拟机E_INVALIDARG (0x80070057)
- hadoop_随笔二_参数
- SQL not exist out join
- 浏览器调起Hbuilder的APP
- LD_RUN_PATH和LD_LIBRARY_PATH是干什么的?
- TZOJ 1705 Dining(拆点最大流)