IdentityServer4【QuickStart】之使用asp.net core Identity
使用asp.net core Identity
IdentityServer灵活的设计中有一部分是可以将你的用户和他们的数据保存到数据库中的。如果你以一个新的用户数据库开始,那么,asp.net core Identity是一个选择。这个示例演示了如何在IdentityServer中使用asp.net core Ientity.
该示例假设你已经完成了前面的所有示例,这个示例将要用asp.net core Identity 模板创建一个新的项目,新项目会替换掉之前的IdentityServer。而其它的工程则没有影响。
新建一个asp.net core Identity工程
第一步是在你的解决方案中添加一个asp.net core Identity的工程。考虑到大量的代码都来源于asp.net core Identity,所以这里直接使用visual studio的一个模板。你最后得把旧的IdentityServer删除。但是你还得配置一下。
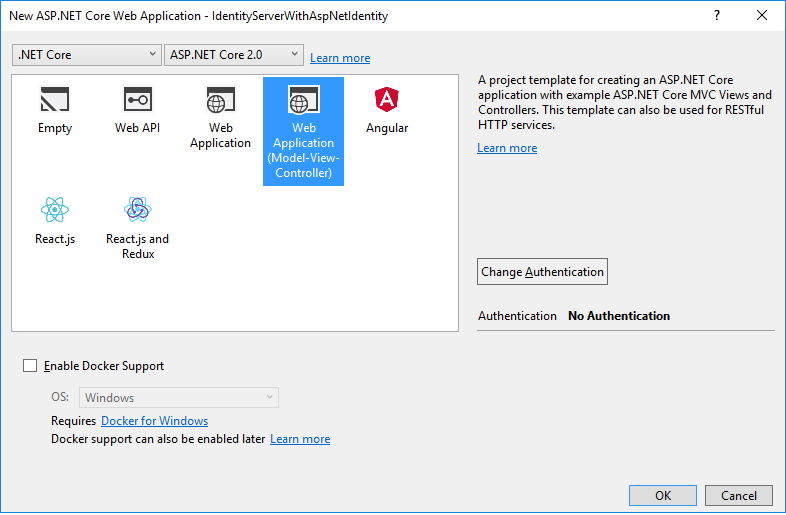
那就从创建一个asp.net core web app开始把:

然后选择MVC模板:
然后在更改身份验证这里选择“个人用户账户”: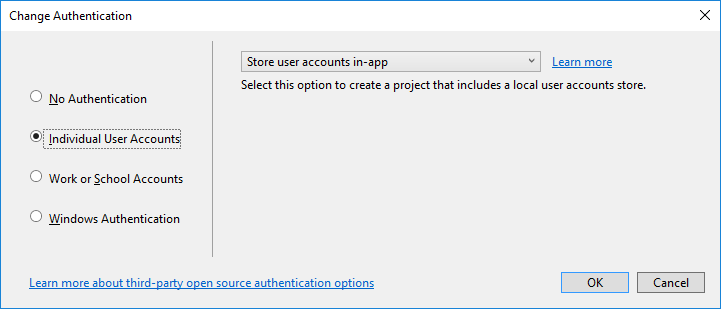
最后,当你选择好之后,点击确定。
修改宿主
别忘了把端口调整到5000.
这样才能兼容之间创建好的客户端和API。
添加IdentityServer的包
添加IdentityServer4.AspNetIdentity的nuget包。因为它依赖IdentityServer包,所以会自动的将IdentityServer4添加到项目中来。

Scopes和客户端的配置
虽然是一个新的项目,我们仍然可以将旧项目中的代码粘贴过来用一下。你现在将之前的IdentityServer中的Config类中的代码粘贴到新项目中。
有一个改变的地方是需要禁用一下确认页面的东西,因为我们现在还没有配置关于确认页面的任何东西。所以我们将RequireConsent设置为false:
new Client

{

    ClientId = "mvc",

    ClientName = "MVC Client",

    AllowedGrantTypes = GrantTypes.HybridAndClientCredentials,

    RequireConsent = false,

    ClientSecrets =

    {

        new Secret("secret".Sha256())

    },

    RedirectUris           = { "http://localhost:5002/signin-oidc" },

    PostLogoutRedirectUris = { "http://localhost:5002/signout-callback-oidc" },

    AllowedScopes =

    {

        IdentityServerConstants.StandardScopes.OpenId,

        IdentityServerConstants.StandardScopes.Profile,

        "api1"

    },

    AllowOfflineAccess = true

}
配置IdentityServer
还是和之前一样,需要在ConfigureServices和Configure这两个Startup中的方法中进行配置。
ConfigureServices
下面的代码显示了工程创建的时候生成的一些样本代码和底部添加的关于IdentityServer的代码。在之前的示例中,AddTestUsers扩展方法用来将用户注册到DI中,但是这会儿我们用AddAspNetIdentity取代了。这个方法需要一个泛型的类型参数,这个类型参数的类型是你asp.net Identity User的类型。
public void ConfigureServices(IServiceCollection services)

{

    services.AddDbContext<ApplicationDbContext>(options =>

        options.UseSqlServer(Configuration.GetConnectionString("DefaultConnection")));

    services.AddIdentity<ApplicationUser, IdentityRole>()

        .AddEntityFrameworkStores<ApplicationDbContext>()

        .AddDefaultTokenProviders();

    // Add application services.

    services.AddTransient<IEmailSender, EmailSender>();

    services.AddMvc();

    // configure identity server with in-memory stores, keys, clients and scopes

    services.AddIdentityServer()

        .AddDeveloperSigningCredential()

        .AddInMemoryPersistedGrants()

        .AddInMemoryIdentityResources(Config.GetIdentityResources())

        .AddInMemoryApiResources(Config.GetApiResources())

        .AddInMemoryClients(Config.GetClients())

        .AddAspNetIdentity<ApplicationUser>();

}
需要注意的是关于IdentityServer的逻辑应该写到AddIdentity方法之后。因为其中有一些方法被重写了。
Configure
这里展示了创建工程的时候生成的代码,还有添加了UseIdentityServer。
public void Configure(IApplicationBuilder app, IHostingEnvironment env)

{

    if (env.IsDevelopment())

    {

        app.UseDeveloperExceptionPage();

        app.UseBrowserLink();

        app.UseDatabaseErrorPage();

    }

    else

    {

        app.UseExceptionHandler("/Home/Error");

    }

    app.UseStaticFiles();

    // app.UseAuthentication(); // not needed, since UseIdentityServer adds the authentication middleware

    app.UseIdentityServer();

    app.UseMvc(routes =>

    {

        routes.MapRoute(

            name: "default",

            template: "{controller=Home}/{action=Index}/{id?}");

    });

}
创建数据库
现在已经给出了一个新的项目,你需要创建数据库。你可以通过项目目录下的命令行工具来执行dotnet ef database update -c ApplicationDbContext,像这样:

但我一般都会在程序包管理控制台上输入update-database
创建一个用户
接下来,你需要运行应用并将一个用户创建到数据库中。点击注册(Register)按钮:

然后在注册页面上注册一个用户:

现在,你已经拥有了一个用户,你可以登陆了。
在MVC客户端上面登陆
运行MVC客户端应用,然后你可以点击Secure这个链接来进行登陆:

你会被重定向到asp.net Identity的登陆页面上,输入你新创建的那个用户的信息:

然后你会被跳转到确认页面上,然后又迅速的重定向回MVC客户端(因为我们配置了RequireConsetn=false了。)。然后,关于你的user的一些claim回被列出来。

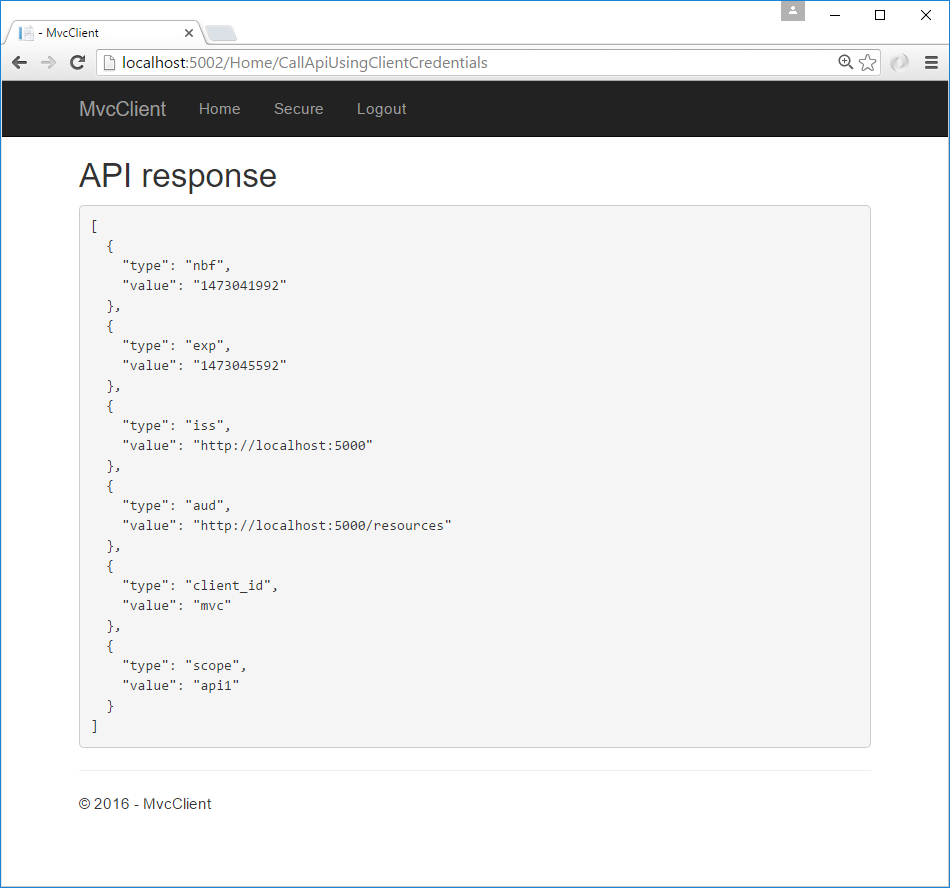
客户端可以代表你的用户来访问api,通过点击Call API using application identity:
下一步
先前的示例项目中有确认页面、错误页面和登出页面,这些缺失的部分你可以直接复制粘贴过来用。一旦你完成了,那个旧的项目就没用了。。然后你需要将RequireConsent改成true。
最后,放上源码:直接点击下载 sample code for this quickstart 吧。
最新文章
- PHP 获取 特定时间范围 类
- 初学者对Spring MVC的认识
- C语言知识整理(1):简介
- IPv6 tutorial 3 New features: IPsec and LAN features
- Simple screenshot that explains the singleton invocation.
- iOS开发 调用系统相机和相册
- jdbc-大数据存储
- 浏览器http的缓存机制
- notepad++运行Python
- Mysql5.7 单表 500万数据迁移到新表的快速实现方案
- Unity中使用百度中文语音识别功能
- SharePoint Framework 基于团队的开发(一)
- 竖直的ViewPager,上下滑动的ViewPager,VerticalViewPager ;
- asp.net mvc 模型验证组件——FluentValidation
- centos7.2 nfs安装配置
- Linux基础(一)流程控制
- POJ2387(KB4-A)
- python 使用else代替状态变量
- VC++的全局变量(转)
- NuGet服务器搭建教程