spring学习(4)
在spring容器内拼凑bean叫做装配。装配bean的时候,需要告诉容器哪些bean以及容器如何使用依赖注入将它们配合在一起。
上下文定义文件的根元素是<beans>,<beans>中有很多<bean>
id不能重复,class要写全。
scope
prototype,singleton,request,session,global-session,
默认为singleton
使用原型bean会对性能产生影响。
特别强调一点,尽量使用scope=singleton,不要使用原型prototype,因为这样对我们的性能影响比较大。
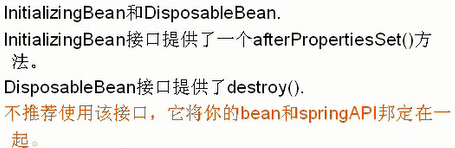
实例化和销毁init-method destroy-method
有时候没有用init-method destroy-method,却使用了注解。如:
@PostConstruct

    public void init(){

        System.out.println("我自己的init方法");

    }

可以注入任何东西,从基本类型到集合类,甚至可以是应用系统的bean。
②如何给集合类型注入值
java主要有几种集合:map set list / 数组
Collection col = new ArrayList()
col只能使用Collection本身有的方法,但是却可以调用被ArrayList实现了的方法。
set使用方法和list一样。
注入list和set。
list中可以注入许多相同的bean
set也可以,但是后面的会把前面的覆盖。
Department类
Employee类
数组的使用:
Depart类
package com.hsp.collection;

import java.util.List;

import java.util.Map;

import java.util.Set;

public class Department {

    private String name;

    private String[] empName;

    private List<Employee> empList;

    private Set<Employee> empsets;

    private Map<String,Employee> empMaps;

    public Map<String, Employee> getEmpMaps() {

        return empMaps;

    }

    public void setEmpMaps(Map<String, Employee> empMaps) {

        this.empMaps = empMaps;

    }

    public Set<Employee> getEmpsets() {

        return empsets;

    }

    public void setEmpsets(Set<Employee> empsets) {

        this.empsets = empsets;

    }

    public List<Employee> getEmpList() {

        return empList;

    }

    public void setEmpList(List<Employee> empList) {

        this.empList = empList;

    }

    public String[] getEmpName() {

        return empName;

    }

    public void setEmpName(String[] empName) {

        this.empName = empName;

    }

    public String getName() {

        return name;

    }

    public void setName(String name) {

        this.name = name;

    }

}
//Employee类
package com.hsp.collection;

public class Employee {

    private String name;

    private int id;

    public int getId() {

        return id;

    }

    public void setId(int id) {

        this.id = id;

    }

    public String getName() {

        return name;

    }

    public void setName(String name) {

        this.name = name;

    }

}
beans.xml配置文件
<?xml version="1.0" encoding="UTF-8"?>

<beans xmlns="http://www.springframework.org/schema/beans"

    xmlns:xsi="http://www.w3.org/2001/XMLSchema-instance"

    xmlns:context="http://www.springframework.org/schema/context"

    xmlns:aop="http://www.springframework.org/schema/aop"

    xmlns:tx="http://www.springframework.org/schema/tx"

    xmlns:mvc="http://www.springframework.org/schema/mvc"

    xsi:schemaLocation="http://www.springframework.org/schema/beans

      http://www.springframework.org/schema/beans/spring-beans-3.2.xsd

      http://www.springframework.org/schema/context

      http://www.springframework.org/schema/context/spring-context-3.2.xsd

      http://www.springframework.org/schema/aop

      http://www.springframework.org/schema/aop/spring-aop-3.2.xsd

      http://www.springframework.org/schema/tx

      http://www.springframework.org/schema/tx/spring-tx-3.2.xsd

      http://www.springframework.org/schema/mvc

      http://www.springframework.org/schema/mvc/spring-mvc-3.2.xsd

      ">

<bean id="department" class="com.hsp.collection.Department">

<property name="name" value="财务部">

</property>

<property name="empName"><!-- 数组 -->

    <list>

        <value>小明</value>

        <value>大明</value>

        <value>大大明</value>

    </list>

</property>

<!-- 给list注入值 -->

<property name="empList">

    <list>

        <ref bean="emp1"/>

        <ref bean="emp2"/>

        <ref bean="emp1"/>

        <ref bean="emp2"/>

        <ref bean="emp1"/>

        <ref bean="emp2"/>

    </list>

</property>

<!-- 给set注入值 -->

<property name="empsets">

    <set>

        <ref bean="emp1"/>

        <ref bean="emp2"/>

        <ref bean="emp1"/>

        <ref bean="emp2"/>

        <ref bean="emp1"/>

        <ref bean="emp2"/>

    </set>

</property>

<!-- 给map注入值 -->

<property name="empMaps">

    <map>

        <entry key="1" value-ref="emp1" />

        <entry key="2" value-ref="emp2" />

    </map>

</property>
<!-- 给属性集合配置 -->

<property name="pp">

<props>

<prop key="pp1">abcd</prop>

<prop key="pp2">1234</prop>

</props>

</property>
</bean>

<bean id="emp1" class="com.hsp.collection.Employee">

<property name="name" value="北京"/>

<property name="id" value="1"/>

</bean>

<bean id="emp2" class="com.hsp.collection.Employee">

<property name="name" value="天津"/>

<property name="id" value="2"/>

</bean>

</beans>
③内部bean
<bean id="foo" class="...Foo">
<property name="emp">
  <!-- 第一方法引用 -->
  <ref bean='neibu'/>

    <bean id="neibu"><!-- 该bean只能在emp里面使用 -->

    </bean>

</property>
</bean>
④继承配置
<property name="name" value="顺平"/>
name的值是类的属性名
public class Student
public class Graduate extends Student
在beans.xml文件中体现配置
<!-- 配置一个学生对象 -->

<bean id="student" class="com.hsp.inherit.Student">

    <property name="name" value="顺平"/>

    <property name="age" value="30"/>

</bean>

<!-- 配置graduate对象 -->

<bean id="graduate" parent="student" class="com.hsp.inherit.Graduate">

    <!-- 如果自己配置属性name,age,则会替换从父对象继承的数据 -->

    <property name="name" value="小明"/>

    <property name="degree" value="学士"/>

</bean>
就如同java里的子类继承父类一样,子类新增的东西会把父类的同名对象覆盖。
若bean的属性是集合类型,按如下处理
设置为null
<property name="name">
<null/>
</property>
⑤
思考:目前我们都是通过set方式给bean注入值,spring还提供了其他的方式注入值,比如通过构造函数注入值!
通过构造函数注入值
beans.xml关键代码
<bean id="employee" class="com.hsp.constructor.Employee">

<!-- 通过构造函数来注入值 -->

<constructor-arg index="0" type="java.lang.String" value="大明"/>

<!-- <constructor-arg index="1" type="int" value="123"/> -->

</bean>
set注入的确定是无法清晰表达哪些属性是必须的,哪些是可选的,构造注入的优势是通过构造强制依赖关系,不可能实例化不完全的或无法使用bean。
Spring IoC容器可以自动装配相互协作bean之间的关联关系。
自动装配有5种方式
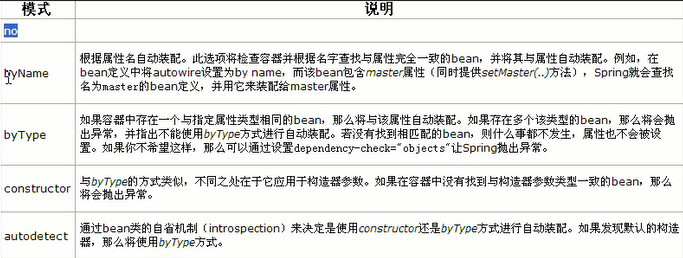
自动装配bean的属性值
自动装配的原理:
autowire=byName:根据属性名自动装配。
比如正好发现有一个bean的id名叫做dog,
原理图:
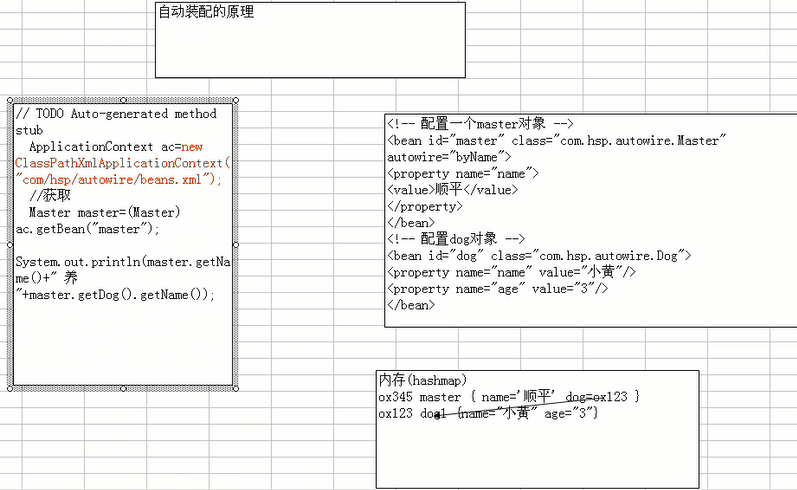
(1)byName的用法,去匹配bean的id值与类属性名相同的bean
<!-- 配置一个master对象 -->

<bean id="master" class="com.hsp.autowire.Master"  autowire="byName">

<property name="name">

<value>顺平</value>

</property>

</bean>

<!-- 配置dog对象 -->

<bean id="dog" class="com.hsp.autowire.Dog">

<property name="name" value="小黄"/>

<property name="age" value="3"/>

</bean>
(2)byType
在没有匹配到的情况下才会去使用byType。寻找和属性类型相同的bean。
<!-- 配置一个master对象 -->

<bean id="master" class="com.hsp.autowire.Master"  autowire="byType">

<property name="name">

<value>顺平</value>

</property>

</bean>

<!-- 配置dog对象 -->

<bean id="dog11" class="com.hsp.autowire.Dog">

<property name="name" value="小黄"/>

<property name="age" value="3"/>

</bean>
(3)constructor:查找和bean的构造参数一致的或多个bean
使用了constructor,就去寻找是否有一个构造函数把dog接收到了,如果找到了就好。
<bean id="master" class="com.hsp.autowire.Master"  autowire="constructor">

<property name="name">

<value>顺平</value>

</property>

</bean>

<!-- 配置dog对象 -->

<bean id="dog11" class="com.hsp.autowire.Dog">

<property name="name" value="小黄"/>

<property name="age" value="3"/>

</bean>
但是只能有一个构造函数。
建议:能不用自动装配就不要用自动装配,set注入就可以了。
(4)autodotect:(3)和(2)之间选一个方式。不确定性的处理与(3)和(2)一致。
(5)default-autowire="byName" 是写在 xsi:schemaLocation="">中的
 xsi:schemaLocation="http://www.springframework.org/schema/beans

      http://www.springframework.org/schema/beans/spring-beans-3.2.xsd

      http://www.springframework.org/schema/context

      http://www.springframework.org/schema/context/spring-context-3.2.xsd

      http://www.springframework.org/schema/aop

      http://www.springframework.org/schema/aop/spring-aop-3.2.xsd

      http://www.springframework.org/schema/tx

      http://www.springframework.org/schema/tx/spring-tx-3.2.xsd

      http://www.springframework.org/schema/mvc

      http://www.springframework.org/schema/mvc/spring-mvc-3.2.xsd

      " default-autowire="no" >
当你在<beans>指定了default-autowire后,所有的bean的默认的autowire就是指定的装配方式。
default-autowire默认是no.
(6)no:这是默认值。
最新文章
- C# 多线程限制方法调用(monitor)
- 00.PHP学习建议
- Unity3D Animation Curve
- Lamp下安全配置随笔
- session与cookie的区别---
- rabbitmq使用dead letter机制来进行retry
- php的socket通信(一)
- gettimeofday() 获取系统时间,精确到微秒 这个似乎只能在linux 下用,不能在windows 下用
- Java盲点:双重检查锁定及单例模式
- Java学习随笔——RMI
- KMP 知识点总结
- 《安卓网络编程》之第二篇 java环境下网络通信的综合应用
- 201521123098 《Java程序设计》第7周学习总结
- 微博爬虫“免登录”技巧详解及 Java 实现(业余草的博客)
- (CLR-Via-C#) 类型基础
- CRT 重启Was
- python3类方法与静态方法
- PyCharm中快速给选中的代码加上{}、<>、()、[]
- java基础-多线程应用案例展示
- Delphi 包的设计思想及它与PAS、BPL、DCU、DLL、OXC的关系