.net项目在linux平台的CI流程(基于Jenkins+mono+jexus)
2024-10-11 12:22:56
内容较多,主要分为以下4方面内容:
- Jenkins的安装部署(centos 7+)
- .net在linux平台CI流程所需的插件管理&配置
- Jenkins配置连接Gitlab(也可使用对应插件连接SVN,TFS作为源码仓库)
- 基于Jenkins的CI流程构建
Jenkins安装部署
- 下载[Jenkins最新版];
- 在服务器上jenkins.war所在目录建立脚本:start-jenkins.sh:
#!/bin/bash
JENKINS_ROOT=/opt/jenkins
export JENKINS_HOME=$JENKINS_ROOT/jenkins_home
nohup java -jar $JENKINS_ROOT/jenkins.war --httpPort= > jenkins.log >& &
- 修改脚本执行权限:
chmod a+x start-jenkins.sh
- 执行脚本:
/bin/bash start-jenkins.sh
- 访问服务器地址(测试服务器地址,脚本指定端口):
http://10.200.XX.XX:8000
.net在linux平台CI流程所需的插件管理&配置
Jenkins在当前开发环境下所需要的插件列表如下:
- Docker相关插件
- CloudBees Docker Build and Publish plugin (This plugin provides the ability to build projects with a Dockerfile, and publish the resultant tagged image (repo) to the docker registry.)
- Docker plugin (This plugin allows slaves to be dynamically provisioned using Docker.)
- docker-build-step (This plugin allows to add various Docker commands into you job as a build step.)
- CaaS插件
- Kubernates plugin (This plugin allows slaves to be dynamically provisioned on multiple Docker hosts using Kubernetes.)
- Building插件
- Git plugin
- Nuget plugin
- MSBuild
- Gitlab Connector
- Gitlab Hook Plugin
- GitLab Plugin
Jenkins配置连接Gitlab
- 在jenkins服务器上新生成SSH key
- 通过以下指令检查服务器是否已经存在SSH Key:
cat ~/.ssh/id_rsa.pub
- 如果没有Key,则通过以下指令新生成一个Key:
ssh-keygen -t rsa -C "jiakai@gridsum.com"
- 通过刚才的指令: cat ~/.ssh/id_rsa.pub 获得生成的Key(公钥部分)
- 在生成Key对应的账户个人"Profile Settings"下的"SSH Keys"标签下,新增这个Key, 新增的Title直接设置为账户名即可
- 完成后在"Your SSH Keys"下可以看到新增的SSH Key公钥信息
基于Jenkins的CI流程构建

Jenkins内部的各流程说明如下:
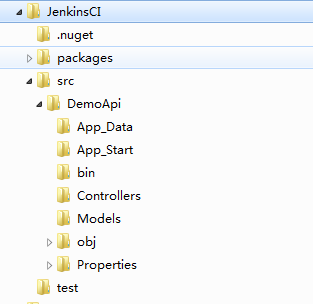
- 测试项目目录结构如下图:
- Source Copy
- 该过程对应Jenkins工作项中的"源码管理"工作区,在该工作区中选中"Git",配置Repository URL及上一步已经添加好的Credential即可,并制定需要编译的分支,比如"master"分支;
- 该流程配置完毕后,可保存工作项,然后"立即构建",正确的话将在Jenkins工作区目录的~/workspace/${JobName}/路径下,查看到从制定的Git Repository上拉取的源码;
- Nuget还原包
- Nuget还原包依赖nuget.exe(需要mono),下载nuget.exe(这里我下载的是2.8.6版本),拷贝至Jenkins服务器的Jenkins运行目录下的.nuget文件夹;
- 在Nuget还原工作项的"Execute shell"中,使用nuget.exe还原包即可:
mono ../../.nuget/nuget.exe restore ${solution file path(.sln)} - 注:nuget2.5版本缺少必要的操作(restore),不可用。
- 在执行过程可能报以下错误:
WARNING: Error: TrustFailure (The authentication or decryption has failed.)
WARNING: Error: TrustFailure (The authentication or decryption has failed.)
WARNING: Error: TrustFailure (The authentication or decryption has failed.)
WARNING: Error: TrustFailure (The authentication or decryption has failed.)
WARNING: Error: TrustFailure (The authentication or decryption has failed.)
需要引入秘钥证书至machine store(注意不要引入到user store):
mozroots --import --machine --sync
certmgr -ssl -m https://go.microsoft.com
certmgr -ssl -m https://nugetgallery.blob.core.windows.net
certmgr -ssl -m https://nuget.org
- mono编译包
- 安装mono后(以安装路径/usr/mono为例),重启 jenkins,查看jenkins系统设置中的环境变量,其中的PATH变量,并确保mono的bin目录已经在PATH环境变量之中:

然后直接调用xbuild编译项目:
xbuild TestApi.sln
- [可选步骤]将编译后的文件形成发布文件,例如:
# Get the deploy files Ready
if [ ! -x ./deploy ] ;then
mkdir deploy
else
rm ./deploy/* -rf
fi
cp ./src/DemoApi/bin ./deploy/bin -Rf
cp ./src/DemoApi/packages.config ./deploy/packages.config -f
cp ./src/DemoApi/Web.config ./deploy/Web.config -f
cp ./src/DemoApi/Global.asax ./deploy/Global.asax -f
- 构建Docker镜像所需的Dockerfile
- 由于我们这里需要在jexus中部署我们的demo api,因此采用公司docker源中的jexus服务器V3版镜像:
if [ -f ./Dockerfile ] ;then
rm ./Dockerfile -f
fi
cat > ./Dockerfile <<EOF
FROM .xxx.xxx.xxx:/library/mono-jexus:v3
COPY ./deploy /data
CMD /usr/jexus/jws start && /usr/sbin/sshd -D
EOF
- 由于我们这里需要在jexus中部署我们的demo api,因此采用公司docker源中的jexus服务器V3版镜像:
- 打包Docker镜像并推送至公司的Docker源
- 这里我们用到CloudBees Docker Build and Publish plugin这个插件

- 按照如下图所示的配置

- 在“高级设置”中,勾选"Skip tag as latest","Force Pull",并且,如果Dockerfile不在默认(./)目录,还需要在“Dockerfile Path”中指定Dockerfile的具体位置:

- 删除过期的Docker镜像
在成功生成新版本的镜像之后,需要删除(或untag)之前版本的镜像:
#Untag the expired images except the newest image id
#Init the parameters
IMG_NAME=demoapi
IMG_URL=/gridsum/ld/demoapi
(docker images | grep ${IMG_NAME} | awk '{print $2}') >.version
#Delete expired images
count=
maxnum=$(wc -l .version | awk '{print $1}')
 ] ;then
sort .version | while read line
do
if [ $count -lt $maxnum ] ;then
    docker rmi $IMG_URL:$line
    let count=count+
fi
done
fi
#Clean the parameters
unset IMG_NAME
unset IMG_URL
rm .version -f
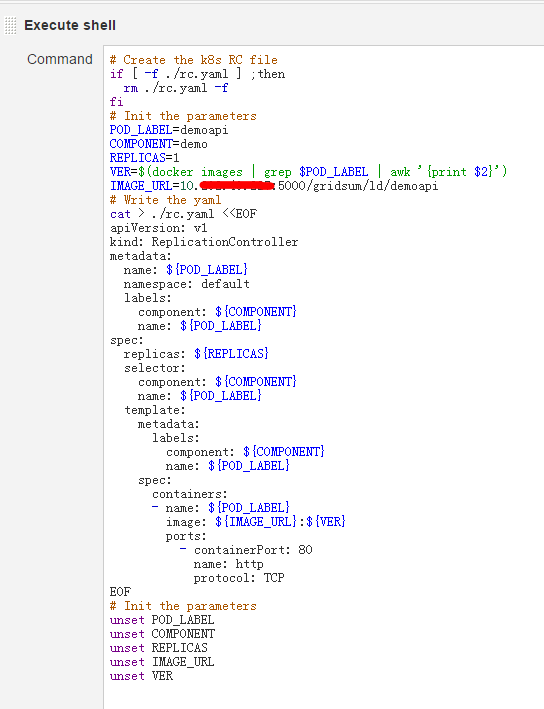
- 建立项目对应的RC文件,注意在RC中指定的Docker镜像版本为本次build的镜像版本:
- 启动新的容器:
# Delete the existed rc by kubectl
#NEED to redrect stderr into null or the BUILD process will be FAILED if there IS a RC running
/opt/jenkins/kube/kubectl -s http://10.200.xx.xx:8080 delete rc demoapi 2>/dev/null
#Create the k8s rc by kubectl
/opt/jenkins/kube/kubectl -s http://10.200.xx.xx:8080 create -f ./rc.yaml
- 容器对应的服务最好手动建立,因为服务是常态化的,一般不随源代码版本更迭发生变化,因此服务的创建可以实现创建好;
- 最后对已发布的服务进行简单的功能测试,通过curl即可:

最新文章
- 从零开始山寨Caffe·陆:IO系统(一)
- Easyui表单之按钮的提交
- Caffe 源碼閱讀(二) SyncedMemory.hpp
- codefoces round193a
- c# 可以设置透明度的 Panel 组件
- Android OpenCV样例调试+报错处理
- typedef和typename关键字
- Spring笔记(三)AOP前篇之动态代理
- html meta标签属性用法集合
- js 调用父窗口的方法
- R语言生成随机数
- 第 5 章 MySQL 备份与恢复
- Linux基础知识第三讲,拷贝文件跟移动文件命令
- Python数据结构之单链表
- Linux学习---条件预处理的应用
- java基础-温故而知新(02)
- 《linux性能及调优指南》 3.4 硬盘瓶颈
- 2018.06.27 POJ3281 Dining(最大流)
- AngularJS 指令中的require
- Ubuntu x86-64汇编(1)