Liferay7 BPM门户开发之27: MVC Portlet插件工程开发
官网上的教材说实话实在精简不清晰.
https://dev.liferay.com/develop/tutorials/-/knowledge_base/7-0/creating-an-mvc-portlet
版本7的Action机制换了:
https://dev.liferay.com/develop/tutorials/-/knowledge_base/7-0/mvc-action-command
上边的例子有不少java代码直接写在jsp里,感觉有点不舒服,要想想替代方法。
关于新建Portlet就不再赘述,只写过程。只需要简单几步,开发前先需要熟悉Gradle.
1、新建工程 File → New → Liferay Module Project.
如果建立了Liferay Workspace,就在Workspace上建立新Module工程
2、首先修改settings.gradle仓库地址:
目的是不再使用IDE建立的不可用仓库地址,红色部分删除
buildscript {
dependencies {
classpath group: "com.liferay", name: "com.liferay.gradle.plugins.workspace", version: "1.0.40"
}
repositories {
maven {
url "https://repo1.maven.org/maven2"
}
maven {
url "https://cdn.lfrs.sl/repository.liferay.com/nexus/content/groups/public"
}
}
}
3、在build.gradle中增加需要的引用
比如增加spring mvc 、Acitiviti的依赖包,
dependencies {

compile 'com.liferay.portal:com.liferay.portal.kernel:2.0.0'

compile 'com.liferay.portal:com.liferay.util.bridges:2.0.0'

compile 'com.liferay.portal:com.liferay.util.taglib:2.0.0'

compile 'com.liferay:com.liferay.application.list.api:1.0.0'

compile 'javax.portlet:portlet-api:2.0'

compile 'javax.servlet:javax.servlet-api:3.0.1'

compile 'org.osgi:org.osgi.service.component.annotations:1.3.0'

compileOnly group: "jstl", name: "jstl", version: "1.2"

compileOnly group: "org.osgi", name: "org.osgi.compendium", version: "5.0.0"

compileOnly group: "org.activiti", name: "activiti-engine", version: "5.21.0"

compile 'org.springframework:spring-webmvc:4.1.6.RELEASE'

compile 'org.springframework:spring-webmvc-portlet:4.1.6.RELEASE'

compile 'org.springframework:spring-aop:4.1.6.RELEASE'

compile 'org.springframework:spring-context:4.1.6.RELEASE'

compile 'org.springframework:spring-core:4.1.6.RELEASE'

compile 'org.springframework:spring-expression:4.1.6.RELEASE'

compile 'org.springframework:spring-web:4.1.6.RELEASE'

compile 'org.springframework:spring-beans:4.1.6.RELEASE'

compile 'org.springframework:spring-jdbc:4.1.6.RELEASE'

compile 'org.slf4j:slf4j-log4j12:1.7.6'

compile 'org.slf4j:slf4j-api:1.7.6'

}

tasks.withType(JavaCompile) {

options.encoding = 'UTF-8'

}
然后,再项目右键"Gradle" >> "Refresh gradle project"
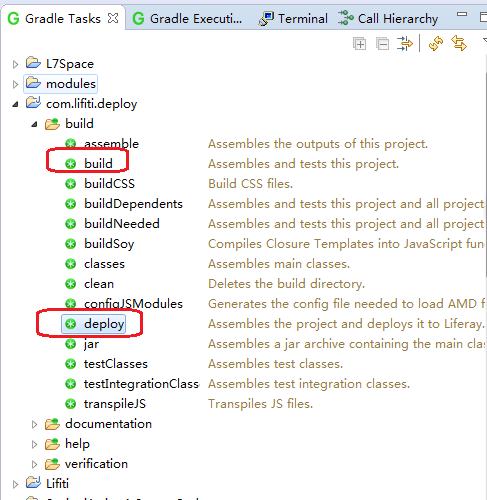
4、编译、部署,见图1
5、调试,Debug 〉〉 然后选一个Liferay 7.XX server
然后手动添加新建的portlet
发现liferay7的调试非常方便,无论是修改了jsp还是java文件,可以立即(大概3-5秒)重新自动部署,调试简单又快捷。
最新文章
- openfoam 的安装【转载】
- 即时反应的input和propertychange方法
- c# 生成json数据包
- 以Outlook样式分组和排列数据项
- Delphi通过Map文件查找内存地址出错代码所在行
- 与时间有关的windows函数
- const放在函数前和函数后
- Ninject之旅目录
- Qt版权符号显示问题
- [Python Study Notes]列表操作
- springMVC源码分析--RequestMappingHandlerAdapter(五)
- 分布式一致性算法2PC和3PC
- ceph-deploy部署过程
- Linux终端记录神器
- [c.c.a.m.AgentManagerImpl] (AgentConnectTaskPool-39:ctx-c37090c5) Failed to handle host connection: java.lang.IllegalArgumentException: Can't add host: with h
- js 触发 change 事件
- MPU6050学习笔记(电源管理器1、2)
- Struts如何获取客户端ip地址
- sparkR could not find function "textFile"
- Tips and Examples Using FNDLOAD (DOC ID 735338.1)