IOS CALayer(一)
2024-10-18 23:33:10
对于一个app的好坏,我们首要判断的便是app的界面,而界面的建立则是在图形的处理基础上的,说到图形处理又不得不提及Quartz2D,CALayer。
在iOS系统中,你能看得见摸得着的东西基本上都是UIView,比如一个按钮、一个文本标签、一个文本输入框、一个图标等等,这些都是UIView。
其实UIView之所以能显示在屏幕上,完全是因为它内部的一个层。
在创建UIView对象时,UIView内部会自动创建一个层(即CALayer对象),通过UIView的layer属性可以访问这个层。当UIView需要显示到屏幕上时,会调用drawRect:方法进行绘图,并且会将所有内容绘制在自己的层上,绘图完毕后,系统会将层拷贝到屏幕上,于是就完成了UIView的显示。
换句话说,UIView本身不具备显示的功能,是它内部的层才有显示功能。
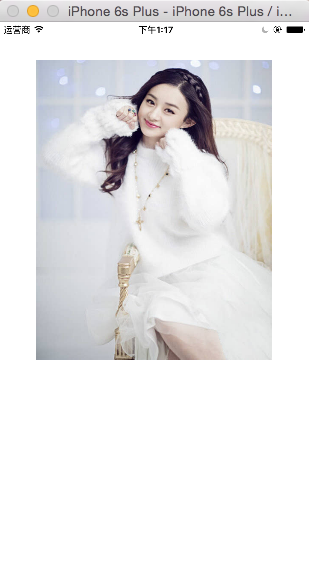
首先展示一下无任何操作的imageView。
//

//  ViewController.m

//  CX - CALayer(一)

//

//  Created by ma c on 16/3/19.

//  Copyright © 2016年 xubaoaichiyu. All rights reserved.

//

#import "ViewController.h"

@interface ViewController ()

@end

@implementation ViewController

- (void)viewDidLoad {

    [super viewDidLoad];

    UIImageView * imageView = [[UIImageView alloc]initWithFrame:CGRectMake(, , self.view.frame.size.width - , )];

    imageView.image = [UIImage imageNamed:@"nvshen.jpg"];

    [self.view addSubview:imageView];

}

@end
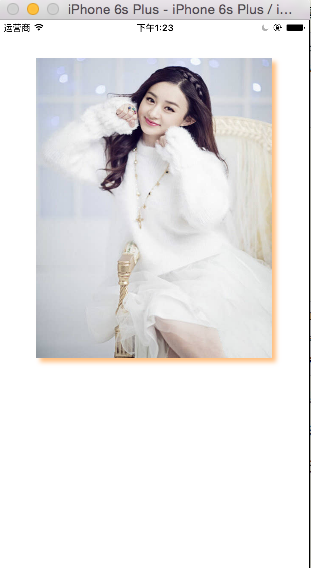
设置阴影的效果
//

//  ViewController.m

//  CX - CALayer(一)

//

//  Created by ma c on 16/3/19.

//  Copyright © 2016年 xubaoaichiyu. All rights reserved.

//

#import "ViewController.h"

@interface ViewController ()

@end

@implementation ViewController

- (void)viewDidLoad {

    [super viewDidLoad];

    UIImageView * imageView = [[UIImageView alloc]initWithFrame:CGRectMake(, , self.view.frame.size.width - , )];

    imageView.image = [UIImage imageNamed:@"nvshen.jpg"];

    //设置阴影的颜色

    imageView.layer.shadowColor = [UIColor orangeColor].CGColor;

    //设置阴影的偏移量

    imageView.layer.shadowOffset = CGSizeMake(, );

    //设置阴影的透明度,1为不透明。

    imageView.layer.shadowOpacity = 0.5;

    [self.view addSubview:imageView];

}

@end
设置圆角的效果

//

//  ViewController.m

//  CX - CALayer(一)

//

//  Created by ma c on 16/3/19.

//  Copyright © 2016年 xubaoaichiyu. All rights reserved.

//

#import "ViewController.h"

@interface ViewController ()

@end

@implementation ViewController

- (void)viewDidLoad {

    [super viewDidLoad];

    UIImageView * imageView = [[UIImageView alloc]initWithFrame:CGRectMake(, , self.view.frame.size.width - , )];

    imageView.image = [UIImage imageNamed:@"nvshen.jpg"];

//    //设置阴影的颜色

//    imageView.layer.shadowColor = [UIColor orangeColor].CGColor;

//    //设置阴影的偏移量

//    imageView.layer.shadowOffset = CGSizeMake(5, 5);

//    //设置阴影的透明度,1为不透明。

//    imageView.layer.shadowOpacity = 0.5;

    //设置圆角的半径

    imageView.layer.cornerRadius= ;

    //使视图支持圆角

    imageView.layer.masksToBounds = YES;

    //masksToBounds 设置为YES 阴影效果将失效。

    [self.view addSubview:imageView];

}

@end
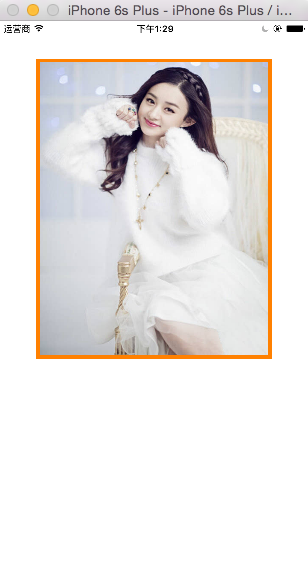
设置边框的效果
//

//  ViewController.m

//  CX - CALayer(一)

//

//  Created by ma c on 16/3/19.

//  Copyright © 2016年 xubaoaichiyu. All rights reserved.

//

#import "ViewController.h"

@interface ViewController ()

@end

@implementation ViewController

- (void)viewDidLoad {

    [super viewDidLoad];

    UIImageView * imageView = [[UIImageView alloc]initWithFrame:CGRectMake(, , self.view.frame.size.width - , )];

    imageView.image = [UIImage imageNamed:@"nvshen.jpg"];

//    //设置阴影的颜色

//    imageView.layer.shadowColor = [UIColor orangeColor].CGColor;

//    //设置阴影的偏移量

//    imageView.layer.shadowOffset = CGSizeMake(5, 5);

//    //设置阴影的透明度,1为不透明。

//    imageView.layer.shadowOpacity = 0.5;

//    //设置圆角的半径

//    imageView.layer.cornerRadius= 10;

//    //使视图支持圆角

//    imageView.layer.masksToBounds = YES;

//    //masksToBounds 设置为YES 阴影效果将失效。

    //设置边框的宽度

    imageView.layer.borderWidth = ;

    //设置边框的颜色

    imageView.layer.borderColor = [UIColor orangeColor].CGColor;

    [self.view addSubview:imageView];

}

@end
设置旋转的效果

//

//  ViewController.m

//  CX - CALayer(一)

//

//  Created by ma c on 16/3/19.

//  Copyright © 2016年 xubaoaichiyu. All rights reserved.

//

#import "ViewController.h"

@interface ViewController ()

@end

@implementation ViewController

- (void)viewDidLoad {

    [super viewDidLoad];

    UIImageView * imageView = [[UIImageView alloc]initWithFrame:CGRectMake(, , self.view.frame.size.width - , )];

    imageView.image = [UIImage imageNamed:@"nvshen.jpg"];

//    //设置阴影的颜色

//    imageView.layer.shadowColor = [UIColor orangeColor].CGColor;

//    //设置阴影的偏移量

//    imageView.layer.shadowOffset = CGSizeMake(5, 5);

//    //设置阴影的透明度,1为不透明。

//    imageView.layer.shadowOpacity = 0.5;

//    //设置圆角的半径

//    imageView.layer.cornerRadius= 10;

//    //使视图支持圆角

//    imageView.layer.masksToBounds = YES;

//    //masksToBounds 设置为YES 阴影效果将失效。

//    //设置边框的宽度

//    imageView.layer.borderWidth = 5;

//    //设置边框的颜色

//    imageView.layer.borderColor = [UIColor orangeColor].CGColor;

    //设置旋转角度

    //参数分别为,旋转角度,旋转轴 x y z

    imageView.layer.transform = CATransform3DMakeRotation(M_PI_4, , , );

    [self.view addSubview:imageView];

}

@end
最新文章
- MVC学习系列14--Bundling And Minification【捆绑和压缩】--翻译国外大牛的文章
- ToList()方法
- 剑指offer题目51-60
- 【Unity】13.2 通过Lighting Window设置相关参数
- C# 程序开始主要是写类和方法 的基本步骤和调用方法
- mysql时间处理
- windows下配置Apache2.4一些改变
- Codeforces Round #319 (Div. 1) C. Points on Plane 分块
- [Hadoop源码解读](一)MapReduce篇之InputFormat
- 【转】Android C程序也可自己手动用交叉编译器编译 (
- Appium手势密码滑动之Z字形走势(java篇)
- windows下用pip安装软件超时解决方案
- WebView的使用--Hybrid App
- iptables工作常用操作
- js弹出对话框的三种方式(转)
- 『C++』STL容器入门
- 使用 StoryBoard 实现左右按钮切换图片的浏览效果
- Taffy自动化测试框架Web开发,Python Flask实践详解
- linux中创建和解压文档的 tar 命令教程
- Office PPT中如何插入flash
热门文章
- 解决mysql“Access denied for user 'root'@'localhost'”
- windows dos命令窗口的环境变量
- ASP.NET MVC 在控制器中接收视图表单POST过来的数据方法
- [JS] JavaScript框架(1) jQuery
- 用Qt写软件系列二:QCookieViewer(浏览器Cookie查看器)
- Dancing Link 详解(转载)
- sql date()函数
- 【循序渐进学Python】12.Python 正则表达式简介
- 树的统计Count---树链剖分
- hibernate3 Duplicate class/entity mapping(异常)