神经网络hopfield的学习
Hopfield神经网络使用说明。
该神经网络有两个特点:
1,输出值只有0,1
2,Hopfield没有输入(input)
这里解释一下第二个特点,什么叫没有输入?因为在使用Hopfield网络的时候,多用于图像仿真,图像仿真意思就是先给你一些标准的图像,
比如1~9的数字,然后用一些别的测试图像(模糊不清,让人识别基本靠半猜半看)去逼近标准图像。而所谓的没有输入,意思就是指,你输入的图像就是
输出结果,那么Hopfield就认为没有输入。MATLAB官方说明:Since Hopfield networks have no inputs……balabala
接着我们实际使用该神经来仿真数字图片,例子运用网络上的识别“1,2”的例子,但具体解释为原创,也在这里摒弃一些网上以讹传讹的错误解释。
Hopfield调用流程:
1 newhop()
函数功能:创建一个离散型Hopfield网络。
调用格式:net=newhop(T);
这里T代表输出,上文解释过,为什么T不是输入,T代表M*N的矩阵
2,sim()函数
% 调用格式:[Y,Af,E,perf] = sim(net,P,[],Ai,T)
% [Y,Af,E,perf] = sim(net,{Q TS},Ai,T)
%
% P,Q:测试向量的个数;
% Ai:初始的层延时,默认为0;
% T:测试向量;
% TS:测试的步数;
% Y:网络的输出矢量;
% Af:训练终止时的层延迟状态;
% E:误差矢量;
% perf:网络的性能。
这是摘自网络的解释,显然不够明确,我们用matlab是help例子说明。
Here we create a Hopfield network with two three-element
stable points T.
创建T的Hopfield网络
T = [-1 -1 1; 1 -1 1]';
net = newhop(T);
Below we check that the network is stable at these points by
using them as initial layer delay conditions. If the network is
stable we would expect that the outputs Y will be the same.
(Since Hopfield networks have no inputs, the second argument
to SIM is Q = 2 when using matrix notation).
我们用初始化数据检查构建的网络,如果网络是稳定的,则我们输出的Y就是输入的Y。
Ai = T;
[Y,Pf,Af] = sim(net,2,[],Ai);
Y
补充,sim的四个参数:
net——表示newhop建立的网络
2——表示T的列数(样本维度),这里的T是转置后的4*2维
[]——表示输入的T是矩阵形式
Ai——需要仿真的数据,这里表示用原数据测试
ps:用矩阵形式,默认神经元是一层,即Ts步长为1
接下来我们要调用多步长的方法。
To see if the network can correct a corrupted vector, run
the following code which simulates the Hopfield network for
five timesteps. (Since Hopfield networks have no inputs,
the second argument to SIM is {Q TS} = [1 5] when using cell
array notation.)
用多步长的方法,就必须要用matlab的胞元结构(cell)
这里说明一下胞元的用法:
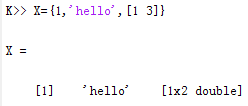
X={x1,x2,x3……},xi可以为任何数据,也可以是cell
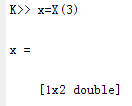
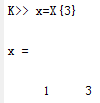
调用X(1)表示取到x1,可以理解为取到了一个对象;而X{1}则是x1的具体值(http://jingyan.baidu.com/article/20095761997932cb0721b485.html)
Ai = {[-0.9; -0.8; 0.7]};
[Y,Pf,Af] = sim(net,{1 5},{},Ai);
Y{1}
参数说明:
Ai——把3*1的向量封装为cell结构
{1,5}——1表示Ai的维度1,5表示用步长5,即5层神经元
{}——表示告诉函数,数据以cell格式传递进来
Ai——用原数据测试网络
重要说明sim仿真函数是横向仿真,就是以列数为仿真单位,例如在下文代码中T是数字“1“,”2”的图片合并,图片格式为12*10,合并后为24*10.
但在仿真前,由于仿真方向按照列为单位,需要转置为10*24,可以形象理解把图片横放后排列。
因此,在设置维度以12(一幅图)为单位。
函数介绍完毕,来分析一下网上给出的数字识别代码:
% ------------------------------number array---------------------------------
one=[- - - - - - - - - -;...
- - - - - - - -;- - - - - - - -;...
- - - - - - - -;- - - - - - - -;...
- - - - - - - -;- - - - - - - -;...
- - - - - - - -;- - - - - - - -;...
- - - - - - - -;- - - - - - - -;...
- - - - - - - - - -];
two=[- - - - - - - - - -;...
- -;- -;...
- - - - - - - -;- - - - - - - -;...
- -;- -;...
- - - - - - - -;- - - - - - - -;...
- -;- -;...
- - - - - - - - - -];
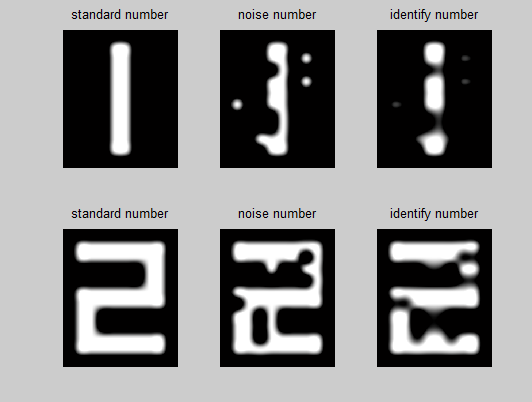
% --------------------------plot standard number figure--------------
subplot(,,)
imshow(imresize(one,))
title('standard number') subplot(,,)
imshow(imresize(two,))
title('standard number')
% ---------------------------creat hopfield net---------------------
T=[one;two]';
net=newhop(T);
% --------------------------generate rand noise------------------
for i=:
for j=:
a=rand;
if a<=0.1
one(i,j)=-one(i,j);
two(i,j)=-two(i,j);
end
end
end
noise_one=one
noise_two=two
% -------------------------plot noise figure----------------------------
subplot(,,)
imshow(imresize(noise_one,))
title('noise number') subplot(,,)
imshow(imresize(noise_two,))
title('noise number')
上述代买为显示图片和加入噪声后显示图片,没什么分析的必要。
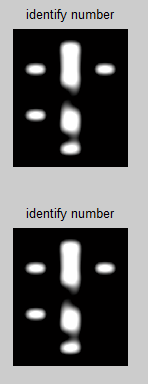
% ------------------------plot identify figure---------------------------
noise1={(noise_one)'};%把图变为cell结构,并转置(横放图片排列)

tu1=sim(net,{,},{},noise1);%每12像素为一张图subplot(,,)
%转回图片并显示,这里补充一下,{3}表示有三层神经网络输出,取第三层输出值
imshow(imresize(tu1{}',20))%放大20倍

title('identify number')

noise2={(noise_two)'};

tu2=sim(net,{,},{},noise2);

tu2{}'

subplot(,,)

imshow(imresize(tu2{}',20))

title('identify number')
延展:其实根据sim函数的说明,以下两端代码效果是一样的,但用cell只能是一层神经网络
%用cell
noise1={(noise_one)'};

tu1=sim(net,{,},{},noise1);

%tu1{}'

subplot(,,)

imshow(imresize(tu1{}',20))

title('identify number')
%用矩阵
noise1=(noise_one)';

tu1=sim(net,,[],noise1);

%tu1{}'

subplot(,,)

imshow(imresize(tu1',20))

title('identify number')
最新文章
- Mediaplayer error (-19,0)
- 获得Map的选择集
- Hadoop 2.6.0 Namenode HA,ResourceManager HA
- 1password密码库格式更新
- 可在广域网部署运行的QQ高仿版 -- GG叽叽V3.7,优化视频聊天、控制更多相关细节
- JS中的for/in语句和arguments参数
- C#压缩文件 不压缩路径
- hiveserver2以及beeline客户端的使用
- 用excel2010 制作复合图表
- 用 eclipse ndk 编译 cocos2d-x for Android
- Centos 64位安装 EPEL源
- html页面高度不同浏览器兼容性设置
- ng-form
- SDN:软件定义网络
- Partition List -- LeetCode
- Swift 网络请求数据与解析
- 浅谈python 手机crash和app crash循环执行问题
- TensorflowTutorial_一维数据构造简单CNN
- Android列表视图ListView和ListActivity-android学习之旅(二十四)
- nginx实现https网站设置